Page is loading ...

Part Number: NV-BRKIC-BC
• For a complete list of acceptable speakers for use with the fi re-rated backcan,
visit https://www.legrand.us/categories/audio-and-video/nuvo-speakers/in-ceiling-speakers.aspx.
•
This backcan was designed to work with a Nuvo speaker bracket. For a complete list of the appropriate brackets to use for an application,
visit https://www.legrand.us/categories/audio-and-video/nuvo-speakers/speaker-brackets.aspx.
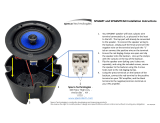
Nuvo Fire-rated Speaker Backcan Features
22.5 mm Hole for 3/8"
Conduit Cable Clamp
(Arlington 38 ASTM or equivalent)
Insulation
Backcan
Speaker Bracket
Wire
Routing Tab
Fig. 1
Control # 5009947
Certifi ed To:
ASTM E119; CAN/ULC S101;
ANSI / UL 263
Certifi cations
• ULC CAN/ULC-S101-M39 ire Endurance Tests of
Building Construction and Materials (Canada)
• ASTM E119-16a (supersedes ASTM E119-98)
Standard Test Methods for Fire Tests of Building
Construction and Materials
• RoHS / REACH Compliance
• ANSI / UL 263 Fire-resistance Rating Compliant
• UBC 7-1 (Uniform Building Code) California State
Fire Marshall (uses ASTM Standards
• NFPA 251 (National Fire Protection Association)
Standard Methods of Tests of Fire Resistance of
Building Construction and Materials
• CE Marking on Product, Instruction Manual and
Packaging
Installation Instructions
Fire-rated Speaker Backcan
1507273 Rev B 20171006

2
This instruction sheet covers the installation of the Nuvo Fire-rated Speaker Backcan. The backcan meets one-hour fi re-rating requirements for in-ceiling
mounting per ASTM E119 and CAN/ULC S101 standards. The design of this in-ceiling backcan allows for easy installation between opened joists spaced a
maximum of 16" on center. The use of Morgan Thermal Ceramics, Superwool Plus Blanket, 96 kg/m
3
density, 25 mm thickness insulation is required. The
insulation must meet the requirements of the certifi cations listed under "Certifi cations" on page 1 when installed in the back can to support the fi re-rating
properties, improve audio performance, and reduce the sound pressure level from the back of the enclosure. The backcan is designed for use with all Nuvo
Series Two, Series Four, and Series Six in-ceiling speakers and is universally compatible with most in-ceiling speakers, regardless of manufacturer. If unsure
about any of the provided instructions to properly install the backcan, please contact a dealer or qualifi ed installer.
PREPARE FOR INSTALLATION
The installer is responsible for obtaining the correct installation materials and mounting hardware. Before proceeding with the installation of the backcan,
read these instructions completely and make sure the correct materials and hardware for the application are available for use during installation:
Note: Check local hardware stores for installation materials and mounting hardware availability.
• A minimum of four (4) #8 x 1-1/4” long mechanical fasteners
• Speaker wire
• Routing material for speaker wire:
– 1/2" conduit and 1/2" conduit set-screw connector, or
– 1/2" UL-approved strain-relief cable clamp
• A minimum of 5/8" thick drywall
• Nuvo mounting bracket to support selected speakers for installation in the backcan (Optional)
Note: A mounting bracket is not required if the backcan is installed directly to sheet drywall materials.
INSTALLATION
STEP 1: Identify the location of the backcan, allowing for 6" of clearance above the mounting joist.
Note: If the ceiling joists are wider than 16" on center, mount two 2" x 4" or 2" x 6" wood posts between the joists to fi t the 16" width requirement. Turn the
backcan for mounting to the posts. See Fig. 3.
STEP 2: Determine which side of the backcan to route the speaker wire (not included) and remove the knockout.
STEP 3: Securely mount the backcan to the joists using a minimum of four #8 x 1-1/4" mechanical fasteners. One mechanical fastener must occupy each
corner slot of the backcan. See Fig. 2.
> 16 inches
16 inches
16 inches
Fig. 2 Fig. 3
STEP 4: Route the wiring. See Fig. 4.
– If using conduit (not included):
○ Place a 1/2" conduit set-screw connector (not included) on the knockout hole.
○ Attach the conduit to the conduit set-screw connector.
○ Pull the speaker wire through the conduit into the backcan. Leave enough speaker wire in the
backcan to connect to the speaker and provide additional wire for future updates.
○ Tighten the screws on the conduit set-screw connector.
– If conduit is not used:
○ Place a 1/2" UL-approved strain-relief cable clamp (not included) on the knockout hole.
○ Pull the speaker wire through the strain-relief cable clamp into the backcan. Leave enough
speaker wire in the backcan to connect to the speaker and provide additional wire for future
updates.
Note: When mounting the backcan to posts between joists wider than 16" apart, thread the
wire through the wire routing tab to prevent the wire from being pinched between the backcan and the joist. See Fig. 3.
Fig. 4

3
STEP 5: Mount the bracket. See Fig. 5. (Optional)
Note: Use of a mounting bracket is not required if the backcan is installed directly to sheet drywall
materials.
– Determine the appropriate Nuvo mounting bracket for the selected speaker.
– Attach the bracket strap to the open slots on the backcan.
– Secure the bracket to the joist per the mounting instructions included with the bracket.
STEP 6: Cover the backcan. See Fig. 6.
Note: Use fi re-rated drywall that meets the requirements of the applicable standards listed in
"Certifi cations" on page 1.
– Cut a hole in the drywall to match the opening of the backcan.
– Attach the drywall to the ceiling making sure the hole aligns with the opening on the backcan.
STEP 7: Install the selected speaker according to the instructions included with the speaker.
Nuvo Fire-rated Speaker Backcan Dimensions
17.75 in. (451 mm) 13.4 in. (340 mm)
17.0 in. (431 mm)
17.75 in.
(451 mm)
5.12 in.
(130 mm)
Fig. 5
Fig. 6

1507273 Rev B 20171006
/