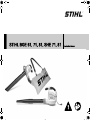
STIHL BGE 61, 71, 81, SHE 71, 81 Owner's manual
- Type
- Owner's manual
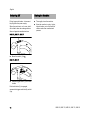
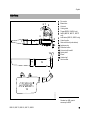
STIHL BGE 61, 71, 81, SHE 71, 81: Powerful blowers and vacuum shredders for cleaning up gardens, paths, and driveways. Ideal for removing leaves, grass clippings, and other debris. Lightweight and easy to handle, with adjustable blowing force and vacuum power. Vacuum function shreds leaves and other materials, reducing their volume for easy disposal.
STIHL BGE 61, 71, 81, SHE 71, 81: Powerful blowers and vacuum shredders for cleaning up gardens, paths, and driveways. Ideal for removing leaves, grass clippings, and other debris. Lightweight and easy to handle, with adjustable blowing force and vacuum power. Vacuum function shreds leaves and other materials, reducing their volume for easy disposal.


-
 1
1
-
 2
2
-
 3
3
-
 4
4
-
 5
5
-
 6
6
-
 7
7
-
 8
8
-
 9
9
-
 10
10
-
 11
11
-
 12
12
-
 13
13
-
 14
14
-
 15
15
-
 16
16
-
 17
17
-
 18
18
-
 19
19
-
 20
20
-
 21
21
-
 22
22
-
 23
23
-
 24
24


STIHL BGE 61, 71, 81, SHE 71, 81 Owner's manual
- Type
- Owner's manual
STIHL BGE 61, 71, 81, SHE 71, 81: Powerful blowers and vacuum shredders for cleaning up gardens, paths, and driveways. Ideal for removing leaves, grass clippings, and other debris. Lightweight and easy to handle, with adjustable blowing force and vacuum power. Vacuum function shreds leaves and other materials, reducing their volume for easy disposal.
Ask a question and I''ll find the answer in the document
Finding information in a document is now easier with AI
Related papers
-
STIHL BGE 61, 71, 81, SHE 71, 81 Owner's manual
-
-
-
-
-
-
-
STIHL BG 86 User manual
-
-
STIHL SHE 71 User manual
Other documents
-
JAXPETY TH17S0187 Portable Air Blower Fan User manual
-
JAXPETY TH17Y0408 User manual
-
909 CXD1800 User manual
-
Yard Machines MTD1400K User manual
-
Mountfield MBL2600 Operating instructions
-
Morrison 2500 Owner's manual
-
 Air Foxx AM4000a Owner's manual
-
Solo 440 User manual
-
COMFORT-AIRE BGE-103A Owner's manual
-
 Heat Controller Comfort-Aire BGE-123A User manual

