
Digital Laser MFP
SCX-5315F
SCX-5115
SCX-5315F/5115 User’s Guide
Home
Visit us at:
www.samsungprinter.com
JC68-01054ARev. 1.00

This manual is provided for information purposes only. All information included herein is
subject to change without notice. Samsung Electronics is not responsible for any changes,
direct or indirect, arising from or related to use of this manual.
© 2003 Samsung Electronics Co., Ltd. All rights reserved.
• SCX-5315F, SCX-5115 and Samsung logo are trademarks of Samsung Electronics
Co., Ltd.
• Centronics is a trademark of Centronics Data Computer Corporation.
• IBM and IBM PC are trademarks of International Business Machines Corporation.
• Microsoft, Windows, Windows 9x, Window Me, Windows 2000, Windows NT 4.0
and Windows XP are registered trademarks of Microsoft Corporation.
• All other brand or product names are trademarks of their respective companies or
organizations.

ii
CONTENTS
Chapter 1:
GETTING STARTED
Unpacking .......................................................... 1.2
Component Location ............................................ 1.4
Front View ..................................................... 1.4
Rear View ...................................................... 1.5
Control Panel Functions ........................................ 1.6
SCX-5315F .................................................... 1.6
SCX-5115 ...................................................... 1.9
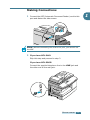
Making Connections ............................................ 1.11
Installing the Drum and Toner Cartridges ............... 1.14
Turning the Machine On ....................................... 1.17
Loading Paper .................................................... 1.17
Setting the Paper Size ......................................... 1.20
Changing the Display Language ............................ 1.20
Using Save Modes .............................................. 1.21
Toner Save ................................................... 1.21
Paper Save ................................................... 1.21
Power Save ................................................... 1.22
Chapter 2:
INSTALLING SOFTWARE
About Samsung Software ..................................... 2.2
MFP Driver ..................................................... 2.2
SmarThru Software ......................................... 2.2
OCR Software
(AnyPage Lite) ............................................. 2.2
System Requirements .......................................... 2.3
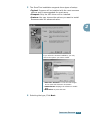
Installing Samsung Software ................................. 2.4
Uninstalling Samsung Software ............................. 2.8
Uninstalling the MFP Driver .............................. 2.8
Uninstalling Samsung SmarThru ...................... 2.10
Using the SmarThru CD-ROM .......................... 2.12

iii
Chapter 3:
PAPER HANDLING
Selecting Print Media ............................................ 3.2
Paper Guidelines .................................................. 3.3
Loading Paper in the Cassette ............................... 3.4
Using the Bypass Tray .......................................... 3.6
Setting the Paper Size for Copying ......................... 3.9
Chapter 4:
COPYING
Loading Paper for Copy Output .............................. 4.2
Selecting a Paper Tray ......................................... 4.2
Making Copies from the Automatic Document Feeder 4.3
Making Copies using the Document Glass ................ 4.4
Setting Copy Options ........................................... 4.6
Image ........................................................... 4.6
Contrast ........................................................ 4.7
Set ............................................................... 4.7
Zoom ............................................................ 4.8
Auto Fit Copying .................................................. 4.9
Clone Copying .................................................... 4.10
Duplex Copying .................................................. 4.11
Collation Copying ................................................ 4.12
Chapter 5:
PRINTING
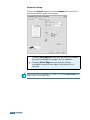
Printing a Document ............................................ 5.2
Printer Settings ................................................... 5.3
Accessing Printer Settings ................................ 5.3
Printer Properties Tabs .................................... 5.4
Printer Properties Buttons & Icons .................... 5.12
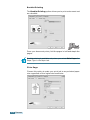
Setting Up the Locally Shared Printer .................... 5.12
In Windows 9x/Me ......................................... 5.12
In Windows NT 4.0/2000/XP ........................... 5.13

iv
Chapter 6:
SCANNING
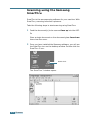
Scanning using the Samsung SmarThru .................. 6.2
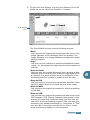
Scanning Process with TWAIN-enabled Software ...... 6.4
Chapter 7:
MAINTENANCE
Cleaning the Scan Unit ......................................... 7.2
Expected Cartridge Life ........................................ 7.3
Replacing the Toner Cartridge ............................... 7.3
Setting to Notify Toner Low ................................... 7.7
Cleaning the Drum ............................................... 7.8
Replacing the Drum Cartridge ............................... 7.8
Consumables and Replacement Parts .................... 7.11
Chapter 8:
TROUBLESHOOTING
Document Jams ................................................... 8.2
Input Misfeed ................................................. 8.2
Exit Misfeed ................................................... 8.3
Roller Misfeed ................................................ 8.3
Paper Jams ......................................................... 8.4
Paper Feed Area ............................................. 8.4
Fuser Area ..................................................... 8.6
Paper Exit Area .............................................. 8.7
Duplex Jam .................................................... 8.9
Bypass Jam .................................................. 8.10
LCD Error Messages ............................................ 8.11
Solving Problems ................................................ 8.13
Copier Problem Solution Chart ......................... 8.13
Printing Problem Solution Chart ....................... 8.15
Fax Problem Solution Chart ............................. 8.18

v
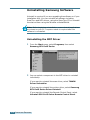
Appendix A:
INSTALLING A NETWORK OPTION
Installing a Network Interface Card ........................ A.2
Configuring Network Parameters ............................ A.6
Supported Operating Systems .......................... A.7
Printing a Network Configuration Page ............... A.7
Configuring TCP/IP .......................................... A.8
Configuring Netware ...................................... A.10
Restoring the Network Configuration ................ A.11
Resetting the Network Interface Card ............... A.11
Configuring the Samsung Network Printer Port ....... A.12
Installing Samsung Network Printer Port ........... A.12
Selecting the Samsung Network Printer Port ...... A.13
Appendix B:
SPECIFICATIONS
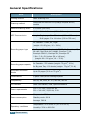
General Specifications .......................................... B.2
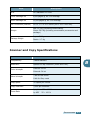
Scanner and Copy Specifications ............................ B.3
Printer Specifications ............................................ B.4
Facsimile Specifications ........................................ B.4

vi
Important Precautions and Safety Information
When using this product, these basic safety precautions should always be followed to
reduce risk of fire, electric shock, and injury to persons:
1. Read and understand all instructions.
2. Use common sense whenever operating electrical appliances.
3. Follow all warnings and instructions marked on the product and in the literature
accompanying the product.
4. If an operating instruction appears to conflict with safety information, heed the
safety information. You may have misunderstood the operating instruction. If you
cannot resolve the conflict, contact your sales or service representative for
assistance.
5. Unplug the product from the AC wall socket and/or telephone jack before
cleaning. Do not use liquid or aerosol cleaners. Use only a damp cloth for
cleaning.
6. Do not place the product on an unstable cart, stand, or table. It may fall, causing
serious damage.
7. Your product should never be placed on, near, or over a radiator, heater, air
conditioner, or ventilation duct.
8. Do not allow anything to rest on the power lead. Do not locate your product where
the cords will be abused by persons walking on them.
9. Do not overload wall outlets and extension cords. This can diminish performance,
and may result in the risk of fire or electric shock.
10. Do not allow pets to chew on the AC power, telephone, or PC interface cords.
11. Never push objects of any kind into the product through case or cabinet openings.
They may touch dangerous voltage points, creating a risk of fire or shock. Never
spill liquid of any kind onto or into the product.
12. You product may have a heavy cover for optimal pressure on the document for
the best scanning and/or faxing (usually the flatbed-type product). In this case,
replace the cover after placing a document on the scan glass, by holding it and
moving it down slowly until it sits back on the product.
13. To reduce the risk of electric shock, do not disassemble the product. Take it to a
qualified service technician when repair work is required. Opening or removing
covers may expose you to dangerous voltages or other risks. Incorrect
reassembly could cause electric shock when the unit is subsequently used.
14. Unplug the product from the telephone jack, PC and AC wall outlet, and refer
servicing to qualified service personnel under the following conditions:
• When any part of the power cord, plug, or connecting cable is damaged or
frayed.

vii
• If liquid has been spilled into the product.
• If the product has been exposed to rain or water.
• If the product does not operate properly after instructions have been followed.
• If the product has been dropped, or the cabinet appears damaged.
• If the product exhibits a sudden and distinct change in performance.
15. Adjust only those controls covered by the operating instructions. Improper
adjustment of other controls may result in damage, and may require extensive
work by a qualified service technician to restore the product to normal operation.
16. Avoid using this product during a lightning storm. There may be a remote risk of
electric shock from lightning. If possible, unplug the AC power and telephone cord
for the duration of the lightning storm.
17. SAVE THESES INSTRUCTIONS FOR FUTURE REFERENCE.

viii
Laser Safety Statement
The printer is certified in the U.S. to conform to the requirements of DHHS 21 CFR,
chapter 1 Subchapter J for Class I(1) laser products, and elsewhere is certified as a
Class I laser product conforming to the requirements of IEC 825.
Class I laser products are not considered to be hazardous. The laser system and
printer are designed so there is never any human access to laser radiation above a
Class I level during normal operation, user maintenance, or prescribed service
condition.
WARNING
Never operate or service the printer with the protective cover removed from Laser/
Scanner assembly. The reflected beam, although invisible, can damage your eyes.

ix
Ozone Safety
During normal operation, this product produces ozone. The
ozone produced does not present a hazard to the operator.
However, it is advisable that the product be operated in a well
ventilated area.
If you need additional information about ozone, please request
your nearest Samsung dealer.
Power Saver
This product contains advanced energy conservation
technology that reduces power consumption when it is not
in active use.
When the product does not receive data for an extended
period of time, power consumption is automatically
lowered.
The energy star emblem does not represent EPA
endorsement of any product or service.

x
Radio Frequency Emissions
FCC Information to the User
This equipment has been tested and found to comply with the limits for a Class A
digital device, pursuant to Part 15 of the FCC Rules. These limits are designed to
provide reasonable protection against harmful interference when the equipment is
operated in a commercial environment. This equipment generates, uses and can
radiate radio frequency energy and, if not installed and used in accordance with the
instruction manual, may cause harmful interference to radio communications.
Operation of this equipment in a residential area is likely to cause harmful
interference in which case the user will be required to correct the interference at his
own expense.
Canadian Radio Interference Regulations
This digital apparatus does not exceed the Class A limits for radio noise emissions
from digital apparatus as set out in the interference-causing equipment standard
entitled “Digital Apparatus”, ICES-003 of the Industry and Science Canada.
Cet appareil numérique respecte les limites de bruits radioélectriques applicables aux
appareils numériques de Classe A prescrites dans la norme sur le matériel brouilleur:
“Appareils Numériques”, ICES-003 édictée par l’Industrie et Sciences Canada.
Fax Branding
The Telephone Consumer Protection Act of 1991 makes it unlawful for any person to
use a computer or other electronic device to send any message via a telephone
facsimile machine unless such message clearly contains in a margin at the top or
bottom of each transmitted page or on the first page of the transmission the following
information:
(1) the date and time of transmission
(2) identification of either business, business entity or individual sending the
message; and
(3) telephone number of either the sending machine, business, business entity or
individual.
Refer to the Facsimile User’s Guide for instructions on how to enter this information
into your product’s memory.
The Telephone Company may make changes in its communications facilities,
equipment operations, or procedures where such action is reasonably required in the
operation of its business and is not inconsistent with the rules and regulations in FCC
Part 68. If such changes can be reasonably expected to render any customer terminal
equipment incompatible with telephone company communications facilities, or
require modification or alteration of such terminal equipment, or otherwise materially
affect its use or performance, the customer shall be given adequate notice in writing,
to allow the customer an opportunity to maintain uninterrupted service.

xi
Ringer Equivalence Number
The Ringer Equivalence Number and FCC Registration Number for this product may
be found on the label located on the bottom or rear of the product. In some instances
you may need to provide these numbers to the telephone company.
The Ringer Equivalence Number (REN) is a measure of the electrical load placed on
the telephone line, and is useful for determining whether you have “overloaded” the
line. Installing several types of equipment on the same telephone line may result in
problems making and receiving telephone calls, especially ringing when your line is
called. The sum of all Ringer Equivalence Numbers of the equipment on your
telephone line should be less than five in order to assure proper service from the
telephone company. In some cases, a sum of five may not be usable on your line. If
any of your telephone equipment is not operating properly, you should immediately
remove it from your telephone line, as it may cause harm to the telephone network.
WARNING:
FCC Regulations state that changes or modifications to this equipment not expressly
approved by the manufacturer could void the user’s authority to operate this
equipment. In the event that terminal equipment causes harm to the telephone
network, the telephone company should notify the customer that service may be
stopped. However, where prior notice is impractical, the company may temporarily
cease service, providing that they:
a) Promptly notify the customer.
b) Give the customer an opportunity to correct the equipment problem.
c) Inform the customer of the right to bring a complaint to the Federal
Communication Commission pursuant to procedures set out in FCC Rules and
Regulations Subpart E of Part 68.
You should also know that:
•Your product is not designed to be connected to a digital PBX system.
• If you intend to use a computer modem or fax modem on the same phone line as
your product, you may experience transmission and reception problems with all
the equipment. It is recommended that no other equipment, except for a regular
telephone, share the line with your product.
• If your area experiences a high incidence of lightning or power surges, we
recommend that you install surge protectors for both the power and the telephone
lines. Surge protectors can be purchased from your dealer or telephone and
electronic specialty stores.
• When programming emergency numbers and/or making test calls to emergency
numbers, use a non-emergency number to advise the emergency service
dispatcher of your intentions. The dispatcher will give you further instructions on
how to actually test the emergency number.
• This product may not be used on coin service or party lines.
• This product provides magnetic coupling to hearing aids.
•You may safely connect this equipment to the telephone network by means of a
standard modular jack, USOC RJ-11C.

xii
Declaration of Conformity (European Countries)
Approvals and Certifications
The CE marking applied to this product symbolises Samsung
Electronics Co., Ltd. Declaration of Conformity with the following
applicable 93/68/EEC Directives of the European Union as of the
dates indicated:
January 1, 1995: Council Directive 73/23/EEC Approximation of the laws of the
member states related to low voltage equipment.
January 1, 1996: Council Directive 89/336/EEC (92/31/EEC), approximation of the
laws of the Member States related to electromagnetic compatibility.
March 9, 1999: Council Directive 1999/5/EC on radio equipment and
telecommunications terminal equipment and the mutual recognition of their
conformity.
A full declaration, defining the relevant Directives and referenced standards can be
obtained from your Samsung Electronics Co., Ltd. representative.
EC Certification
Certification to 1999/5/EC Radio Equipment & Telecommunications
Terminal Equipment Directive (FAX)
This Samsung product has been self-certified by Samsung for pan-European single
terminal connection to the analogue public switched telephone network (PSTN) in
accordance with Directive 1999/5/EC. The product has been designed to work with
the national PSTNs and compatible PBXs of the European countries:
In the event of problems, you should contact the Euro QA Lab of Samsung Electronics
Co., Ltd. in the first instance.
The product has been tested against TBR21. To assist in the use and application of
terminal equipment which complies with this standard, the European
Telecommunication Standards Institute (ETSI) has issued an advisory document (EG
201 121) which contains notes and additional requirements to ensure network
compatibility of TBR21 terminals. The product has been designed against, and is fully
compliant with, all of the relevant advisory notes contained in this document.

xiii
Replacing the Fitted Plug (for UK Only)
IMPORTANT
The mains lead for this machine is fitted with a standard (BS 1363) 13 amp plug and
has a 13 amp fuse. When you change or examine the fuse, you must re-fit the correct
13 amp fuse. You then need to replace the fuse cover. If you have lost the fuse cover,
do not use the plug until you have another fuse cover.
Please contact the outlet you purchased the machine from.
The 13 amp plug is the most widely used type in the UK and should be suitable.
However, some buildings (mainly old ones) do not have normal 13 amp plug socket.
You will need to buy a suitable plug adaptor. Do not remove the moulded plug.
WARNING
If you cut off the moulded plug, dispose of it immediately.
You cannot rewire the plug and you may receive an electric shock if you plug
it into a socket.
IMPORTANT WARNING
: You must earth this machine.
The wires in the mains lead have the following colour code:
• Green and Yellow: Earth
• Blue: Neutral
• Brown: Live
If the wires in the mains lead do not match the colours marked in your plug, do the
following:
You must connect the green and yellow wire to the pin marked by the letter `E', or
by the safety `Earth symbol' or coloured green and yellow or green.
You must connect the blue wire to the pin which is marked with the letter `N' or
coloured black.
You must connect the brown wire to the pin which is marked with the letter `L' or
coloured red.
You must have a 13 amp fuse in the plug, adaptor, or at the distribution board.

xiv
NOTE: Any queries, problems or requests for accessories/Information as well as
service should be directed at the address shown in your warranty paperwork.

1
GETTING STARTED
Thank you for purchasing Samsung multifunctional
product. This machine provides printing, copying,
scanning, and faxing (SCX-5315F only) functions!
This chapter provides step-by-step instructions on
setting up the machine, and installing the software.
This chapter includes:
• Unpacking
• Component Location
• Control Panel Functions
• Making Connections
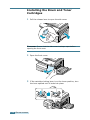
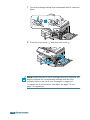
• Installing the Drum and Toner Cartridges
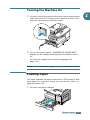
• Turning the Machine On
• Loading Paper
• Setting the Paper Size
• Changing the Display Language
• Using Save Modes

G
ETTING
STARTED
1.2
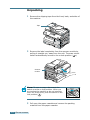
Unpacking
1
Remove the shipping tape from the front, back, and sides of
the machine.
2
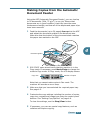
Remove the label completely from the scanner module by
pulling it straight out, away from the unit. The scan unlock
switch automatically moves to the unlock position
()
.
NOTE:
To scan or copy a document, the
switch must be on that position. When you
are moving the machine or do not intend to
use it for a long time, push the switch to the
lock position ( ).
3
Pull open the paper cassette and remove the packing
material from the paper cassette.
Tape
Scanner
module

G
ETTING
STARTED
1.3
1
4
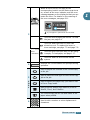
Ensure that you have the following:
NOTE:
You can purchase and install an optional Network Print Server. For
details, see Appendix A, "Installing a Network Option."
USB Cable
AC Power Cord
*
*. The appearance of the power cord and the telephone line cord
vary according to countries.
Telephone Line Cord
*
(For SCX-5315F only)
TAM Lead
(For SCX-5315F UK only)
This User’s Guide,
Facsimile User’s Guide
(SCX-5315F only)
,
Quick install Guide
CD-ROM
†
†. The CD-ROM contains the MFP driver, SmarThru software,
the SmarThru user’s guides and the Adobe Acrobat Reader program.
Starter Toner Cartridge Drum Cartridge

G
ETTING
STARTED
1.4
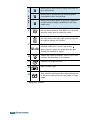
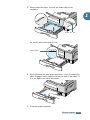
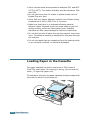
Component Location
Take a moment to familiarise yourself with the main components
of your machine.
Front View
Automatic
Document Feeder
Document
Guides
Document
Input Tray
Document
Output Tray
Control Panel
(See page 1.6 for SCX-5315F.
See page 1.9 for SCX-5115.)
Paper Cassette
Front Cover
Release lever
Side Cover
Paper Guides
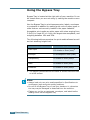
Bypass Tray
Scanner Module

G
ETTING
STARTED
1.5
1
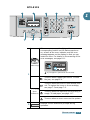
Rear View
Paper Exit Extension
ADF
(Automatic Document
Feeder)
Connector
Document Cover
Paper Cassette
Telephone
Connections
(available in
SCX-5315F only)
Document
Glass
AC Power Cord
Connector
Parallel Connector
USB
Connector
Power Switch
Page is loading ...
Page is loading ...
Page is loading ...
Page is loading ...
Page is loading ...
Page is loading ...
Page is loading ...
Page is loading ...
Page is loading ...
Page is loading ...
Page is loading ...
Page is loading ...
Page is loading ...
Page is loading ...
Page is loading ...
Page is loading ...
Page is loading ...
Page is loading ...
Page is loading ...
Page is loading ...
Page is loading ...
Page is loading ...
Page is loading ...
Page is loading ...
Page is loading ...
Page is loading ...
Page is loading ...
Page is loading ...
Page is loading ...
Page is loading ...
Page is loading ...
Page is loading ...
Page is loading ...
Page is loading ...
Page is loading ...
Page is loading ...
Page is loading ...
Page is loading ...
Page is loading ...
Page is loading ...
Page is loading ...
Page is loading ...
Page is loading ...
Page is loading ...
Page is loading ...
Page is loading ...
Page is loading ...
Page is loading ...
Page is loading ...
Page is loading ...
Page is loading ...
Page is loading ...
Page is loading ...
Page is loading ...
Page is loading ...
Page is loading ...
Page is loading ...
Page is loading ...
Page is loading ...
Page is loading ...
Page is loading ...
Page is loading ...
Page is loading ...
Page is loading ...
Page is loading ...
Page is loading ...
Page is loading ...
Page is loading ...
Page is loading ...
Page is loading ...
Page is loading ...
Page is loading ...
Page is loading ...
Page is loading ...
Page is loading ...
Page is loading ...
Page is loading ...
Page is loading ...
Page is loading ...
Page is loading ...
Page is loading ...
Page is loading ...
Page is loading ...
Page is loading ...
Page is loading ...
Page is loading ...
Page is loading ...
Page is loading ...
Page is loading ...
Page is loading ...
Page is loading ...
Page is loading ...
Page is loading ...
Page is loading ...
Page is loading ...
Page is loading ...
Page is loading ...
Page is loading ...
Page is loading ...
Page is loading ...
Page is loading ...
Page is loading ...
Page is loading ...
Page is loading ...
Page is loading ...
Page is loading ...
Page is loading ...
Page is loading ...
Page is loading ...
Page is loading ...
Page is loading ...
Page is loading ...
Page is loading ...
Page is loading ...
Page is loading ...
Page is loading ...
Page is loading ...
Page is loading ...
Page is loading ...
Page is loading ...
Page is loading ...
Page is loading ...
Page is loading ...
Page is loading ...
-
 1
1
-
 2
2
-
 3
3
-
 4
4
-
 5
5
-
 6
6
-
 7
7
-
 8
8
-
 9
9
-
 10
10
-
 11
11
-
 12
12
-
 13
13
-
 14
14
-
 15
15
-
 16
16
-
 17
17
-
 18
18
-
 19
19
-
 20
20
-
 21
21
-
 22
22
-
 23
23
-
 24
24
-
 25
25
-
 26
26
-
 27
27
-
 28
28
-
 29
29
-
 30
30
-
 31
31
-
 32
32
-
 33
33
-
 34
34
-
 35
35
-
 36
36
-
 37
37
-
 38
38
-
 39
39
-
 40
40
-
 41
41
-
 42
42
-
 43
43
-
 44
44
-
 45
45
-
 46
46
-
 47
47
-
 48
48
-
 49
49
-
 50
50
-
 51
51
-
 52
52
-
 53
53
-
 54
54
-
 55
55
-
 56
56
-
 57
57
-
 58
58
-
 59
59
-
 60
60
-
 61
61
-
 62
62
-
 63
63
-
 64
64
-
 65
65
-
 66
66
-
 67
67
-
 68
68
-
 69
69
-
 70
70
-
 71
71
-
 72
72
-
 73
73
-
 74
74
-
 75
75
-
 76
76
-
 77
77
-
 78
78
-
 79
79
-
 80
80
-
 81
81
-
 82
82
-
 83
83
-
 84
84
-
 85
85
-
 86
86
-
 87
87
-
 88
88
-
 89
89
-
 90
90
-
 91
91
-
 92
92
-
 93
93
-
 94
94
-
 95
95
-
 96
96
-
 97
97
-
 98
98
-
 99
99
-
 100
100
-
 101
101
-
 102
102
-
 103
103
-
 104
104
-
 105
105
-
 106
106
-
 107
107
-
 108
108
-
 109
109
-
 110
110
-
 111
111
-
 112
112
-
 113
113
-
 114
114
-
 115
115
-
 116
116
-
 117
117
-
 118
118
-
 119
119
-
 120
120
-
 121
121
-
 122
122
-
 123
123
-
 124
124
-
 125
125
-
 126
126
-
 127
127
-
 128
128
-
 129
129
-
 130
130
-
 131
131
-
 132
132
-
 133
133
-
 134
134
-
 135
135
-
 136
136
-
 137
137
-
 138
138
-
 139
139
-
 140
140
-
 141
141
-
 142
142
-
 143
143
-
 144
144


Ask a question and I''ll find the answer in the document
Finding information in a document is now easier with AI
Related papers
-
Samsung SCX-5115 User manual
-
Samsung 835P User manual
-
-
-
-
-
-
-
Samsung SF-750 Series User manual
-
Other documents
-
Copystar ECOSYS P2135dn Installation guide
-
KYOCERA FS-1370DN 120V Installation guide
-
Copystar FS-1016 Quick start guide
-
Lexmark X340N User manual
-
OKI B730dn Owner's manual
-
Ricoh SP 5300DN User guide
-
Ricoh AC20 User manual
-
Ricoh P 801 User guide
-
Olivetti d-Color MF2400 Owner's manual
-
Panasonic DP180 Operating instructions