Black & Decker NPP2018 User manual

Category
Power tools
Type
User manual
1
.ECNEREFER ERUTUF ROF LAUNAM SIHT EVAS
LAUNAM NOITCURTSNI
NN
NN
PP
PP
PP
PP
22
22
00
00
11
11
88
88
CC
CC
oo
oo
rr
rr
dd
dd
ll
ll
ee
ee
ss
ss
ss
ss
PP
PP
oo
oo
ll
ll
ee
ee
SS
SS
aa
aa
ww
ww
RONOITSEUQAEVAH DLUOHS UOY FI
RUOY HTIWMELBORPAECNEIREPXE
CED& KCALB K TCUDORP RE
08-1
LLAC -0
NOITAMROFNI GNIWOLLOF EHT EVAH ,LLAC UOY EROFEB
.)M0310 .g.e( EDOC ETAD DNA ,.oN EPYT ,.oN GOLATAC ,ELBALIAVA
A ,SESAC TSOM NI REKCED & KCALB NACEVITATNESERPER
AEVAHUOYFIENOHP EHT REVOMELBORPRUOY EVLOSER
SI KCABDEEF RUOY .LLAC A SU EVIG ,TNEMMOC RO NOITSEGGUS
.REKCED & KCALB OT LATIV
:
W
O
N
K
D
L
UO
HS
U
O
Y
N
O
I
T
A
M
R
O
F
N
I
Y
E
K
.
e
s
u
t
s
r
i
f
e
r
o
f
e
b
s
r
u
o
h
r
o
f
y
r
e
t
t
a
b
e
g
r
a
h
C
G
N
I
T
S
UJ
D
A
"
o
t
r
e
f
e
R
.
N
I
A
H
C
N
O
I
S
N
E
T
-
R
E
V
O
T
O
N
O
D
.
n
i
a
hc
g
n
i
n
o
i
s
n
e
t
f
o
d
o
h
t
e
m
r
e
p
o
r
p
r
o
f
"
N
O
I
S
N
E
T
N
I
A
H
C
.
e
s
u
f
o
s
r
u
o
h
o
w
t
tsr
i
f
g
n
i
r
u
d
y
lt
n
e
u
q
e
r
f
n
i
a
h
c
n
e
t
h
g
i
t
e
R
654 155
AUSTRALIA
NEW ZEALAND
64 9579 7600
2
2
IMPORTANT SAFETY RULES
WARNING: Read and understand all instructions. Failure to
follow all instructions listed below may result in electric shock, fire
and/or serious personal injury.
SAVE THESE INSTRUCTIONS
Before Operating Pole Saw
For safe operation, read and understand all instructions before
using the Pole Saw. Follow all safety instructions. Failure to follow
all safety instructions listed below, can result in serious personal
injury.
Watch what you are doing. Use common sense. Do not operate
Pole Saw when you are tired.
Use Pole Saw for cutting wood only. Do not use Pole Saw for
purpose not intended. Do not use for cutting non-wood items.
Only well-instructed adults should operate Pole Saw. Never allow
children to operate.
Do not allow children or untrained individuals to use this unit.
Wear the following safety gear when operating Pole Saw:
- heavy-duty gloves
- steel-toed safety footwear with non-skid soles
- safety glasses, goggles or face screen that are marked to
comply with ANSI Z87
- safety hard hat
- ear mufflers or ear plug
- face or dust mask (if working in dusty areas)
Wear heavy long pants and boots. Do not wear loose fitting
clothing, short pants, jewelry of any kind, or go barefoot.
Secure long hair so it is above shoulder level to prevent
entanglement in any moving parts.
Before cutting, always provide the following:
- clear work area
- secure footing
- planned retreat path from falling limbs
Inspect tree before trimming. Make allowance for branches to fall
freely to the ground.
Do not use your Pole Saw to fell saplings.
While Operating Pole Saw
Stay alert. Use common sense while operating the unit.
Keep work area clean. Cluttered areas invite injuries.
Keep children, animals and bystanders at least 50 ft. (15 m) away
from Pole Saw. Only Pole Saw user should be in work area.
Do not use the Pole Saw to cut down trees.
Grip Pole Saw securely - one hand on the pole, the other on the
handle.
Keep finger off trigger until ready to make cut.
Before starting Pole Saw, make sure chain is not touching anything.
Keep all parts of body away from chain when Pole Saw is running.
Do not force Pole Saw while cutting. Apply light pressure. It will do
the job better and safer at the rate for which it was intended.
Carry Pole Saw from one place to another
- with battery removed
- by holding pole at balance point
- with guide bar and chain to rear and with scabbard attached
Do not cut small brush and saplings with the Pole Saw. Slender
matter may catch in the chain and be whipped toward you. This
could also pull you off balance.
Do not operate in poor lighting.
Keep firm footing and balance. Do not overreach. Overreaching
can result in loss of balance or exposure to hot surfaces.
Keep all parts of your body away from any moving part.
Do not, under any circumstance, use any attachment or accessory
on this product, which was not provided with the product, or
identified as appropriate for use with this product in this Instruction
Manual.
Do not operate Pole Saw:
- while under the influence of alcohol, medication, or drugs
- in rain or in damp or wet areas
- where highly flammable liquids or gases are present
3
- if Pole Saw is damaged, adjusted wrong, or not fully and
securely assembled
- if trigger does not turn Pole Saw on and off. Chain must stop
moving when you release trigger. Have faulty switch replaced by
authorized service center. See “Service Information”.
- while in a hurry
- while in tree or on a ladder
- while on aerial booms, buckets or platforms
- during high wind or storming weather
General Safety Rules
WARNING: Shock Hazard. To protect yourself from electrocution,
do not operate within 50 feet (15 m) of overhead electrical lines.
Failure to do this could result in severe personal injury.
To protect yourself from falling branches do not stand directly under
the branch or limb being cut. This unit should not be held at an
angle over 60 degrees from ground level.
Keep the handles dry, clean, and free of oil.
Before you start the unit, make sure the chain is not contacting any
object.
Make sure the cutting chain has stopped before setting the unit
down.
Service
Tool service must be performed only by qualified repair
personnel. Service or maintenance performed by unqualified
personnel could result in a risk of injury. See “Service Information”.
When servicing a tool, use only identical replacement parts.
Follow instructions in the Maintenance section of this manual.
Use of unauthorized parts or failure to follow Maintenance
Instructions may create a risk of electric shock or injury.
Guard Against Kickback
WARNING: KICKBACK may occur when the nose or tip of the
guide bar touches an object, or when the wood closes in and pinches
the saw chain in the cut. Tip contact in some cases may cause a
lightning fast reverse reaction, kicking the guide bar up and back
towards the operator. Pinching the saw chain along the top of the
guide bar may push the guide bar rapidly back towards the operator.
Either of these reactions may cause you to lose control of the saw
which could result in serious injury to user.
The following precautions should be followed to minimize
kickback:
Grip Pole Saw firmly. Hold the saw firmly with both hands when the
unit is running. Use a firm grip with thumbs and fingers encircling
the saw handle and pole.
Do not over reach.
Keep proper footing and balance at all times.
Don't let the nose of the guide bar contact a log, branch, ground or
other obstruction.
Do not extend Pole Saw handle above shoulder height.
Use devices such as low kickback chain, chain braking system and
special guide bars that reduce the risks associated with kickback.
Only use replacement bars and chains specified by the
manufacturer or the equivalent.
Never let the moving chain contact any object at the tip of the guide
bar.
Keep the working area free from obstructions such as other trees,
branches, rocks, fences, stumps, etc. Eliminate or avoid any
obstruction that your saw chain could hit while you are cutting
through a particular log or branch.
Keep your saw chain sharp and properly tensioned. A loose or dull
chain can increase the chance of kickback. Check tension at
regular intervals with the motor stopped and battery removed.
Begin and continue cutting only with the chain moving at full speed.
If the chain is moving at a slower speed, there is a greater chance
for kickback to occur.
Cut one branch at a time.
Use extreme caution when re-entering a previous cut. Engage
spiked bumpers into wood and allow chain to reach full speed
before proceeding with cut.
Do not attempt plunge cuts or bore cuts.
Watch for shifting branches or other forces that could close a cut
and pinch or fall into chain.
4
Kickback Safety Features
Warning: The following features are included on your Pole Saw
to help reduce the hazard of kickback; however such features will
not totally eliminate this dangerous reaction. As a chain saw user do
not rely only on safety devices. You must follow all safety
precautions, instructions, and maintenance in this manual to help
avoid kickback and other forces which can result in serious injury.
Reduced-Kickback Guide Bar, designed with a small radius tip
which reduces the size of the kickback danger zone on bar tip. A
reduced- kickback guide bar is one which has been demonstrated
to significantly reduce the number and seriousness of kickbacks
when tested in accordance with safety requirements for electric
chain saws.
Low-Kickback Chain, designed with a contoured depth gauge and
guard link which deflect kickback force and allow wood to gradually
ride into the cutter. A low-kickback chain is a chain which has met
kickback performance requirements of ANSI B175.1 when tested
on the representative sample of chain saws.
Specific Safety Rules
Hold tool by insulated gripping surfaces when performing an
operation where the cutting tool may contact hidden wiring.
Contact with a "live" wire will make exposed metal parts of the tool
"live" and shock the operator.
WARNING: Some dust created by power sanding, sawing,
grinding, drilling, and other construction activities contains chemicals
known to cause cancer, birth defects or other reproductive harm.
Some examples of these chemicals are:
• lead from lead-based paints,
• crystalline silica from bricks and cement and other masonry
products, and
• arsenic and chromium from chemically-treated lumber. (CCA)
Your risk from these exposures varies, depending on how often you
do this type of work. To reduce your exposure to these chemicals:
work in a well ventilated area, and work with approved safety
equipment, such as those dust masks that are specially designed
to filter out microscopic particles.
Avoid prolonged contact with dust from power sanding,
sawing, grinding, drilling, and other construction activities.
Wear protective clothing and wash exposed areas with soap
and water. Allowing dust to get into your mouth, eyes, or lay on the
skin may promote absorption of harmful chemicals.
WARNING: Use of this tool can generate and/or disburse
dust, which may cause serious and permanent respiratory or
other injury. Always use NIOSH/OSHA approved respiratory
protection appropriate for the dust exposure. Direct particles away
from face and body.
SAVE THESE INSTRUCTIONS
The label on your tool may include the following symbols.
V................volts A ....................amperes
Hz..............hertz W ..................watts
min............minutes ..................alternating current
..........direct current
n
o ..................no load speed
..............
Class II Construction
....................earthing terminal
............safety alert symbol .../min ............revolutions or
......................per minute
3. CAUTION: To reduce the risk of injury, charge only
Black & Decker Batteries. Other types of batteries may burst
causing personal injury and damage.
4. Do not expose charger to rain or snow.
5. Use of an attachment not recommended or sold by Black &
Decker may result in a risk of fire, electric shock, or injury to
persons.
6. To reduce risk of damage to electric plug and cord, pull by plug
rather than cord when disconnecting charger.
7. Make sure cord is located so that it will not be stepped on, tripped
over, or otherwise subjected to damage or stress.
8. An extension cord should not be used unless absolutely
necessary. Use of improper extension cord could result in a risk
of fire, electric shock or electrocution.
a. Two-wire cords can be used with 2-wire or 3-wire extension
cords. Only round jacketed extension cords should be used, and
we recommend that they be listed by Underwriters Laboratories
(U.L.). If the extension is to be used outside, the cord must be
suitable for outdoor use. Any cord marked for outdoor use can
also be used for indoor work. The letters "W" or "WA" on the cord
jacket indicate that the cord is suitable for outdoor use.
b. An extension cord must have adequate wire size (AWG or
American Wire Gauge) for safety, and to prevent loss of power
and overheating. The smaller the gauge number of the wire, the
greater the capacity of the cable; that is, 16 gauge has more
capacity than 18 gauge. When using more than one extension to
make up the total length, be sure each extension contains at
least the minimum wire size.
CHART FOR MINIMUM WIRE SIZE (AWG)OF EXTENSION CORDS
NAMEPLATE RATING AMPS – 0 – 10.0
Total Extension Cord Length (ft) 25 50 75 100 125
Wire Gauge 18 18 16 16 14
9. Use only the supplied charger when charging your tool. The use
of any other charger could damage the tool or create a
hazardous condition.
5
Battery Cap Information
Battery storage and carrying caps are provided for use whenever
the battery is out of the tool or charger. Remove cap before placing
battery in charger or tool.
WARNING: Do not store or carry battery so that metal objects
can contact exposed battery terminals. For example, do not place
battery in aprons, pockets, tool boxes, product kit boxes, drawers,
etc. with loose nails, screws, keys, etc. without battery cap.
Transporting batteries can possibly cause fires if the battery
terminals inadvertently come in contact with conductive materials
such as keys, coins, hand tools and the like. “The US Department of
Transportation Hazardous Material Regulations (HMR) actually
prohibit transporting batteries in commerce or on airplanes (i.e.
packed in suitcases and carryon luggage) UNLESS they are
properly protected from short circuits. So when transporting
individual batteries, make sure that the battery terminals are
protected and well insulated from materials that could contact them
and cause a short circuit.”
Safety Warnings and Instructions:
Charging
1. This manual contains important safety and operating
instructions.
2. Before using battery charger, read all instructions and cautionary
markings on (1) battery charger, (2) battery, and (3) product
using battery.
Battery Cap
.gnigrahc nehw regrahc eno ylno esU.01
remotsuc on era erehT .regrahc eht nepo ot tpmetta ton oD.11
rekceD & kcalB dezirohtua yna ot nruteR .edisni strap elbaecivres
.retnec ecivres
ylereves era yeht fi neve yrettab ro loot eht etarenicni TON OD.21
a ni edolpxe nac seirettab ehT .tuo nrow yletelpmoc ro degamad
.erif
rednu rucco yam sllec yrettab eht morf diuqil fo egakael llams A.31
ton seod sihT .snoitidnoc erutarepmet ro gnigrahc ,egasu emertxe
siht dna nekorb si laes retuo eht fi ,revewoH .eruliaf a etacidni
:niks ruoy no steg egakael
.retaw dna paos htiw ylkciuq hsaW.a
.rageniv ro eciuj nomel sa hcus dica dlim a htiw ezilartueN.b
retaw naelc htiw meht hsulf ,seye ruoy ni steg diuqil yrettab eht fI.c
lacidem etaidemmi kees dna setunim 01 fo muminim a rof
.noitnetta :ETON LACIDEM fo noitulos %53-52 a si diuqil ehT
.edixordyh muissatop
yrettaB eht gnigrahC
.YROTCAF EHT TA DEGRAHC YLLUF TON SI YRETTAB EHT
,YRETTABEHT EGRAHC OT GNITPMETTA EROFEB
.SNOITCURTSNI YTEFAS EHT FO LLA DAER YLHGUOROHT
zH 0 tlov dlohesuoh dradnats esu ot dengised si regrahc ehT
.rewop
lacirtcele zH 0 tloV dradnats yna otni regrahc eht gulP.1
.teltuo snaem yb egrahc ton oD :ETON
rewop CD ro rotareneg enigne na fo
.CA V ylno esU .ecruos
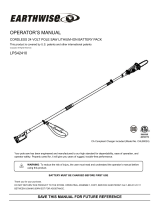
sa yrettab eht otno regrahc eht edilS.2
ni nwohs 1 erugif yrettab eht tel dna
rof yllaitini egrahc sruoh eht retfA .
ruoy ,egasu lamron rednu ,egrahc laitini
ni degrahc ylluf eb dluohs yrettab
.yrettab eht evomer dna ,regrahc gulpnU.3
6
setoN gnigrahC tnatropmI
ni degrahc ylluf eb dluohs yrettab ruoy ,egasu lamron retfA.1
ot pu ekat yam ti ,yletelpmoc nwod-nur si yrettab eht fI .sruoh
eht morf tnes saw yrettab ruoY .degrahc ylluf emoceb ot sruoh
ti ,ti esu ot gnitpmetta erofeB .noitidnoc degrahcnu na ni yrotcaf
.sruoh tsael ta rof degrahc eb tsum
F°04 woleb erutarepmet ria na ni yrettab eht egrahc TON OD.2
(.F°501 evoba ro )C° 5,4( sihT)C° 5,04 lliw dna tnatropmi si
tseb dna efil tsegnoL .yrettab eht ot egamad suoires tneverp
ria nehw degrahc si yrettab fi deniatbo eb nac ecnamrofrep
.)C°42(.F°57 tuoba si erutarepmet
ot mraw emoceb dna muh yam regrahc eht ,gnigrahc elihW.3
a etacidni ton seod dna noitidnoc lamron a si sihT .hcuot
.melborp
ta tnerruc kcehC )1(ylreporp egrahc ton seod yrettab eht fI.4
kcehC )2( .ecnailppa rehto ro pmal a ni gniggulp yb elcatpecer
snrut hcihw hctiws thgil a ot detcennoc si elcatpecer fi ees ot
dna regrahc evoM )3( .sthgil eht tuo nrut uoy nehw ffo rewop
ot)C° 5,4( F°04 fo erutarepmet ria gnidnuorrus a ot yrettab
)4()C° 5,04(.F°501 ,KO era erutarepmet dna elcatpecer eht fI
yrettab eht dnes ro ekat ,gnigrahc reporp teg ton od uoy dna
eeS .retnec ecivres rekceD&kcalB lacol ruoy ot regrahc dna
.segap wolley ni cirtcelE slooT
ecudorp ot sliaf ti nehw degrahcer eb dluohs yrettab ehT.5
OD .ylsuoiverp enod ylisae erew hcihw sboj no rewop tneiciffus
a ni kcap yrettab sti htiw tcudorp gnisu EUNITNOC TON
.noitidnoc detelped
rof egrahc no yrettab eht gnivael diova ,efil yrettab gnolorp oT.6
hguohtlA .)esu tuohtiw syad 03 revo( emit fo sdoirep dednetxe
ecuder yltnacifingis nac ti ,nrecnoc ytefas a ton si gnigrahcrevo
.efil kcap yrettab llarevo
5 delcyc gnieb retfa ecnamrofrep mumitpo hcaer lliw yrettab ehT.7
seirettab eht nur ot deen on si erehT .egasu lamron gnirud semit
tseb eht si egasu lamroN .gnigrahcer erofeb yletelpmoc nwod
seirettab eht gnigrahcer dna gnigrahcsid fo dohtem
230 5
230 5
230
FIG 1
approx. 1 hour
2
1
2
2
7
Features
Before using your Pole Saw familiarize yourself with all operating and
safety features.
5
4
3
2
1
11
10
9
8
7
6
A. Handle Module
B. Center Extension
C. Saw Head Module
1. Trigger Switch
2. Lock Button
3. Battery
4. Foam Gripper
5. Threaded Pole
6. Threaded Sleeve
7. Center Extension Pole
8. Sprocket Cover (other side)
9. Allen Head Screws (other side)
10. Guide Bar
11. Saw Chain
12. Scabbard
13. Allen Wrench
14. Oil Bottle
6
Pole Saw Names and Terms
Chain Brake - A device used to stop the Pole Saw.
Drive Sprocket or Sprocket - The toothed part that drives the saw
chain.
Guide Bar - A solid railed structure that supports and guides the
saw chain.
Guide Bar Scabbard - Enclosure fitted over guide bar to prevent
tooth contact when saw is not in use.
Kickback - The backward or upward motion, or both of the guide
bar occurring when the saw chain near the nose of the top area of
the guide bar contacts any object such as a log or branch, or when
the wood closes in and pinches the saw chain in the cut.
Low-Kickback Chain - A chain that complies with the kickback
performance requirements of ANSI B175.1-1991 (when tested on a
representative sample of chain saws.
Reduced Kickback Guide Bar - A guide bar which has been
demonstrated to reduce kickback significantly.
Replacement Saw Chain - A chain that complies with kickback
performance requirements of ANSI B175.1-1991 when tested with
specific chain saws. It may not meet the ANSI performance
requirements when used with other saws.
Saw Chain - A loop of chain having cutting teeth, that cut the wood,
and that is driven by the motor and is supported by the guide bar.
Spiked Bumper (Spike) - The pointed tooth or teeth for use when
pruning to pivot the saw and maintain position while sawing.
Switch - A device that when operated will complete or interrupt an
electrical power circuit to the motor of the chain saw.
Switch Lockout - A movable stop that prevents the unintentional
operation of the switch until manually actuated.
Trimming (Pruning) - Process of cutting limbs from a tree.
Undercut - An upward cut from underside of a log or limb.This is
done while in normal cutting position and cutting with top of guide
bar.
A
B
C
12
13
14
Preparing Your Pole Trimmer for Use
WARNING: Read and understand all instructions. Failure to
follow all instructions listed below may result in electric shock, fire
and/or serious personal injury.
Installing and Removing Saw Chain
WARNING: Sharp moving blade. To prevent accidental
operation, insure that battery is disconnected from the handle
before performing the following operations. Failure to do this
could result in serious personal injury.
CAUTION: Sharp moving blade. Always wear protective
gloves when installing or removing the chain. The chain is sharp
and can cut you when it is not running.
Place the saw on a firm surface.
Rotate the two allen head screws
counterclockwise with the wrench
provided as shown in figure 2.
Remove sprocket cover, bar clamp,
and allen head screws.
To remove the chain, rotate the screw
in the front of the housing using the
flat screwdriver end of the wrench as
shown in figure 3. Turning the screw
counterclockwise allows the guide
bar to recede and reduces the
tension on the chain so that it may be
removed.
Lift the worn chain out of the groove
in the guide bar.
Flip guide bar over.
To replace the chain, check to make
sure that the slot in the guide bar is
over the two location pins shown in
figure 3A and that the hole below the
slot is located over the adjustment
pin.
Place new chain in groove of guide bar and around sprocket. Make
sure saw teeth are facing correct direction by matching arrow on
chain with graphic on housing shown here.
Rotate the screw in the front of the
housing clockwise to increase the chain tension as in Figure 3.
Replace sprocket cover, bar clamp, and allen head screws.
Follow instructions for adjusting the chain tension.
Adjusting Chain Tension
With the saw still on a firm surface
check the chain tension. The tension
is correct when the chain snaps back
after being pulled 1/8” (3mm) away
from the chain bar with light force
from the middle finger and thumb as
shown in figure 4. There should be
no “sag” between the guide bar and the
chain on the underside as shown in
figure 5.
To adjust saw chain tension, loosen
allen head screws
Rotate the screw in the front of the
housing using the flat screwdriver end
of the wrench as shown in figure 3.
Do not over-tension the chain as this will lead to excessive wear
and will reduce the life of the bar and chain. Overtensioning also
reduces the amount of cuts you will get per battery charge.
Once chain tension is correct, tighten allen head screws to clamp
bar.
When the chain is new check the tension frequently (after
disconnecting battery) during the first 2 hours of use as a new chain
stretches slightly.
2
5
3
8
4
3A
LOCATING PINS
ADJUSTMENT PIN
Chain Oiling
A high quality bar and chain oil or
SAE30 weight motor oil should be used
for chain and bar lubrication. The use
of a vegetable based bar and chain oil
is recommended when pruning trees.
Mineral oil is not recommended
because it may harm trees. Never use
waste oil or very thick oil. These may
damage your chain saw.
Lubricate the whole chain evenly
before each use as shown in figure 6.
Also lubricate the chain whenever replacing a fully discharged
battery with a fully charged one.
Transporting Pole Saw
Always remove the battery pack from the
handle (figure 7) and cover the chain with the
scabbard (figure 8) when transporting the
Pole Saw. See page 5 for additional
information on transporting the battery.
9
Assembly
Joining Saw Head Module to 18V Handle Module
WARNING: Sharp moving blade. To prevent accidental
operation, insure that battery is disconnected from the handle
and that the protective scabbard is in place on the chain before
performing the following operations. Failure to do this could result
in serious personal injury.
The three modules which make up the 18V Pole Saw are keyed to
insure correct assembly. If a module does not smoothly attach to
another do not force fit.
Combining the handle module (A) to the saw head module (C)
creates a pole saw that is approximately 6 foot in length as shown in
figure 9.
To attach the handle module to the saw head module:
1. Align the groove on the outside of the coupling end of the handle
module (A) with the tongue on the
inside of the coupling end of the saw
head module (C). See figure 10. Push
the two sections completely together.
2. Slide the threaded sleeve (6) figure 11
on the saw head module down as far as
possible and rotate the sleeve clockwise
until it stops and completely covers the
orange threads as shown in figure 12.
WARNING: Always check to make
sure that the sleeve is completely
threaded on and that the orange
threads are no longer visible. Not
threading the sleeve completely on
could result in the modules becoming
disconnected creating a hazardous
condition. Periodically check the
connections to insure that no orange
threads are visible.
Groove
10
11
12
9
6
7
8
Disassembly
Detaching Saw Head Module
WARNING: Sharp moving blade. To prevent accidental
operation, insure that battery is disconnected from the handle
and that the protective scabbard is in place on the chain before
performing the following operations. Failure to do this could result
in serious personal injury.
When detaching the modules, whether it is in the two
module or three module mode, always detach the
saw head module first. To do this, rest the handle
module on the ground and grasp the center of the
saw head module with
one hand figure 17. Use
your other hand to loosen
the threaded sleeve
figure 18 and then pull
the two halves apart.
Repeat this process if the center extension
was attached.
Operating the Pole Saw
WARNING: Read and understand all
instructions. Failure to follow all
instructions listed below may result in
electric shock, fire and/or serious personal
injury.
Connecting the Battery
Place the battery in the tool as shown in
figure 19 and be certain that it is inserted
fully into the tool cavity until it “clicks” into
place. To remove the battery from the tool,
press down on the release button on the
back of the battery (figure 20) and slide
out.
10
20
17
18
19
Joining Center Extension to Saw Head Module and
Handle Module
Adding the extension (B) to the handle module (A) and saw head
module (C) creates a Pole Saw that is approximately 9 foot in length
as shown in figure 13.
To attach the middle module to the handle module and saw head
module:
1. Align the groove on the outside of the
coupling end of the handle module (A)
with the tongue on the inside of the
coupling end of the center extension (B).
See figure 14. Push the two sections
completely together.
2. Slide the threaded sleeve (6) (figure
15) on the center extension down as far
as possible and rotate the sleeve
clockwise until it stops and completely
covers the orange threads as shown in
figure 16.
3. Repeat steps 1 and 2 above to attach
the saw head module to the center
extension.
WARNING: Always check to make
sure that the sleeve is completely
threaded on and that the orange threads are no longer visible.
Not threading the sleeve completely on could result in the modules
becoming disconnected creating a hazardous condition.
Periodically check the connections to insure that no orange threads
are visible.
Groove
14
15
16
13
Switch
Always be sure of your footing and grip the
Pole Saw firmly with both hands with the
thumb and fingers encircling the handle.
To turn the tool ON pull the lock button (1)
back with your thumb and then squeeze
the trigger (2) with your fingers as shown
in figure 21. (Once the tool is running you
can release the lock button.) To turn the
tool OFF, release the trigger.
Auto-Stop Chain Braking System
Your chain saw is fitted with an auto-stop chain braking system which
will stop the chain quickly each time you release the rear trigger, or if
kickback should occur. This system should be tested before every
use.
11
21
Pole Saw Trimming /
Pruning
Warnings:
Never stand directly
under the limb you
are cutting. Always
position yourself out of
the path of falling
debris.
Always wear head,
eye, foot and body
protection. Wearing
body protection helps
reduce the risk of
injury when operating
this unit.
Never
stand on a
ladder or
other
unstable
support
while using the Pole
Saw. Always avoid
any position which can
cause you to loose your balance and cause severe injury.
Keep other persons at least 50 feet (15m) from the
work area. Distractions can cause you to lose control.
Electrocution Hazard. To prevent shock, do not
operate within 50 feet (15m) of overhead electrical
lines. Always check surrounding area for hidden
electrical lines.
Do not extend Pole Saw switch handle above
shoulder height.
Always Wear:
Head Protection
Eye Protection
Work Gloves
Long Pants
Steel Toed Shoes
Operating Position
Pruning With the Pole Saw
Warning: When pruning trees:
Guard Against Kickback which can result in
severe injury or death. See “KICKBACK”,
page 3 to avoid the risk of kickback.
Do not overreach. Make sure your footing is
firm. Keep feet apart. Divide your weight evenly
on both feet.
Use both hands to grip Pole Saw as shown
in figure 22. Use a firm grip. Thumbs and
fingers must wrap around Pole Saw handle and
pole. Keep fingers away from
sawdust exhaust chute shown in
figure 22a.
Never operate while in a tree, in
any awkward position or on a
ladder or other unstable surface.
You may lose control of Pole Saw
causing severe injury.
Follow directions below to trim a tee.
1. Make sure Pole Saw is running at full speed before making a cut.
When starting a cut, place moving chain against limb. Hold Pole
Saw firmly in place to avoid
possible bouncing or skating
(sideways movement) of Pole
Saw.
2. Guide Pole Saw using light
pressure. Make first cut six inches
from tree trunk on underside of
limb. Use top of guide bar to make
this cut. Cut 1/3 through diameter
of limb. Then make the finish cut
from the top as shown in figure
23.
12
If you try to cut off thick branches
from the bottom, the branch may
close in and pinch the saw chain
in the cut. If you try to cut off thick
branches from the top, without a
shallow undercut, the branch may
splinter figure 24.
Do not force Pole Saw. The motor
will overload and can burn out. It
will do the job better and safer at
the rate for which it was intended.
3. Remove Pole Saw from cut while
it is running at full speed. Stop Pole Saw by releasing trigger.
Make sure chain has stopped before setting Pole Saw down.
Saw chain sharpness
The cutters will dull immediately if they touch the ground or a nail
while cutting.
Saw chain tension
This should be done regularly. Refer to page 8 “Adjusting Chain
Tension”.
Pole Saw Maintenance Section
Regular maintenance ensures a long effective life for the tool.
After every 10 minutes of use be sure to remove the battery (be
aware the chain and bar can be hot!) check the bar and chain for
correct tension and lubricate per pole saw instruction manual.
Use only mild soap and damp cloth to clean the tool. Never let any
liquid get inside the tool; never immerse any part of the tool into a
liquid.
IMPORTANT: To assure product SAFETY and RELIABILITY, repairs,
maintenance and adjustment should be performed by authorized
service centers or other qualified service organizations, always using
identical replacement parts.
22
22a
23
24
31
seirosseccA
& kcalB tseraen ruoy morf elbaliava era rab dna niahc tnemecalpeR
.retnec ecivres rekceD
00-283326 # niahc tnemecalpeR
00-183326 # rab tnemecalpeR
eb yam launam siht ni dednemmocer ton seirossecca fo esu ehT
.suodrazah
noitceS gnitoohselbuorT
:gniwollof eht kcehc yltcerroc etarepo ton seod waS eloP ruoy fI
melborP
elbissoP
esuaC elbissoP noituloS
ton lliw looT
.trats
ton lliw tinU
.egrahc
niahc / raB
.detaehrevo
ton yrettaB
.ylreporp dellatsni
ton yrettaB
.degrahc
ton nottub tuo-kcoL
.detautca
snoitcennoc eloP
ylreporp ton
.denethgit
ton yrettaB
otni detresni
.regrahc
.thgit oot niahC
noitacirbuL
.dedeen
.noitallatsni yrettab kcehC
gnigrahc yrettab kcehC
.stnemeriuqer
kcol no kcab lluP
.reggirt etautca/nottub
launam noitcurtsni ot refeR
.snoitcennoc elop rof
regrahc otni yrettab tresnI
.sraeppa DEL der litnu
fi sruoh ot pu egrahC
.deniard yllatot yrettab
no noitces ot refeR
.noisnet niahc gnitsujda
niahc rof snoitces ot refeR
.noitacilppa gnilio
si niahC
.esool
tuc rooP
.ytilauq
tes noisnet niahC
.yltcerrocni
tes noisnet niahC
.yltcerrocni
sdeen niahC
.tnemecalper
niahc rof noitces ot refeR
.gninoisnet
no noitces ot refeR
.noisnet niahc gnitsujda
noisnet evissecxE :etoN
raew evissecxe ot sdael
rab fo efil ni noitcuder dna
.niahc &
01 yreve retfa etacirbuL
.esu fo setunim
rof noitces ot refeR
.niahc fo noitallatsni
2
41
cirtcelE-slooT eeS
segaP wolleY
selaS & ecivreS rof
.tnoC noitceS gnitoohselbuorT
melborP elbissoP
esuaC
elbissoP
noituloS
tub snur tinU
.tuc ton seod
dellatsni niahC
.sdrawkcab
rof snoitces ot refeR
gnivomer dna gnillatsni
.niahc
SERVICE INFORMATION
All Black & Decker Service Centers are staffed
with trained personnel to provide
customers with efficient and reliable power tool service.
Whether you need
technical advice, repair, or genuine factory replacement parts, contact the
Black & Decker location nearest you. To find
your local service location, refer
to the yellow page directory under “Tools—Electric” or call:
(AUS) 1800-654-155 or (NZ) 09 579 7500
or visit www.blackanddecker.com.au
GUARANTEE
Black & Decker is confident of the quality
of its products and offers an
guarantee. This guarantee statement is in
addition to and in
provisions of the Consumer
Guarantee Act 1993 (New Zealand only),
Trade Practices Act 1974 and State legislation (Australia only), which
rights upon consumers.If a Black & Decker product becomes
materials, workmanship or lack of conformity,
of purchase, Black & Decker guarantees
to replace defective parts, repair products subjected to fair wear and tear
or replace such products to ensure minimum incon
customer unless: The product has been used for trade, professional or
hire purposes; The product has been subjected to miss use or neglect;
The product has sustained damage through foreign objects, substances
or accidents; Repairs have been attempted by persons other than
To claim on the guarantee, you will need tosubmit proof of purchase to
the seller or an authorised repair agent. You can check the location of
your nearest authorised repair agent by contacting your local
Black & Decker office at the address indicated in this manual.
outstanding
statutory rights. Your attention is drawn to the
no way prejudices your
confers
defective due to faulty
within 48 months from the date
venience to the
Australia
Black & Decker (Australia) Pty. Ltd. 20
Fletcher Road, Mooroolbark,
Victoria, 3138
Tel. 03-8720 5100
Fax 03-9727 5940
New Zealand
Black & Decker 81 Hugo Johnston Drive
Penrose, Auckland, New Zealand
Tel. 09 579 7600
Fax 09 579 8200
Dec 05
5145878-01
5145878-01
  • Page 1 1
  • Page 2 2
  • Page 3 3
  • Page 4 4
  • Page 5 5
  • Page 6 6
  • Page 7 7
  • Page 8 8
  • Page 9 9
  • Page 10 10
  • Page 11 11
  • Page 12 12
  • Page 13 13
  • Page 14 14
  • Page 15 15
  • Page 16 16

Black & Decker NPP2018 User manual

Category
Power tools
Type
User manual

Ask a question and I''ll find the answer in the document

Finding information in a document is now easier with AI