Page is loading ...

The reference materials in this section are designed for Drivers using in-cab tablets running ELD software.
Note. If you are unsure as to whether your device is running on AOBRD or ELD software, please contact
your fleet administrator.
Learn how to log into the system, enter the necessary information, start your driving time, complete a roadside
inspection, manage co-drivers, successfully complete the post-trip sign out process, and more using the
reference materials listed below:
Using Your ELD Tablet
Exploring the Welcome Screen
Beginning Your Shift
During Your Shift
Managing Exceptions
Understanding and Resolving Conflicts
Completing a Roadside Inspection
Editing, Approving, and Certifying Logs
Using Co-Drivers
Using ELD Messaging – Driver (Pro/Enterprise Only)
Ending Your Shift
Exploring the Driver Portal
Note. An instructional video is available for most of the ELD reference articles listed above. Where
applicable, videos are provided in the top-right corner of the article page under Related Video.
Using Your ELD Tablet
Using the ELD tablet
The tablet has several physical buttons that allow you to operate the tablet. We have provided descriptions for the
most commonly used buttons below.
Standard, Pro, Enterprise ELD
Link:https://help.wextelematics.com/docs/eld-driver-reference/ Last Updated:March 6th, 2018
ELD Driver Reference
Copyright ©2019 Wex Telematics Page: 1 of 48

Numbe
r
Button Description
1 Power Press this button to wake the tablet. Press and hold this button to power off or
reboot the tablet.
2 + Press this button to increase the volume on the tablet.
3 - Press this button to decrease the volume on the tablet.
4 Home Press this button to return to the tablet Home Screen from any application.
5 Multitask Press this button to quickly switch between open application windows.
6 Return Press this button to return to the previous screen within the active application
window.
Using ELD Tablet Applications
The tablet can run multiple applications. We have provided descriptions for the applications available on the
tablet in the table below. To view and/or open applications, tap on the Home button (see table above) and tap on
the application icon of the application you would like to use or open. You may need to scroll up to see all
available tablet applications.
Note. Drivers should only need to use the eFleetSuite, Messaging, and Driver Guide applications on the
tablet, all other applications are available for the HOS Administrator to use, if required, or are
applications to be run in the background of the eFleetSuite application.
App Icon App Description
Settings Use this app to adjust settings on the tablet.
Vehicle
Data
Service
(VDS)
This app provides raw diagnostic data about the communication
between the tablet and the tracking device.
Not typically used, unless under the direction of an HOS Support
Team member.
eFleetSuite Use this app to sign in to the tablet, record HOS events, view
available driving time, review previous logs and
DVIR information, and more.
Standard, Pro, Enterprise ELD
Link:https://help.wextelematics.com/docs/eld-driver-reference/ Last Updated:March 6th, 2018
ELD Driver Reference
Copyright ©2019 Wex Telematics Page: 2 of 48

App Icon App Description
Magellan
SmartGPS
This app provides navigation/mapping integration from the GPS
Portal to the ELD tablet.
Background app, not typically used actively.
Updater Use this app to keep HOS applications up-to-date.
Messaging Use this app to send messages and view incoming messages and
dispatches from the
dispatcher.
Driver Guide Use this app to open a comprehensive resource on using the tablet
and
its features.
Exploring the Welcome Screen
Getting to Know the Welcome Screen
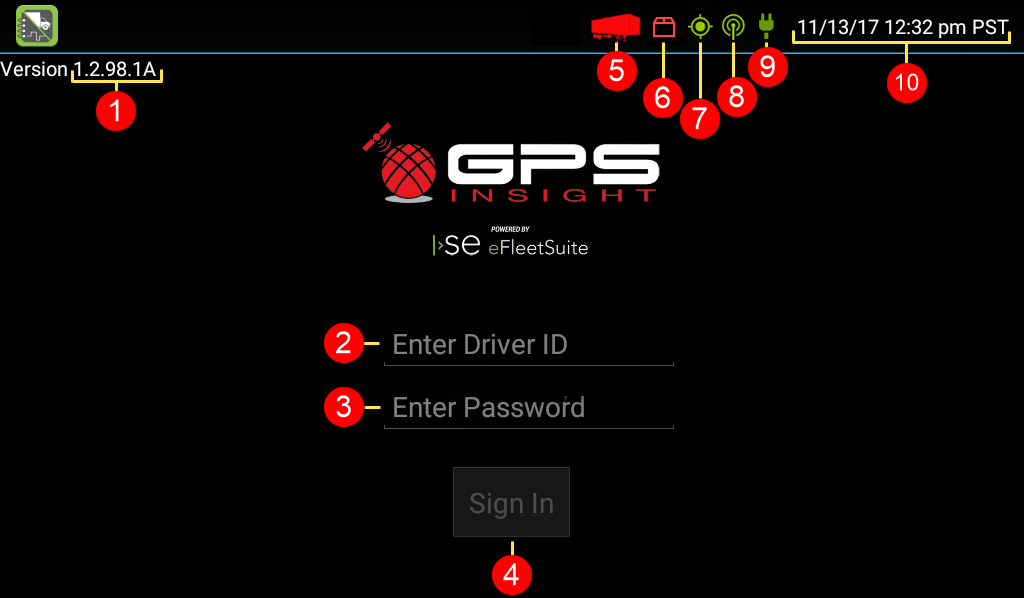
The eFleetSuite Welcome Screen will automatically display when the vehicle’s ignition status is turned to ON.
You will use this screen to sign in to your ELD tablet. Additionally, some of the features/icons appearing on this
screen (e.g., Trailer icon, Shipment icon, Communication icon, Connection icon, System Time) will be displayed
throughout your use of the ELD tablet. Therefore, please take some time to familiarize yourself with the properties
of the Welcome Screen as provided below.
Standard, Pro, Enterprise ELD
Link:https://help.wextelematics.com/docs/eld-driver-reference/ Last Updated:March 6th, 2018
ELD Driver Reference
Copyright ©2019 Wex Telematics Page: 3 of 48

Feature Description
1 – Version Number Displays the current software version.
Note: Tap to view Provisioning Information and System Check for
troubleshooting purposes, which can be especially helpful when verifying
ignition installation.
2 – Driver ID Field Tap to enter your Driver ID in this field.
3 – Password Field Tap to enter your Password in this field.
4 – Sign In button Tap this button after entering your credentials to sign in to the device.
5 – Trailer Icon () Indicates that trailer information has not been entered into the logs.
6 – Shipment Icon () Indicates that shipment information has not been entered into the logs.
7 – GPS Icon () Displays the status of the ELD's GPS lock on location data.
Green = Location received
Yellow = Location data received but unable to get a valid fix on the location
Red = No location received
8 – Communication Icon () Displays the status of the ELD's connectivity to the host software.
Green = Connection
Yellow = Communication is temporarily turned off (no data to send)
Red = No connection
9 – Connection Icon () Displays the status of the ELD's connectivity to the GPS hardware.
Green = Connected and recording data
Grey = Data has stopped being received and paper logs should be used
Red = Connection to GPS hardware has been lost and paper logs should
be used
10 – System Time The system date and time against which activity is logged.
Exploring the Driver Overview Screen
Getting to know the Driver Overview Screen
The eFleetSuite Driver Overview screen appears upon successful sign in to the ELD tablet. This is the Home
screen of the application. We highly recommend using the table provided below to fully understand the features
of this screen because you will see this screen for the majority of the time you are using the tablet.
Standard, Pro, Enterprise ELD
Link:https://help.wextelematics.com/docs/eld-driver-reference/ Last Updated:March 6th, 2018
ELD Driver Reference
Copyright ©2019 Wex Telematics Page: 4 of 48

Feature Description
1 – Status Bar Displays system time, notification that trailer/shipment information has not
been entered, and the ELD's status/connectivity information to GPS
location data, host software, and GPS hardware.
See Exploring the Welcome Screen for additional information.
2 – Driving Time Details Displays your time remaining under each applicable Hours of Service rule.
By default, this section displays your current status and Gain Time. Tap the
down arrow () to expand this section and view your time remaining under
each applicable Hours of Service rule.
3 – Available Drive Time
Gauge
Displays your available drive time in hours and minutes (hh:mm).
4 – Task Bar Displays buttons used to perform tasks such as change status,
review/request logs, add driver, add/drop shipment, add/drop trailer, certify
logs, view/add DVIR.
See table below for additional information.
5 – Rest Break Record off duty activity during the work shift without having to sign out and
sign back in to the device.
Navigating the Task Bar
Unsure of what tasks you can perform from the Task Bar? The following table includes a list of task buttons and
corresponding descriptions.
Task Description
Standard, Pro, Enterprise ELD
Link:https://help.wextelematics.com/docs/eld-driver-reference/ Last Updated:March 6th, 2018
ELD Driver Reference
Copyright ©2019 Wex Telematics Page: 5 of 48

Task Description
Status Tap to choose the option that best describes your current activity:
– ON Driver
– ON Not Driver
– SB (Sleeper Berth)
– OFF Sign out
– OFF PC (Personal Conveyance)
– ON YM (Yard Moves)
See During Your Shift for additional information regarding
status options.
Options Tap to expand the Options Menu, which includes the following options:
– Edit Vehicle ID
– Review Logs
– Request Logs
– Pre Shift
– Post Shift
– Take Exception
– Diagnostics
– Roadside Inspection
The Options button may display an orange or red flag. An orange flag indicates
there are logs that require your attention. A red flag specifically indicates there is
missing data that you must update. You are legally required to manage any
items in orange or red.
+ Driver Tap to allow a co-driver to sign in.
Shipment Tap to add or drop a shipment.
Trailers Tap to add or drop a trailer.
Logs Tap to view the graph grid of duty statuses for today's date, access log
history/details, and/or certify logs.
DVIR Tap to view the most recent driver vehicle inspection report (DVIR) for any
resource (vehicles, trailers, etc.) in the vehicle combination
and/or start a new DVIR.
Beginning Your Shift
The following steps walk you through the process of signing in, choosing your status, reviewing DVIR information,
adding/removing shipment information, and adding/removing trailer information on your ELD tablet.
Signing In to the ELD Tablet1.
1.
Start the vehicle to power on the ELD tablet (automatic).
When the tablet is on, the eFleetSuite App (
Standard, Pro, Enterprise ELD
Link:https://help.wextelematics.com/docs/eld-driver-reference/ Last Updated:March 6th, 2018
ELD Driver Reference
Copyright ©2019 Wex Telematics Page: 6 of 48

) automatically opens and displays the Welcome Screen.
2.
Enter your Driver ID in the Driver ID field, password in the Password field, and tap Return/Enter ( )
on the keyboard.
Note. A secure default password is automatically generated when a driver is added to the
HOS Portal. If you did not receive a password from your administrator, or you have not yet
changed your password in the Driver Portal, contact your administrator.
The ELD contacts the host system and downloads logs for the last seven days (if any).
3.
Wait for the logs to download, and tap Ok.
Note. If you have no cell coverage, you can still complete the sign-in process and drive until
you have cell coverage. The application records information and continues attempting to
connect to the cell network. Logs download upon connection.
The Driver Overview screen appears. During the sign-in process, the task bar will display the Status and
Cancel buttons only.
Note. After successful sign-in, the Driver Overview screen will provide additional options. From
this screen, you can view your available drive time, current status, Gain Time At, and more. You
can also change your duty status to Rest Break or perform HOS tasks using the buttons in the
Task Bar. For additional information regarding the Driver Overview screen, see Exploring the
Driver Overview Screen.
Standard, Pro, Enterprise ELD
Link:https://help.wextelematics.com/docs/eld-driver-reference/ Last Updated:March 6th, 2018
ELD Driver Reference
Copyright ©2019 Wex Telematics Page: 7 of 48

Your Available Drive Time gauge displays your available drive time in hours and minutes (hh:mm). The
color featured in the gauge reflects your approximate drive time left (see below).
Gauge Color Remaining Drive Time
Green Greater than 3 hours of driving time remains.
Yellow Between 1-3 hours of driving time remains.
Red Less than 1 hour of driving time remains.
Note. If you do not have a full set of hours, the Gain Time At field (top left) shows the next
date/time at which you will receive a full set of hours provided that you remain in the same duty
status. Gain Time is calculated when you have less than a full day’s driving time available and if
you are currently in Sleeper Berth or Rest Break status. Gain Time cannot be calculated if you
are in ON Driver or ON Not Driver status. If you are in On Driver or ON Not Driver status, the
Gain Time will show as N/A.
Choosing Status on the ELD Tablet2.
1.
From the Driver Overview screen, tap Status.
2.
Tap the status option that best describes your current activity.
(For the purpose of this training, we will select ON Driver status.)
Note. If selecting Yard Moves (ON YM), or Personal Conveyance (OFF PC), you are required to
enter a note regarding the status.
Standard, Pro, Enterprise ELD
Link:https://help.wextelematics.com/docs/eld-driver-reference/ Last Updated:March 6th, 2018
ELD Driver Reference
Copyright ©2019 Wex Telematics Page: 8 of 48

Note. You will be prompted to enter your location if the ELD does not have a lock on GPS
location. Choose the location type (City/State, Intersecting Highway, Highway/Mile Marker, or
Highway/Service Plaza), enter the information in the fields provided, and then tap OK to continue.
If this occurs on a regular basis and you are not
in an area that affects GPS connectivity (out in the open), notify your Fleet Administrator and
consider contacting the GPS Insight Support Team.
3.
When prompted, verify the Vehicle ID matches the Vehicle ID provided by your motor carrier.
4.
Tap the pencil icon to update the Vehicle ID.
Note. Before moving forward, it is important that you verify that the vehicle ID in your vehicle
combination matches exactly what your motor carrier has on file.
5.
Tap OK to continue.
Managing Shipments on the ELD Tablet3.
Standard, Pro, Enterprise ELD
Link:https://help.wextelematics.com/docs/eld-driver-reference/ Last Updated:March 6th, 2018
ELD Driver Reference
Copyright ©2019 Wex Telematics Page: 9 of 48

Note. If you are the first driver to sign in during your work shift, the device may ask that you review
the trailers and shipments entered by the previous driver. This is also your initial opportunity to
remove or add new resources (shipments, trailers, etc.).
The Manage Shipments screen appears.
If any shipments were previously added to the combination, the corresponding Shipment ID will appear
under Current Shipments.
To add shipments:
1.
From the Manage Shipments screen, enter the shipment ID in the Shipment ID field under Add
Shipments and tap Return/Enter on the keyboard.
The Shipment ID appears under Current Shipments.
To remove shipments:
1.
From the Manage Shipments screen, tap on the item(s) from the Current Shipments section, and tap
Remove.
The shipment is removed from the Current Shipments section of the screen.
Note. The device allows you to add or remove shipments from the Driver Overview screen at any
point during your shift, once you have completed the sign in process. From the Driver Overview
screen, tap Shipment ( ).
2.
Tap Next.
If a trailer(s) was entered by the previous driver, the trailer ID(s) will display and you will be asked: “Would
you like to keep the following trailer?”
3.
Tap Yes or No.
4.
Request and review the previous DVIR submitted for the trailer using the instructions listed in Step 4.
Review Previous DVIR.
If you selected No, the trailer will be removed from the resource list automatically once you have reviewed
the Previous DVIR.
Standard, Pro, Enterprise ELD
Link:https://help.wextelematics.com/docs/eld-driver-reference/ Last Updated:March 6th, 2018
ELD Driver Reference
Copyright ©2019 Wex Telematics Page: 10 of 48

Reviewing Previous DVIR on the ELD Tablet4.
Note. Always review the previous DVIR with care before operating the vehicle to ensure that all
information is true and correct. You are responsible for ensuring that all required records in your
possession are correct and up-to-date.
1.
When the inspection information appears for your resource, tap Request DVIR.
2.
Once the DVIR is received, tap OK.
3.
Review the DVIR, and tap Next.
Note. Use this time to perform an inspection walk around.
Note. Carry Over Defects: In some cases, the previous DVIR for an asset may include a
defect that was certified as Repairs Not Necessary. This denotes that the defect or deficiency
may still exist, but that repair was not required in order for the vehicle to be operated safely.
The logging device will “carry over” such defects to the next DVIR. You will be notified when
beginning a new inspection report if the previous report has such defects. You may add or edit
these defects as needed.
The Certify and Submit screen appears.
Note. If defects were noted on the previous inspection, the Certify and Submit screen may
appear with a Repairs status option. Indicate whether repairs were made or not necessary.
Standard, Pro, Enterprise ELD
Link:https://help.wextelematics.com/docs/eld-driver-reference/ Last Updated:March 6th, 2018
ELD Driver Reference
Copyright ©2019 Wex Telematics Page: 11 of 48

4.
Deem the vehicle as Safe to Operate or Unsafe to Operate.
1.
If the vehicle is safe to operate, tap Yes. Enter notes (if applicable), and then tap Done.
2.
If your vehicle is unsafe to operate, tap No.
1.
Enter applicable notes regarding the status, and then tap Done.
2.
Once the Driver Overview screen appears, tap Status.
3.
Tap OFF Sign Out, and follow the prompts for completing a post-trip driver vehicle
inspection to document the defects.
Note. Part names and defect descriptions are specific to the type of resource (vehicle or trailer)
selected at the time of the inspection. All defects lists provide an Other option, where you can
enter your own description. Part name and defects descriptions can be customized by your motor
carrier.
Adding/Removing Trailers on the ELD Tablet5.
We recommend that you add/remove any trailer(s) (if applicable) to your resources before you begin
driving to ensure that your records are as current and up-to-date as possible.
To add trailers:
The system recognizes previously added trailers and prompts you to review the previous applicable DVIR
when added. If this is the first time the trailer is added, you may not see this prompt and will complete a
new DVIR instead. If you do not receive the prompt for a trailer that has been added previously, verify you
have entered the Trailer ID correctly.
1.
From the Driver Overview screen, tap Trailers ( ).
2.
From the Manage Trailers screen, enter the Trailer ID in the Trailer ID field under Add Trailers and tap
Return/Enter on your keyboard.
Standard, Pro, Enterprise ELD
Link:https://help.wextelematics.com/docs/eld-driver-reference/ Last Updated:March 6th, 2018
ELD Driver Reference
Copyright ©2019 Wex Telematics Page: 12 of 48

3.
When the inspection information appears for your trailer, enter the location (if prompted), and tap
Request DVIR.
4.
If a previous DVIR was submitted for the trailer, review the DVIR using the instructions from Step 4.
Reviewing Previous DVIR. If a DVIR was not submitted previously, follow the steps below after tapping
OK.
If there are no existing defects:
1.
Tap No Defects.
The Certify and Submit screen appears.
2.
Deem the trailer safe to operate or not safe to operate:
1.
If the trailer is safe to operate, tap Yes, and enter notes (if applicable) or if the trailer is
not safe to operate, tap No and enter notes.
The trailer ID appears in the Current Trailers section.
If there are existing defects:
1.
Tap Add Defects.
The Inspection screen appears, displaying a list of parts specific to the selected resource on the left-hand
side of the screen.
2.
Add defect(s) by tapping on parts from the available list.
A sub-defect menu appears, displaying a list of potential defects applicable to the part you selected.
Note. You may need to scroll up to view the entire list.
3.
Tap on the defect you would like to record. If none of the defects listed apply, use the Other field
to add a description of the defect.
4.
Tap Next.
5.
Review your DVIR details. If you need to make changes, tap Back and make your changes.
Otherwise, tap Next.
The Certify and Submit screen appears.
7.
Deem the trailer as safe to operate or not safe to operate:
1.
If the trailer is safe to operate, tap Yes and enter notes (if applicable).
2.
For Repair Status, tap Complete (if repairs were done) or tap Not Needed (if repairs
were not necessary to safely operate the trailer).
3.
If the trailer is not safe to operate, tap No and enter notes.
5.
Tap Done.
Once you have completed your review, the Trailer ID appears under Current Trailers on the left side of the
Standard, Pro, Enterprise ELD
Link:https://help.wextelematics.com/docs/eld-driver-reference/ Last Updated:March 6th, 2018
ELD Driver Reference
Copyright ©2019 Wex Telematics Page: 13 of 48

screen.
6.
Tap Home when finished.
Note. If the trailer is not safe to operate, sign out and contact your administrator.
To remove trailers:
1.
From the Driver Overview screen, tap Trailers.
2.
Tap on the trailer you would like to remove, and tap Remove.
3.
When the inspection information appears for your trailer, enter the location (if prompted), and tap OK.
4.
If you have multiple resources, tap on the trailer you would like to remove and follow the below steps.
If there are no existing defects:
1.
Tap No Defects.
The Certify and Submit screen appears.
2.
Deem the trailer safe to operate or not safe to operate:
1.
If the trailer is safe to operate, tap Yes, and enter notes (if applicable) or if the trailer is
not safe to operate, tap No and enter notes.
The trailer ID appears in the Current Trailers section.
If there are existing defects:
1.
Tap Add Defects.
The Inspection screen appears, displaying a list of parts specific to the selected resource on the left-hand
side of the screen.
2.
Add defect(s) by tapping on parts from the available list.
A sub-defect menu appears, displaying a list of potential defects applicable to the part you selected.
Note. You may need to scroll up to view the entire list.
3.
Tap on the defect you would like to record. If none of the defects listed apply, use the Other field
to add a description of the defect.
4.
Tap Next.
5.
Review your DVIR details. If you need to make changes, tap Back and make your changes.
Otherwise, tap Finish.
The Trailer ID is removed from the list under Current Trailers.
5.
Tap Home when finished.
The Driver Overview screen appears. The system automatically changes you status to DRIVING when the
vehicle is in motion, and the Driver Overview screen is locked until the vehicle is no longer moving.
During Your Shift
Use the instructions provided below to complete the following HOS tasks during your shift:
Standard, Pro, Enterprise ELD
Link:https://help.wextelematics.com/docs/eld-driver-reference/ Last Updated:March 6th, 2018
ELD Driver Reference
Copyright ©2019 Wex Telematics Page: 14 of 48

Managing the Vehicle ID
Changing Status
Managing Rest Breaks
Adding/Removing Trailer
Adding/Removing Shipment
Requesting Logs
Reviewing Logs
Logging Pre- or Post-Shift Hours
Viewing Diagnostics
Correcting Missing Data
Correcting Unidentified Driver Events
Note. You can perform a DVIR during your shift; however, we have included instructions for performing a
DVIR in Ending Your Shift (ELD), as completing a DVIR is a required step during the Sign Out process.
Managing the Vehicle ID
The Edit Vehicle ID option allows you to update the Vehicle ID if the ID has changed since signing in.
To update your Vehicle ID:
1.
From the Driver Overview screen, tap Options ( ).
The Options menu expands.
2.
Tap Edit Vehicle ID.
3.
Tap the Edit Vehicle ID field to expand your keyboard and make your edits.
Note. If you do not need to change the vehicle ID, tap Cancel.
4.
When ready, tap OK to update the Vehicle ID.
IMPORTANT! It is crucial that you verify the Vehicle ID shown or entered matches the Vehicle ID provided by
your motor carrier. If the Vehicle ID has changed, you will be prompted to perform a post-trip inspection on the
previous vehicle and pre-trip inspection on the new vehicle.
Changing Status
Your status should always reflect the option that best describes your current activity. If/When your status changes
Standard, Pro, Enterprise ELD
Link:https://help.wextelematics.com/docs/eld-driver-reference/ Last Updated:March 6th, 2018
ELD Driver Reference
Copyright ©2019 Wex Telematics Page: 15 of 48

during your shift, make sure to update your status accordingly.
To change your status:
1.
From the Driver Overview screen, tap Status ( ).
The Choose Status window appears, displaying a list of available status options (see reference table
below).
2.
Tap on the status that best describes your activity.
Your new status is displayed under Current Status on the Driver Overview screen.
Note. Some status changes may require you to review and/or complete a DVIR.
Use the status options and corresponding descriptions as listed below for reference.
Status Description
ON Driver Choose this status when you are on duty and taking control of the vehicle. The
logging device will detect when the vehicle is moving* and automatically records
your activity as Driving (D) and ON when the vehicle is stopped.
*A driving event is reported when the tablet detects movement of ? 5MPH. After
5 minutes of no movement, the tablet will prompt you to choose whether to stay
in Driving status or update to On Duty. If no response after 60 seconds, the
tablet will automatically switch to On Duty.
No other driver may take control of the vehicle until you choose a different status,
start a Rest Break, or sign out.
Standard, Pro, Enterprise ELD
Link:https://help.wextelematics.com/docs/eld-driver-reference/ Last Updated:March 6th, 2018
ELD Driver Reference
Copyright ©2019 Wex Telematics Page: 16 of 48

Status Description
ON Not Driver Choose this status ONLY if you are signing in as the co-driver (i.e., on duty but
not in control of the vehicle). This will record your activity as ON. If no one has
taken control of the vehicle, the automatic motion detection system will continue
to track vehicle movements and report these movements as Unidentified Driver
events.
Note. You should never use this status if you are the only driver on duty.
SB (Sleeper Berth) Choose this status when you are beginning a period of rest in the vehicle’s
sleeper berth*. This will record your activity as SB.
*Do NOT move the vehicle while in this status. Moving the vehicle while in this
status will place you back into Driving (D) status and affects your driving time. If
you need to move the vehicle while you are in this status, update your status to
Personal Conveyance (if available).
OFF Sign Out Choose this status when you are relieved of duty and are signing out of the
logging device (OFF Sign Out), or if you plan to remain On Duty (ON) but do not
plan on using the vehicle (ON Sign Out). This will record your activity as OFF, or
On Duty (ON), respectively.
To record your status as off duty without signing out of the logging device, see
Managing Rest Breaks.
OFF PC Choose this status if you are relieved from all responsibility for performing work
and you are operating the vehicle for your own personal use. This will record
your activity as “Authorized Personal Use of CMV (PC)."
You will be asked if you would like to update your status from OFF-PC status
after the vehicle is turned off then on again. You will be placed back into Driving
(D) status if vehicle movement is detected.
Standard, Pro, Enterprise ELD
Link:https://help.wextelematics.com/docs/eld-driver-reference/ Last Updated:March 6th, 2018
ELD Driver Reference
Copyright ©2019 Wex Telematics Page: 17 of 48

Status Description
ON YM Choose this status only if you are moving your vehicle on private property (e.g.,
motor carrier's yard, truck stops, etc.). This will record your activity as “Yard
Moves (YM)." This status is automatically ended as a result of a vehicle ignition
cycle or device reboot. You may manually change status back to ON Driver,
which results in a vehicle inspection system prompt; however, you may turn your
ignition OFF for a few seconds and then back ON to automatically end an ON
YM (current status changes from “ON YM” to “ON (D)” with re-ignition) to avoid
an extra inspection.
Your tablet recognizes administrator-designated company yard locations. While
operating the vehicle in this location, you'll remain in this status regardless of
ignition cycles. If you leave this location or your speed surpasses the 20 MPH
threshold within the location, your status will automatically switch to Driving (D).
Tip! Using this status, when applicable, is helpful if you've reached an
ON duty limit and would like to avoid the system recording a driving
violation. Additionally, YM helps save time from the "Driving" line of your
log; however, if you don't use most of your "Driving" Time each shift,
using this feature may not result in significant time gains on your log.
OFFW Choose this status when you are waiting at a natural gas or oil well site (US and
Canada). This will record your activity as "Off duty, waiting at well site (OFFW)."
Note. If the system detects vehicle movement, your status is
automatically changed to Driving (D). If you are moving the vehicle,
remember to reselect the status if applicable.
OFFS Choose this status when you are resting in other sleeping accommodations
(other than the vehicle's sleeper berth) at a natural gas or oil well location (US).
This will record your activity as "Off duty, sleeping at well site (OFFS)."
Note. If the system detects vehicle movement, your status is
automatically changed to Driving (D). If you are moving the vehicle,
remember to reselect the status if applicable.
Note. Regarding OFFW and OFFS statuses: The “waiting time” provision in Section 395.1(d)(2) is
available only to operators of those commercial motor vehicles (CMVs) that are (1) specially constructed
for use at oil and gas well sites, and (2) for which the operators require extensive training in the operation
of the complex equipment, in addition to driving the vehicle. These status options are only available if
your HOS Admin assigns an applicable driver type supporting the provision to your profile.
Managing Rest Breaks
Standard, Pro, Enterprise ELD
Link:https://help.wextelematics.com/docs/eld-driver-reference/ Last Updated:March 6th, 2018
ELD Driver Reference
Copyright ©2019 Wex Telematics Page: 18 of 48

This option allows you to record off-duty activity during your work shift without signing out.
IMPORTANT! Do not move the vehicle while in this status. If you need to move the vehicle for any reason,
update your status to Personal Conveyance (if available). This option should only be used if you are returning to
duty in the same vehicle before the end of the work shift.
Note. For passenger-carrying drivers, use this status whenever you need to record off-duty time. Update
your status to Personal Conveyance if you need to move the vehicle while in this status.
Beginning a Rest Break
To begin a rest break:
1.
From the Driver Overview screen, tap Rest Break ( ).
The Confirm Rest Break window appears, asking you to confirm you would like to begin a rest break.
2.
Tap OK to confirm the status change.
Note. If you would like to exit the Confirm Rest Break window and not begin a rest break, tap Cancel.
You will remain in the status you were in before tapping Rest Break.
The application records your status as Off Duty without signing you out. The application calculates the
minimum rest necessary to improve driving time and displays this value in the Gain Time At field. Gain
Time At and Available Drive Time are both recalculated when the required rest break time is fulfilled.
Ending a Rest Break
To end a rest break:
1.
From the Driver Overview screen, tap Stop Break ( ).
The Choose status window appears, displaying available status options.
2.
Tap the status that best describes your current activity.
Standard, Pro, Enterprise ELD
Link:https://help.wextelematics.com/docs/eld-driver-reference/ Last Updated:March 6th, 2018
ELD Driver Reference
Copyright ©2019 Wex Telematics Page: 19 of 48

Note. Choosing any option other than OFF Sign Out returns you to the Driver Overview screen and
causes Gain Time At and Available Drive Time to be recalculated.
Adding/Removing a Trailer
You can add or remove a trailer at any time during your shift. However, if you are the first driver to sign in during
your shift, you may be prompted by the application to review trailers added by a previous driver, and remove or
add new resources during the sign-in process. For this reason, step-by-step instructions on adding/removing a
trailer are provided in Beginning Your Shift, Step 5. Add/Remove Trailers. Visit the aforementioned article and
step for instructions.
Adding/Removing a Shipment
You can add or remove a shipment at any time during your shift. However, if you are the first driver to sign in
during your shift, you may be prompted by the application to review shipments added by a previous driver and
remove or add new resources during the sign-in process. For this reason, step-by-step instructions on
adding/removing a shipment are provided in Beginning Your Shift, Step 3. Manage Shipments. Visit the
aforementioned article and step for instructions.
Requesting Logs
This option allows you to synchronize your electronic records with the HOS Portal at any time during your trip.
Common reasons for synchronizing your logs include:
Download amendments to your logs for the current or previous day(s)
Download notes for a DVIR after it has been reviewed
Download inspection checklists and other configuration settings that have changed since you signed in
To requests logs:
1.
From the Driver Overview screen, tap Options ( ).
2.
Tap Request Logs.
3.
Tap Yes to confirm the request.
The Logs Pending icon ( ) appears in the status bar indicating the device is waiting for driver logs to
be synchronized.
Once completed, a screen appears confirming that logs are now up to date and your name.
Reviewing Logs
This option is visible if you have uncertified logs or if an HOS Admin user (non-driver) has proposed an edit to
your log that requires your attention.
Note. If you have uncertified logs or proposed edits that require review, you will notice an orange flag in
the upper-left corner of the Options ( ) button.
Standard, Pro, Enterprise ELD
Link:https://help.wextelematics.com/docs/eld-driver-reference/ Last Updated:March 6th, 2018
ELD Driver Reference
Copyright ©2019 Wex Telematics Page: 20 of 48
/


