
SONY.
3-861-907-22
Trinitron °Color TV
Operating Instructions
KV-2OV80 KV-27S40 KV-27V40
KV-27S45 KV-27V45
KV-27S65 KV-27V65
© 1997 by Sony Corporation

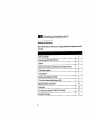
Him Table of Contents
Welcome! ........................................ 3
Precautions ...................................... 3
Using This Manual .......................... 3
Connecting and Installing the TV
Mnki. HCin._lt hnln .......... ,l
Cable or Antenna Connections ...................... 5
Connecting direrlly to cable
I)l' inl ii1111,111111 ...................................
{ "rlhht iIlill _lliillllilri
Cable Box Connections ................................... 6
Cable box .......................................................... 6
Cable box and cable ........................................ 6
VCR Connections ............... _............................. 7
Connecting an antenna/cable "IV
system with a VCR .......................... 7
Connecting a VCR and "IV with a
cable box ........................................... 7
DBS Connections ............................................. 8
Connecting a DBS receiver ............................ 8
Connecting a DBS receiver and a
VCR .................................................... 9
Additional Connections ................................ 10
Connecting a DVD Player ........................... 10
Connecting an audio system ....................... 10
Connecting two VCRs for tape
*.,illl.g ti_lll g MI bNI'III 11(( H rl' .., I I
Connecting a camcorder .............................. 11
Basic Set Up
Using the remote control Move &
Select buttons ................................. 12
Adjustments bars ........................................... 12
Oil _'rtt, il I lell_/lnsirtit'lions ....................... ]2
Using your New TV
Settingup theTV automatically ..................13
Watching the TV ............................................14
Watching two programs at one
time--- PIP ....................................... 16
Using your Menus
Learning menu selection .............................. 18
Using the VIDEO menu ................................ 19
Using the AUDIO menu ............................... 20
Using the TIMER menu ................................ 22
I Illill_ Ihl_ HI_+I"I I1' lllltllii .............................. 2_1
Operating video equipment
I_rngrannnllll4 Ihe rt_lmltP ............................. _(I
Operating a cable box or DBS
receiver
Programming the remote ............................. 28
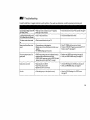
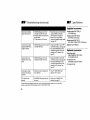
Troubleshooting ........................... 29
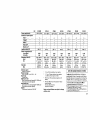
Specifications ................................ 30
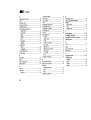
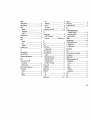
Index .............................................. 32

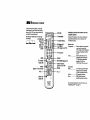
JrRemote Control
In the instructions that follow, we will refer
te the buttons on your remote controI. Model
shown i_ RM-Y167, your remote control may
not look like the one illustrated.
Keepthisflap unfolded and lookto this page
SYSTEM OFF
(page 15)
TWVTR
(page 15)
DISPLAY
SLEEP
JUMP
_TV/DBS
(page 20)
RESET
(pages19,20 and 22)
VOL+/-
CODE SET
(page 26)
_
-:®;
MUTING
TV(POWER)
TV (FUNCTION)
PIP(page 16)
"IV/VIDEO
ANT (page 5 and 15)
-- MTS/GUIDE (page 21)
Select buttons
(page 12 and 18)
MENU
-- CH +/-
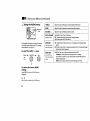
Getting to know the buttons on the
remote control -
Names of the buttons on the remote contrgl are
presented in different colorsto _prese_t the
available functions.
Button color
Transparent ......... Press to select the component
you want to control; e.g.
VTR (VCR)/DVD, D_S (Direct
Broadcast Satellite)/CABLE,
or 'IV.
Green ............... Buttons relevant to power
operations, like turning the
TV, DBS (Direct Broadcast
Satelllte)/CABLE, or
VTR (VCR)/DVD on or off.
Label color
White ............... TV/VTR (VCR)/DVD/DBS
(Direct Broadcast Satellite)
/CABIE operation buttons.
Yellow ............... PIP operation buttons.
Blue ................. DBS (Direct Broadcast
Satellite) operation buttons.
For a detailed explanation of most buttons, see
"Watching the TV" on page 14.

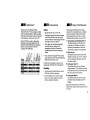
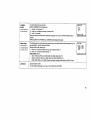
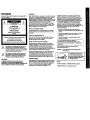
Welcome! Precautions
Using This Manual
Thank you for purchasing the Sony
Trinitron ®Color TV. This manual is written
for the models listed below. Before reading,
check the model number located on the front
of this manual or on the rear of your TV.
Model KV-27S45 is used for illustration
purposes. The screens displayed are for
model KV-27V65. Differences in operation
features are indicated in the text; tor
example, "KV-27S45 only".
Model
Number
KV-2OVSO
KV-27S45
KV-27V40
I(V-27V65
Safety
• Operate the TV only on 120 V AC.
• The plug is designed, for safety purposes,
to fit in the wall outlet only one way. If
you are unable to insert the plug fully into
the outlet, contact your dealer.
• If any liquid or solid object should fall
inside the cabinet, unplug the TV
immediately and have it checked by
qualified personnel before operating it
further.
• If you will not be using the TV for several
days, disconnect power by pulling the plug
itselL Never pull on the cord.
For details concerning safety precautions, see the
supplied leaflet "IMPORTANT SAFEGUARDS".
Installing
• To prevent internal heat build-up, do not
block the ventilation openings.
• Do not install the TV in a hot or humid
place, or in a place subject to excessive
dust or mechanical vibration.
This manual is divided into four major
sections. We recomme2ad that you carefully
review the contents of each section in the
order presented to ensure that you fully
understand the operation of your new TV.
1 Connecting and Installing the TV
This section guides you through your
initial set up. It will show you how to
connect to your antenna or cable, and
connect any accessories or components.
2 Basic Set Up
This section teaches you the basic skills
needed to operate your new TV. It shows
you how to operate special functions of
the remote control.
3 Using your New TV
This section shows you how to begin
using your new TV. It will show you how
to use the Easy Set Up Guide feature, and
how to use your remote control.
4 Using your Menus
This section teaches you how to access
on-screen menus and adjust your TV's
settings.
Instructions in this manual arewritten for the
remote control. Similar controls may befound on the
TV console.

_" ! Connecting and Installing the TV
Making Connections
Refertothetablebelow,itwilldirectyou to thediagramsuitabletothecomponents you willbe
connecting.
Cable or antenna only 5
Cable and antenna (KV-27S65, 27V65 only) 5
Cable box 6
Cable box and cable to view scrambled channels (KV-27S65, 27V65 only) 6
VCR and cable or antenna 7
VCR and cable box 7
Direct Broadcast Satellite Receiver (DBS) 8
VCR and Direct Broadcast Satellite Receiver (DBS) 9
Digital Versatile Disc receiver (DVD) 10
Audio system 10
Two VCRs for tape editing (KV-27V40, 27V45, 27V65 only) 11
Camcorder to view tapes 11
4

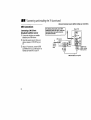
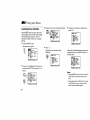
Cable or Antenna Connections c
Connecting directly to cable or an
antenna
The connection you choose will depend on the
cable found in your home. Newer homes will
be equipped with standard coaxial cable
(see A); older homes will probably have
300-ohm twin lead cable (see B); still other
homes may contain both (see C).
A
B
• VHF only
or
• VHF/UHF
or
• Cable
75-ohm (Rearof TV)
coaxialcable VHF/UHF
300-ohm twin (Rear of TV)
• VHF only lead cable VHF/UHF
or
• UHF only
or
• VHF/UHF Antennaconnector
75-ohm coaxial cable
• VHF _l='_ (RearofTV)
EAC-66 U/V mixer
• UHF =====(_'J| #
(not supplied)
300-ohmtwin leadcable
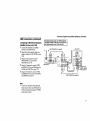
Cable and antenna
• KV.27S65,27V65only
If your cable provider does not feature local
channels, you may find this set up convenient.
Select Cable or ANT mode by pressing ANT
on the remote control. You will be able to
alternate between the two input sources.
(Rear of TV)
CATV cable AUX
aD'-- l
(No connection "TO TO CONVERTER
CONVERTER" in this case)
Antenna cable
VHF/UHF
Note
• In order to receive channels with an
antenna, you will need to turn your CABLE
to OFF (see page 23) and perform the
AUTO PROGRAM function.

Connecting and Installing the TV (continued)
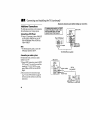
Cable Box Connections
Some pay cable TV systems use scrambled or
encoded signals that require a cable box* to
view all channels.
Cable box
1 Connect the coaxial connector from your
cable to the IN on your cable box.
2 Using a coaxial cable, connect OUT on
your cable box to VHF/UHF on your TV.
Cable box and cable
• KV-27S65,27V65only
For this set up, you can switch between
scrambled channels (through your cable box),
and normal (CATV) channels by pressing
ANT on your remote control.
Notes
• Your Sony remote control can be
programmed to operate your cable box.
(see page 28)
• When using PIP, you cannot view the
window picture with the AUX input.
I fyouwillbecontrollingaflchannelselection I
throughyour cablebox,youshouldconsiderusing
the CHANNELFIXfeature discussedon page23.
(Rear of TV)
(;able VHF/UHF
iN I--_ OUT
*Cablebox
If you are connecting a cable box through the AUX input and would I
like to switch between the AUX and normal (CATV) input you should
consider using the CHANNEL FIX feature discussed on page 23.
*Cable box (Rear of TV)
scrambleo VERTE
7S-ohm coaxial v
(signal)
cable (not supplied) VHF/UHF°
CATV cable
(unscrambled channels)
6

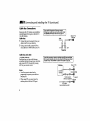
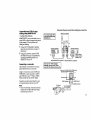
VCR Connections
Connecting an antenna/cable TV
system with a VCR
1 Attach the coaxial connector from your cable
or antenna to IN on your VCR+
2 Using A/V connectors, connect AUDIO and
VIDEO OUT on your VCR to AUDIO and
VIDEO IN on your TV (Yellow-VIDEO,
White-AUDIO Left, Red-AUDIO Right).*
3 Using a coaxial connector, connect OUT on
your VCR to VHF/UHF on your TV.
• If you a_e connecting a monaural VCR, connect only the
single white audio output to the left input on your "IV.
Disconnect aft power sources before making any connections.
VCRmust be connected and
turned on to operate PIP
(KV-27S45, 271/45 only).
Coaxial cable
VCR
m_ _ AmOR_L _0_ SW_
1 " _ _1
(Rear of TV)
VMC-810S/820S (not supplied)
Ired)
[white)
(yellow)
Connecting a VCR and lrv with a
cable box
You will need a splitter (not supplied) for the
following connection.
1 Connect the single (input) jack of the splitter
to your incoming cable connection. Connect
the other two (output) jacks (using coaxial
cable) to IN on your cable box and VHF/UHF
on your TV.
2 Using a coaxial connector, connect OUT on
your cable box to IN on your VCR.
3 Using A/V connectors, connect AUDIO and
VIDEO OUT on your VCR to AUDIO and
VIDEO IN on your TV (Yellow-VIDEO,
White-AUDIO Left, Red-AUDIO Right).
For optimum picture quality, use S VIDEOinstead of I
the yellow AN cable. S Video does not provide sound,
your audio connectors must still be connected.
1
Cable
Splitter Cable box
(not supplied)
Coaxial cable
VCR
[+:
(Rear of TV)
t
VMC-810S/820S (not supplied)
(redl
(white)
[yellow)
7

_ _ Connecting and Installing the TV (continued)
Disconnect all power sources before making any connections.
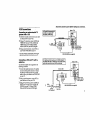
DBS Connections
Connecting a DBS (Direct
Broadcast Satellite) receiver
1 Connect the cable from your satellite
antenna to your DBS receiver.
2 Attach the coaxial connector from your
cable or antenna to VHF/UHF on your
TV.
3 Using A/V connectors, connect AUDIO
and VIDEO OUT on your DBS receiver to
AUDIO and VIDEO IN on your TV.
For optimum picture quality, use S VIDEO (Rear of TV)
instead of the yellow A/V cable. S Video does L
not provide sound, your audio connectors _©
muststill beconnected. 2
wFu_
Satellite I _c_ _)_)_ _1 _L_l
cable _ AUDIO-R (red)
V _ AUDIO-L(white)
3 _ VIDEO (yellow)
/
I
VMC-810S/820S (not supplied)
8

DBS Connections (continued)
Connecting a DB$ (Direct Broadcast
Satellite) receiver and a VCR
1 Connect the cable from your satellite
antenna to your DBS receiver•
2 Attach the coaxial connector from your
cable or antenna to VHF/UHF IN on your
VCR.
3 Using a coaxial connector, connect
VHF/UHF OUT on your VCR to
VHF/UHF on your TV.
4 Using A/V connectors, connect AUDIO
and VIDEO OUT on your DBS receiver to
AUDIO and VIDEO IN on your VCR.
5 Using A/V connectors, connect AUDIO
and VIDEO OUT on your VCR to AUDIO
and VIDEO IN on your TV.
Disconnect all power sources before making any connections.
For optimum picture quality, use S VIDEO instead of
the yellow AN cable. S Video does not provide sounc
your audio connectors must still be connected.
DBS receiver
VMC-810S/820S (not supplied)
I VCR _ I
(Rear of TV)
t
VMC-810S/820S (not supplied)
iv_o
EAUDIO-R (red)
AUDIO-L (white)
VIDEO (yellow)
Note
• To view from the DBS or VCR, select the
video input to which your DBS receiver or
VCR is connected by pressing TV/VIDEO
on the remote control.
: 9

Connecting and Installing the 71/(continued)
Disconnect all power sources before making any connections.
Additional Connections
The following connections are for accessories
that will enhance your viewing options.
Connecting a DVD Player
1 Using A/V connectors, connect LINE OUT
on your DVD to VIDEO IN on your TV
(Red-AUDIO Right, White-AUDIO Left,
Yellow-VIDEO).
Note
• For the best picture quality, connect the
DVD player directly to the TV.
For optimum picture quality, use S VIDEO
I instead of the yellow AN cable. S Video
does not provide sound, your audio
connectors must still be connected,
(Rear of DVD player)
1 _ AV outputs
__ (Rear of TV)
_ AUDIO-R (red)
_-- AUDIO-L (white)
VIDEO (yellow)
VMC-810S/8ZOS (not supplied)
Connecting an audio system
For enhanced sound, connect your audio
system to your TV.
1 Using AUDIO connectors, connect AUDIO
OUT on your TV to one of the unused line
inputs (e.g. TV, AUX, TAPE 2) on your
stereo (White-AUDIO Left, Red-AUDIO
Right).
2 Set your stereo to the chosen line input
(e.g. TV, AUX, TAPE 2). Refer to page 20
of this manual for additional audio setup
instructions.
(Rear of TV)
2
RK-74A
(not supplied)
I-ine
10

Connecting two VCRs for tape
editing using MONITOR OUT
• KV-27V40, 27V45, 27V65 only
MONITOR OUT gives you the ability to use a
second VCR to record a program being played
by the primary VCR or to perform tape
editing and dubbing.
1 Connect the VCR intended for playback
using the setup instructions on page 7 of
this manual.
2 Using A/V connectors, connect AUDIO
and VIDEO IN on your VCR intended for
recording to MONITO R AUDIO and
VIDEO OUT on your TV.
Connecting a camcorder
This connection is convenient for viewing a
picture directly from your camcorder.
Using A/V connectors, connect AUDIO and
VIDEO OUT on your camcorder to AUDIO
and VIDEO IN on your TV (Yellow-VIDEO,
White-AUDIO Left, Red-AUDIO Right).
Connection can also be made directly to your
A/V input located on the rear of your TV.
Note
• If you are connecting a monaural camcorder,
connect only the single white audio output
to the left input on your TV.
Disconnect all power sources before making any connections.
I You cannotchange video I
inputs while editing using
[ MONITOR OUT. [
(Rear of KV*27V65
VCR (for playback) VCR (for recording)
• . . _ " II III . . . _
1_ _ _ 2_ VIDEO lyell°w)
AUDIO-L (white)
AUDIO-R Ired)
i
VMC-810S/820S (not supplied) VMC-810S/820S (not supplied)
If you have an S Wdeo equipped
camcorder, you can use an 5 Video
connection for optimum picture quality.
(Front of KV-27V40, 27V45, 27V65 only)
VIDEO (yellow)--_ _L_- AUDIO-R (red)
VMC-810S/820 v_S _ _ AUDIO-L (white)
AV output _C_=_ (n°t suppli_O)S _
11

JB i" Basic Set up
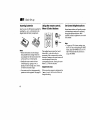
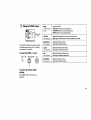
Inserting batteries
Insert two size AA (R6) batteries (supplied) by
matching the + and - on the batteries to the
diagram inside the battery compartment.
Notes
• Remove the batteries to avoid damage
from possible battery leakage whenever
you anticipate that the remote control will
not be used for an extended period.
• Handle the remote control with care.
Avoid dropping it, getting it wet, or
placing it in direct sunlight, near a heater,
or where the humidity is high.
• Your remote control can be programmed to
operate most video equipment. (see page 26)
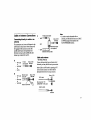
Using the remote control,
Move & Select buttons
_ove
The supplied remote control has "arrow"
buttons (4', _., _,, ,_,) which allow for
movement of the on-screen selector in four
directions. Pressing on the outer buttons will
cause the selector to move in the
corresponding direction. Pressing the center
button (CE) ) will select the item.
Adjustments bars
When menu items present an adjustment bar
( _ or --,-,-), use the arrow buttons to
change the setting.
On-Screen Helpllnstructions
Several menu windows will provide prompts
and instructions to assist you in navigating
through the different functions. When
presented, use these to supplement the instru_tio-ns
in this manual.
Note
• To reset your TV to factory settings, turn
the TV on. Then, while pressing the RESET
button, press the POWER key on your TV.
The TV will turn itself off, then back on.
(except KV-20V80).
12

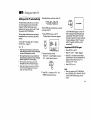
Using your New TV
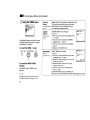
Setting up the "IV automatically
The Easy Setup Guide allows you to set the
on-screen language and set all receivable
channels. The Easy Setup Guide screen
appears every time you lama on the TV until
you perform AUTO PROGRAM.
The Easy Setup Guide feature does not apply for
installations that use a cable boxfor all channel
selection.
To set up the TV manually, refer to "Using the
SET UP menu" on page 23.
Tips "_"
• performthisfunctionduringtheday, withtheantenna
and_ cableproperly cannected, to ensunethat all available
channels will bebroadcasting and receivablc.
• AfleruaingtheEasySetupGuideyouunllstillhavethe
option ofadjusting atry ofthe system settings,likeskipping
channels, through the SET UP menu (page 24).
• TheTVmustbesettotheTVinputtoexecuteAIdTO
pROGRAM. Puss ANT until a channelnumberappears.
• lfyourcableorantennaisconnectetltaAUX, then
press ANT until AUX appa_ next to thechannel
number. (KV-27S65, 27V65 only)
Using the buttons on the front of the TV:
oO {ZIJO
For KV-27V65, the control buttons are located
on the top of the TV.
1 Press POWER to turn on the TV.
The Easy Setup Guide screen appears.
POWER I B'__I_: ICH÷]
_ EN_I_I{I_: [CN-]
_lk_[I _" tiP: [tO_+]
_1'11 : [tO_-]
First Pl_ c_nn_t
e_ble/_tm.
Pttss ISI_llPI'_ _it:
2 (except Canadian models)
Press CH + to select English screens or
CH - to select Spanish screens.
- CHANNEL +
] Press VOL + to continue or VOL- for a
DEMO of functions and menus.
-- VOLUME+
[_ fl_JT[2 PROfiRgP1
AUTO PROGRAM appears and the TV
starts scanning and presetting chartnels
automatically. When all the receivable -
channels are stored, the lowest numbered
channel is displayed. If the TV receives
cable TV channels, CABLE is s_ ON
automatically.
To perform AUTO SET UPagain
• Press SET UP on the TV.
• PressCH + orCH - to select a language.
• Press VOL + to restore factory settings
(CONTINUE TO AUTO PROGRAM? will
appear on the screen). Press CH + to
continue or CH - to exit.
• Press SET UP to exit.
Note
• When you perform AUTO PROGRAM,
your CHANNEL FIX, CHANNEL BLOCK
and ON/OFF TIMER settings will be
erased.
13

Using your New TV (continued)
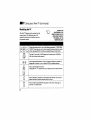
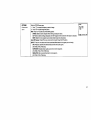
Watching the TV
All of the TV featurescan be accessed via the
remote control. The following chart will
explain the function of the buttons found on
your remote control.
REFER TO THE
ILLUSTRATION OF THE
REMOTE CONTROL ON THE
INSIDE FRONT COVER OF
THIS MANUAL AS YOU
REVIEW THIS CHART
Activate the remote control for use with the following components: TV, DBS/CABLE,
VTR/DVD. Press when you want to control connected components with your remote
control (see pages 26-28 for instructions on programming your remote control)
cZ) cD
POWER
(_ Turns the "iV on and off. If VIDEO appears on the screen, press TV/VIDEO or
ANT until a channel number appears.
(_. _ Use for direct channel selection. Press 0-9 to select a channel, the channel will
change after 2 seconds, or you can press ENTER for immediate selection.
CH
Press to scan through the channels.
Keeping the CH + or - pressed aflows you to rapidly scan to the desired channel.
©
ou.P Press to alternate or jump back and forth between two channels. You can jump
O between the last two channels selected with the 0-9 keys.
_,_,mNa Press to mute the sound (MUTING will appear on the screen). Press again or
O press VOL + to restore sound.
14

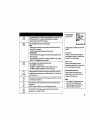
SLEEP
DIe,PLay
Press repeatedly until the TV displays the approximate time in minutes (30, 60, or
90) that you want the TV to remain on before shutting off automatically.
Cancel by pressing until SLEEP OFF appeam.
Press repeatedly to step through available displays:
Statue
Channel number, current time, channel caption (if set) and Mufti-Channel TV
Sound (MTS) are displayed.
The MTS mode indication disappears after three seconds.
CAPTION VISION
CAPTION VISION will be displayed on the screen if the broadcaster offers this
service. (see right)
To cancel the display, press DISPLAY repeatedly until DISPLAY OFF appears.
D/SPLA Y OFF disappears after three seconds.
wN,_o Press repeatedly to step through available video inputs:
"IV and VIDEO 1 (KV-27S40 only)
TV, VIDEO 1 and VIDEO 2 (KV-20V80, 27S45, 27S65, 27V40 only)
IV, VIDEO 1, VIDEO 2 and VIDEO 3 (KV-27V45, 27V65 only)
_rr Press to change the VHF/UHF input to the AUX input (KV-27S65, 27V65 only).
(_ For detailed connection information, see '_Cable and antenna" or "Cable box and
(AUX input) cable" on pages 5.6.
TVlVTR
+O Press when you are finished using a VCR and you want to switch to the TV input.
Your VCR power will remain on.
M_ Press this button to cycle through the Multi-channel TV Sound (MTS) options.
O (see page 21).
Gu_o_ GUIDE is a feature of DBS, refer to your DBS operation instructions.
SYS'nEM The SYSTEM OFF button allows you to turn off the TV and all connected
OFF
equipment at once. (Except KV-20V80)
CAPTION VISION
(Closed Caption)
LP
(_h_EL SET UP
F_tJORI TE C_
C_VdEL BLOG<
VIDEO _L
_3_1_3_ UISION:CCI
SeIect _ Exit_
Some programs are broadcast with CAPTION
VISION.
CCl, 2, 3 or 4
Shows you e printed version of the dialog or
sound effects of a program. (The mode should
be set to CC1 for most programs)
TEXT1, 2, 3 or 4
Shows you network/station information
presented using either half or the whole screen.
It is not usually related to the program.
XDS (Extended Data Service)
Shows a network name, program name,
program length, and time of the show if the
broadcaster offers this service.
Note
• Poor reception of TV programs can cause
errors in CAPTION VISION and XDS.
Captions may appear with a white box or
other errors instead of intended text.
15

Using your New TV (continued)
Watching two programs at
one time - PIP
The Picture-in-Picture (PIP) feature allows you
to view two channels simultaneously, one in
the full size "main" picture and one in a smaller
"window" picture. This means that two
separate tuners must be available to provide
the two signals.
Certain models (KV-27S45, 27V45 only) are
equipped with a single tuneT.This simply means
that a VCR must be connected and turned on for
PIP to operate.
Tip "_÷
To ensure a correct single tuner PIP connection
(KV-27S45, 27V45 only), make sure the following list
is complete before using PIP:
• A cable or antenna is connected to the VCR
• The VCR is connected to your TV
• The VCR is turned on
(for detailed connection infornmtion, see pages 5-7)
Note
• You must press TV (FUNCTION) before you
can control PIP with the yellow labeled buttons.
16
_ EFER TO THE ILLUSTRATION OF
THE REMOTE CONTROL ON THE
INSIDE FRONT COVER OF THIS
MANUAL AS YOU REVIEW THIS
CHART
The sound of the main Input-source mode
picture is received, or TV channel for
/the main picture
Main _ "_ 61/ Input-source mode
picture -- or TV channel for
Window -
Press once to display the window picture (1/9 size).
Press again to reduce the size ofthe window picture (1/16 size).
Press a third time to remove the window picture.
PIP
W/VIDEO Press repeatedly to step through available video inputs:
(_) TV, VIDEO 1, VIDEO 2, and VIDEO 3 (KV-27S45, 27S65, 27V45,
27V65 only)
If you have a single tuner, your PIP input source is the VCR.
AUDIO Press to altsmate sound between the main picture and the window
(_ picture. A _ will appear for a few seconds to indicate which picture is
receiving sound.

TV/VTR
+©
CH
-©
Press to change the rv channel in the window picture. (KV-27S65, 27V65 only)
For models KV-27S45, 27V45, you must press VTPJDVD (FUNCTION), then use
the main CH +/- buttons to change channels. (see right)
POSITION Press to move the location of the window picture (counterclockwise) around the
(_ main picture.
FREEZE Press to freeze the window picture. Great for copying down phone numbers,
(_ addresses, recipes, etc.
Press FREEZE again to restore the previous screen(s).
SWAP Press to switch the audio and video of the main picture and the window picture.
(_ Each time you press SWAP, the picture and sound of the two will be swapped.
Any channels being received through the AUX jack cannot be displayed as a
window picture. (KV-27S65, 27V65 only)
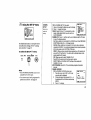
Changing channels with a single
tuner PIP
• KV-27S45, 27V45 only
1 Press TV/VlDEO untilyou reach the TV
input.
2 Press PIP (the window picture appears).
To change the window picture:
1 Press VTPJDVD (FUNCTION).
2 Press the main CH +/- buttons to change
channels,
To change the main picture:
1 Press TV (FUNCTION).
2 Press the main CH +/- buttons to change
channels.
Note
• If you have the same program in both the
window and the main picture and cannot
change the channel in the window; p'sss
TVNIDEO untilyou reach the TV input in the
main picture.
17

Using your Menus
Learning menu selection
Use the MENU button to access a menu and
use the select buttons (4. or €) to alter settings.
Use the following example, in which we
activate the CABLE, to learn how to modify
settings.
1 Press the MENU button.
The main menu appears.
(_ M_: VIUIO
SS m,m_,l,., .....
/t40v,_ m S_l_:tt_ Exit _J
2 Press _,or € to highlight the desired menu
(in this case SET UP _) and press _ to
select it.
CF_ SET UP
FPkJORITE CHflNNEL
CFW4NNI:LBLOCK
VIDFO LP_L
C_€_TI_ UISION:CCI
Select(_ Exit_
18
3 Press $ or € to move to the desired option.
VIDEO BLL_I3EI._
_elect (_9Exit (B)
4 Press C_).
Options for your selection will be
displayed.
_C_BLE: O_F
CFIqNNEL FIX: OFF
(%UTO PRI](J_
CHI_i_qE]L5KIp/l_O
_L CPPT IO_l
Select_ Exit_
5 Press # or € to make your selection and
press (i).
l O_IN__ SET LP l
I'C_IBLE: ON
CFKaWNEL 5K Ip_DO
When you are finished making changes to the
selected menu, choose _MENU to return to
the main menu.
FA4_ORITE CHANNEL
CF_QNNEL BLOCK
O_TION UISION:CCI
_l_t_ Exit_
Notes
• Pressing MENU on the remote control will
allow you to exit from the menus at any
time.
• If any menu items are "blacked out", press
the ANT button on your remote control
until a channel number appears.

[] Using the VIDEO menu
_;'UIUID I
B_I_SS ,,,=,,=,_........... Ad ustment
HUE ........................ bars
For detailed information on using the remote
to modify menu settings, refer to "Learning
menu selection" on page 18.
To select the VIDEO [] menu:
Display _ Highlight[] _ Select
CD
5
To restore the factory VIDEO
settings
PressRESETwhilethe VIDEO menu is
displayed.
MODE (except KV-2OV8O)
Customizedpicture VIVID: Select to receive a vivid, bright picture.
viewing STANDARD: Select to receive a standard picture.
MOVIE: Select to receive a softened picture.
PICTURE Adjust left to decrease picture contrast and soften the color.
P_ctureAdjustment Adjust right to increase picture contrast and create more vivid color.
BRIGHTNESS Adjust left to darken the picture.
PictureAdjustment Adjust right to brighten the picture.
COLOR Adjust left to decrease color intensity.
PictureAdjustment Adjust right to increase color intensity,
HUE Adjust left to decrease the green tones.
PictureAdjustment Adjust right to increase the green tones.
SHARPNESS Adjust left to soften the picture.
PictureAdjustment Adjust right to sharpen the picture.
19
Page is loading ...
Page is loading ...
Page is loading ...
Page is loading ...
Page is loading ...
Page is loading ...
Page is loading ...
Page is loading ...
Page is loading ...
Page is loading ...
Page is loading ...
Page is loading ...
Page is loading ...
Page is loading ...
Page is loading ...
Page is loading ...
-
 1
1
-
 2
2
-
 3
3
-
 4
4
-
 5
5
-
 6
6
-
 7
7
-
 8
8
-
 9
9
-
 10
10
-
 11
11
-
 12
12
-
 13
13
-
 14
14
-
 15
15
-
 16
16
-
 17
17
-
 18
18
-
 19
19
-
 20
20
-
 21
21
-
 22
22
-
 23
23
-
 24
24
-
 25
25
-
 26
26
-
 27
27
-
 28
28
-
 29
29
-
 30
30
-
 31
31
-
 32
32
-
 33
33
-
 34
34
-
 35
35
-
 36
36


Sony KV-27S40 Owner's manual
- Category
- CRT TVs
- Type
- Owner's manual
Ask a question and I''ll find the answer in the document
Finding information in a document is now easier with AI
Related papers
Other documents
-
Panasonic CT 27SX32 User manual
-
Philips 27-COLOR TV W-PIP-REMOTE-DBX STEREO 27PS60S User manual
-
-
Aiwa HV-FX9000U User manual
-
RCA CRT Television User manual
-
 Curtis Mathes CMC13410 User manual
-
moon 820S User manual
-
Toshiba 32AFX61 Owner's manual
-
Toshiba 36HFX71 Owner's manual
-
