Page is loading ...

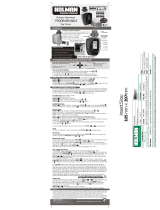
STATION MODELS – Available in 4 or 6 stations. (THIS MODEL IS A 4 STATION UNIT)
OUTDOOR MODEL – Supplied with 240VAC x 24VAC inbuilt transformer, lead with plug.
D
E
S
I
G
N
E
D
&
E
N
G
I
N
E
E
R
E
D
A
U
S
T
R
A
L
I
A
N
Instruction Manual
N10372
DIAL EZY GARDENER
0218P8002_Dial Ezy Gardener_Instruction_Manual-FINAL.indd 1 8/10/2015 9:19 am

Introduction 1
Glossary 2
Key Features 3
Programming Instructions
Introduction 4
Set automatic program 4
Programming example 5
Spare watering planner 6
General tips for easy programming 7
Programming
Set current time & correct day 8
Set calendar 8
Set start times 9
Set watering days 10-11
Set station run times 11-12
Manual Operations
Run a single station 13
Current test feature 13
Run a program 14
Stop watering 14
Stacking start times 14
Automatic back up 15
Other Features
Rain sensor 15-16
Rain delay 16
STOP all watering 17
Water budgeting & seasonal
adjustment
17
Special Functions
Current sensing and faulty
station skip 18
Fault indication feature 18
Clearing the programs 19
Store automatic programs 19
feature
Installation Instructions
Mounting the controller 20
Electrical hook-up 20
Field wiring connections 21
Power supply connections 21
Terminal block layout 22
Pump Start Relay Connection 22
Single phase pump installation 23
Master valve installation 23
(including rain sensor )
Station (valve) installation 24
Pump protection (system test) 25
Fault Finding Guide 26-27
Electrical Characteristics 28
Electrical outputs 28
Electrical power supply 28
Overload protection 28
Power failure 28-29
Servicing the controller 29
Guarantee
CONTENTS
0218P8002_Dial Ezy Gardener_Instruction_Manual-FINAL.indd 2 8/10/2015 9:19 am

1
Dial Ezy Gardener is available in 4 and 6 station congurations. Designed
to cover a wide range of applications from residential and commercial turf, to light
agriculture, and professional nursery.
This controller has a possible 2 separate programs with up to 8 starts per day.
The controller has a 7 day watering schedule with individual day selection per
program or a 365 calendar for odd/even day watering or selectable interval watering
schedules from every day to every 15th day. Individual stations can be allocated to
one or all programs and can have a run time of 1 minute to 12 hours 59 minutes or 25
hours if the water budget is set to 200%.
Holman has always been concerned with sustainable water usage. The controller
has many water saving features that can be used to maintain the highest standard
of plant quality with the least amount of water consumption. The integrated budget
facility allows global changes of run times without affecting programmed run times.
This allows for decreasing total water consumption on days of minimal evaporation.
INTRODUCTION
0218P8002_Dial Ezy Gardener_Instruction_Manual-FINAL.indd 1 8/10/2015 9:19 am

2
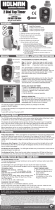
GLOSSARY
LARGE MENU BUTTONS
Easy operation with fast scroll
feature for entry and review.
INTERFACE
DECAL
LARGE HIGH CONTRAST LCD
Displays all programming
information.
FRONT MOUNTED
SENSOR SWITCH
ON/OFF switch for easy
access to override
QUICK PROGRAM
SELECTION KEY
The “Slide” key allows
faster program
entry and
review.
TERMINAL COVER
Easy to remove for
easy access.
LARGE SELECTION DIAL
Navigates through all
programming information.
0218P8002_Dial Ezy Gardener_Instruction_Manual-FINAL.indd 2 8/10/2015 9:19 am

3
KEY FEATURES
4 & 6 station models.
Toroidal high capacity transformer rated to 1.25AMP (30VA):
Outdoor model with an inbuilt transformer includes lead & plug.
2 programs, each of which has 4 start times. Maximum of 8 start times per day.
Station run times from 1 minute to 12 hours & 59 minutes.
Selectable watering options:
- Individual 7 day selection.
- Even, Odd or Odd -31.
- Interval watering day selection from every day to every 15th day.
Watering budgeting feature allows quick adjustment of the station run times by
percentage, from 10% to 200%.
Rain sensor input will turn off all stations or selected stations during wet periods, if a
sensor is installed.
Permanent memory feature will retain automatic programs during power failures.
Standard 9 volt block alkaline battery can be used to program the controller
remotely without AC power.
Manual functions:
- Run a program once.
- Run a single station, with current AMPS testing feature.
- “OFF” position, stops a watering cycle or to stop automatic programs during
winter.
Pump or master valve input is standard.
Real time clock backed up with 3V Lithium battery (pre-tted)
Current sensing and faulty station skip
0218P8002_Dial Ezy Gardener_Instruction_Manual-FINAL.indd 3 8/10/2015 9:19 am

4
PROGRAMMING INSTRUCTIONS
INTRODUCTION
This controller has been designed with 2 separate programs to allow different
landscape areas to have their own individual watering schedules.
A program is a method of grouping stations (valves) with similar watering
requirements to water on the same days. These stations will water in sequential order
and on the days selected.
Group the stations (valves) which are watering similar landscape areas together.
Examples: Turf, ower beds, gardens. These different groups may require
individual watering schedules, or programs
Plan your watering schedule completing the planner supplied at the back of this
book.
Set the current time and correct day of the week. If odd or even day watering
is going to be used, make sure the current year, month and day of the month is
correct.
HINT: To select a different program use the program slide swtich
. There are two
separate watering programs. Use the slide switch to move to the next program
number. This is handy for quick reviewing of previously entered information without
losing your place in the programming cycle.
SET AUTOMATIC PROGRAM
Set the automatic program for each group of stations (valves) by completing the
following three steps:
1. Set start times
This sets the time when the watering schedule is to commence.
Note: For each start time, all the stations (valves) selected for the program will
come on in sequential order. If two start times are set, the stations (valves) will
come on twice.
2. Set Watering Days
These are the selected days when the automatic system will be active.
3. Set Station Run Times
This sets the watering duration required for each station (valve).
0218P8002_Dial Ezy Gardener_Instruction_Manual-FINAL.indd 4 8/10/2015 9:19 am

5
PROGRAMMING EXAMPLE
A typical example of a 4 station system is outlined below as a guide to assist you
when planning your watering schedule. In this example all 2 programs are used, the
lawn areas are using gear drive sprinklers. The ower beds are being watered with
micro sprays.
PROGRAMMING INSTRUCTIONS
Back lawn
EVERY
SECOND
DAY
5
6
0218P8002_Dial Ezy Gardener_Instruction_Manual-FINAL.indd 5 8/10/2015 9:19 am

6
SPARE WATERING PLANNER
SCROLL
BACK
5
6
0218P8002_Dial Ezy Gardener_Instruction_Manual-FINAL.indd 6 8/10/2015 9:19 am

7
P
PROGRAMMING
This controller has been designed for quick intuitive programming.
Remember these simple tips for hassle free programming.
1. Complete the spare watering planner at the back of this book.
2. When setting, one push of the button will increment one unit.
3. Holding one button down will fast scroll through units.
4. During the programming, only ashing units are able to be set.
5. Adjust ashing units using the or
buttons.
6. Pressing
will scroll forward through the settings in an orderly sequence.
7
. Pressing
will scroll back to previous settings and setting can be changed.
The large dial is the primary
device for selecting an operation.
Rotate the dial to the function
you wish to alter or review.
The
1
2
the program slide switch is used
to select different programs. Select from two
programs.
Once you have selected the primary function
and program you wish to alter, you can then
use the
or
to change that function’s
value.
Only display elements that are ashing can be
altered with the
keys.
Use the
to scroll through other values
within the function that can be altered.
INCREASE
VALUE (+)
SWITCH
PROGRAM (P)
DECREASE
VALUE (-)
SCROLL
FORWARD
SCROLL
BACK
1
2
0218P8002_Dial Ezy Gardener_Instruction_Manual-FINAL.indd 7 8/10/2015 9:19 am

8
PROGRAMMING
Set current time & correct day
Turn the dial to “Set Clock/Calendar” position.
The minutes will be ashing. Use the
or
to adjust.
Press
button and the “hour” will ash. Use
or
to adjust.
NOTE: AM/PM must be set correctly.
Press
and the “day of the week” will ash. Use
or
to set the
correct day.
Set Calendar
NOTE: The calendar only needs to be set when selecting Odd/Even day watering in
areas where water restrictions may require this feature.
Press
button until the year, month and day are shown. The “year” will be ashing.
Use
or
to adjust if required.
Press
and the “month” will ash. Use
or
to adjust if required.
Press
and the “date” will ash. Use
or
to adjust if required.
HINT: To return to the clock, turn dial to another position.
Before proceeding, ensure the spare watering planner has been completed. From
your planner, you should be aware which stations (valves) are allocated to each
program. Set one program at a time to ensure that the schedules are completed
correctly.
0218P8002_Dial Ezy Gardener_Instruction_Manual-FINAL.indd 8 8/10/2015 9:19 am

9
Example: SET PROGRAM 1
Step 1 –
SET START TIMES
NOTE: all stations will come on in sequential order for each start time.
Turn the dial to “Set Start Times” and ensure that “Prog No 1” is showing. If not, then
use the
1
2
slide switch to select “Prog No 1”.
The “Start No” will be ashing. The display will show:
Use
or
to change the “Start No” if required, otherwise press
and the
“hour” will ash.
Use
or
to adjust if required.
NOTE: Ensure AM/PM position is correct.
Press
and the “minutes” will ash.
Use
or
to adjust if required
.
Each program has up to 4 start times. Should you require a second start time,
press
and ‘Start 1” will ash.
Advance to “Start 2” by pressing
The display will show:
Press
and proceed as per setting Start 1.
HINT: To toggle a start on or off press
or
when the hour is ashing.
To change to a different program either to review or alter, move the
1
2
slide
switch
.
PROGRAMMING
0218P8002_Dial Ezy Gardener_Instruction_Manual-FINAL.indd 9 8/10/2015 9:19 am

10
PROGRAMMING
Step 2 – SET WATERING DAYS
This unit has individual day selection, EVEN/ODD/ ODD -31 Date selection in
areas where water restrictions require this feature, or interval watering from every
day to every 15th day.
INDIVIDUAL DAY SELECTION
Turn the dial to “Set Watering days” and ensure that “Prog No 1” is showing. If not,
then use the
1
2
slide switch to select “Prog No 1”.
“MON” will be ashing. The display will show:
To turn Monday off press
the
button.
To turn it back on press the
button.
To advance to the next day use the
button, the display will then ash Tue. Use
or
to turn days ON or OFF
and advance to the next day using .
Remember to set all 7 days ON or OFF. Active watering days will be shown by the
under the DAY.
ODD/EVEN DATE SELECTION (Optional)
In some regions users are only allowed to water their gardens on odd dates if their
house number is odd, or even dates when their house number is even.
This controller allows this to be done simply by setting the relevant selection of odd
or even and setting the current date into the controller. The controller will account for
leap years.
If you require the odd/even date option, simply keep pressing the
button until
“Even” is shown. Press the
button and “Odd” will be shown. Press again
and “Odd -31” wil be shown.
This feature may be required in areas where water restrictions are enforced, and not
allowing watering on two odd dates together.
NOTE: Remember to set the 365 day calendar when setting the clock, or this feature
will be out of sequence (refer page 8 “set calendar”).
0218P8002_Dial Ezy Gardener_Instruction_Manual-FINAL.indd 10 8/10/2015 9:19 am

11
INTERVAL DAY SELECTION
Press the
button until “interval days” is ashing.
The display will show:
“Interval 1” will be ashing. This means the controller will
water every day. The display will show how many days
are left before an active schedule.
For example, if it showed “1” then in one day’s time the controller will run this program.
To change the interval day, press the
or
button.
Select from 1 to 15 interval days.
NOTE: When changing the interval day, the next active day is always changed to 1.
This means that tomorrow is the rst active day to run.
Step 3 – STATION RUN TIMES
This is the length of time that each station (valve) is scheduled to water on a
particular program. Maximum watering time is 12 hours 59 minutes for each station.
A station can be assigned to any or all of the possible 3 programs, if required.
Turn the dial to the “Set Station Run Times” position.
The display will show:
NOTE: This means that station 1 of program
1 has no run time programmed in it. The controller
has permanent memory so when the device is rst used
there will be no run times set. Unlike other controllers,
when there is a power failure, even if the battery is not
installed, the programmed values will be restored to the unit.
PROGRAMMING
0218P8002_Dial Ezy Gardener_Instruction_Manual-FINAL.indd 11 8/10/2015 9:19 am

12
PROGRAMMING
Continue until all the stations in Program1 have been set with a run time or if a
station(s) is not required to be active in this particular program, ensure that the run
time is set to “OFF”.
NOTE: To turn a station “OFF” press the
when the minutes are ashing, and
when the hours are ashing.
This completes the setting up procedure for automatic program 1.
Select from up to 2 programs using the
1
2
slide switch for different watering
schedules. Once on the desired number, follow the three steps to set an automated
program:
1. Set start Times
2. Set Watering Days
3. Set Station Run Times
TIP: Although the controller will run automatic programs with the main dial in any
position (with the exception of “OFF”), it is advisable to leave the main dial in the
“AUTO” position when not programming or running manual stations or programs.
Step 3 - Station Run Times (cont.)
Press
or
button to select the station (valve) number, and press the
button and the run time minutes will ash. Alter by using
or
.
Press the
button and the run time hours will ash. Alter by using
or
.
Press the
button and the current station will ash. Select the next station to
change by using
or
and proceed by pressing and alter using
or .
0218P8002_Dial Ezy Gardener_Instruction_Manual-FINAL.indd 12 8/10/2015 9:19 am

13
MANUAL OPERATIONS
Run a Single Station
The maximum run time for a station is 12 hours 59 minutes. To manually run a single
station once, turn the dial to the “Run Single Station”
position.
The display will show:
The default run time for a single station is 10 minutes.
Advance to the selected station by pressing
as many
times as required, and then press
to adjust the run time with
and
.
The controller will start running the selected station and the run time will decrement in
the display.
If there is a pump or master valve connected, “PUMP A” will be shown in the display.
Indicating that the pump/master is running. As soon as the single station run time has
elapsed, the unit will revert back to automatic mode. This means that if you forget to
turn the dial back to the “Auto” position, the controller will still run its automatic starts,
as scheduled. To turn the station off, change the position of the main dial, to “OFF”.
Current Test Feature
When the dial is in the “Run Single Station” position, press
button to show the
current AMPs for the selected station. As this controller has an electronic fuse (set
at 1.0AMPs), this is an important feature to show how much current each station is
drawing. If the current AMPs are higher than 1.0AMPs the electronic fuse will turn the
station “Off”. This usually means that there is a fault with the solenoid coil or a short in
the wiring. This fault needs to be xed as the controller will skip the faulty station in the
“AUTO” run mode and no watering will occur in that area of the garden.
The display will also show the faulty station number and beep until midnight.
Press to return to the station that you are testing. Each station can be tested by
pressing
and then .
0218P8002_Dial Ezy Gardener_Instruction_Manual-FINAL.indd 13 8/10/2015 9:19 am

14
MANUAL OPERATIONS
Run a Program
To manually run a complete program, rotate the dial to “Run Program”. The word
“OFF” will be ashing.
The display will show:
To enable program 1 to start press the
button.
The icon “OFF” will change to “ON”.
This program has now been enabled so that it can be
run. To make program 1 run, press the
button.
NOTE: So long as there are run times in program 1 then program 1 will start and
water the stations associated with it.
To select the next program move
1
2
program slide switch to program 2.
Enable program 2 to run by pressing the
button followed by
NOTE: to disable a program number, press the
button.
NOTE: When running programs in manual mode the “Budget %” will alter the
running times of each individual station.
Stop Watering
To stop an automatic or manual watering schedule, turn the dial to the “OFF”
position.
NOTE: For automatic watering remember to turn the dial back to the “Auto” position,
as “OFF” will stop any future watering cycles from occurring.
Stacking Start Times
Should you accidentally set the same watering start time on more than one program,
the controller will “stack” them in sequential order. All programmed start times will be
watered from the highest number rst.
0218P8002_Dial Ezy Gardener_Instruction_Manual-FINAL.indd 14 8/10/2015 9:19 am

15
OTHER FEATURES
Automatic Backup
This product is tted with permanent memory. This allows the controller to hold all
stowed values even in the absence of power sources, which means that programmed
information will never be lost. Fitting the 9 volt block battery is ideal for remote
programming and to show the display during power outages. However, if the battery
is not tted the real time clock is backed up with a Lithium coin battery that has been
factory tted. This means that when the power returns the clock will be restored to the
current time.
It is recommended that the 9V battery is tted and it is changed every 12 months.
A “Fault Bat” icon will show in the display when the battery has a week left to run.
When this occurs, replace the battery as soon as possible.
The 9V battery will show the display for 9 months without AC power and will go into
sleep mode after a minute if there is no AC power.
Note: If there is AC power the buttons will be responsive at all times.
In the sleep mode the clock will be shown but the dial/buttons will not be responsive
until
or are pushed to wake it up.
Rain Sensor
When installing a rain sensor, rst remove the the factory
tted link between the “C” and “R” terminals shown here,
by the plate.
Replace with the two wires from the rain sensor into these
terminals, polarity NOT required. Move the rain sensor
switch on the fascia to “ON”.
0218P8002_Dial Ezy Gardener_Instruction_Manual-FINAL.indd 15 8/10/2015 9:19 am

16
OTHER FEATURES
Turn the dial to “Set Rain Sensor” to enable individual
stations to be set rain sensor “ON” or “OFF”.
The display will show:
If the station is turned “ON” this means that the sensor
will control it, should it rain. The default mode is for all stations to be rain sensor “ON”.
Should you have a station (valve) that always needs to be watered, e.g. an enclosed
green house or plants that are under cover, then the rain sensor can be turned “OFF”
for these particular stations. This way when the sensor is wet they will still water. To
select a station to turn “OFF”. Press the
button, the rain sensor is now switched
off for this station.
TIP: To turn the station back “ON” press the
button. To advance to the next
station use the
button and the station number will increment. Do this operation
for all stations (valves) on the controller that need to be altered.
HINT: To disable the rain sensor and allow all stations to water regardless of the
setting, move the slide switch marked Rain/Sensor to the “OFF” position.
To reactivate it slide the switch to the “ON” position.
Rain Delay (Rain sensor cont...)
Different rain sensors react in different ways. The most common complaint about rain
sensors, is that they dry out too quickly, and allow the system to come on within hours
of a rain storm. To counter this problem the controller has a “Rain Delay” setting that
allows a specic delay time to elapse after the rain switch has dried out before the
controller will water again. Turn the dial to the “Set Rain Sensor” position. Then press
the
button. The rain delay value will now be ashing.
The display will show:
Press the
button to alter the rain delay time in
increments of 24 hours at a time.
A maximum delay of 9 days can be set.
0218P8002_Dial Ezy Gardener_Instruction_Manual-FINAL.indd 16 8/10/2015 9:19 am

17
OTHER FEATURES
Stop All Watering
To stop all watering cycles during winter, turn the dial to the “OFF” position.
The display will show “ALL OFF”:
This means that all automatic schedules will not come on,
but the programmed information is still retained in the
memory and the clock still keeps track of time even
though it is no longer being displayed.
To reactivate watering, turn the dial to the “Auto” position.
Water Budgeting & Seasonal Adjustment
The automatic station run times can be adjusted by percentage as the seasons
change. This will save valuable water as the run times can be adjusted quickly in
spring, summer, and autumn to reduce or increase water usage.
Ensure the dial is in the “Auto” position.
Press the
button.
The display will show:
This means that the run times are set to 100%, i.e.
if station 1 is set to 10 minutes then it will run for 10 minutes.
Should however the value change to say 50% then instead
of running for 10 minutes station 1 would now run for 50% of 10 minutes,
i.e. 5 minutes.
Conversely should the budget value be altered to show 200% then instead of running
10 minutes on station 1, it would run for 20 minutes. The budget calculation is applied
to all stations and all run times that are active.
To increase the budget percentage press the
, to decrease the budget
percentage press the
. The percentage value will increment or decrement in
multiples of 10%. The maximum value is 200% and the minimum value is 10%.
To return to the clock display press the
button
.
Should the budget value no longer be 100% then it
will be shown in the clock display, e.g. if we set the
budget to 200%
The display will show:
0218P8002_Dial Ezy Gardener_Instruction_Manual-FINAL.indd 17 8/10/2015 9:19 am

18
SPECIAL FUNCTIONS
Current Sensing and Faulty Station Skip
This unit has a M205 1AMP Glass Fuse to protect the transformer from power
surges, and an electronic fuse to protect the circuit from eld or valve faults. The
electronic fuse has a cut-off point of 1AMP and any eld fault drawing a current
higher than this will cause the unit to shut the station output off and then skip to the
next available station. This fault will be displayed as “Fuse Fault” and STN__. The
faulty station number will be shown in the display until 12:00pm and the unit will also
beep every 5 seconds. If there are multiple station faults, only the last station number
will be displayed, and the controller will clear the fault display at midnight and try
again at the next run time. The controller is “Short Circuit Proofed” and will try to run
the stations at the next available auto run time.
Note: To test or check the current for any station, move the Dail to “Run Single
Station”. Advance with
to the station number that you require and press .
The display will show the combined current AMPS that this station is using.
Note: This includes the combined pump/master current, as well as the selected
station.
Fault Indication Feature
The following fault indictations are shown in the display:
“NO AC” - Not connected to mains power or transformer not working.
“Fault Bat” - 9V battery not connected or at. Change battery.
“Fuse Fault Stn_ - Field wiring fault ot faulty valve as shown in the STN__.
Check and x eld fault.
0218P8002_Dial Ezy Gardener_Instruction_Manual-FINAL.indd 18 8/10/2015 9:19 am
/