Polycom SoundStation 2W User And Administrator Manual
- Category
- IP phones
- Type
- User And Administrator Manual
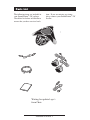
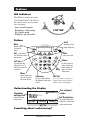
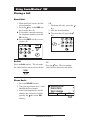
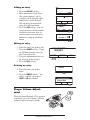
Polycom SoundStation 2W is a wireless, analog conference phone designed to facilitate effective business communication. With features like call hold, transfer, and conferencing, it enhances collaboration and productivity. Its user-friendly interface, adjustable volume controls, and clear display provide a seamless user experience. The SoundStation 2W is ideal for small to medium-sized conference rooms, offering high-quality audio for crystal-clear conversations.
Polycom SoundStation 2W is a wireless, analog conference phone designed to facilitate effective business communication. With features like call hold, transfer, and conferencing, it enhances collaboration and productivity. Its user-friendly interface, adjustable volume controls, and clear display provide a seamless user experience. The SoundStation 2W is ideal for small to medium-sized conference rooms, offering high-quality audio for crystal-clear conversations.


-
 1
1
-
 2
2
-
 3
3
-
 4
4
-
 5
5
-
 6
6
-
 7
7
-
 8
8
-
 9
9
-
 10
10
-
 11
11
-
 12
12
-
 13
13
-
 14
14
-
 15
15
-
 16
16
-
 17
17
-
 18
18
-
 19
19
-
 20
20
-
 21
21
-
 22
22
-
 23
23
-
 24
24
-
 25
25
-
 26
26
-
 27
27
-
 28
28
-
 29
29
-
 30
30
-
 31
31
-
 32
32
-
 33
33
-
 34
34
-
 35
35


Polycom SoundStation 2W User And Administrator Manual
- Category
- IP phones
- Type
- User And Administrator Manual
Polycom SoundStation 2W is a wireless, analog conference phone designed to facilitate effective business communication. With features like call hold, transfer, and conferencing, it enhances collaboration and productivity. Its user-friendly interface, adjustable volume controls, and clear display provide a seamless user experience. The SoundStation 2W is ideal for small to medium-sized conference rooms, offering high-quality audio for crystal-clear conversations.
Ask a question and I''ll find the answer in the document
Finding information in a document is now easier with AI
Related papers
-
Polycom NOT FOUND VTX 1000 User manual
-
Polycom NOT FOUND VTX 1000 User guide
-
-
Polycom SoundStation IP 3000 Quick Reference Manual
-
-
Polycom VTX 1000 User guide
-
Polycom SoundStation IP Quick start guide
-
-
-
Other documents
-
Serene HDPhone HD 65 Operating instructions
-
Spracht cp-2010 User manual
-
Poly SoundStation IP 7000 Quick start guide
-
Poly SoundStation2W Administrator Guide
-
Poly SoundPoint IP 650 User guide
-
-
-
Poly VVX 1500 D Administrator Guide
-
Poly VBP 6400-ST Series User guide
-