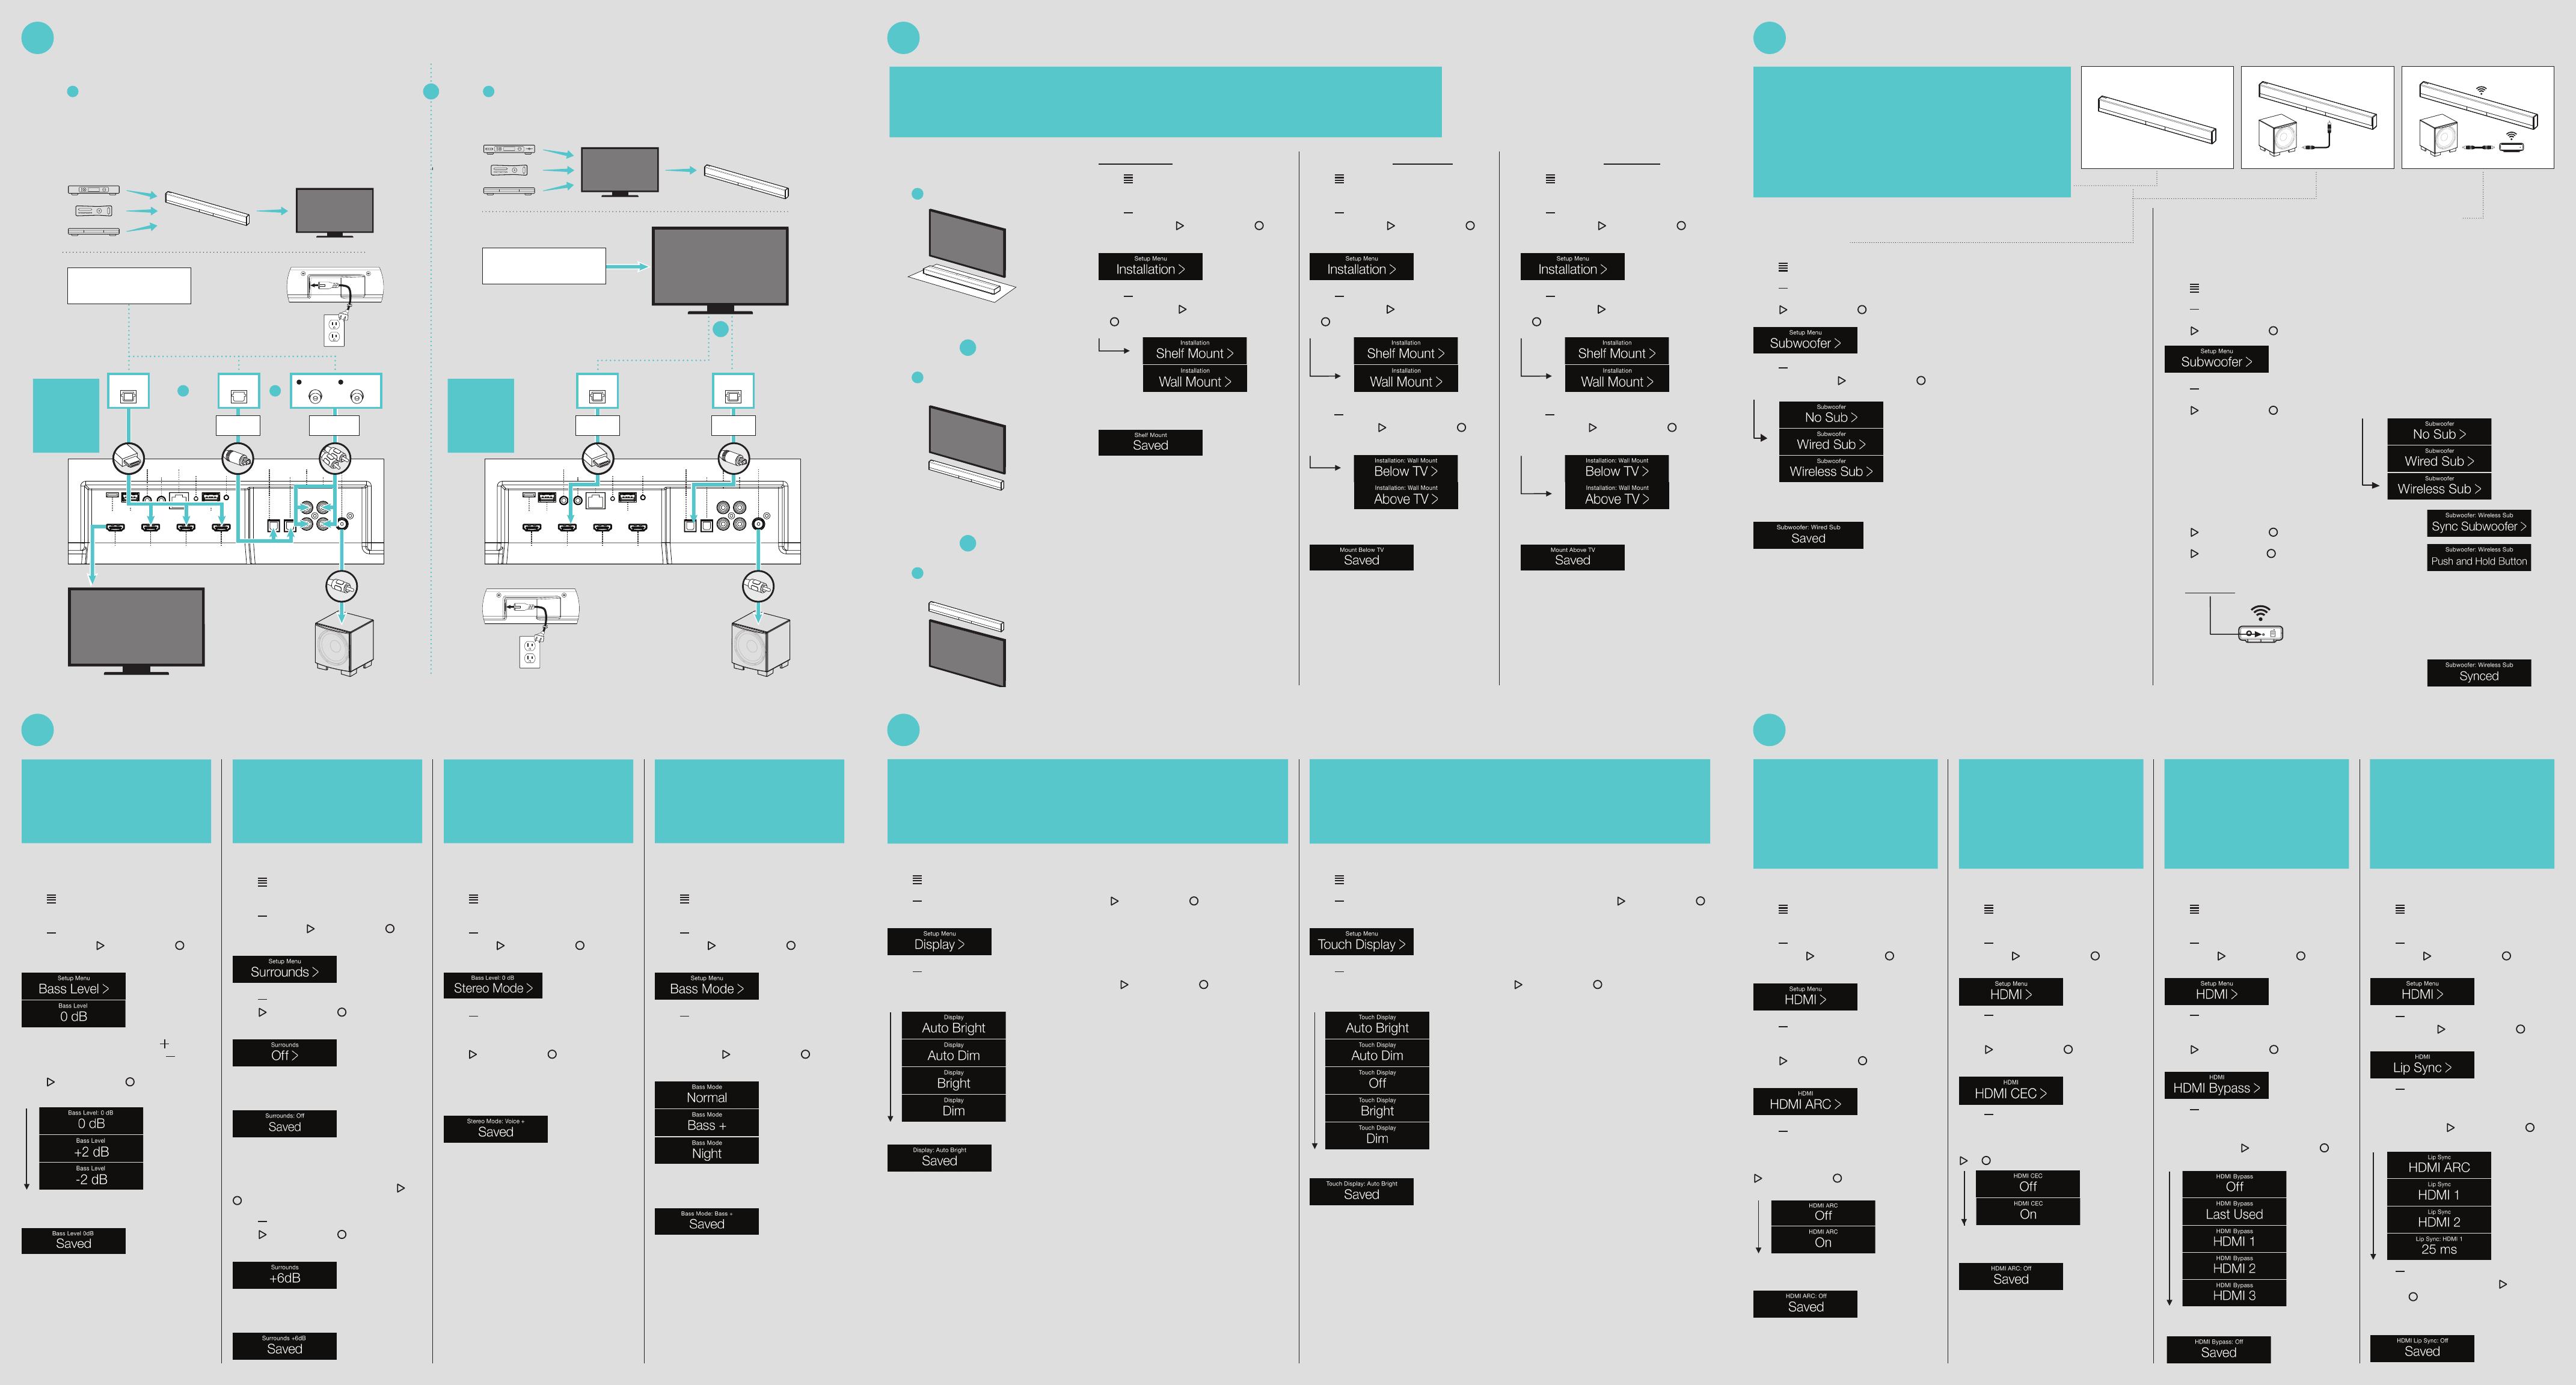
OPTIONS: Wired Sub or Wireless Sub (PW Soundbar ONLY)
Wired Sub
Press (Menu) on the Remote or the soundbar’s touch display.
Press
(Scroll Down) to scroll down to Subwoofer submenu.
Press
(Scroll Right) or (Select) to select the Subwoofer submenu.
Press (Scroll Down) to scroll down to the desired option, either: No Sub, Wired Sub or
Wireless Sub. Press
(Scroll Right) or (Select) to select Wired Sub.
If the selection was successful the soundbar’s display will indicate Saved.
Wireless Sub (PW Soundbar ONLY)
Connect a RCA cable from the subwoofer wireless receiver to your subwoofer and plug the
receiver in the wall outlet. The LED on the front panel of the PW Soundbar will blink continuously.
Once Synced, the LED will become Solid illumination.
Press
(Menu) on the Remote or the soundbar’s touch display.
Press
(Scroll Down) to scroll down to Subwoofer submenu.
Press
(Scroll Right) or (Select) to select the Subwoofer submenu.
Press (Scroll Down) to scroll down to Wireless Sub.
Press
(Scroll Right) or (Select) to select Wireless Sub.
Press (Scroll Right) or (Select) to select Sync Subwoofer.
Press (Scroll Right)or (Select) to select
Push and Hold Button.
Now Push & Hold the Sync button on the rear of the subwoofer receiver.
If the selection was successful the soundbar’s display will
indicate Synced. If the option was not successful the soundbar’s
display will indicate Failed.
SUBWOOFER STATUS:
Factory Default = No Sub
Configures how the soundbar handles the bass information.
NOTE! Your soundbar is designed to work with one subwoofer when
wired or wirelessly connected to a subwoofer. If multiple subwoofers are
desired, an RCA Y-Splitter cable can be used with either installation.
subwoofer
wireless
receiver
subwoofer
wireless
receiver
subwoofer
wireless
receiver
Acoustics: Bass Level / Surrounds / Stereo Mode / Bass Mode
Connections Installation
OPTIONS: Increase or
decrease dB
Press (Menu) on the Remote or the
soundbar’s touch display.
Press (Scroll Down) to scroll down to
Bass Level. Press (Scroll Right) or
(Select) to select the Bass Level submenu.
To increase the Bass Output press (Volume
Up). To decrease Bass Output press
(Volume
Down) . When the desired level is achieved,
press
(Scroll Right) or (Select) to select
the desired level
If your selection was successful the soundbar’s
display will indicate Saved.
OPTIONS: Off
Press (Menu) on the Remote or the
soundbar’s touch display.
Press (Scroll Down) to scroll down to
Surrounds. Press (Scroll Right) or
(Select) to select the Surrounds submenu.
Press (Scroll Down) to scroll down to Off.
Press
(Scroll Right) or (Select) to select
Off.
If the selection was successful, the soundbar’s
display will indicate Saved
If more output is required a +6dB option can
be enabled:
From the Surrounds submenu press the
or
enter the Surrounds submenu
Press
(Scroll Down) to scroll down to +6dB.
Press
(Scroll Right) or (Select) to select
+6dB.
If the selection was successful the display will
indicate Saved.
OPTIONS: Stereo Mode, Voice
+ or Wide
Press (Menu) on the Remote or the
soundbar’s touch display.
Press (Scroll Down) to scroll down to Stereo
Mode. Press
(Scroll Right) or (Select) to
select the Stereo Mode submenu.
Press (Scroll Down) to scroll down to the
desired option, either (Normal – default), Voice
+ or Wide. Once the desired option is displayed,
press
(Scroll Right) or (Select) to select
Normal, Voice + or Wide.
If the selection was successful, the soundbar’s
display will indicate Saved.
OPTIONS:
Bass Mode + or Night
Press (Menu) on the Remote or the
soundbar’s touch display.
Press (Scroll Down) to scroll down to Bass
Mode. Press
(Scroll Right) or (Select) to
select the Bass Mode submenu.
Press (Volume Down) to scroll down to
the desired option, either (Normal – default),
Bass + or Night. Once the desired option is
displayed, press
(Scroll Right) or (Select)
to select Normal, Bass + or Night.
If the selection was successful, the soundbar’s
display will indicate Saved.
Shelf Mount (Default)
Press (Menu) on the Remote or the
soundbar’s touch display.
Press (Scroll Down) to scroll down to
Installation. Press (Scroll Right) or
(Select) to select the Installation submenu.
Press (Scroll Down) to scroll down to
Shelf Mount. Press (Scroll Right)
or
(Select) to select Shelf Mount.
If your selection was successful the
soundbar’s display will indicate Saved.
Wall Mount – Below TV
Press (Menu) on the Remote or the
soundbar’s touch display.
Press (Scroll Down) to scroll down to
Installation. Press (Scroll Right) or
(Select) to select the Installation submenu.
Press (Scroll Down) to scroll down to
Wall Mount. Press (Scroll Right)
or
(Select) to select Wall Mount.
For a Below TV soundbar installation,
press (Scroll Down) to scroll down to
Below TV. Press (Scroll Right) or
(Select) to select Below TV.
If your selection was successful the
soundbar’s display will indicate Saved.
Wall Mount – Above TV
Press (Menu) on the Remote or the
soundbar’s touch display.
Press (Scroll Down) to scroll down to
Installation. Press (Scroll Right) or
(Select) to select the Installation submenu.
Press (Scroll Down) to scroll down to
Wall Mount. Press (Scroll Right)
or
(Select) to select Wall Mount.
For an Above TV soundbar installation,
press (Scroll Down) to scroll down to
Above TV. Press (Scroll Right) or
(Select) to select Above TV.
If your selection was successful the
soundbar’s display will indicate Saved.
BASS LEVEL:
Factory default = 0dB
Configures the bass level from +/-10dB, in
2dB increments.
SURROUNDS:
Factory Default = ON
Configures the soundbar to output
simulated surround sound information
with a multi channel signal.
STEREO MODE:
Factory Default = Normal
Configures how the soundbar will
reproduce 2ch audio signals.
BASS MODE:
Factory Default = Normal
Adjusts the intensity of the bass signal
from Night mode to Bass+.
HDMI Settings: HDMI ARC / HDMI CEC / HDMI Bypass / Lip Sync
(PW Soundbar ONLY)
To enable HDMI ARC:
Press (Menu) on the Remote or the
soundbar’s touch display.
Press (Scroll Down) to scroll down to
HDMI. Press
(Scroll Right) or (Select)
to select HDMI submenu.
Press (Volume Down) to scroll down to the
HDMI ARC submenu.
Press (Scroll Right) or (Select) to select
HDMI ARC submenu.
Press (Volume Down) to scroll down to the
desired option, either (Off – default) or ON.
Once the desired option is displayed, press
(Scroll Right) or (Select) to select Off
or ON.
If the selection was successful the soundbar’s
display will indicate Saved.
To enable HDMI CEC:
Press (Menu) on the Remote or the
soundbar’s touch display.
Press (Scroll Down) to scroll down to
HDMI. Press
(Scroll Right) or (Select)
to select HDMI submenu.
Press (Volume Down) to scroll down to the
HDMI CEC submenu.
Press (Scroll Right) or (Select) to select
HDMI CEC submenu.
Press (Volume Down) to scroll down to the
desired option, either Off or ON.
Once the desired option is displayed use the
or select (Off – default) or ON
If the selection was successful the soundbar’s
display will indicate Saved.
To enable HDMI Bypass:
Press (Menu) on the Remote or the
soundbar’s touch display.
Press (Scroll Down) to scroll down to
HDMI. Press
(Scroll Right) or (Select)
to select HDMI submenu.
Press (Volume Down) to scroll down to
HDMI Bypass.
Press (Scroll Right) or (Select) to select
HDMI Bypass submenu.
Press (Volume Down) to scroll down to the
desired option, either Off, Last, HDMI 1,
HDMI 2, or HDMI 3. Once the desired input
is displayed, press
(Scroll Right) or
(Select) to select the input.
If the selection was successful the soundbar’s
display will indicate Saved.
To adjust HDMI Lip Sync:
Press (Menu) on the Remote or the
soundbar’s touch display.
Press (Scroll Down) to scroll down to
HDMI. Press
(Scroll Right) or (Select)
to select HDMI submenu.
Press (Volume Down) to scroll down to
Lip Sync. Press (Scroll Right) or
(Select) to select Lip Sync submenu.
Press (Volume Down) to scroll down to
the desired input, either: HDMI 1, HDMI 2,
HDMI 3 or HDMI ARC. Once the desired input
is displayed, press
(Scroll Right) or
(Select) to select the input.
Press (Volume Down) to scroll to the
desired adjustment level. Press
(Scroll
Right) or
(Select) to select the level.
If the selection was successful the soundbar’s
display will indicate Saved.
HDMI ARC: Factory Default = Off
Enables the HDMI cable connected
from the soundbar to the TV to transmit
audio from the TV back to the soundbar.
NOTE: The HDMI CEC option may also be
required depending on TV model.
HDMI CEC Consumer Electronics
Control: Factory Default = Off
Enables all compatible CEC devices to be
controlled using a single remote via the
HDMI connection. NOTE: The HDMI CEC
option may also be required for HDMI
ARC depending on TV model.
HDMI BYPASS: Factory Default = Off
Enables the soundbar to pass an audio/
video signal directly to the TV from the
connected devices when the soundbar is
in standby mode.
HDMI LIP SYNC: Factory Default: 0ms
Adjusts the delay of the HDMI audio
content to that of the video. This should
only be adjusted if the audio timing is
faster than that of the video. Timing can
be adjusted from 0ms to 300ms for each
HDMI input, in 5ms increments
Display Settings: Display / Touch Display
OPTIONS: Auto Bright, Auto Dim, Bright & Dim
Press (Menu) on the Remote or the soundbar’s touch display.
Press
(Scroll Down) to scroll down to Display. Press (Scroll Right) or (Select) to select the
Display submenu.
Press (Scroll Down) to scroll down to the desired option, either (Auto Bright – default), Auto Dim,
Bright or Dim. Once the desired option is displayed, press
(Scroll Right) or (Select) to select
Auto Bright, Auto Dim, Bright or Dim.
If the selection was successful, the soundbar’s display will indicate Saved.
OPTIONS: Auto Bright, Auto Dim, Off, Bright & Dim
Press (Menu) on the Remote or the soundbar’s touch display.
Press
(Scroll Down) to scroll down to scroll down to Touch Display. Press (Scroll Right) or
(Select) to select the Touch Display submenu.
Press (Scroll Down) to scroll down to the desired option, either Auto Bright, Auto Dim, Off, Bright
or Dim. Once the desired option is displayed, press
(Scroll Right) or (Select) to select Auto
Bright, Auto Dim, Off, Bright or Dim.
If the selection was successful, the soundbar’s display will indicate Saved.
OLED (Front) DISPLAY: Factory Default = Auto Bright
Configures the brightness and behavior of the front panel display.
TOUCH DISPLAY: Factory Default = Auto Bright
Configures the brightness and behavior of the touch panel display
5 64
1 2
Choose a location for
the Paradigm soundbar
Place the soundbar on a flat table surface.
Shelf Mount
ATTENTION: Refer to Owner’s Manual
for Wall-Mounting Instructions.
1
OR
A
Choose your connections option …
Wall Mount –
Below TV
B
ATTENTION: Refer to Owner’s Manual
for Wall-Mounting Instructions.
OR
Wall Mount –
Above TV
C
Connections
2
OR
Sub OutAnalog 1 In
Analog 2 In
Left
White
Left
White
Right
Red
Right
Red
Optical 1 In
Optical 2 In
HDMI 1 In HDMI 2 In
EthernetIR Out
IR Out
Factory Use Factory Use
Wi-Fi
Setup
Wi-Fi
Status LED
HDMI 3 InHDMI Out
With Audio Return Channel
Factory Use
Audio &
Video
Connections
Audio & Video
Connections
Audio
Connection
Audio
Connections
Only
OR
B
Multi-Channel Audio/Video Sources:
Blu-ray, DVD, Game Console,
Cable Box, Satellite Receiver, Etc.
Single RCA Cable
Sold Seperately
Digital Out
Audio
Connection
HDMI Out
TV
TV
Optical Cable
(Digital)
HDMI Cable
Sub OutAnalog 1 In
Analog 2 In
Left
White
Left
White
Right
Red
Right
Red
Optical 1 In
Optical 2 In
HDMI 1 In HDMI 2 In
EthernetIR Out
IR Out
Factory Use Factory Use
Wi-Fi
Setup
Wi-Fi
Status LED
HDMI 3 InHDMI Out
With Audio Return Channel
Factory Use
Choose an Audio
Connection:
A
Multi-Channel Audio/Video Sources:
Blu-ray, DVD, Game Console,
Cable Box, Satellite Receiver, Etc.
OROR
HDMI Out
TV
TV
HDMI Audio &
Video Connection
(Recommended).
HDMI Audio &
Video Connection
(Recommended).
Optional Subwoofer
Use an analog RCA cable for a
wired subwoofer connection.
A wireless subwoofer connection
is available on the PW Soundbar.
Optional Subwoofer
Use an analog RCA cable for a
wired subwoofer connection.
A wireless subwoofer connection
is available on the PW Soundbar.
Single RCA Cable
Sold Seperately
Digital Out
Optical Cable
(Digital)
Analog Out
R
Analog Out
L
Dual RCA Cable
(Analog)
Connect your external components (cable box, dvd player, etc.) audio and video
connections to your to your TV. Connect your TV’s audio connections to your
Paradigm soundbar.
RECOMMENDED: Connect your external components (cable box, Blu-ray
player, dvd player, etc.) to your Paradigm soundbar using an HDMI cable.
Use another HDMI cable to connect from your soundbar’s HDMI Out to your TV.
For external components without HDMI, use an Optical or RCA cable for an
audio connection to your soundbar. Video connections can be made from
your external components to your TV using an Optical, RCA or Coaxial cable.
Choose a location for
Place the soundbar on a flat table surface.
Shelf Mount
ATTENTION: Refer to Owner’s Manual
for Wall-Mounting Instructions.
OR
A
Choose your connections option …
Wall Mount –
Below TV
B
ATTENTION: Refer to Owner’s Manual
for Wall-Mounting Instructions.
OR
Wall Mount –
Above TV
C
Connections
2
OR
Sub OutAnalog 1 In
Analog 2 In
Left
White
Left
White
Right
Red
Right
Red
Optical 1 In
Optical 2 In
HDMI 1 In HDMI 2 In
EthernetIR Out
IR Out
Factory Use Factory Use
Wi-Fi
Setup
Wi-Fi
Status LED
HDMI 3 InHDMI Out
With Audio Return Channel
Factory Use
Audio &
Video
Connections
Audio & Video
Connections
Audio
Connection
Audio
Connections
Only
OR
B
Multi-Channel Audio/Video Sources:
Blu-ray, DVD, Game Console,
Cable Box, Satellite Receiver, Etc.
Single RCA Cable
Sold Seperately
Digital Out
Audio
Connection
HDMI Out
TV
TV
Optical Cable
(Digital)
HDMI Cable
Sub OutAnalog 1 In
Analog 2 In
Left
White
Left
White
Right
Red
Right
Red
Optical 1 In
Optical 2 In
HDMI 1 In HDMI 2 In
EthernetIR Out
IR Out
Factory Use Factory Use
Wi-Fi
Setup
Wi-Fi
Status LED
HDMI 3 InHDMI Out
With Audio Return Channel
Factory Use
Choose an Audio
Connection:
A
Multi-Channel Audio/Video Sources:
Blu-ray, DVD, Game Console,
Cable Box, Satellite Receiver, Etc.
OROR
HDMI Out
TV
TV
HDMI Audio &
Video Connection
(Recommended).
HDMI Audio &
Video Connection
(Recommended).
Optional Subwoofer
Use an analog RCA cable for a
wired subwoofer connection.
A wireless subwoofer connection
is available on the PW Soundbar.
Optional Subwoofer
Use an analog RCA cable for a
wired subwoofer connection.
A wireless subwoofer connection
is available on the PW Soundbar.
Single RCA Cable
Sold Seperately
Digital Out
Optical Cable
(Digital)
Analog Out
R
Analog Out
L
Dual RCA Cable
(Analog)
Connect your external components (cable box, dvd player, etc.) audio and video
connections to your to your TV. Connect your TV’s audio connections to your
Paradigm soundbar.
RECOMMENDED: Connect your external components (cable box, Blu-ray
player, dvd player, etc.) to your Paradigm soundbar using an HDMI cable.
Use another HDMI cable to connect from your soundbar’s HDMI Out to your TV.
For external components without HDMI, use an Optical or RCA cable for an
audio connection to your soundbar. Video connections can be made from
your external components to your TV using an Optical, RCA or Coaxial cable.
This option configures both the orientation of the soundbar’s display
as well as the soundbar‘s equalization and voicing, to make sure
you achieve the best sound for the set orientation.
The installation orientation options are as follows: Shelf Mount
(default), Wall Mount – Below TV, and Wall Mount – Above TV.
The default installation orientation setting is Shelf Mount.
Wireless SubWired SubNo Sub
(Factory Default)
Sync
Sub Out Input: 9V 250mA
IMPORTANT!
PW Soundbar rear
panel shown. HDMI
Connections and
Wi-Fi Setup are
only available on
the PW Soundbar.
IMPORTANT!
PW Soundbar rear
panel shown. HDMI
Connections and
Wi-Fi Setup are
only available on
the PW Soundbar.
3
Subwoofer