Vermeiren Inovys II-E Installation guide

Type
Installation guide

Vermeiren Inovys II-E, your new motorized wheelchair, offers a range of features to enhance your mobility and independence. With its powerful motor and adjustable seat, you can navigate various terrains comfortably. Safety features like parking brakes and adjustable footrests ensure a secure and personalized ride. Explore new possibilities and enjoy greater freedom with your Inovys II-E.

Vermeiren Inovys II-E, your new motorized wheelchair, offers a range of features to enhance your mobility and independence. With its powerful motor and adjustable seat, you can navigate various terrains comfortably. Safety features like parking brakes and adjustable footrests ensure a secure and personalized ride. Explore new possibilities and enjoy greater freedom with your Inovys II-E.

VERMEIREN
INSTALLATION MANUAL
Inovys
Inovys wheelchairs
2020-03
Content
Installation manual
- 1 -
EN
NL
PL
CS
Content
Preface........................................................................................................................ 2
1 Scope of delivery .......................................................................................... 3
1.1 Tools ............................................................................................................... 3
2 Assembly and disassembly ......................................................................... 3
3 Adjustments .................................................................................................. 4
3.1 Rear-wheel position ........................................................................................ 5
3.2 Seat height and seat angle ............................................................................. 6
3.3 Seat depth ...................................................................................................... 7
3.4 Backrest height and depth .............................................................................. 7
3.5 Parking brakes ................................................................................................ 8
3.6 Leg rest length ................................................................................................ 8
3.7 Footplate angle ............................................................................................... 9
3.8 Footrest width ................................................................................................. 9
3.9 Calfrest height ................................................................................................. 9
3.10 Calfrest depth ............................................................................................... 10
3.11 Width between calfrests ................................................................................ 10
3.12 Armrest depth ............................................................................................... 10
3.13 Width between armrests ............................................................................... 10
3.14 Changing battery (only for Inovys II-E) .......................................................... 11
Inovys wheelchairs
2020-03
Preface
Installation manual
- 2 -
EN
NL
PL
CS
Preface
To support you on the installation and repairs of this wheelchair, this installation manual is offered.
Please read it carefully. If you still have questions after reading this manual, do not hesitate to
contact Vermeiren.
The information in this manual applies to following wheelchair(s):
Inovys II
Inovys II-E
Inovys II-F
Important note
Pictures of the product are used to clarify the instructions. Details of the shown product may
deviate from your product.
Information available
On our website http://www.vermeiren.com/ you will always find the most recent version of
following information. Please consult this website regularly for possible updates.
Visually impaired people can download the electronic version of this manual and have it read out
by means of a text-to-speech software application.
User manual
For user and specialist dealer
User manual of applied handset and battery charger (if applicable).
For user and specialist dealer
Installation instructions (Instructions for detail adjustments)
For specialist dealer
Torque table (maximum torques for bolts and nuts)
For specialist dealer
Service manual for wheelchairs
For specialist dealer
Drawings of (spare) parts
EC declaration of conformity
Inovys wheelchairs
2020-03
Scope of delivery
Installation manual
- 3 -
EN
NL
PL
CS
1 Scope of delivery
The following items are part of the delivery.
Frame including wheels, backrest frame, seat and positioning mechanisms (mechanical or
electric *).
Backrest and 2 leg rests
2 Armrests
Headrest *
Battery charger in pocket *
Tools
User manual of:
o wheelchair
o handset *
o battery charger *
o battery *
This installation manual
Accessories (if applicable), like red reflector stickers to be used in France.
Before use, check that everything is included and that no products are damaged.
Please note that the basic configuration may differ in different European countries. Contact your
specialist dealer.
(*) Depends on wheelchair model.
1.1 Tools
To repair and adjust the wheelchair, the following tools are needed:
Wrench set no. 10 to no. 22
Allen keyset no. 3 to no. 8
Screwdriver Phillips head
Screwdriver
Nipper
Pliers
2 Assembly and disassembly
The assembly and disassembly of the wheelchair is described in the user manual.
Inovys wheelchairs
2020-03
Adjustments
Installation manual
- 4 -
EN
NL
PL
CS
3 Adjustments
Risk of tipping over
Be aware that by changing the position of the rear wheels, the stability of the wheelchair is
influenced. By adjusting the rear wheels
in rear adjustment position, the wheelchair becomes more stable, but less manoeuvrable;
in front adjustment position, it becomes less stable but more manoeuvrable.
Important remarks
For more information
,
contact Vermeiren.
To increase stability and manoeuvrability, the following adjustments can be made:
rear-wheel position, see §3.1.
seat height and angle, see §3.2.
CAUTION
Risk of injuries or damage
Read the user manual of the specific wheelchair.
Be aware of the technical details and limits of intended use; see the user manual.
The wheelchair needs to be adjusted by a specialist dealer according to the instructions in
this chapter.
Only use parts and tools described in this manual.
Prevent bystanders from accessing the working area.
Collect all small parts in a box or bag.
While adjusting and operating the wheelchair, make sure no objects or body parts get caught
between moving parts. In particular, pay attention to the position of the cables.
If a battery is applied
, unplug the battery charger and switch the operating console off before
you perform any mechanical adjustments.
Any modification to the product will lapse the warranty and will cease the responsibility of
Vermeiren.
Make sure all screws are firmly secured before riding your wheelchair. Adhere to the
tightening torques for screws according to the Torque table on our website.
CAUTION
Inovys wheelchairs
2020-03
Adjustments
Installation manual
- 5 -
EN
NL
PL
CS
3.1 Rear-wheel position
Risk of injuries or damage
After adjustment of the
rear wheels, check the working of the brakes and adjust according to §3.5
.
For each type of driving wheel (16”, 22” and 24”), two adjustment positions are available:
Holes no. 1 for 24” driving wheels, with 45 mm in between;
Holes no. 2 for 22” driving wheels, with 45 mm in between;
Holes no. 3 in the frame tubes, for 16” driving wheel, with 50 mm in between;
The delivered wheel sockets fits in each of the four bores of the mounting plate.
The wheel sockets for the 16” wheels (transit version) only fit in the bores (3)
of the frame
tubes.
To change the position of the wheel socket:
1. Remove the rear wheels, see user manual.
2. Remove the hex nut (4) on the inside of the mounting plate. Collect the wheel socket,
washer, distance ring (2x) and bushing.
3. Mount the wheel socket in the other bore, according to the part drawing of the specific type
of wheelchair assembly.
4. Tighten the hex nut (4) firmly.
5. Repeat this for the second wheel socket. Make sure that the wheel sockets, left and right
side, are mounted in the corresponding bore of the mounting plate.
6. Install both rear wheels.
CAUTION
1
2
3
4
Inovys wheelchairs
2020-03
Adjustments
Installation manual
- 6 -
EN
NL
PL
CS
3.2 Seat height and seat angle
The seat height of the Inovys wheelchair is adjustable in 3 positions in steps of 35 mm. To adjust
the seat height, the following connection points (located below the seat frame) need to be
repositioned:
at front tube (A), connection of base frame and seat-frame support (10);
at base-frame support (B), connection of base frame and seat-inclination motor (11);
at rear-wheel mounting plate (C), connection of base frame and seat-frame support (12).
To adjust the height:
1. Remove the socket screw and nut for item (10), (11) and (12) and collect the spacers.
2. Mount item (10+12) with the spacers in one of the adjustment holes:
o In lowest position (460 mm), in hole no. 1;
o In medium position (495 mm), in hole no. 2;
o In highest position (530 mm), in hole no. 3.
3. Tighten socket screws and nuts firmly.
4. Repeat adjustments (A) and (C) at the other side of the wheelchair.
5. Mount item (11) with spacers in one of the holes at location (B), according to the same hole
selection made for item (10+12).
6. Tighten socket screws and nuts firmly.
12
C
10
11
A
B
C
3
1
2
3
1
2
3
1
2
B
A
Inovys wheelchairs
2020-03
Adjustments
Installation manual
- 7 -
EN
NL
PL
CS
3.3 Seat depth
The seat depth can be changed
by adjusting the seat frame position
(3 positions available: 480 – 500 – 520 mm)
or
by adjusting the backrest depth, see §3.4. With the backrest-
depth adjustment, a minimum seat depth of 460 mm is possible.
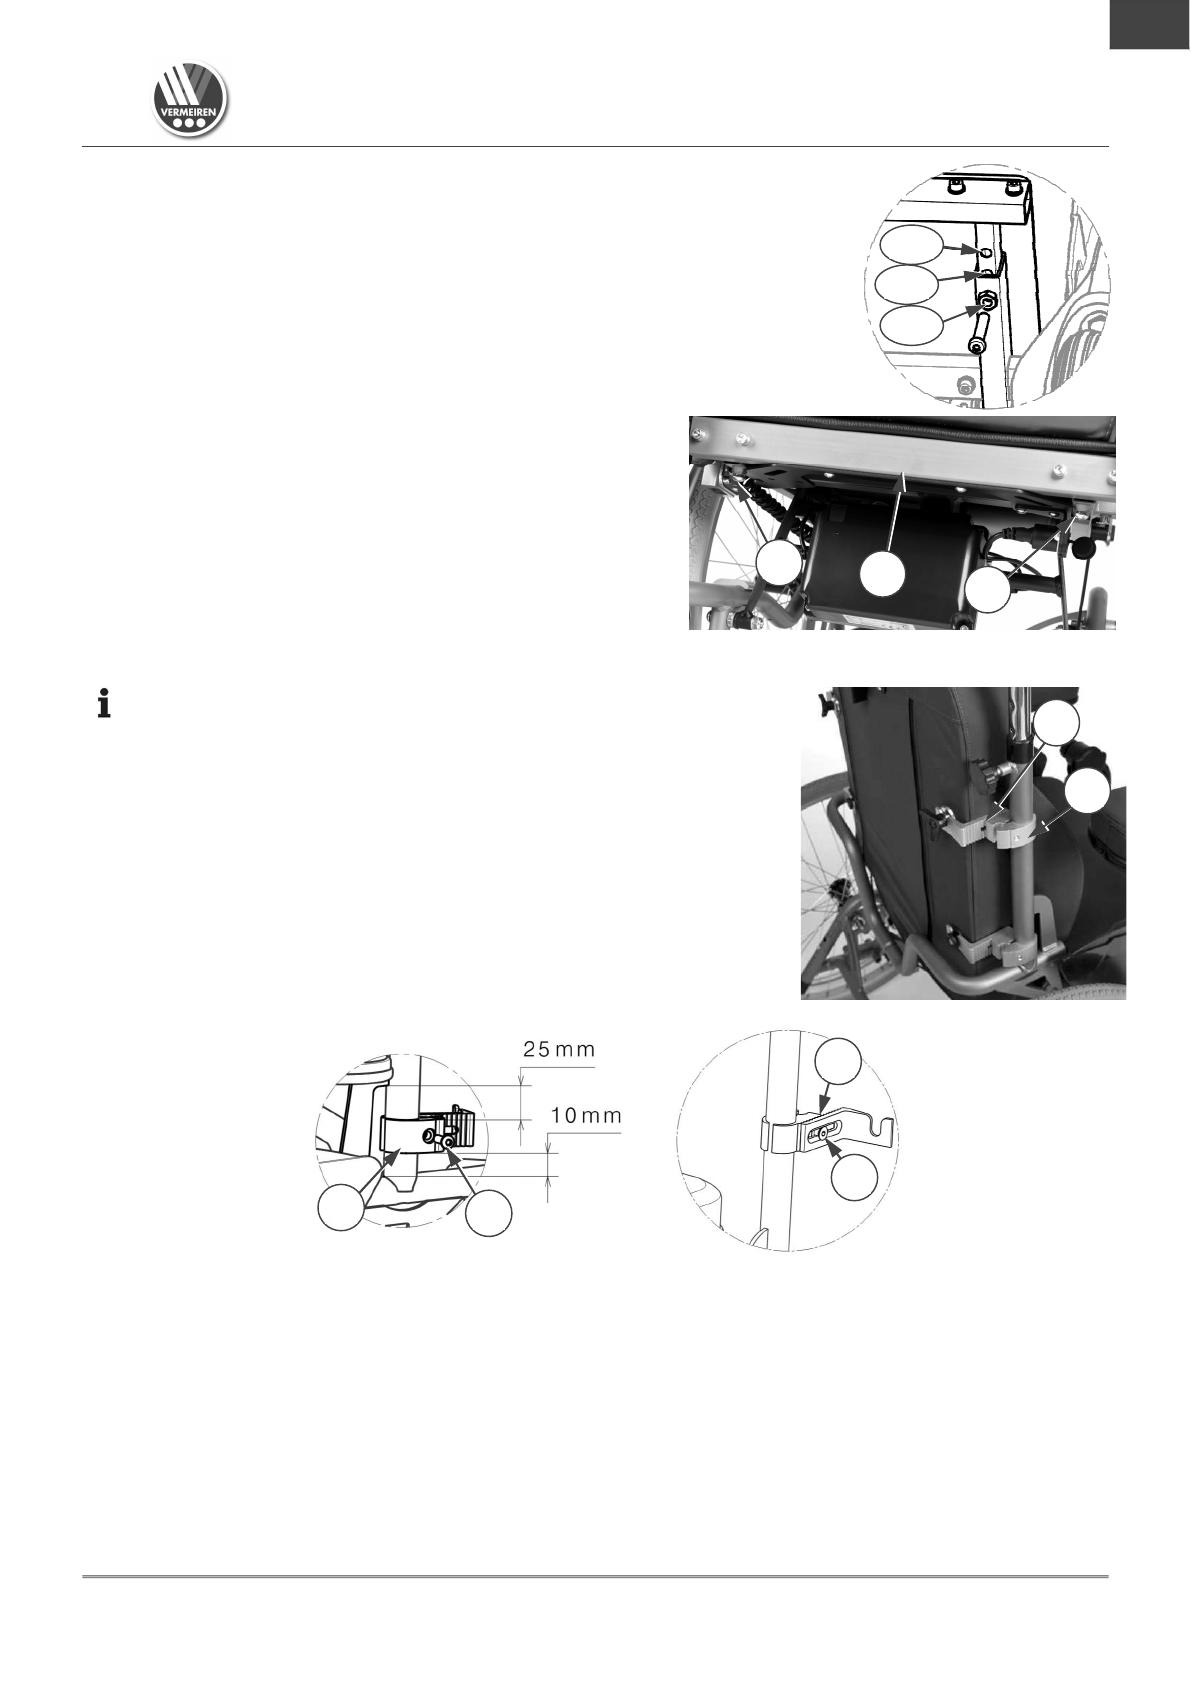
To adjust the seat frame:
1. Loosen both socket screws (16) on each side,
beneath the seat-frame front.
2. Move the seat-frame front (17) forward or
backward to the desired position.
3. Retighten socket screws (16) firmly.
3.4 Backrest height and depth
Adjust the height of the backrest at the brackets (20) (over max.
50 mm; stepless):
1. Loosen socket screws (21) of the four brackets to make them
free to slide.
2. Adjust the backrest to the desired height.
3. Retighten the socket screw of each bracket.
Adjust the backrest depth at the toothed clamps (19) of the brackets:
1. Remove the backrest.
2. Loosen the socket screw (18) of the toothed clamp (19).
3. Move the bracket forward/backward, but make sure that all teeth of the clamp stay covered.
4. Retighten the socket screw.
5. Repeat this adjustment for the other brackets/clamps. Make sure all 4 brackets/clamps are
adjusted identically.
6. Mount the backrest in place.
Use the backrest as reference to position the brackets.
To remove the backrest, see user manual.
17
16
16
500
480
520
19
20
21
18
19
20
Inovys wheelchairs
2020-03
Adjustments
Installation manual
- 8 -
EN
NL
PL
CS
3.5 Parking brakes
Risk of injuries
Adjust the parking brakes after adjustment o
n the rear-
wheel
position
,
and when tyres are worn to compensate the wear.
Adjust the correct braking force of the parking brakes:
1. Release the brake, see user manual.
2. Loosen the socket screws (22) to make the brake free to slide.
3. Slide the brake over the guide (23) to the desired position.
4. Retighten the socket screws (22).
5. Verify if the brake is working properly: the wheel is blocked, but the
brake can be operated easily. If this is not the case, repeat the steps
above until the brakes are adjusted well.
6. Repeat for the second parking brake. Make sure that both brakes
are adjusted identically.
3.6 Leg rest length
Risk of injuries or damage
The maximum length of the footrest is limited to the length indicated
by a triangle on the front of the footrest tube, see picture. This
maximum length adjustment is not possible in sitting position; the
footplates will touch the ground.
Make sure that the distance to the ground in sitting position is minimal
60 mm to avoid touching small obstacles and to prevent damage to
the footrest
.
To adjust the length of the footrests:
1. Remove the socket screw (24) on the back of the footrest.
2. Adjust the footrest to a comfortable length.
3. Retighten the socket screw firmly.
4. Repeat for the second footrest. Make sure that the footrests are
positioned identically.
CAUTION
CAUTION
22
23
24
Inovys wheelchairs
2020-03
Adjustments
Installation manual
- 9 -
EN
NL
PL
CS
3.7 Footplate angle
To adjust the angle of the foot plate at its toothed clamp:
1. Loosen the socket screw (25) on the footrest (26).
2. Turn the footplate in the desired angle (80°- 100°). The
dashes (27) on the toothed clamp indicate the angular
positions.
3. Retighten the socket screw (25).
4. Repeat for the second footrest.
3.8 Footrest width
Risk of injuries
The maximum width of one footrest is limited by the
position of the
two sockets screws. Both need to be
secured.
To adjust the width between the footrests:
1. Loosen the two socket screws (28) next to the
footrest, below the seat front.
2. Adjust the footrest to a comfortable width.
3. Tighten the screws (28) firmly.
4. Repeat this for the second footrest.
Make sure the footrests are positioned identically on
both sides of the seat.
3.9 Calfrest height
The calfrests are available in different sizes:
small size for wheelchair with seat width 400 mm;
medium size for wheelchair with seat width 450 mm or 500 mm.
1. Turn the calfrest outwards.
2. Loosen the socket screw (30) that clamps the calfrest
support on the footrest.
3. Slide the calfrest up/down to a comfortable position (step
less).
4. Retighten the socket screw (30) with nut.
5. Repeat this for the second calf rest. Make sure that the calf
rests are positioned identically.
CAUTION
28
28
25
26
27
30
Inovys wheelchairs
2020-03
Adjustments
Installation manual
- 10 -
EN
NL
PL
CS
3.10 Calfrest depth
1. Loosen the socket screw (31) on the calfrest support (32).
2. Adjust the depth of the calfrest to a comfortable position (7
positions available).
3. Retighten the socket screw (31).
4. Repeat for the second calfrest. Make sure that the calfrests are
positioned identically.
3.11 Width between calfrests
1. Loosen the two socket screws (33) on the back of the calf rest.
2. Adjust the width to a comfortable position (2 positions available).
Do not use the hole (34) in the middle!
3. Retighten the two socket screws (33).
4. Repeat for the second calfrest. Make sure that the calf rests are
positioned symmetrically.
3.12 Armrest depth
1. Loosen both nuts (35) of the fixing bolts beneath the
arm cushion.
2. Remove nut and spring plunger (36).
3. Push the arm cushion into the desired position.
4. Retighten the fixing bolts (35).
5. Mount spring plunger (36) and nut (x2).
6. Verify the working of the spring plunger by moving the
arm cushion forward and backward.
7. Repeat for the second armrest. Make sure both
armrests are positioned identically.
3.13 Width between armrests
Risk of injuries
The maximum width of one armrest is limited by the position of
two sockets screws. Both need to
be secured.
CAUTION
35
35
36
33
34
31
32
Inovys wheelchairs
2020-03
Adjustments
Installation manual
- 11 -
EN
NL
PL
CS
Adjust the width of the armrests:
1. Loosen the two socket screws (37) next to the armrest, below the
seat frame.
2. Adjust the armrest to a comfortable width (max. 25 mm outwards).
3. Tighten the screws (37) firmly by hand.
4. Repeat for the second armrest. Make sure that the armrests are
positioned identically.
3.14 Changing battery (only for Inovys II-E)
Risk of injuries and damage
If replacement of the batteries is necessary
, the complete battery pack needs to be
exchanged (IP66). Contact Vermeiren for more information.
Never try to open the battery pack.
Read and apply the instructions of the battery pack and charger to remove, install and charge the
battery. These instructions are part of the delivery.
The identification of the battery and its serial number can be found on the bottom of the battery.
CAUTION
37
© Vermeiren Group 2020
Vermeiren GROUP
Vermeirenplein 1 / 15
B-2920 Kalmthout
BE
website: www.vermeiren.com
Instructions for specialist dealer
This instruction manual is part and parcel of the product and must accompany
every product sold.
Version B, 2020-03
All rights reserved, including translation.
No part of this manual may be reproduced in any form what so ever (print,
photocopy, microfilm or any other process) without written permission of the
publisher, or processed, duplicated or distributed by using electronic systems.
R.E.: Vermeiren GROUP, Vermeirenplein 1/15 - 2920 Kalmthout Belgium
Installation manual - Inovys_EN_2020-03_B
  • Page 1 1
  • Page 2 2
  • Page 3 3
  • Page 4 4
  • Page 5 5
  • Page 6 6
  • Page 7 7
  • Page 8 8
  • Page 9 9
  • Page 10 10
  • Page 11 11
  • Page 12 12
  • Page 13 13
  • Page 14 14
  • Page 15 15
  • Page 16 16

Vermeiren Inovys II-E Installation guide

Type
Installation guide

Vermeiren Inovys II-E, your new motorized wheelchair, offers a range of features to enhance your mobility and independence. With its powerful motor and adjustable seat, you can navigate various terrains comfortably. Safety features like parking brakes and adjustable footrests ensure a secure and personalized ride. Explore new possibilities and enjoy greater freedom with your Inovys II-E.

Ask a question and I''ll find the answer in the document

Finding information in a document is now easier with AI