
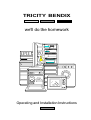
TRICITY BENDIX
we'll do the homework
Operating and Installation Instructions

2
Dear Customer,
These instructions are designed to help you get to know
your new model quickly and to achieve the best possible
results. If your hob is a different type to the one you are
used to, it may take a while to adapt to any new features.
In addition, it may also be worth considering the suitability
of your existing cookware and saucepans. After many
years of use they may have become distorted and to
achieve satisfactory results, it may be advisable to pur-
chase some new ones, following the recommenda-tions
given in this booklet.
It is most important that this instruction book should be
retained with the appliance for future reference. Should
the appliance be sold or transferred to another owner, or
should you move house and leave the appliance, always
ensure that the book is supplied with the appliance in
order that the new owner can be acquainted with the
functioning of the appliance and the relevant warnings.
Please ensure that you read the 'Before Use' passage on
page 9 before using the appliance and that you follow the
recommendations given.
PRECAUTIONS TO USERS

3
CONTENTS
Please refer to the sections in this booklet that apply to
your particular model.
Specification .......................................................... 4
Technical Specification........................................... 5
Warnings ............................................................... 6
Installation.............................................................. 7
Electrical Connections ........................................... 8
How to use your Hob .............................................. 9
Cooking Equipment .............................................. 10
Maintenance and Cleaning ................................... 12
Preserving ............................................................ 14
Help us to help you .............................................. 15
Before calling a Service engineer .......................... 16
Guarantee ............................................................ 16
Tricity-Bendix-Service-Centres .............................. 17

4
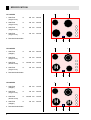
SPECIFICATION
HC 312 B/W
1. Heat Zone ∅ 180 mm 1800 W
(single circuit)
2. Heat Zone ∅ 145 mm 1200 W
(single circuit)
3. Heat Zone ∅ 180 mm 1700 W
(single circuit)
4. Heat Zone ∅ 145 mm 1200 W
(single circuit)
5. Residual Heat Indicator
HH 322 B/W
1. Heat Zone ∅ 180 mm 1800 W
(halogen)
2. Heat Zone ∅ 145 mm 1200 W
(single circuit)
3. Heat Zone ∅ 120/180 mm 1700 W
(double circuit)
4. Heat Zone ∅ 145 mm 1200 W
(single circuit)
5. Residual Heat Indicator
HH 352 B/W
1. Heat Zone ∅ 180 mm 1700 W
(halogen)
2. Heat Zone ∅ 145 mm 1200 W
(single circuit)
3. Heat Zone ∅ 120/180 mm 1700 W
(double circuit)
4. Heat Zone ∅ 145 mm 1200 W
(halogen)
5. Residual Heat Indicator
23
154
23
154
23
154
H
H
H

5
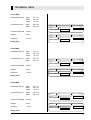
TECHNICAL DATA
HC 312 B/W
Outside Dimensions : width 572 mm
depth 502 mm
height 49 mm
Cutout Dimensions : width 560 mm
depth 490 mm
Total connected load : 5.8 kW
Voltage : 240 V
Frequency : ~ 50 Hz
Rating plate
HH 322 B/W
Outside Dimensions : width 572 mm
depth 502 mm
height 49 mm
Cutout Dimensions : width 560 mm
depth 490 mm
Total connected load : 5.9 kW
Voltage : 240 V
Frequency : ~ 50 Hz
Rating plate
HH 352 B/W
Outside Dimensions : width 572 mm
depth 502 mm
height 49 mm
Cutout Dimensions : width 560 mm
depth 490 mm
Total connected load : 5.9 kW
Voltage : 240 V
Frequency : ~ 50 Hz
Rating plate
Typ 082.0 HC 312 B Prod.No. 941 689 284
Instr. No. Ser.No. 5.8 kW
TRICITY BENDIX
240 V ~ 50 Hz
SWISS MADE
Typ 082.0 HC 312 W Prod.No. 941 689 285
Instr. No. Ser.No. 5.8 kW
TRICITY BENDIX
240 V ~ 50 Hz
SWISS MADE
Typ 107.0 HH 322 B Prod.No. 941 689 286
Instr. No. Ser.No. 5.9 kW
TRICITY BENDIX
240 V ~ 50 Hz
SWISS MADE
Typ 107.0 HH 322 W Prod.No. 941 689 287
Instr. No. Ser.No. 5.9 kW
TRICITY BENDIX
240 V ~ 50 Hz
SWISS MADE
Typ 108.0 HH 352 B Prod.No. 941 689 288
Instr. No. Ser.No. 5.9 kW
TRICITY BENDIX
240 V ~ 50 Hz
SWISS MADE
Typ 108.0 HH 352 W Prod.No. 941 689 289
Instr. No. Ser.No. 5.9 kW
TRICITY BENDIX
240 V ~ 50 Hz
SWISS MADE

6
WARNINGS
THESE WARNINGS ARE PROVIDED IN THE
INTERESTS OF YOUR SAFETY, YOU MUST READ
THEM CAREFULLY BEFORE INSTALLING OR USING
THE APPLIANCE.
This appliance is designed to be operated by adults only.
Children should not be allowed to tamper with t h e
controls or play with or near the product.
Any installation work must be undertaken by a qualified
electrician or competent person. The appliance must be
installed according to the instructions.
Any electrical work required to install this appliance
should be carried out by a qualified electrician.
It is dangerous to alter the specifications or modify the
product in any way.
This product should be serviced by an authorised Service
Engineer and only genuine approved spare parts
should be used. Details of servicing arrange-ments are
supplied.
Under no circumstances should you attempt to repair the
appliance yourself. Repairs carried out by inex-perienced
persons may cause injury or more serious malfunctioning.
Refer to your local Service Centre. Always insist on
approved spare parts. Details of servicing arrangements
are supplied.
Always ensure that all control knobs are in the "off"
position when not in use.
Take great care when heating fats and oils as they will
ignite if they become too hot.
For hygiene and safety reasons this appliance should be
kept clean at all times. A built-up of fats or other
foodstuffs could result in a fire.
Do not leave utensils containing foodstuffs e.g. fat or oil
on the appliance in case it is inadvertently switched on.
This product has been designed for cooking edible
foodstuffs only, and must not be used for any other
purposes.
Always switch off the isolator switch at the cooker point
and allow the appliance to cool before any maintenance
or cleaning work is carried out.
Only clean this appliance in accordance with the
instructions given in this book.
This appliance is heavy and care must be taken when
moving it.
Cookers and hobs become very hot with use, and retain
their heat for a long period of time after use.
You must therefore take care when using the appliance.
Supervise childen at all times and do not allow them to
touch the cooker or hob surface or be in the vicinty of the
appliance until it has cooled after use.
Ensure that all packaging, both inside and (where
applicable) outside the appliance is removed before
the appliance is used.
If you use a saucepan which is smaller than the heated
area on the hob the handle may become hot. Ensure
that you protect your hand before touching the handle.
Never cook directly on the hob surface without a
saucepan/cooking utensil. Never place plastic or any
other material which may melt on the hob surface.
Always carefully lift saucepans on and off the hob. This
will prevent accidents caused by spillage and will also
keep cleaning to a minimum. Similarly ensure sauce-
pans and cooking utensils are large enough to contain
foods to prevent spillages and boil overs.
Unstable or misshapen pans are dangerous and should
not be used on the hotplate as unstable pans
may tip or spill and cause an accident. You must follow
the recommendations for saucepans given in
this book.
For ceramic hobs - Do not use the appliance if the
ceramic glass is damaged. Contact your Customer
Service Centre. Details supplied in this book.
Do not place heavy weights on the ceramic glass.
Do not heat sealed cans or aerosols on the hob. They
may explode if they are heated.
Do not stand on the appliance.
Do not hang towels or dishcloths from the appliance.
Do not use this appliance if it is in contact with water.
Similarly never operate it with wet hands.

7
INSTALLATION
The hob must be installed in accordance with the
installation instructions for this appliance. Connection to
the electricity supply must be made by a qualified
electrician to a suitable double pole switch with a control
separation of at least 3 mm (complying with IEE
regulations).
WARNING: THIS APPLIANCE MUST BE EARTHED
For ceramic hobs:
WARNING: DO NOT USE THE HOB IF ANY PART OF
THE SURFACE OF THE CERAMIC GLASS IS
DAMAGED OR CRACKED.
Switch off the electricity supply and contact your Custo-
mer Service Centre.
Before Use
Please ensure that any protective film and all packaging
has been removed from the appliance before switching
on.
Rating Plate
The rating plate is situated on the underside of the unit
and gives the model and serial number of the appliance,
which should be quoted in any communication. It is
advisable to make a note of these in the back of this book
before the appliance is installed.The model number is
also shown on the left hand of the hob under the control
knobs.
Cabinet Dimensions
1. The dimensions and positioning of the necessary
cut out sizes are detailed in fig.1.
These dimensions are important and failure to comply
with them may result in restricted air circulation and
discolouration to adjacent surfaces.
2. The distance between the worktop aperture and the
rear wall must be at least 50 mm. The distance
between the worktop aperture and a sidewall must
be at least 100 mm.
Installing The Hob
Fix the spring clips with the enclosed screws on the
sides of the worktop inside the cut-out.
The upper fold on the clip-spring is there to stop the
hob.
Position the springs has to be made in accordance
with the enclosed template.
Lower the hob into the opening and carefully press
first the rear, than the front side of the hob down until
it "snaps" into the springs.
An adhesive foam seal is already fixed to the underside
of the hob's frame.
The seal on the underside of the hob will ensure that it
is airtight between the hob and the work surface, this will
prevent any spillages from seeping into the cabinet
below. Place the hob carefully into the recess, with the
cable outlet of the hob at the back. Press firmly around
the edge of the hob, to compress the foam strip and
ensure an airtight seal.
Then, proceed to fix the hob firmly into the working
surface, with the 6 fixing clamps as shown in Fig.3,
making sure that the seal between the hob and the work
surface is secure by tightening the fixing clamps.
Fig.1
Fig.3
Fig.2
20
The distance between
the underside of the
hob and the furniture
under-neath must be
at least 20 mm.

8
Connect the earth wire to the terminal marked with the
letter 'E' or with the earth symbol.
Connect the live wire to the terminal marked with the
letter 'L' and coloured brown.
Connect the neutral wire to the terminal marked with the
letter 'N' and coloured blue.
Tighten the terminal screws and the cable clamp, then
refit the terminal plate cover.
General Notes
It is recommended that items may be affected by heat
e.g. certain foodstuffs, plastic articles should NOT be
stored above or below the hob unit. This applies to
aerosols which could explode.
The electricity supply, control panel and the wiring
are the responsibility of the installer, but would
normally be wall mounted close to the unit, with the
cable outlet behind the unit housing cabinet.
Enquiries regarding the installation of the electricity
supply should be made to the local Electricity Board
offices, to ensure compliance with their regulations.
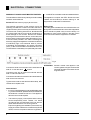
ELECTRICAL CONNECTIONS
WARNING: THIS APPLIANCE MUST BE EARTHED.
The manufacturer declines any liability should this safety
measure not be observed.
Switch OFF the electricity supply at the mains.
The electrical connection of the ceramic hob to the
specially provided built-in switch box and to the built-in
range should only be carried out by a trained technician.
To wire the hob, carefully place the unit, face downward
on a flat surface with the control area overhanging, to
avoid damage to the controls. Remove the screws
securing the cover to the terminal box, remove the cover
and connect the supply cable via the cable clamp (Fig.4),
to the terminals provided. The cable connecting the
electricity supply to this appliance must have conductors
of sufficiently high cross sectional area to prevent
overheating and degradation. Six square millimetres
(6mm
2
) is the recommended cross sectional area. The
cord should be routed away from potentially hot areas.
Fig.4
You MUST ensure that the cabinet is stable and level.
This appliance complies with EEC Directive number
76/889 and amendment 82/499 relating to the
suppression of radio and TV interference.
Rating Plate
The rating plate is situated on the underside of the unit
and gives the model and serial number of the appliance
(which should be quoted in any communi-cation). It is
advisable to make a note of these in the back of this
instruction book before the appliance is installed.
ATTENTION: Should a visible crack appear in the
ceramic glass the equipment should be
switched off at the mains and a service
engineer called.

9
HOW TO USE YOUR HOB
CONTINUOUS VARIABLE ZONE CONTROL COOKING GUIDE
Operation very gentle 1-2 to keep food warm; to melt butter and chocolate
gentle 3-4 to prepare cream-xauces, stews and milk pudings or to fry eggs
slow 5-6 dried vegetables, frozen food, fruit, boiling water or milk
medium 7-8 boiled potatoes, fresh vegetables, pates, soups, broths, pancakes, fish
high 9-10 larger stews, meat roll, fish, omelettes, steaks
fast 11-12 steaks, escalopes and frying
Before using your hob always ensure that the surface of
the cooking areas and the saucepans are clean and dry.
Never cook directly on heated areas as this may cause
damage and make more cleaning!
The hob control panel is on the left hand side of the hob.
It is important to be guided by any particular recommen-
dations given in the saucepan manufacturer's instruc-
tions regarding the use of heat setting to suit the type of
pan. Close fitting lids on the saucepans will ensure faster
results.
As the heat zone comes on, a "residual heat indicator"
light will illuminate in the panel at the left side of the
appliance. Its relative position in the panel represents
which cooking zone is hot. This indicator light will go out
when the hob has cooled down, after the control knob has
been reset to the zero position.
Hobs become very hot with use, and retain their heat for
a long period of time after use. You must therefore take
great care when using the appliance, supervise children
at ALL times and do NOT allow them to touch the surface
or be in the vicinity of the appliance until it has cooled
after use.
Place the saucepans with contents onto the cooking
area and turn the control knob to an appropriate setting.
The highest setting will allow the maximum amount of
heat to be transferred to the pan for initial fast boiling or
heating.
To select a setting for simmering after initial fast boiling
or heating or for slower cooking, turn to a lower number.
The numbers do not denote any set temperature, but
after using the hob a few times, no difficulty will be
experienced in selecting an appropriate setting although
this will vary with the type and quantity of food, the size
and type of saucepan and whether or not the lid is used.
Remove any food spills on the hob as soon as possible
to prevent them from being burned on. Please see notes
on the care and cleaning of your hob.
Spills from sugar solutions MUST be removed from the
hob before the syrup has set, otherwise damage to the
glass ceramic surface will occur.
For conventional ceramic and Tricity Bendix
HALOGEN HEAT hobs:
Allow all the heated areas to run on a medium setting for
a few minutes. Any smoking which occurs is quite
normal and if the odour emitted during this initial burning
off is unpleasant, it may be necessary to open a window
or door for ventilation.
For ceramic hobs:
When the appliance has cooled, apply a thin coating of
Cleaner Conditioner to the ceramic glass panel. This will
not only protect the surface, but also make it easier to
clean after use.
Fig. 5

10
COOKING EQUIPMENT
SAUCEPANS
Conventional Ceramic Hobs
Pans should have flat bases and be approximately the
same size as the cooking area.
The hob is fitted with a thermal limiter, which is a safety
device to prevent the ceramic glass overheating, larger
pans can be used - up to 225mm (9") base diameter on
a nominal 180mm (7") heated area - providing they do not
overlap the hob trims.
The base of the pans should be smooth. You must
ensure that any new pans are well scrubbed to remove
any rough edges or take off any deposits left from
manufacture.
Halogen Heated Hobs
The recommendations are as for the conventional ceramic
hob, although it is preferable to use pans with non-
reflective bases. Smooth exterior enamel based pans,
which absorb heat, can also be used.
Specialist Pans
Pressure cookers, preserving pans, etc. should comply
with the recommendations for normal saucepans given
above. Traditional round bottomed woks are not suitable
for use even with a stand, but woks with flat bases may
be used.
General Notes
Very thin, badly dented and distorted pans, particularly
with uneven bases should NOT be used.
Never place a utensil with a skirt (e.g.a bucket) on the
heated area.
Pans should not have rough bases and should be lifted
on and off the heated area not slid on, since this may
in time scratch the surface finnish of the hob.
* Do not use large preserving pans or fish kettle across
2 hotplates as damage may occur to the hob.
* Pans must NOT overlap the hob trims.
How To Use Your Hob
1. Before using your hob, always ensure the surface of
the cooking areas and the saucepans are clean and
dry. Never cook directly on heated areas as it may
cause damage and make more cleaning!
2. Place the saucepans with contents onto the coo-king
area and turn the control knob to an appro-priate
setting. The highest setting will allow the maximum
amount of heat to be transferred to the pan for initial
fast boiling or heating, but is important to be guided
by any particular recommendations given in the
saucepan manufacturer's instructions regarding the
use of heat setting to suit the type of pan. Close fitting
lids on the saucepans will ensure faster results.
3. To select a setting for simmering after initial fast
boiling or heating, or for slower cooking, turn to a
lower number. The numbers do not denote any set
temperature, but after using the hob a few times, no
difficulty will be experienced in selecting an appropriate
setting, although this will vary with the type and
quantity of food, the size and type of saucepan and
whether or not the lid is used.
4. Remove any food spills on the hob as soon as pos-
sible to prevent them from being burned on. Please
see notes on the care and cleaning of your hob. On
ceramic hobs, sugar solutions e.g. jam and syrups
must be wiped off the hob surface immediately to
avoid the surface being damaged.
5. It is inadvisable to leave an empty pan on a heated
area.
6. Saucepans may be rested on unheated areas when
cooking is complete, prior to serving the food.
Deep Fat Frying
For safety purposes when deep fat frying, fill the pan only
one-third full of fat or oil.
Do not cover the pan with a lid and do not leave the pan
unattended. In the unfortunate event of a fire, switch off
at the mains supply and cover the pan with a lid or damp
cloth to assist in smothering the flames.
wrong wrong good

11
COOKING EQUIPMENT
Do not leave the fat or oil on the frying pan on the hob to
store it, in case the hob is inadvertantly switched on.
1. Preparing the food
Seal the food by coating with flour, egg and bread-
crumbs or batter. Do not use a basket with batter
coated food as they will stick.
2. Amount of oil
For safety purposes, fill the pan only one-third full
of fat or oil.
3. Testing the temperature of the oil
It is advisable to test the temperature of the oil with
a thermometer. Alternatively drop a small cube of
bread into the oil which should brown in just under
a minute if the oil is at 190° C/375°F.
4. Cooking the food
Lower the food gently into the oil. Do not add too much
food at once or the temperature of the oil will be
reduced and may result in soggy, greasy food. Turn
the food if necessary: doughnuts float to the surface
so will not brown on the upperside if not turned. Once
cooked, drain on absorbent paper, kitchen roll for
example.
5. Double frying of chips
Double frying will ensure good chips. First fry the chips
for a few minutes at 170°C/340°F to seal the outside.
Remove the chips from the oil. Increase the temperature
of the oil to 190°C/375°F to finish cooking and brown
the chips.
Chips may be kept for several hours after the frying
before finishing off with the second frying.

12
Before carrying out the following instruction, make
sure that the appliance is DISCONNECTED from the
electricity supply.
Helpful Tips
Make sure the bottom of utensils and cooking areas
are clean and dry.
Select the correct heat settings and use saucepans
large enough to accommodate and liquid to eliminate
boilovers and splattering.
If possible, wipe up food spills from adjacent heating
areas before using the areas for cooking.
Note:
Use recommended ceramic hob cleaners only.
Cleaning
To keep exterior trims and control panel in spotless
condition, wipe after each use with a warm soapy
cloth.
Wipe the control knobs with a damp cloth, that was
wrung out in hot, soapy water, then dry thoroughly.
Remove any food spills on the hob as soon as possible
with a damp cloth.
Make sure that the hob is cool before applying any
cleaning materials.
Ceramic Hobs
Use Cleaner Conditioner daily. As it cleans, it leaves a
protective coating of silicone on the smooth surface, that
helps to prevent scratches and abrasions in which food
particles can collect. It also helps to prevent build-up of
mineral deposits and future cleaning is easier.
Apply a dab of cleaner in the centre of each heated
area to be cleaned. (For normal cleaning, start with
about 5ml spoonful of cleaner, apply more if needed).
Dampen a cloth and then proceed to clean the hob. To
remove more stubborn marks use a slightly dam-
penednon-stickpancleaner(e.g.Scotchbrite-Vileda).
Wipe off this application with another clean damp
cloth and dry thoroughly.
Any smearing or hazing on the surface can be remo-
ved with a lightly dampened cloth and then polished
with a soft dry cloth.
Note
If a wet paper towel is used to remove spills from a
warm cooking area, be careful to avoid steam burns.
Do not use a sponge or dishcloth. They leave a film of
water (which has added detergent) on heating areas,
which may turn brown and resemble dis-colouration,
next time the area is heated. If this happens, apply
Cleaner Conditioner to remove it.
MAINTENANCE AND CLEANING

13
How To Deal With Metal Marks
Metal deposits can be identified as grey/brown marks on
the ceramic surface and are usually caused by dragging
saucepans with aluminium bases, particu-larly when
new, across the ceramic surface.
To avoid these marks, protect the surface of the hob with
Cleaner Conditioner and lift the saucepans across the
heated areas. Ensure that new aluminium based
saucepans are well scrubbed on the base to remove any
rough edges and take off any deposits left from
manufacture.
The marks are easily removable, providing they are
cleaned off straight away using the recommended
cleaners, and are not allowed to burn onto the ceramic
surface for long periods.
About Discolouration
Discolouration occurs on the surface, not IN it.
By following proper care and cleaning recommen-
dations the surface will remain clean and bright.
The cooking surface should be cleaned thoroughly each
day to remove all visable spills. Cleaner Condi-tioner has
been specially formulated, to use only as much as
necessary. If the Cleaner Conditioner is used too
generously, a heavy film may be left that will burn on and
discolour when the areas are heated. When this occurs,
lightly scrub the surface with a dampened non-stick pan
cleaner, this will help to loosen the excess Cleaner
Conditioner. Then wipe the surface with a dampened
cloth and polish with a soft dry cloth.
Important Notes
a) In the event of the hob being scratched, spills will
collect and appear as fine lines. These are not fully
removable but, can be minimised by the daily use of
Cleaner Conditioner. These scratches do not affect
the cooking performance.
b) Spills from sugar solutions MUST be removed from
the hob before the syrup has set, otherwise damage
to the glass ceramic surface will occur.
c) Do not place aluminium foil dishes on the hot sur-face
as these will cause damage to the hob.
d) Hob Brite Cleaner Conditioner is the current recom-
mended cleaner for use on the ceramic hob.
e) Cleaner Conditioner is for the ceramic hob only and
must NOT be used as a general all purpose cleaner.
MAINTENANCE AND CLEANING

14
PRESERVING
1. Do not use a pan that overlaps the perimeter of the hob
trim.
2. To allow for a full rolling boil, the pan should be no more
than one third full when all the ingredients have been
added. It is better to use two pans rather than overfill
one, or use half quantities.
3. Use firm fruit or vegetables and wash well before using.
4. Preserving sugar gives clear jam, however granulated
sugar is cheaper and gives equally good flavour.
5. Crystallization may be caused if sugar is not comple-
tely dissolved before bringing jam to the boil. Over
boiling will affect the flavour, setting properties and
colour of the jam.
6. To test jam for setting:
If a jam thermometer is available, boil jam to 104°C.
Marmalade should be boiled to 106°C. If a thermo-
meter is not available, remove pan from heat, place
sample of jam on a cold dish and cool quickly (i.e. in
a freezer or frozen food storage compartment of a
refrigerator). When cold, it will crinkle and hold the
mark of a finger run through, if it is ready.
7. The scum should be removed as soon as possible
after setting, but marmalade should be allowed to cool
before potting to prevent the peel rising.
8. Remove soilage from sugar solutions on ceramic
glass hobs before the syrup has set otherwise
subsequent damage of the glass ceramic surface will
occur.

15
HELP US TO HELP YOU
Please determine your type of enquiry writing or telepho-
ning:
1. SERVICE
In the event of your appliance requiring service Tricity
Bendix Limited have an arrangement with Electrolux
Group Service.
Before calling out an Engineer, please ensure you have
read the details under the heading "Before Calling a
Service Engineer" and have the model number and
purchase date to hand. The telephone number and
address for service is detailed on the list headed "Tricity
Bendix Service Centres".
PLEASE NOTE that all enquiries concerning service
should be addressed to your local Customer Service
Centre.
2. CUSTOMER RELATIONS DEPARTEMENT
FOR GENERAL ENQUIRIES concerning your Tricity
Bendix appliance, or futher information on Cookers,
Microwaves, Refrigeration or Home Laundry equipment,
you are invited to contact our Customer Relations
Department.
We have fully trained Home Economists and Advisors
just a telephone call away who can provide product
information and brochures.
Do not hesitate to contact us by letter or telephone as
follows (or see Service Centres):
TRICITY BENDIX LTD.
99 Oakley Road
Luton
Bedfordshire LU4 9QQ
Tel.: 0582 494000

16
BEFORE CALLING A SERVICE ENGINEER
We strongly recommend that you carry out the following
checks on your appliance before calling a Service
Engineer. It may be that the problem is a simple one,
which you can solve yourself without the expense of a
Service call. If our Service Engineer finds that the
problem is listed below you will be charged for the call
whether or not the appliance is under guarantee:
Problem - Solution:
The hob does not work
check that it is switched on at the control panel.
check that the cooker point fuse is working.
The hotplates are slow to boil:
check that the recommended saucepans are being
used (see instructions).
The hotplates simmer inadequately:
check that the recommended saucepans are being
used (see instructions).
The Ceramic glass is stained or discoloured:
check that you have followed all the recommended
steps for cleaning as given in the instructions.
GUARANTEE
This Guarantee is offered to you as an extra benefit
and does not affect your legal rights.
Tricity Bendix products are carefully designed, manu-
factured, tested and inspected and in consequence we
undertake to replace or repair any part found to be
defective in material or workmanship, within one year of
delivery to the original purchaser, free of charge.
The Company does not accept liability for defects arising
from neglect, misuse or accident.
There are certain conditions which may invalidate this
guarantee:
a) It is dependant upon the appliance being correctly
installed and used in accordance with the Company's
instructions under normal domestic conditions within
the United Kingdom or the Republic of Ireland.
b) Service under the guarantee must be carried out by a
Tricity Bendix service representative or authorised
agent.
c) The guarantee may be invalidated by unauthorised
repair or modification of the appliance.
Proof of the date of purchase will be required before
service under guarantee is provided.
Addresses or telephone numbers for service requests
are detailed on "Tricity Bendix Service Centres".
We must point out that this guarantee does not
cover liability for loss of food or other contents.

17
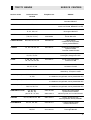
Service centre Postcode areas Telephone no. Address
covered
ABERDEEN DD, IV, KW, AB, PH 0224-696569 8 Cornhill Arcade, Cornhill Drive,
Aberdeen AB2 5UT
BELFAST BT 0232-746591 Unit C3, Edenderry Ind. Estate,
326 Crumlin Road, Belfast BT 14 7EE
BIRMINGHAM WR, DY, B, WV, 021-358 7076 8Lammermoor Avenue, Great Barr,
TF, ST, WS, SY Birmingham B43 6ET
BRISTOL (BA, BS, SN, TA) 0272-21 18 76 Waring House, Redcliffe Hill,
(TQ, EX, TR, PL) 0626-65909 Bristol BS1 6TB
CANVEY ISLAND RM, CM, SS, CO, IG 0268 694144 Canvey Centre
2-4Sandhurst, Kings Road,
Canvey Island SS8OQY
CARDIFF CF, HR, LD, NP, SA 0222 460131 Guardian Industrial Estate,
ClydesmuirRoad
Tremorfa, Cardiff CF2 2QS
GLASGOW DG, KA, ML, G, PA, 041 647 4381 20 Cunningham Road, ClydeEstate,
KY, EH, TD, FK Rutherglen, Glasgow G73 1PP
LEEDS S, DN, HU, YO, WF, 0532 608511 64-66 Cross Gates Road,
HX, HD, LS, HG, BD Leeds LS15 7NN
LEICESTER LE, DE, CV, NG, 0533 515131 10-12 Buckminster Road,
LN, PE, IP, NR Leicester LE3 9AR
LIVERPOOL CW, CH, LL, L, WA 051 254 1724 Unit 1, Honeys Green Lane,
West Derby, Liverpool L12 9JR
LONDON (North) E, EC, WC, N, NW 081-443 3464 London North Centre
W, EN 2-4 Sandhurst, Kings Road, Canvey Island SS8 0QY
LONDON (South) SE, SM, CR, BR, SW 081-658 9069 London South Centre
2-4 Sandhurst, Kings Road, Canvey Island SS8 0QY
LONDON (West) AL, CB, LU, MK, SG, 081-965 9699 London West Centre
WD, HA, UB, TW 2-4 Sandhurst, Kings Road, Canvey Island SS8 0QY
NEWTON AYCLIFFE (CA, DL, DH, 0325-301 400 PO Box 40 Preston Road,
NE, SR, TS) Aycliffe Industrial Estate,
(SK, M. BL. OL, BB, 0282-74621-4 Newton Aycliffe, Co. Durham DL5 6XL
OXFORD GL, HP, NN, OX, SL, RG 0993-704 411 Suite 3, Windrush Court,
56 A High Street, Witney OX8 6BL
PORTSMOUTH BH, DT, PO, SO, 0705-667 411 Limberline Road, Hilsea
Portsmouth PO3 5JJ
TONBRIDGE CT, DA, ME, TN, 0732- 357 722 61-63 High Street,
BN, RH 0273-694 341 Tonbridge TN9 1SD
TRICITY BENDIX SERVICE CENTRES

This handbook is accurate at the date of printing but will be superseded and should be disregarded if
specifications or appearance are changed in the interests of continued improvement.
TRICITY BENDIX
we'll do the homework
Tricity Bendix Limited, 99 Oakley Road, Luton Bedfordshire LU4 9QQ
09.1993 374 1039-01
-
 1
1
-
 2
2
-
 3
3
-
 4
4
-
 5
5
-
 6
6
-
 7
7
-
 8
8
-
 9
9
-
 10
10
-
 11
11
-
 12
12
-
 13
13
-
 14
14
-
 15
15
-
 16
16
-
 17
17
-
 18
18


Tricity Bendix HC312B User manual
- Category
- Hobs
- Type
- User manual
Ask a question and I''ll find the answer in the document
Finding information in a document is now easier with AI
Related papers
-
 Tricity Bendix HH352W User manual
-
 Tricity Bendix HH322W User manual
-
 Tricity Bendix HC312SS User manual
-
 Tricity Bendix HH321W User manual
-
 Tricity Bendix TM470AL User manual
-
 Tricity Bendix Si310W User manual
-
 Tricity Bendix 3100CW1 User manual
-
 Tricity Bendix SIE501W User manual
-
 Tricity Bendix Si340B User manual
-
 Tricity Bendix Si330W User manual


