
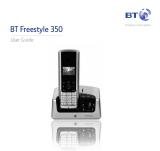
BT Verve 450
User Guide

• Ultra slim handset.
• Answering machine with up to 15 minutes digital recording time
and helpful voice prompts.
• 200 Name and number phonebook to store all your contact numbers
for easy dialling.
• Store a directory entry then copy it – or the entire phonebook –
to another BT Verve 450 handset.
• Send and receive text messages.
1
• Quick access to a range of BT Services including directory enquiries
and call divert.
• Caller Display lets you see who’s calling and your phone stores details
of the last 20 callers in a Calls list.
2
• Register up to 5 handsets to the base without the need for
additional wiring.
• Digital call quality with a range of up to 300 metres outdoors and
up to 50 metres indoors (in ideal conditions).
1 You must subscribe to your network provider’s Caller Display Service for text messaging to
work and you must not withhold your telephone number. A quarterly fee may be payable.
Some other network provider lines may not be compatible with this text messaging service.
2 You must subscribe to your network provider’s Caller Display or Call Waiting service for these
features to work. A quarterly fee may be payable.
Please note that this equipment is not designed for making emergency telephone calls when
the power fails. Alternative arrangements should be made for access to emergency services.
Welcome…
to your BT Verve 450 Digital Cordless
Telephone Answering Machine

Section
This User Guide provides you with all
the information you need to get the
most from your phone.
Before you make your first call you will
need to set up your phone. Follow the
simple instructions in ‘Getting Started’,
on the next few pages.
Need help?
If you have any problems setting up or using your
BT Verve 450 please call the Helpline on 0800 218 2182*
or email bt.helpdesk@vtecheurope.com
Alternatively, you may find the answer in the ‘Help’ section
at the back of this guide.
IMPORTANT
Only use the telephone line cord supplied.
Got everything?
• BT Verve 450 handset
• BT Verve 450 base
• 1 x NiMH rechargeable battery
(pre-installed)
• Mains power adaptor (item code
040367 for black product / item
code 045028 for white product)
• Telephone line cord
If you have purchased a
BT Verve 450 multiple pack
you will also have the following
items for each handset:
• BT Verve 450 additional handset
• BT Verve 450 charger
• 1 x NiMH rechargeable battery
(pre-installed)
• Small mains power adaptor for
charger (item code 040368 for
black product / item code
042169 for white product)
* Calls made from within the UK mainland network are free.
Mobile and International call costs may vary.

4
If you experience any problems, please call the Helpline on 0800 218 2182* or email [email protected]
In this guide
Getting started
Location . . . . . . . . . . . . . . . . . . . . . . . . . . . . . 7
Setting up. . . . . . . . . . . . . . . . . . . . . . . . . . . . 7
Setting up for multiple packs . . . . . . . . . . . . 9
Set date and time manually. . . . . . . . . . . . . . 10
Getting to know your phone
Handset buttons. . . . . . . . . . . . . . . . . . . . . . . 11
Handset display / display icons . . . . . . . . . . . 12
Base . . . . . . . . . . . . . . . . . . . . . . . . . . . . . . . . 13
Navigating the menus . . . . . . . . . . . . . . . . . . 14
Menu map . . . . . . . . . . . . . . . . . . . . . . . . . . . 15
Using the phone
Switching the handset on or off . . . . . . . . . . 16
Make an external call . . . . . . . . . . . . . . . . . . . 16
Preparatory dialling . . . . . . . . . . . . . . . . . . . . 16
End a call . . . . . . . . . . . . . . . . . . . . . . . . . . . . 16
Receive a call . . . . . . . . . . . . . . . . . . . . . . . . . 17
Call Waiting. . . . . . . . . . . . . . . . . . . . . . . . . . . 17
Earpiece / handsfree volume. . . . . . . . . . . . . 18
Secrecy (mute) . . . . . . . . . . . . . . . . . . . . . . . . 18
Handsfree . . . . . . . . . . . . . . . . . . . . . . . . . . . . 18
Make a handsfree call . . . . . . . . . . . . . . . . . . 18
Answer a call handsfree. . . . . . . . . . . . . . . . . 19
Switch to handsfree during a call . . . . . . . . . 19
Redial the last number called . . . . . . . . . . . . 19
Redial a number from the redial list . . . . . . . 20
Save a number from the redial list
to the directory . . . . . . . . . . . . . . . . . . . . . . . 20
Delete a redial number . . . . . . . . . . . . . . . . . 20
Delete all redial numbers . . . . . . . . . . . . . . . 21
Keypad lock . . . . . . . . . . . . . . . . . . . . . . . . . . 21
Find handset (paging) . . . . . . . . . . . . . . . . . . 22
Message & Call inbox . . . . . . . . . . . . . . . . . . . 22
Directory
Store a name and number . . . . . . . . . . . . . . . 23
View an entry . . . . . . . . . . . . . . . . . . . . . . . . . 24
View directory capacity . . . . . . . . . . . . . . . . . 24
Dial an entry . . . . . . . . . . . . . . . . . . . . . . . . . . 24
Edit a name and number . . . . . . . . . . . . . . . . 25
Copy an entry . . . . . . . . . . . . . . . . . . . . . . . . . 25
Copy all entries . . . . . . . . . . . . . . . . . . . . . . . . 26
Delete an entry. . . . . . . . . . . . . . . . . . . . . . . . 26
Delete entire directory. . . . . . . . . . . . . . . . . . 27
Edit call group name . . . . . . . . . . . . . . . . . . . 27
Change call group ringtone . . . . . . . . . . . . . . 28
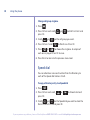
Speed dial. . . . . . . . . . . . . . . . . . . . . . . . . . . . 28
To copy a Directory entry to a Speed dial . . . 28
To delete a Speed dial . . . . . . . . . . . . . . . . . . 29
To edit a Speed dial . . . . . . . . . . . . . . . . . . . . 30
To dial using a Speed dial. . . . . . . . . . . . . . . . 30
4

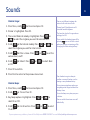
Sounds
Handset ringer . . . . . . . . . . . . . . . . . . . . . . . . 31
Handset beeps . . . . . . . . . . . . . . . . . . . . . . . . 31
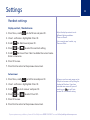
Settings
Display contrast / Handset name . . . . . . . . . 33
Auto answer . . . . . . . . . . . . . . . . . . . . . . . . . . 33
Handset reset . . . . . . . . . . . . . . . . . . . . . . . . . 34
Ringer . . . . . . . . . . . . . . . . . . . . . . . . . . . . . . . 34
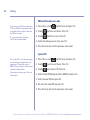
Handset priority . . . . . . . . . . . . . . . . . . . . . . . 35
Dialling mode . . . . . . . . . . . . . . . . . . . . . . . . . 35
PBX / switchboard access code . . . . . . . . . . . 36
System PIN . . . . . . . . . . . . . . . . . . . . . . . . . . . 36
System reset . . . . . . . . . . . . . . . . . . . . . . . . . . 37
Date / Time / Alarm
Set date & time . . . . . . . . . . . . . . . . . . . . . . . 38
Set alarm call . . . . . . . . . . . . . . . . . . . . . . . . . 39
Stop alarm ring. . . . . . . . . . . . . . . . . . . . . . . . 39
Calls lists
Caller Display . . . . . . . . . . . . . . . . . . . . . . . . . 40
Calls list . . . . . . . . . . . . . . . . . . . . . . . . . . . . . . 40
View call details . . . . . . . . . . . . . . . . . . . . . . . 40
Dial from the Calls list . . . . . . . . . . . . . . . . . . 41
Copy a Calls list number to the directory . . . 41
Calls list settings . . . . . . . . . . . . . . . . . . . . . . . 42
New call alert . . . . . . . . . . . . . . . . . . . . . . . . . 42
Delete an entry. . . . . . . . . . . . . . . . . . . . . . . . 43
Delete entire Calls list. . . . . . . . . . . . . . . . . . . 43
Voicemail . . . . . . . . . . . . . . . . . . . . . . . . . . . . 43
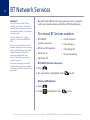
BT Network services
Pre-stored BT Services numbers . . . . . . . . . . 44
BT 118 500 (Directory Enquires) . . . . . . . . . 44
BT Verve 450 Helpdesk . . . . . . . . . . . . . . . . . 44
Call Divert on/off/check . . . . . . . . . . . . . . . . 45
Call Waiting on/off/check . . . . . . . . . . . . . . . 45
Answering machine
Using the answering machine
from the handset . . . . . . . . . . . . . . . . . . . . . . 46
Switch the answering machine on / off . . . . 46
Outgoing messages . . . . . . . . . . . . . . . . . . . . 47
Record your own outgoing message . . . . . . 47
Check or delete your outgoing message . . . 47
Answer settings . . . . . . . . . . . . . . . . . . . . . . . 48
Call screening . . . . . . . . . . . . . . . . . . . . . . . . . 49
Message playback . . . . . . . . . . . . . . . . . . . . . 50
Delete all old messages . . . . . . . . . . . . . . . . . 51
Using the answering machine at the base . . 51
Switch on / off . . . . . . . . . . . . . . . . . . . . . . . . 51
Message playback . . . . . . . . . . . . . . . . . . . . . 51
Remote access . . . . . . . . . . . . . . . . . . . . . . . . 52
5In this guide
If you experience any problems, please call the Helpline on 0800 218 2182* or email [email protected]

To enable / disable remote access. . . . . . . . . 52
If you forget to switch on your
answering machine . . . . . . . . . . . . . . . . . . . . 53
Operating your answering
machine remotely . . . . . . . . . . . . . . . . . . . . . 53
Text messaging
Subscribe to the text messaging service. . . . 55
Cost of the fixed line service . . . . . . . . . . . . . 55
Send a text message . . . . . . . . . . . . . . . . . . . 56
Using the Outbox . . . . . . . . . . . . . . . . . . . . . . 57
Receiving messages . . . . . . . . . . . . . . . . . . . . 58
Read messages . . . . . . . . . . . . . . . . . . . . . . . . 58
Edit or delete templates. . . . . . . . . . . . . . . . . 59
Service Centre numbers. . . . . . . . . . . . . . . . . 60
Add or change Service Centre numbers . . . . 60
Select Send Service Centre . . . . . . . . . . . . . . 61
Switch new message alert on or off . . . . . . . 62
Using additional handsets
Registering an additional handset . . . . . . . . 63
Select base . . . . . . . . . . . . . . . . . . . . . . . . . . . 64
De-register a handset . . . . . . . . . . . . . . . . . . 64
Internal calls . . . . . . . . . . . . . . . . . . . . . . . . . . 65
Call another handset . . . . . . . . . . . . . . . . . . . 65
Transfer a call . . . . . . . . . . . . . . . . . . . . . . . . . 65
3-way conference call . . . . . . . . . . . . . . . . . . 66
Help . . . . . . . . . . . . . . . . . . . . . . . . . . . . . . . . . 67
General information
Safety information . . . . . . . . . . . . . . . . . . . . . 74
Cleaning . . . . . . . . . . . . . . . . . . . . . . . . . . . . . 75
Environmental . . . . . . . . . . . . . . . . . . . . . . . . 75
Product disposal instructions . . . . . . . . . . . . 75
Guarantee . . . . . . . . . . . . . . . . . . . . . . . . . . . 76
Technical information. . . . . . . . . . . . . . . . . . . 77
R&TTE . . . . . . . . . . . . . . . . . . . . . . . . . . . . . . . 77
Declaration of Conformance . . . . . . . . . . . . . 77
Connecting to a switchboard. . . . . . . . . . . . . 77
Inserting a pause . . . . . . . . . . . . . . . . . . . . . . 77
Recall . . . . . . . . . . . . . . . . . . . . . . . . . . . . . . . 77
6 In this guide
If you experience any problems, please call the Helpline on 0800 218 2182* or email [email protected]

Location
Place your BT Verve 450 within 2 metres of the mains power
socket and telephone socket so that the cables will reach.
Make sure it is at least 1 metre away from other electrical
appliances to avoid interference.
Your BT Verve 450 works by sending radio signals between the
handset and base. The strength of the signal depends on
where you site the base. Putting it as high as possible ensures
the best signal.
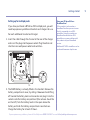
Setting up
1. Plug the mains power cable into the socket marked on the
underside of the base and plug the other end into the mains
power wall socket and switch the power on. You can place the
cable behind the retaining clip to prevent the plug being
accidentally pulled from the socket.
Getting started
7
WARNING
Do not place your BT Verve 450 in the
bathroom or other humid areas.
Handset range
The BT Verve 450 has a range of 300
metres outdoors when there is a clear
line of sight between the base and
handset. Any obstruction between the
base and handset will reduce the range
significantly. With the base indoors
and handset either indoors or
outdoors, the range will normally be
up to 50 metres. Thick stone walls can
severely affect the range.
Signal strength
The icon on your handset indicates
when you are in range. If moving out
of range of the base, the range
indicator will flash. If you go out of
range, any call you are on will be lost.
Which power adaptor?
If you have purchased a multiple pack,
you should use the power adaptor with
the smallest plug for the base.
IMPORTANT
The base station must be plugged into
the mains power socket at all times.
Do not connect the telephone line
until the handset is fully charged.
Only use the power and telephone
cables supplied with the product.
If you experience any problems, please call the Helpline on 0800 218 2182* or email [email protected]

Battery low warning
If the icon flashes in the handset
display you will need to recharge the
handset before you can use it again.
You also hear a low battery warning
beep once every 60 seconds.
During charging, the icon will scroll
in the display.
Battery performance
In ideal conditions, a fully charged
battery should give up to 10 hours talk
time or 100 hours standby time on a
single charge.
Note that new batteries do not reach
full capacity until they have been in
normal use for several days.
To keep the battery in the best
condition, leave the handset off the
base for a few hours at a time.
Running the battery right down at
least once a week will help it last as
long as possible.
The charge capacity of rechargeable
batteries will reduce with time as they
wear out, giving the handset less
talk/standby time. Eventually they will
need to be replaced. New batteries are
available from the BT Verve 450
Helpline on 0800 218 2182*.
After charging your handset for the
first time, subsequent charging time is
about 6–8 hours a day. Batteries and
handset may become warm during
charging. This is normal.
The base indicator lights up. The answering machine is
switched on.
2. The NiMH battery is already fitted in the handset. Remove the
battery compartment cover, by sliding it downward and lifting
it off.
Locate the battery lead and connector and plug it into the
socket inside the battery compartment (the red wire should be
on the left). Tuck the battery leads in the space above the
battery and slide the battery compartment cover back on.
3. Place the handset on the base to charge for at least 20 hours.
When the handset is fully charged the icon will be displayed.
4. When the battery is fully charged, plug one end of the
telephone line cord into the socket marked on the rear of
the base and the other end into the telephone wall socket.
8 Getting started
If you experience any problems, please call the Helpline on 0800 218 2182* or email [email protected]

Setting up for multiple packs
If you have purchased a BT Verve 450 multiple pack, you will
need to prepare any additional handsets and chargers for use.
For each additional handset and charger:
1. Insert the cable through the channel at the rear of the charger
and insert the plug into the power socket. Plug the other end
into the mains wall power socket and switch on.
2. The NiMH battery is already fitted in the handset. Remove the
battery compartment cover, by sliding it downward and lifting
off. Locate the battery lead and connector and plug it into the
socket inside the battery compartment (the red wire should be
on the left). Tuck the battery leads in the space above the
battery and slide the battery compartment cover back on.
Charge the battery for at least 20 hours.
9Getting started
Using your BT Verve 450 on a
Broadband line?
If this product is to be used on a
broadband line then you must ensure
that it is connected via an ADSL
microfilter. Using this product on a
Broadband line without an ADSL
microfilter may cause problems with
this product and your Broadband
service.
Additional BT ADSL microfilters can be
purchased from www.shop.bt.com
If you experience any problems, please call the Helpline on 0800 218 2182* or email [email protected]

Date and time
Providing you have subscribed to your
network’s Caller Display service, the
date and time is set automatically for
all handsets when you receive your
first call.
The date and time is recorded with
each answering machine message you
receive.
If you do not have a Caller Display
service you can set the date and time
manually.
Any additional handsets supplied as part of a multipack are
pre-registered to the base so, once charged, are ready for use.
The handset number is shown in the display.
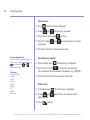
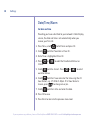
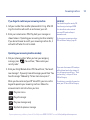
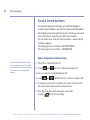
Set date and time manually
1. Press
Menu
and scroll to
Settings
and press
OK
.
2. Scroll to
Clock/Time/Alarm
then press
OK
.
3.
Date
/
Time
is highlighted. Press
OK
.
4. The current Time format is highlighted. Scroll or
to choose
24 hour
or
12 hour
.
5. Scroll to
Date format
and scroll or to choose
dd/mm
or
mm/dd
.
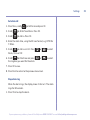
6. Scroll to
Enter time
and enter the time
e.g. 1705 for 5 05 pm.
7. Scroll to
Enter date
and enter the date, e.g. 09 06 07
for 9th June 2007.
8. Press
OK
to save.
9. Press
Back
until you return to standby.
Your BT Verve 450 is ready for use.
10 Getting started
If you experience any problems, please call the Helpline on 0800 218 2182* or email [email protected]

11
If you experience any problems, please call the Helpline on 0800 218 2182* or email [email protected]
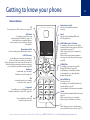
Getting to know your phone
BT
Press to open the BT Services menu, page 44.
(UP) Redial
In standby, press to open and
scroll through the Redial list, page 19.
In talk mode, press to adjust volume.
In menu mode, press to scroll up through
the options.
Option button (left)
Press to select options displayed on screen.
(LEFT) Directory
In standby, press to access the directory.
When on a call press to mute the handset.
When entering text, press to move the cursor left.
When listening to answering machine messages,
press to play the previous message, page 50.
Handsfree
In talk mode, press to switch
handsfree on and off, page 18.
Talk
In standby mode, press to make
and receive calls, page 16.
1 Voicemail
In standby, press and hold to dial your
network’s voicemail service 1571, page 43.
,
Press and hold to switch the
handset ringer on or off.
Option button (right)
Press to select options displayed
on screen.
Recall
For use with switchboard/PBX and
BT Calling Features.
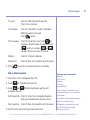
(RIGHT) Messages & Call inbox
In standby, press to access the Calls list,
answering machine messages or SMS text
messages menu, page 22.
When entering text, press to move the
cursor right.
When listening to answering machine
messages, press to skip to next message,
page 50.
(DOWN) Calls
In standby, press to open and scroll
through the Calls list, page 40.
In talk mode, press to adjust volume.
In menu mode, press to scroll down
through the options.
End call/Off or On
Press to end a call.
In standby, press and hold to switch the
handset off/on, page 16.
In menu mode, press to return to standby.
#/Lock
Press and hold to lock/unlock the keypad,
page 21.
When entering text, press to switch
between upper and lower case letters.
0
When storing an entry in the directory,
press and hold to enter a Pause, page 77.
Handset buttons
Menu
Int

12
If you experience any problems, please call the Helpline on 0800 218 2182* or email [email protected]
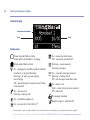
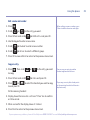
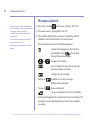
Handset display
Getting to know your phone
Display icons
Shows handset battery status.
Scrolls when the handset is charging.
Empty when filled in black.
On – displayed in standby mode to indicate
handset is in range of the base.
Flashing – to warn you are moving
out of range.
Off – out of range or cannot connect to the
base selected.
On – during a call.
Flashing incoming call.
On – handsfree speaker on.
On – missed call in the Calls list.*
On – answering machine on.
Off – answering machine off.
Flashing – new answering
machine messagse.
On – new text message received.
Flashing – mailbox is full.
Off – all messages have been read.
On – alarm is set.
Flash – alarm time has been reached.
Off – alarm off.
The keypad is locked.
Handset ringer is switched off.
* For this feature to work you must subscribe to your network provider’s Caller Display service. A quarterly fee may be payable.
Handset name/number
Time
Date

Base
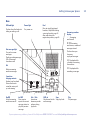
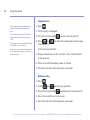
Getting to know your phone
Off hook light
Flashes when the handset is
taking or making a call.
Power light
On: power on.
Find
Press to ring all registered
handsets, helpful for finding
a missing handset, page 22.
Also used during the
registration process, page 63.
On/Off
Switch answering
machine on or off.
I
SKIP
Press once to
repeat the current
message, twice to
play the previous
message.
Vol + / Vol –
Increase or
decrease speaker
volume during
play back.
SKIP
I
Skip forward to the
next message.
Stop
Stop play back.
Play
Play messages.
Answering machine
display
- -
Answering
machine off.
0-99
Answering
machine on, number of
messages stored.
Flashes when you
have new,
unplayed messages.
rA
Displayed while
a handset is accessing
the machine.
rE
Displayed while
recording a message.
Text message light
On: you have new
messages.
Flashing: sending message
Off: all messages
have been read.
Del
Delete answering
machine messages.
2-position
charging contacts
Handset can be placed
flat on the base or
raised for easier pick
up and viewing.
13
If you experience any problems, please call the Helpline on 0800 218 2182* or email [email protected]

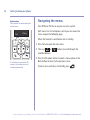
Navigating the menus
Your BT Verve 450 has an easy to use menu system.
Each menu has a list of options, which you can see on the
menu map on the following page.
When the handset is switched on and in standby:
1. Press
Menu
to open the main menu.
2. Then use or buttons to scroll through the
available options.
3. Press the
OK
option button to select a menu option or the
Back button to return to the previous screen.
To exit a menu and return to standby, press .
14 Getting to know your phone
If you experience any problems, please call the Helpline on 0800 218 2182* or email [email protected]
Option buttons
Press to select the option displayed
on the screen.
If no buttons are pressed for 30
seconds, the handset returns to
standby automatically.
Menu
Int
Options
Up
Down

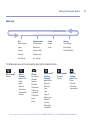
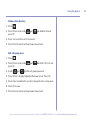
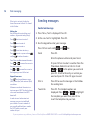
Menu map
15Getting to know your phone
If you experience any problems, please call the Helpline on 0800 218 2182* or email [email protected]
Text
Write new text
Inbox
Outbox
Template
Text settings
Answer machine
Play messages
Delete msg
Answer on/off
Outgoing msg
Ans. settings
Sound
Ringer
Tones
Settings
H/set settings
Base settings
Date/Time/Alarm
The following menus can be accessed by pressing the relevant button:
Calls list empty
Settings
Calls list
displayed,
press
Option
Details
Delete
Delete all
Call number
Store number
Settings
BT menu
Dir enquiries
Helpdesk
Divert on
Divert off
Check divert
Call wait on
Call wait off
Chk call wait
Empty
Empty
Names menu
Directory
displayed,
press
Option
New entry
Edit entry
View
Copy
Copy all
Delete entry
Delete all
Capacity
Edit call grp
Speed dial
Directory empty
New entry
Capacity
Redial list
displayed,
press
Option
Delete
Delete all
Call number
Store number
or or

Using the phone
16
When you make a call, the
light on the base flashes.
Call timer
Your handset will automatically time
the duration of all external calls.
The handset display shows the call
duration both during and for a few
seconds after your call.
Out of range warning
When the handset goes out of range of
the base, the flashes.
If you are on a call, the line will hang
up. Move back within in range. The
handset will automatically re-connect
to the base.
Switch handset on or off
To switch off
1. Press and hold .
2.
Switch off?
is displayed, press
Yes
to confirm.
To switch on
1. Press and hold .
2.
Switch off?
is displayed, press
No
.
Make an external call
1. Press .
2. When you hear the dial tone, dial the number.
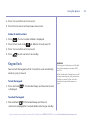
Preparatory dialling
1. Dial the number first. If you make a mistake press
Clear
to
delete the last digit.
2. Press to dial.
End a call
1. Press .
If you experience any problems, please call the Helpline on 0800 218 2182* or email [email protected]

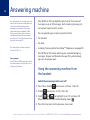
Receive a call
When you receive a call, the phone rings. The display shows
the caller’s number if available or the caller’s name if it
matches an entry in the phonebook. If you do not have a
Caller Display service, the screen shows
External call
.
1. Press .
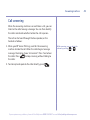
Call Waiting
Providing you have subscribed to your network’s Call Waiting
service and it is switched on, your BT Verve 450 will alert you
to a second incoming call while you are already engaged on an
external call.
1. You will hear the call waiting tone and the display will show
the number of the caller, or the name if it matches an entry in
your directory.
2. Press to answer the new call and your first caller is put
on hold.
3. Press to toggle between the two callers.
4. Press to hang up the current call.
17Using the phone
To switch your call waiting service on
or off, see page 45.
If you experience any problems, please call the Helpline on 0800 218 2182* or email [email protected]
Auto answer
As long as you have auto answer set to
ON you can answer a call by lifting the
handset off the base. If you have
switched auto answer off, you will
need to press as well. Auto answer
ON is the default setting. See page 33.

During a handsfree call, press or
to change the volume.
Earpiece / handsfree volume
During a call you can adjust the volume of the earpiece or
loudspeaker. There are 5 levels.
1. Press or to increase or decrease the volume.
Secrecy (Mute)
During a call, you can talk to someone nearby without your
caller hearing.
1. Press . The display shows
Mute on
and your caller cannot
hear you.
2. Press again to return to your caller.
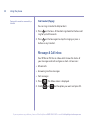
Handsfree
Handsfree lets you talk to your caller without holding the
handset. It also enables other people in the room to listen to
your conversation over the loudspeaker.
Make a handsfree call
1. Dial the number then press . is displayed. You hear your
call over the handset loudspeaker. Press to switch the call
between the earpiece and the loudspeaker.
18 Using the phone
If you experience any problems, please call the Helpline on 0800 218 2182* or email [email protected]

2. Press to end the call.
Answer a call handsfree
When the phone rings:
1. Press . The call is transferred to the handset loudspeaker.
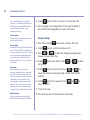
Switch to handsfree during a call
1. During a call: press to put the call on the loudspeaker.
To switch handsfree off and return the call to the earpiece,
press again.
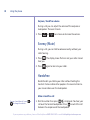
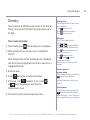
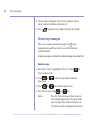
Redial
Up to the last 15 telephone numbers called are saved in the
redial list. You can then select any of the numbers to redial,
delete or copy to the directory.
Redial the last number called
1. Press the last number you called is displayed.
2. Press to dial.
19Using the phone
If you experience any problems, please call the Helpline on 0800 218 2182* or email [email protected]

Press Clear to delete any unwanted
digits and then enter new ones using
the keypad.
If the directory is full, the display
shows Memory full and the number
will not be saved. You will need to
delete a number in the directory first,
see page 26.
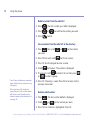
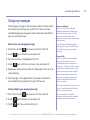
Redial a number from the redial list
1. Press , the last number you called is displayed.
2. Press or to scroll to the number you want.
3. Press to dial.
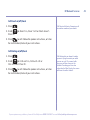
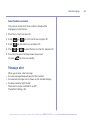
Save a number from the redial list to the directory
1. Press then scroll or to the number
you want.
2. Press
Option
and scroll to
Store number
.
3. Press
OK
. Use the keypad to enter a name.
4. Scroll to
Number
. The number is displayed.
5. If required, scroll to
Select Group
then press
or to select a group.
6. Press
OK
. The entry is saved. Press
Back
to return to the
previous menu level.
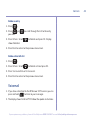
Delete a redial number
1. Press . The last number dialled is displayed.
2. Scroll or to the number you want.
3. Press
Option
.
Delete
is highlighted. Press
OK
.
20 Using the phone
If you experience any problems, please call the Helpline on 0800 218 2182* or email [email protected]
Page is loading ...
Page is loading ...
Page is loading ...
Page is loading ...
Page is loading ...
Page is loading ...
Page is loading ...
Page is loading ...
Page is loading ...
Page is loading ...
Page is loading ...
Page is loading ...
Page is loading ...
Page is loading ...
Page is loading ...
Page is loading ...
Page is loading ...
Page is loading ...
Page is loading ...
Page is loading ...
Page is loading ...
Page is loading ...
Page is loading ...
Page is loading ...
Page is loading ...
Page is loading ...
Page is loading ...
Page is loading ...
Page is loading ...
Page is loading ...
Page is loading ...
Page is loading ...
Page is loading ...
Page is loading ...
Page is loading ...
Page is loading ...
Page is loading ...
Page is loading ...
Page is loading ...
Page is loading ...
Page is loading ...
Page is loading ...
Page is loading ...
Page is loading ...
Page is loading ...
Page is loading ...
Page is loading ...
Page is loading ...
Page is loading ...
Page is loading ...
Page is loading ...
Page is loading ...
Page is loading ...
Page is loading ...
Page is loading ...
Page is loading ...
Page is loading ...
Page is loading ...
Page is loading ...
Page is loading ...
-
 1
1
-
 2
2
-
 3
3
-
 4
4
-
 5
5
-
 6
6
-
 7
7
-
 8
8
-
 9
9
-
 10
10
-
 11
11
-
 12
12
-
 13
13
-
 14
14
-
 15
15
-
 16
16
-
 17
17
-
 18
18
-
 19
19
-
 20
20
-
 21
21
-
 22
22
-
 23
23
-
 24
24
-
 25
25
-
 26
26
-
 27
27
-
 28
28
-
 29
29
-
 30
30
-
 31
31
-
 32
32
-
 33
33
-
 34
34
-
 35
35
-
 36
36
-
 37
37
-
 38
38
-
 39
39
-
 40
40
-
 41
41
-
 42
42
-
 43
43
-
 44
44
-
 45
45
-
 46
46
-
 47
47
-
 48
48
-
 49
49
-
 50
50
-
 51
51
-
 52
52
-
 53
53
-
 54
54
-
 55
55
-
 56
56
-
 57
57
-
 58
58
-
 59
59
-
 60
60
-
 61
61
-
 62
62
-
 63
63
-
 64
64
-
 65
65
-
 66
66
-
 67
67
-
 68
68
-
 69
69
-
 70
70
-
 71
71
-
 72
72
-
 73
73
-
 74
74
-
 75
75
-
 76
76
-
 77
77
-
 78
78
-
 79
79
-
 80
80


Ask a question and I''ll find the answer in the document
Finding information in a document is now easier with AI
Related papers
Other documents
-
Telefunken TD 291 COLOMBO User guide
-
Philips 800 User manual
-
 British Telecom 28612 Datasheet
-
 British Telecom 19559 Datasheet
-
 British Telecom 32115 Datasheet
-
British Telecom Paragon 650 User guide
-
 British Telecom 19812 Datasheet
-
British Telecom Paragon 510 User guide
-
Motorola D1110 Series User manual
-
ASCOM D62 Quick start guide


