Netopia
™
4652 SDSL/IDSL Router
Getting Started Guide
M
AKING
B
ROADBAND
W
ORK
™

Copyright
©2002 Netopia, Inc., v.053002
All rights reserved. Printed in the U.S.A.
This manual and any associated artwork, software, and product designs are copyrighted with
all rights reserved. Under the copyright laws such materials may not be copied, in whole or
part, without the prior written consent of Netopia, Inc. Under the law, copying includes
translation to another language or format.
Netopia, Inc.
2470 Mariner Square Loop
Alameda, CA 94501-1010
U.S.A.
Part Number
For additional copies of this electronic manual, order Netopia part number 6180029-00-01.

Contents 3
G
Chapter 1 — Introduction.............................................................5
Overview.......................................................................... 5
Features and Capabilities.................................................. 5
How to Use this Guide....................................................... 6
Chapter 2 — Making the Physical Connections.............................7
Find a Location................................................................. 7
What You Need................................................................. 7
Important Safety Instructions ............................................ 8
Identify the Connectors and Attach the Cables.................... 9
Netopia 4652 SDSL/IDSL Router Status Lights ................ 11
Chapter 3 — Connecting to Your Local Area Network..................13
Readying Computers on Your Local Network...................... 13
Connecting to an Ethernet Network .................................. 14
Chapter 4 — Sharing the Connection..........................................17
Configuring TCP/IP on Windows-based Computers............. 17
Dynamic configuration (recommended).................... 18
Static configuration (optional)................................. 19
Configuring TCP/IP on Macintosh Computers .................... 21
Dynamic configuration (recommended).................... 21
Static configuration (optional)................................. 22
Chapter 5 — Console-Based Management..................................25
Connecting through a Telnet Session................................ 26
Configuring Telnet software.................................... 27
Connecting a Console Cable to Your Router ...................... 27
Navigating through the Console Screens........................... 28
Chapter 6 — Easy Setup............................................................29
Easy Setup Console Screens........................................... 29
Accessing the Easy Setup console screens............. 29
Quick Easy Setup Connection Path................................... 31
DSL Line Configuration .......................................... 33
CC
CC
oo
oo
nn
nn
tt
tt
ee
ee
nn
nn
tt
tt
ss
ss

4 User’s Reference Guide
Easy Setup Profile................................................. 35
IP Easy Setup ....................................................... 36
Easy Setup Security Configuration .......................... 38
Appendix A — Technical Specifications and Safety Information ...41
Description..................................................................... 41
Power requirements .............................................. 41
Environment ......................................................... 41
Software and protocols.......................................... 41
Agency Approvals............................................................ 41
Regulatory notices ................................................ 42
Important safety instructions................................. 43
Limited Warranty and Limitation of Remedies-Revised
January 2002.............................................................................45

Introduction 1-5
CC
CC
hh
hh
aa
aa
pp
pp
tt
tt
ee
ee
rr
rr
11
11
II
II
nn
nn
tt
tt
rr
rr
oo
oo
dd
dd
uu
uu
cc
cc
tt
tt
ii
ii
oo
oo
nn
nn
Overview
The Netopia 4652 SDSL/IDSL Router is a full-featured, stand-alone DSL router for connecting diverse local area
networks (LANs) to the Internet and other remote networks. The Netopia 4652 SDSL/IDSL Router uses a high
performance SDSL or IDSL line to provide your whole network with a high-speed connection to the outside
world.
This section covers the following topics:
■
“Features and Capabilities” on page 1-5
■
“How to Use this Guide” on page 1-6
Features and Capabilities
The Netopia 4652 SDSL/IDSL Router provides the following features:
■
SDSL/IDSL WAN interface supports symmetric data rates from 144 kbps to 2.32 Mbps
■
Interoperable with a wide array of DSLAM equipment
■
Support for Ethernet LANs with multiple Ethernet IP subnets
■
Four 10/100-Base T Ethernet ports connect easily to an existing LAN. An integrated 4-port 10/100BaseT
Ethernet switch delivers speed and performance for connected workstations, servers, or existing LAN
environments
■
IP routing for Internet and Intranet connectivity
■
NAT/NATP, multi-NAT, and DHCP for security and convenience
■
Built-in VPN acceleration delivers wire-speed VPN performance
■
Built-in firewall protects LAN resources from Internet intruders
■
Support for Console-based management
■
Console-based Telnet client
■
UNIX syslog client
■
Status lights (LEDs) for easy monitoring and troubleshooting
■
Wall-mountable, Bookshelf (Side-stackable), or Desktop-stackable design for efficient space usage

1-6 Getting Started Guide
How to Use this Guide
In addition to the documentation contained in the accompanying
Firmware User’s Guide
, this guide is designed
to get you up and running and connected to your local area network and the Internet. It is intended to be viewed
on-line, using the powerful features of the Adobe Acrobat Reader. The information display has been deliberately
designed to present the maximum information in the minimum space on your screen. You can keep this
document open while you perform any of the procedures described, and find useful information about the
procedure you are performing.
You can also print out all of the manual, or individual sections, if you prefer to work from hard copy rather than
on-line documentation. The pages are formatted to print on standard 8 1/2 by 11 inch paper. We recommend
that you print on 3-hole punched paper, so that you can put the pages in a binder for future reference.
This guide is organized into chapters describing the Netopia 4652’s advanced features. You may want to read
each chapter’s introductory section to familiarize yourself with the various features available.
Use the guide’s table of contents and index to locate informational topics.

Making the Physical Connections 2-7
CC
CC
hh
hh
aa
aa
pp
pp
tt
tt
ee
ee
rr
rr
22
22
MM
MM
aa
aa
kk
kk
ii
ii
nn
nn
gg
gg
tt
tt
hh
hh
ee
ee
PP
PP
hh
hh
yy
yy
ss
ss
ii
ii
cc
cc
aa
aa
ll
ll
CC
CC
oo
oo
nn
nn
nn
nn
ee
ee
cc
cc
tt
tt
ii
ii
oo
oo
nn
nn
ss
ss
This section tells you how to make the physical connections to your Netopia 4652 SDSL/IDSL Router. This
section covers the following topics:
■
“Find a Location” on page 2-7
■
“What You Need” on page 2-7
■
“Identify the Connectors and Attach the Cables” on page 2-9
■
“Netopia 4652 SDSL/IDSL Router Status Lights” on page 2-11
Find a Location
When choosing a location for the Netopia SDSL/IDSL Router, consider:
■
Available space and ease of installation
■
Physical layout of the building and how to best use the physical space available for connecting your Netopia
SDSL/IDSL Router to the LAN
■
Available wiring and jacks
■
Distance from the point of installation to the next device (length of cable or wall wiring)
■
Ease of access to the front of the unit for configuration and monitoring
■
Ease of access to the back of the unit for checking and changing cables
■
Cable length and network size limitations when expanding networks
For small networks, install the Netopia 4652 near one of the LANs. For large networks, you can install the
Netopia 4652 in a wiring closet or a central network administration site.
What You Need
Locate all items that you need for the installation.
Included in your router package are:
■
The Netopia 4652 SDSL/IDSL Router
■
A power adapter and cord with a mini-DIN8 connector
■
One Category 5 Ethernet cable
■
One Category 5 DSL WAN (or Line) cable
■
A DB-9 to DB-9 console cable
■
The Netopia CD containing software and documentation

2-8 Getting Started Guide
You will need:
■
A Windows–based PC or a Macintosh computer with Ethernet connectivity for configuring the Netopia 4652.
This may be built-in Ethernet or an add-on card, with TCP/IP installed and configured. See “Sharing the
Connection” on page 4-17.
■
A DSL wall outlet wired for a connection to a telephone carrier who supports Symmetric Digital Subscriber
Line (SDSL) or ISDN DSL (IDSL) connections.
Important Safety Instructions
CAUTION: Depending on the power supply provided with the product, either the direct plug-in power supply
blades, power supply cord plug or the appliance coupler serves as the main power disconnect. It is
important that the direct plug-in power supply, socket-outlet or appliance coupler be located so it is readily
accessible.
CAUTION (North America Only): For use only with a CSA Certified or UL Listed Limited Power Source or
Class 2 power supply, rated 12Vdc, 1.5A.
CAUTION (Europe Only): For use only with a GS approved Limited Power Source, rated 12Vdc, 1.5A.
TELECOMMUNICATION INSTALLATION CAUTIONS
When using your telephone equipment, basic safety precautions should always be followed to reduce the
risk of fire, electric shock and injury to persons, including the following:
1. Do not use this product near water, for example, near a bathtub, wash bowl, kitchen sink or laundry
tub, in a wet basement or near a swimming pool.
2. Avoid using a telephone (other than a cordless type) during an electrical storm. There may be a remote
risk of electrical shock from lightning.
3. Do not use the telephone to report a gas leak in the vicinity of the leak.
SAVE THESE INSTRUCTIONS

Making the Physical Connections 2-9
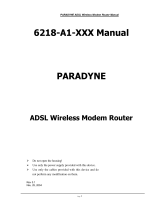
Identify the Connectors and Attach the Cables
Identify the connectors and switches on the back panel and attach the necessary Netopia Router cables.
The figure below displays the back of the Netopia 4652 SDSL/IDSL Router.
Power
Ethernet
DSL
2 DSL
3
1 Ethernet
Power
1 Computer
1 Netopia Router
Connect your computer, DSL
line, and power source as
shown.
1. For a direct computer to
router Ethernet connection,
use the standard Ethernet
cable included with your
router.
2. Use the supplied DSL line
cable to connect the router
to your DSL wall outlet.
3. Connect the supplied
power brick to a power outlet
and the mini-DIN8 connector
end to the router.

2-10 Getting Started Guide
Netopia 4652 back panel
.
1. Connect the mini-DIN8 connector from the power adapter to the power port, and plug the other end into an
electrical outlet.
2. Connect one end of the Category 5 cable to the DSL port, and the other end to your DSL wall outlet.
3. Connect the Ethernet cable to an Ethernet port on the router and the other end to your computer.
You should now have: the power adapter plugged in; the Ethernet cable connected between the router and
your computer; and the DSL cable connected between the router and the DSL wall outlet.
Port Description
DSL port An RJ-48 jack labeled DSL for your SDSL or IDSL connection. The Netopia 4652
supports connections to either SDSL or IDSL lines.
Ethernet ports Four RJ-45 10/100Base-T Ethernet jacks. You will use any one of these to configure the
Netopia 4652. For a new installation, use an Ethernet connection. Alternatively, you can
use the console connection to run console-based management using a direct serial
connection. You can either connect your computer directly to an Ethernet port using the
supplied Category 5 Ethernet cable, or connect both your computer and the Netopia
4652 to an existing LAN environment. All of the ports are auto-sensing, eliminating the
need for crossover cables.
Console port A DB-9 console port for a direct serial connection to the console screens. You can use
this if you are an experienced user. See “Connecting a Console Cable to Your Router” on
page 5-27.
Power port A mini-DIN8 power adapter cable connection.
DSL
Ethernet
4321
Console Power
DSL port Ethernet ports Console port Power port

Making the Physical Connections 2-11
Netopia 4652 SDSL/IDSL Router Status Lights
The figure below represents the Netopia 4652 status light (LED) panel.
Netopia 4652 LED front panel
The following table summarizes the meaning of the various LED states and colors:
When this happens... the LEDs...
The power is on
Power
is green.
The Router detects an error
Alert
is red.
The WAN is training
SDSL
or
IDSL
flashes green.
The WAN has trained
SDSL
or
IDSL
is green.
An Ethernet port is connected to an Ethernet link partner
device
P1
,
P2
,
P3
, or
P4 Ethernet
is solid green.
An Ethernet port has traffic
P1
,
P2
,
P3
, or
P4 Ethernet
flashes green.
Note:
The remaining LEDs are not used.
POWER
SDSL
IDSL
P1
P2
P3
P4
ETHERNET
ALERT

2-12 Getting Started Guide

Connecting to Your Local Area Network 3-13
CC
CC
hh
hh
aa
aa
pp
pp
tt
tt
ee
ee
rr
rr
33
33
CC
CC
oo
oo
nn
nn
nn
nn
ee
ee
cc
cc
tt
tt
ii
ii
nn
nn
gg
gg
tt
tt
oo
oo
YY
YY
oo
oo
uu
uu
rr
rr
LL
LL
oo
oo
cc
cc
aa
aa
ll
ll
AA
AA
rr
rr
ee
ee
aa
aa
NN
NN
ee
ee
tt
tt
ww
ww
oo
oo
rr
rr
kk
kk
This chapter describes how to physically connect the Netopia 4652 to your local area network (LAN). Before you
proceed, make sure the Netopia 4652 is properly configured. You can customize the router’s configuration for
your particular LAN requirements using console-based management (see “Console-Based Management” on
page 5-25).
This section covers the following topics:
■
“Readying Computers on Your Local Network” on page 3-13
■
“Connecting to an Ethernet Network” on page 3-14
Readying Computers on Your Local Network
PC and Macintosh computers must have certain components installed before they can communicate through
the Netopia 4652. The following illustration shows the minimal requirements for a typical PC or Macintosh
computer.
Application software:
This is the software you use to send e-mail, browse the World Wide Web, read
newsgroups, etc. These applications may require some configuration. Examples include the Eudora e-mail client
and the Web browsers Microsoft Internet Explorer and Netscape Navigator.
TCP/IP stack:
This is the software that lets your PC or Macintosh computer communicate using Internet
protocols. TCP/IP stacks must be configured with some of the same information you used to configure the
Netopia 4652. There are a number of TCP/IP stacks available for PC computers. Windows 95 includes a built-in
TCP/IP stack. Macintosh computers use either MacTCP or Open Transport. See “Configuring TCP/IP on
Windows-based Computers” on page 4-17. Macintosh computers use either MacTCP or Open Transport. See
“Configuring TCP/IP on Macintosh Computers” on page 4-21.
Ethernet:
Ethernet hardware and software drivers enable your PC or Macintosh computer to communicate on
the LAN.
Ethernet Driver
TCP/IP stack
Application software
Your PC
or Macintosh
computer
To the Netopia 4652

3-14 Getting Started Guide
Once the Netopia 4652 is properly configured and connected to your LAN, PC and Macintosh computers that
have their required components in place will be able to connect to the Internet or other remote IP networks.
Connecting to an Ethernet Network
You can connect a standard 10/100Base-T Ethernet network to the Netopia 4652 using any of its available
Ethernet ports.
Netopia 4652 back panel
The Netopia 4652 in a 10/100Base-T network
DSL
Ethernet
4321
Console Power
Ethernet ports
To connect your 10/100Base-T network to the
Netopia 4652 through the Ethernet ports, use
standard Category 5 Ethernet cables with RJ-45
connectors.

Connecting to Your Local Area Network 3-15
If you add devices connected through a hub or switch, connect the hub or switch to any Ethernet port on the
Netopia 4652.
Macintosh
PC
PC
Ethernet
Hub
If you have more than four devices
to connect, you can attach
additional devices using standard
Category 5 Ethernet cables (not
provided) connected to a 10- or
100Base-T Ethernet hub or switch.
All of the ports on the router will
auto detect 10- or 100Base-T.
Crossover cables are not required.

3-16 Getting Started Guide

Sharing the Connection 4-17
CC
CC
hh
hh
aa
aa
pp
pp
tt
tt
ee
ee
rr
rr
44
44
SS
SS
hh
hh
aa
aa
rr
rr
ii
ii
nn
nn
gg
gg
tt
tt
hh
hh
ee
ee
CC
CC
oo
oo
nn
nn
nn
nn
ee
ee
cc
cc
tt
tt
ii
ii
oo
oo
nn
nn
Once you have set up your physical local area network, you will need to configure the TCP/IP stack on each
client workstation connected to your Netopia 4652. This chapter describes how to configure TCP/IP for both
Windows-based and Macintosh computers.
This chapter explains the following topics:
■ “Configuring TCP/IP on Windows-based Computers” on page 4-17
■ “Configuring TCP/IP on Macintosh Computers” on page 4-21
Configuring TCP/IP on Windows-based Computers
Configuring TCP/IP on a Windows computer requires the following:
■ An Ethernet card (also known as a network adapter)
■ The TCP/IP protocol must be “bound” to the adapter or card

4-18 Getting Started Guide
Dynamic configuration (recommended)
To configure your PC for dynamic addressing do the following:
Note: You can also use these instructions to configure other computers on your network to accept IP
addresses served by the Netopia 4652.
1. Go to the Start
Menu/Settings/Control
Panels and double click
the Network icon. From
the Network components
list, select the
Configuration tab.
2. Select TCP/IP-->Your Network Card. Then select
Properties. In the TCP/IP Properties screen, select the IP
Address tab. Click “Obtain an IP Address automatically”.
3. Click on the DNS Configuration tab. Click Disable DNS.
DNS will be assigned by the router with DHCP.
4. Click OK in this window and the next window. When
prompted, reboot the computer.

Sharing the Connection 4-19
Static configuration (optional)
If you are manually configuring for a fixed or static IP address, perform the following:
1. Go to Start Menu/Settings/Control Panels and double click the Network icon. From the Network
components list, select the Configuration tab.
2. Select TCP/IP-->Your Network Card. Then select Properties. In the TCP/IP Properties screen, select the
IP Address tab. Click “Specify an IP Address.”
Enter the following:
IP Address: 192.168.1.2
Subnet Mask: 255.255.255.0
This address is an example of one that can be used to configure the router. Your ISP or network
administrator may ask you to use a different IP address and subnet mask.

4-20 Getting Started Guide
4. Click OK in this window and the next window. When prompted, reboot the computer.
Note: You can also use these instructions to configure other computers on your network with manual or static
IP addresses. Be sure each computer on your network has its own IP address.
Click on the DNS Configuration tab. Click Enable DNS.
Enter the following
information:
Host: Type the name
you want to give to
this computer.
Domain: Type your
domain name. If you
don't have a domain
name, type your ISP's
domain name; for
example,
netopia.com.
DNS Server Search
Order: Type the
primary DNS IP
address given to you
by your ISP. Click
Add. Repeat this process for the secondary DNS.
Domain Suffix Search Order: Enter the same domain
name you entered above.
3. Click on the Gateway tab (shown below).
Under “New gateway,” enter
192.168.1.1. Click Add. This is the
Netopia 4652’s pre-assigned IP address.
Page is loading ...
Page is loading ...
Page is loading ...
Page is loading ...
Page is loading ...
Page is loading ...
Page is loading ...
Page is loading ...
Page is loading ...
Page is loading ...
Page is loading ...
Page is loading ...
Page is loading ...
Page is loading ...
Page is loading ...
Page is loading ...
Page is loading ...
Page is loading ...
Page is loading ...
Page is loading ...
Page is loading ...
Page is loading ...
Page is loading ...
Page is loading ...
Page is loading ...
/