Marantec CS 320 Owner's manual

Type
Owner's manual

This manual is also suitable for

EN
Control CS 320 FU / Rev.A 1.01 – 1
Operating Instructions
Control CS 320 FU
2 – Control CS 320 FU / Rev.A 1.01 Control CS 320 FU / Rev.A 1.01 – 3
1. Contents
1. Contents. . . . . . . . . . . . . . . . . . . . . . . . . . . . . 2
2. Information in this document . . . . . . . . . . . . 3
3. General safety instructions . . . . . . . . . . . . . . 3
4. Product overview. . . . . . . . . . . . . . . . . . . . . . 4
4.1 Product description...................4
4.2 Variants ...........................4
4.3 MotherboardCS320FU ...............5
4.4 Version CS 320 FU-I
Frequency converter incorporated in drive,
CS320controlinseparatehousing.......6
4.5 Version CS 320 FU-E
Frequency converter and CS 320 control
togetherinonehousing ...............6
4.6 Connection of Siemens G110 frequency
converter ..........................8
4.7 Connection of Siemens V20 frequency
converter ..........................8
5. Installation. . . . . . . . . . . . . . . . . . . . . . . . . . . 9
5.1 Safety instructions for installation ........9
5.2 Mains connection ....................9
5.3 Internal fuse protection...............11
5.4 Mainsvoltageselection ..............11
5.5 Supply to external devices
(only with 400 V / 3-phase connection) ...12
5.6 Connection of electronic limit position system
absolute value encoder (AWG) .........12
5.7 Mechanical limit switch (MEC) connection. 13
5.8 Connection of command devices........15
5.9 Lightgridconnection ................17
5.10 Connectionofclosingedgeprotective
device 1 . . . . . . . . . . . . . . . . . . . . . . . . . . 18
5.11 Connectionlightbarrier1 .............19
5.12 Terminalassignment,relayoutputs ......20
5.13 Connectionofprogrammableinputs . . . . . 20
5.14 Safety input per EN 12453 ............23
5.15 Radioreceiver,pluggable .............24
5.16 CS radio ..........................25
5.17 Digital991 ........................25
5.18 Connection of external radio receiver ....26
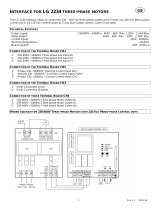
5.19 Connection of frequency converter ......26
5.20 Connection of LCD monitor............27
5.21 Connection of MS BUS components .....27
5.22 Transmission system radio.............28
6. Initialisation. . . . . . . . . . . . . . . . . . . . . . . . . .28
7. Setting the limit positions . . . . . . . . . . . . . . .29
7.1 Checkingthedrive/traveldirection .....29
7.2 Settingthemechanicallimitswitches ....29
7.3 Settingtheelectronicendpositionsystem
usingthesettingbuttonsonthe
circuit board .......................29
7.4 Settingtheelectroniclimitpositionsystem
via the LCD monitor .................30
7.5 Settingtheintermediatepositionsofthe
electronic limit position system via
the LCD monitor ....................30
8. Programming . . . . . . . . . . . . . . . . . . . . . . . . .31
8.1 Overview of the LCD monitor ..........31
8.2 LCDmonitoroperatingmodes..........31
8.3 Expert menu.......................32
8.4 RESET............................32
8.5 RESETTING the controller with
LCDmonitor.......................33
8.6 RESETTING the controller without
LCDmonitor.......................33
8.7 RESETthefrequencyinvertersettings ....33
9. Frequency converter . . . . . . . . . . . . . . . . . . .34
9.1 General ..........................34
9.2 Adjustable values . . . . . . . . . . . . . . . . . . . 34
9.3 Traveldiagrams.....................36
9.4 Rated values for motor ...............37
10. Navigator (only LCD monitor) . . . . . . . . . . . .38
11. Functional overviews . . . . . . . . . . . . . . . . . . .40
11.1 Automatic mode....................40
11.2 Inputoperatingmode ................41
11.3 Explanations of the relay modes:........51
11.4 Explanations of the inputs: ............54
11.5 Diagnosisoperatingmode/errormemory. 58
12. Fault display and remedial measures. . . . . . .61
12.1 Fault display on the LCD monitor........61
12.2 ErrormessageviaLEDindicator ........65
13. Technical data . . . . . . . . . . . . . . . . . . . . . . . .67
13.1 Mechanical and electrical data .........67
13.2 Categoryandperformancelevelofthesafety
function per EN ISO 13849-1 ..........68
14. Service . . . . . . . . . . . . . . . . . . . . . . . . . . . . . .69
15. Manufacturer’s declaration . . . . . . . . . . . . . .70
16. Annex . . . . . . . . . . . . . . . . . . . . . . . . . . . . . . .71
16.1 Safetycircuitmeasuringpoints .........71
16.2 Overview of the connections ...........72
Control CS 320 FU / Rev.A 1.01 – 3
EN
2 – Control CS 320 FU / Rev.A 1.01 Control CS 320 FU / Rev.A 1.01 – 3
3. General safety instructions
WARNING!
Failure to comply with the documentation could
result in life-threatening danger!
Be sure to follow all the safety instructions in this
document.
document.
Warranty
Thefunctionandsafetyoftheequipmentisonlyguaranteed
ifthewarningandsafetyinstructionsincludedinthese
operatinginstructionsareadheredto.
Themanufacturerisnotliableforpersonalinjuryordamage
topropertyiftheseoccurasaresultofthewarningsand
safetyadvicebeingdisregarded.
The manufacturer does not accept any liability or warranty
fordamageduetotheuseofnon-approvedsparepartsand
accessories.
Intended use
ThecontrollerCS320FUisdesignedexclusivelyfor
controllingdoorsystemsthroughdriveswithmechanicallimit
switches (MEC) or an electronic limit position system (AWG).
Thedoordrivesmustbedesignedforcontrolwithafrequency
inverter.
Target group
Onlyqualiedandtrainedelectriciansmayconnect,
programmeandservicethecontrol.
Qualiedandtrainedelectriciansmustmeetthefollowing
requirements:
Knowledgeofthegeneralandspecicsafetyandaccident
preventionregulations,
Knowledgeoftherelevantelectricalregulations,
Trainingintheuseandcareofappropriatesafety
equipment,
Capableofrecognisingthedangersassociatedwith
electricity.
Original operating instructions
Copyright.
No part of these instructions may be reproduced without
our prior approval.
Subjecttoalterationsintheinterestoftechnicalprogress.
Alldimensionsgiveninmm.
Thediagramsinthismanualarenottoscale.
Key to symbols
WARNING!
Indicates a hazard with a medium level of risk which, if not
avoided, could result in death or serious injury.
CAUTION!
Indicates a hazard with a low level of risk which, if not
avoided, could result in minor or moderate injury.
ATTENTION!
Indicatesanimminentdangerofdamageordestruction.
CHECK
Indicates a check to be performed.
REFERENCE
Reference to separate documents which must be complied
with.
Action request
List, itemisation
Ô Reference to other sections of this document
2. Information in this document
4 – Control CS 320 FU / Rev.A 1.01 Control CS 320 FU / Rev.A 1.01 – 5
4 – Control CS 320 FU / Rev.A 1.01
Instructions regarding installation and connection
ThecontrolisdesignedwithXtypeterminals.
The system must be disconnected from the electricity supply
beforecarryingoutanyelectricalwork.Itmustbeensured
that the electricity supply remains disconnected for the
duration of the work.
Localprotectiveregulationsmustbecompliedwith.
Consultthemanufacturerbeforecarryingoutmodications
orreplacingthemainsconnectioncable.
Ingeneral,anoriginalwiringharnessfrom
MFZGmbH&Co.KGshouldbeusedforestablishingthe
connectionbetweenthedoordriveandcontroller.Changes
orreplacementsshallonlytakeplacefollowingconsultation
with the manufacturer and approval by the same.
Information concerning operation
Unauthorised persons (particularly children) should not be
allowedtoplaywithpermanentlyinstalledadjustingor
control devices.
Keep remote controls beyond the reach of children.
Observethevalidstandardsandregulations!
4. Product overview
4.1 4.1 Product descriptionProduct description
ThecontrollerCS320FUisdesignedforuseinindustrial
areas and can be used with all door types in these areas.
This facilitates the speed-independent control of door drives.
It is possible to connect drives with mechanical limit switches
(MEC) or an electronic limit position system (AWG).
All the necessary command devices and safety elements can
be connected, set and evaluated.
ProgrammingtakesplaceviaapluggableLCDmonitor.
Alternatively, a service tool is available as an accessory.
The service tool consists of a stick and an app.
ThefollowingsuppliervariantsofthecontrollerCS320are
possible:
4.2 4.2 VariantsVariants
Housing variants:
ControllerCS320FUinthe“standard”housing
ControllerCS320FU-Einthe“combination”or“maxi”
housing
Variants of the pluggable LCD monitor:
LCD monitor on the circuit board
LCDmonitorinthehousingcover
Hard-wiredLCDmonitor,pluggable(MSBUS)
Command device variants:
3-foldbuttonCSintegratedinthehousing
Optional:
Housingwithout3-foldbutton
HousingwithON/OFFkeyswitch
Housingwithmainswitch
Housingwithemergencystop
Pluggablecomponents(circuitboard)
Brakemonitoringmodule
Week timer
Radio receiver
Radiotransmissionsystemforclosingedgeprotective
device and/or a safety element.
Theoperatinginstructionsdescribetheconnection
andprogrammingoptionsandvariantsoftheCS320
controller with connected LCD monitor and from software
versionV1.01a.
General safety instructions
4 – Control CS 320 FU / Rev.A 1.01 Control CS 320 FU / Rev.A 1.01 – 5
EN
4.3 4.3 Motherboard CS320Motherboard CS320FUFU
Explanation:
X1: Mainsconnectionterminalstrip
X2: Motorterminalstrip
X3: Terminalstripforcommanddevices
X4: Terminalstripforsafetyelements
X5: Terminalstripforrelays
X6: ConnectorstripforinternalON/OFFswitch
X7: Connectorstripforinternal3-foldbuttonKDT
X8: ConnectorstripforLCDmonitor
(Beneath the LCD monitor)
X9: Connectorstripforradioreceiver
X10: Connectorstripforweektimer/brakemonitoring
module
X11: Connectorstripforelectroniclimitpositionsystem
(AWG)
X12: Connectorstripforexternalradioreceiver
X13: Connectorstripforinternal3-foldbuttonCS
X15: Terminalstripformechanicallimitswitches(MEC)
X16: ConnectorstripforBUSsystem(MSBUS)
X17: Plug-inconnectorRJforBUSsystem(MSBUS)
X18: Connectorstripforfrequencyconverter(interface)
X19: Terminalstripforsupplyingexternaldevices
230V/50Hz
X20: Connectorstripfortransmissionsystem
X21: Mainsvoltageselection
H1: Readyforoperation(green)
Lightsupwithpowersupply.
H2: Statusindicator(red)
Lightsupwithfaultsorwithactuationofthesafety
equipment
S1: Programmingbutton(+)
(Beneath the LCD monitor)
S2: Programmingbutton(–)
(Beneath the LCD monitor)
S3: Programmingbutton(P)
(Beneath the LCD monitor)
F1: Fuseprotectionforexternaldevices230V/50Hz
(max. 1A slow-blow)
F2.1: Fuse protection for controller and drive L1 (max. 10 A)
F2.2: Fuse protection for controller and drive L2 (max. 10 A)
F2.3: Fuse protection for controller and drive L3 (max. 10 A)
Terminal strip for protective conductor (PE)
X10
B2
B1
W
V
U
1
2
3
4
5
6
7
8
X5
1
2
3
4
5
6
7
8
X15
1
2
3
4
5
6
7
8
9
10
X4
X7
X6
X12
N
L3
L2
L1
X1
X21
F2.1
F2.2
F2.3
F1
1
2
3
4
5
6
7
8
9
12
11
10
X9
X8
X20
S1
X13
X19
X3
X16
H1
H2
X11
X18
S2
S3
X2
X17
4.3 / 1
6 – Control CS 320 FU / Rev.A 1.01 Control CS 320 FU / Rev.A 1.01 – 7
4.4 4.4 Version CS 320 FU-I Version CS 320 FU-I
Frequency converter incorporated in Frequency converter incorporated in
drive, CS 320 control in separate housingdrive, CS 320 control in separate housing
X10
B2
B1
W
V
U
1
2
3
4
5
6
7
8
X5
1
2
3
4
5
6
7
8
X15
1
2
3
4
5
6
7
8
9
10
X4
X7
X6
X12
N
L3
L2
L1
X1
X21
F2.1
F2.2
F2.3
F1
1
2
3
4
5
6
7
8
9
12
11
10
X9
X8
X20
S1
X13
X19
X3
X16
H1
H2
X11
X18
S2
S3
X2
X17
B
C
A
4.4 / 1
A Frequency converter
B CS 320 control
C Housing
Siemens frequency converter
Type G110 230V/1~/0.75 kW incorporated in drive,
forSTAseriesforusewithspring-balancedsectionaldoors,
notincludingbrakemoduleorbrakeresistor
4.5 4.5 Version CS 320 FU-E Version CS 320 FU-E
Frequency converter and CS 320 control Frequency converter and CS 320 control
together in one housingtogether in one housing
X10
B2
B1
W
V
U
1
2
3
4
5
6
7
8
X5
1
2
3
4
5
6
7
8
X15
1
2
3
4
5
6
7
8
9
10
X4
X7
X6
X12
N
L3
L2
L1
X1
X21
F2.1
F2.2
F2.3
F1
1
2
3
4
5
6
7
8
9
12
11
10
X9
X8
X20
S1
X13
X19
X3
X16
H1
H2
X11
X18
S2
S3
X2
X17
A
B
C
D
4.5 / 1
A Frequency converter
B CS 320 control
C Brake module / brake resistor (under the PCB)
D Housing
Siemens frequency converter
TypeG110230V/1~/0.75kWin“Kombi”housing
for STA series,
notincludingbrakemoduleorbrakeresistor
TypeV20230V/1~/0.75kW in“Kombi”housing
TypeV20400V/3~/1.5kW in“Kombi”housing
TypeV20400V/3~/2.2kW in“Kombi”housing
for MTZ, MDF, SDO series,
includingbrakemoduleorbrakeresistor
Product overview
6 – Control CS 320 FU / Rev.A 1.01 Control CS 320 FU / Rev.A 1.01 – 7
EN
X10
B2
B1
W
V
U
1
2
3
4
5
6
7
8
X5
1
2
3
4
5
6
7
8
X15
1
2
3
4
5
6
7
8
9
10
X4
X7
X6
X12
N
L3
L2
L1
X1
X21
F2.1
F2.2
F2.3
F1
1
2
3
4
5
6
7
8
9
12
11
10
X9
X8
X20
S1
X13
X19
X3
X16
H1
H2
X11
X18
S2
S3
X2
X17
B
C
D
E
F
X0
A
4.5 / 2
A Frequency converter
B Load contactor*
C PCB fuse protection
D CS 320 control
E Brake module / brake resistor (under the PCB)
F Housing
* Only version 230V/1~/1.5 kW und 400V/3~/4.0 kW
Siemens frequency converter
TypeV20230V/1~/1.5kW inMaxihousing
TypeV20400V/3~/3.0kW inMaxihousing
TypeV20400V/3~/4.0kW inMaxihousing
for MTZ, MDF, SDO series,
includingbrakemoduleorbrakeresistor
8 – Control CS 320 FU / Rev.A 1.01 Control CS 320 FU / Rev.A 1.01 – 9
4.6 4.6 Connection of Siemens G110 frequency Connection of Siemens G110 frequency
converterconverter
A
D
B
C
BU
RD
VT
BK
GY/PK
YE
PK
WH
BN
GN
CS320
CS320
4.6 / 1
Legend:
BK black PK pink
GN green RD red
GY grey VT violet
BU blue YE yellow
WH white BN brown
A Voltagesupply,230V/1~/N/PE
(suppliedthroughCS320/X2)
B Motor output, 230V/3~/PE
C Plug-inconnectionforFUdatacable
(differentcolourcodingforFU-IandFU-E)
D LED FU operation
4.7 4.7 Connection of Siemens V20 frequency Connection of Siemens V20 frequency
converterconverter
A
D
C
F
B
E
GN
WH
BN
YE
PK
X18 - CS320
4.7 / 1
Legend:
PK pink
GN green
YE yellow
BN brown
WH white
A Voltagesupply,230V/1~/N/PEor400V/3
(suppliedthroughCS320/X2)
B Motor output, 230V/3~/PE or 400V/3~/PE
C Plug-inconnectionforFU-Edatacable
D LED FU operation
E Brakemoduleconnection,DC+/DC-
(connection for brake resistor on brake module)
F Bridge(MUSTbeused)
Product overview
8 – Control CS 320 FU / Rev.A 1.01 Control CS 320 FU / Rev.A 1.01 – 9
EN
5. Installation
5.1 5.1 Safety instructions for installationSafety instructions for installation
WARNING!
Life-threatening danger due to electric shock!
Beforeperformingwiringwork,alwaysdisconnectthe
system from the power supply. Make sure that the power
supplyremainsdisconnectedduringwiringwork.
ATTENTION!
Property damage due to improper installation of
the controller!
Inordertoavoiddamagetothecontroller,observethe
followingpoints:
Onlyqualiedandtrainedelectriciansmayworkon
electrical systems.
Switch off the power supply to the system, check that it
isde-energisedandsafeguardagainstreconnection.
Mains cables and control cables must be routed separa-
tely.
The line types and cross-sections must be selected in
accordancewiththevalidspecications.
Itisessentialtoobservethelocalprotectiveregulations.
Observethespecicationsofthedoormanufacturerfor
installation.
Thefollowingpointsmustbecorrecttoguarantee
fault-freefunctioning:
Thedoorisinstalled,fullyfunctionalanddesignedfor
power-driven operation.
Thegearmotoristtedandreadyforoperation.
Thecommandandsafetydevicesarettedandreadyfor
operation.
ThecontrolhousingwiththeCS320FUcontrolleristted.
Observethevalidstandardsandregulations!
REFERENCE
The instructions from the respective manufacturer must be
observedfortheinstallationofthedoor,thegearmotorand
the command and safety devices.
5.2 5.2 Mains connectionMains connection
Prerequisites
Thefollowingpointsmustbecorrecttoguaranteethe
function of the controller:
Themainsvoltagemustcorrespondwiththeinformation
on the type plate.
Themainsvoltagemustbethesameastheinputvoltage
of the frequency converter.
Theoutputvoltageofthefrequencyconvertermustbethe
sameasthesupplyvoltagefortheoperator.
Themotorratingdataconguredmustcomplywiththe
data on the type plate.
In the case of three-phase power, this must have a
clockwiserotatingeld.
Withaxedconnection,anall-polemainswitchmustbe
used.
With three-phase power, only triple block circuit breakers of
type C (max. 16 A) shall be used.
ATTENTION!
Malfunctions due to improper installation of the
controller!
Theuseoffrequencyconvertersresultsinhigh-frequency
pulsatingdirectfaultcurrents/leakagecurrentsagainst
the protective conductor (PE). Any residual current device
(RCD)usedmustthereforebeoftypeB+(VDE0100-
530, 531.3.2).
Werecommendusingaseparatefaultcurrentcircuit
breakerforeverydoororgatesystem.
Beforeswitchingonthecontrolforthersttime,acheck
mustbecarriedoutaftercompletingthewiringtoensure
that all the motor connections on the motor and the
controlaresecurelyxed.Allcontrolvoltageinputsare
galvanicallyisolatedfromthesupply.
The control and load lines of the connected drives must
bedouble-insulatedalongtheirentireroute.
10 – Control CS 320 FU / Rev.A 1.01 Control CS 320 FU / Rev.A 1.01 – 11
Detailed circuit diagram for mains connection and
motor connection (230V / 1-phase / 0.75 kW)
X1
L
L
N
N
L1U
V
W
DC+ DC-
DC+ DC-
R+ R-
B1
B2
N
X21
F1
X19
F2.3
F2.2
F2.1
X11
X18
X2
A
C
B
3
M
230 V
50 Hz
/
/ /
1 N PE
5.2 / 1
Detailed circuit diagram for mains connection and
motor connection (230V / 1-phase / 1.5 kW)
N
L1
U
V
W
DC+ DC-
DC+ DC-
R+ R-
A
C
B
3
M
1L1 3L2 5L3
4T22T1
6L3
13N0
14N0
A1
A2
D
230 V
50 Hz
/
/ /
1 N PE
NL1PE
X0
5.2 / 2
Detailed circuit diagram for mains connection and
motor connection (400 V 3-phase / 1.5 kW / 2.2 kW)
5.2 / 3
Detailed circuit diagram for mains connection and
motor connection (400 V 3-phase / 4.0 kW)
L3
L1
L2
U
V
W
DC+ DC-
DC+ DC-
R+ R-
A
C
B
3
M
1L1 3L2 5L3
4T22T1
6L3
13N0
14N0
A1
A2
D
400 V
50 Hz
/
/ /
3 N PE
L3L2L1NPE
X0
5.2 / 4
Key:
A Brakeresistor(notforSTAandFDOrange)
B Brakemodule(notforSTAandFDOrange)
C Frequency converter
D Load contactor
M1: Motor
X1: Terminalblockformainsconnection
(with load contactor)
X1: Terminalblockformainsconnection
X2: Terminalblockformotor
X11: Connector strip for electronic limit position system
with safety circuit
X15: Terminalblockformechanicallimitswitches
(SafetycircuitatX2/B1-B2)
X19: Powersupplyconnectionforexternaldevices
Connection:
ConnectelectroniclimitpositionsystemtoX11,or
mechanicallimitswitchtoX15ofthecontroller.
Connectpowersupplyfrequencyinverter(A)toX2,orX10
of the controller.
Connectingthemotortothefrequencyconverter.
ConnectFU(C)datacabletoX18ofthecontrol.
Connect the control to the mains power supply.
Cablegroupsmustbesecuredclosetotheirrelevant
terminalsusingacabletie.
Check and compare technical data.
Ô „13.Technicaldata“
Installation
10 – Control CS 320 FU / Rev.A 1.01 Control CS 320 FU / Rev.A 1.01 – 11
EN
5.3 5.3 Internal fuse protectionInternal fuse protection
ThecontrollerCS320FUisequippedwithinternalfuse
protection (F2) at the mains input. The fuse elements are
equippedwithnefuses8A/T(5.2x20mm)inthefactory.
N
L3
L2
L1
X1
X21
F2.1
F2.2
F2.3
3
400 V / 50 Hz
/ N / PE
5.3 / 1
ATTENTION!
Malfunctions due to improper fuse protection of
the controller!
Internalfusemaximum10A/T!
The internal fuses do not replace fuse protection of the
supply cable. This shall be realised with max. 16 A and must
beconguredastripleblockcircuitbreakersoftypeC.
Ô „5.2Mainsconnection“
5.4 5.4 Mains voltage selectionMains voltage selection
ThepositionofthebridgeconnectortoX21mustbeadjusted
tothesupplyvoltageandmotorvoltage.
PE
PE
PE
N
L3
L2
L1
X1
X21
3
400 V / 50 Hz
/ N / PE
F2.3
F2.2
F2.1
PE
PE
PE
N
L3
L2
L1
X1
X21
F1
X19
3
230 V / 50 Hz
/ PE
F2.1
F2.2
F2.3
AUF
ZU
PE
PE
PE
L
N
X1
X21
F1
X19
X11
X18
1
230 V / 50 Hz
/ N / PE
F2.1
F2.2
F2.3
5.4 / 1
PE
PE
PE
N
L3
L2
L1
X1
X21
3
400 V / 50 Hz
/ N / PE
F2.3
F2.2
F2.1
PE
PE
PE
N
L3
L2
L1
X1
X21
F1
X19
3
230 V / 50 Hz
/ PE
F2.1
F2.2
F2.3
AUF
ZU
PE
PE
PE
L
N
X1
X21
F1
X19
X11
X18
1
230 V / 50 Hz
/ N / PE
F2.1
F2.2
F2.3
5.4 / 2
12 – Control CS 320 FU / Rev.A 1.01 Control CS 320 FU / Rev.A 1.01 – 13
5.5 5.5 Supply to external devices Supply to external devices
(only with 400 V / 3-phase connection)(only with 400 V / 3-phase connection)
TheCS320FUhas2separatevoltagesuppliesforexternal
components,suchassignaldevices,lightbarriers,etc.
X19 230V/1~
X4 24V-DC
N
L3
L2
L1
X1
X21
X19
3
400 V / 50 Hz
max. 1A
230V-AC
max. 500mA
24V-DC
/ N / PE
X4
1
2
3
4
5
6
7
8
9
12
11
10
F1
-
+
L
N
5.5 / 1
NOTE:
UseoftheconnectionX19isonlypossiblewithasupplywith
400V / N / 3~.
TheconnectionX19isprotectedbythefuseelementF1
(max.1A/T).
5.6 5.6 Connection of electronic limit position Connection of electronic limit position
system absolute value encoder (AWG)system absolute value encoder (AWG)
5.6 / 1
A
B
A: Absolutevalueencoderplug
B: AWGplug-interminal
Connector strip X11 (on connector A)
4 7
grey yellow
5 8
green pink
6 9
white brown
5.6 / 2
Cables with either numbered or
coloured wires are used for the AWG,
dependingonthedrive:
4(grey): Safetychaininput
5(green): RS485B
6 (white): GND
7 (yellow): RS485 A
8 (pink): Safety circuit output
9 (brown): 12V DC
Connector strip B (only absolute value encoder)
5.6 / 3
C: Thermal element in the drive
D: Emergencymanualactuation(emergencycrankor
emergencychain)
Installation
12 – Control CS 320 FU / Rev.A 1.01 Control CS 320 FU / Rev.A 1.01 – 13
EN
NOTE:
In order to satisfy the requirements of EN 12453:2017 the
electronic end position system must comply as a minimum
withPL“c”withamin.category2perENISO13849-1.
In order to satisfy this requirement, it is only permissible to
use an absolute value encoder from MFZ (art. no. 97957) as
an electronic end position system.
5.7 5.7 Mechanical limit switch (MEC) connectionMechanical limit switch (MEC) connection
Alternatively to the absolute value encoder as an electronic
system, it is also possible to connect a mechanical cam limit
switch and evaluate this.
WithrstcommissioningandafteraRESET,theconnected
limit position system is automatically detected. With a
subsequentchange,therespectivelimitpositionsystemmust
beselectedviaaparametersettingintheINPUToperating
mode.
Series STA, MDF05, MTZ05
5.7 / 1
S1
S2
S3
S4
S5
S6
Series MDF20+, KD, MTZ20+
S1
S2
S3 S4 S5 S6
5.7 / 2
Mechanical limit switches
1
2
3
4
5
6
7
8
X15
S2
S5
S1
S6
5.7 / 3
Safety circuit
U
V
W
B1
B2
X2
S3
S4
S7
S8
5.7 / 4
14 – Control CS 320 FU / Rev.A 1.01 Control CS 320 FU / Rev.A 1.01 – 15
Example of connection with 7-wire solution
1
2
3
4
5
6
7
8
U
V
W
B1
B2
X2
X15
S2
S5
S1
S6
S3
S4
S7
S8
5.7 / 5
Legend:
S1 Supplementary limit switch UP
S2 Limit switch UP
S3 Safety limit switch UP
S4 Safety limit switch DOWN
S5 Limit switch DOWN
S6 Supplementary limit switch DOWN
S7 Emergencyoperation(NC-contact)
S8 Motor thermal protection
NOTE:
In order to satisfy the requirements of EN 12453:2017 the
mechanical limit switches must have been approved as a
“reliablecomponent”inaccordancewithENISO13849-1.
Driveswithintegratedsafetycatchdevicemustnotbe
equipped with mechanical limit switches.
ATTENTION!
Property damage due to improper installation!
Connection as a 6-wire solution is prohibited and can lead
to destruction of the CS 320 circuit board.
ReferencepotentialonX2/B1-B2=24V-DC
ReferencepotentialonX15=12V-DC
1
2
3
4
5
6
7
8
S3
S4
S7
S8
S2
S5
S1
S6
U
V
W
B1
B2
X2
X15
5.7 / 6
Installation
14 – Control CS 320 FU / Rev.A 1.01 Control CS 320 FU / Rev.A 1.01 – 15
EN
5.8 Connection of command devices
CAUTION!
Risk of injury due to uncontrolled door movement!
A CLOSE command in dead-man operation without a view
of the door is not permitted.
Install the command devices for the dead-man operation
indirectvisualcontactwiththedoor,althoughoutside
thedangerzonefortheoperator.
ACLOSEcommandwithoutvisualsightofthedoormay
onlybegivenviainput1/MOD32(X4/9-10).
If the command device is not a key switch:
Installitataheightofatleast1.5m.
Install it where it is inaccessible to the public.
Command devices (standard)
X3
A
B
C
D
E
5.8 / 1
Legend:
A Button / input DOWN
B Button / input impuls
C Button / input UP
(UP inside, with active two-way control)
D STOP button
E Emergencystopcommanddevice
UP / STOP / DOWN switch (6-wire solution)
X3
A
C
D
5.8 / 2
UP / STOP / DOWN switch (4-wire solution)
X3
A
C
D
5.8 / 3
IMPULS button
Selection of the function via IMPULS parameter
Ô „11.2Inputoperatingmode“onpage41
B
X3
5.8 / 4
- UP switch
- STOP button
16 – Control CS 320 FU / Rev.A 1.01 Control CS 320 FU / Rev.A 1.01 – 17
Cover keypad KDT
Push-button with NO / NC contacts.
Up to year of manufacture 12 / 2009.
X7X7
5.8 / 7
J
J Jumper(bridge)
The jumper must be connected if the KDT keypad is not
connected.
Cover keypad CS
Silicone keys with NO contacts.
From year of manufacture 01 / 2010.
X13
5.8 / 8
External radio receiver
1
2
3
4
5
6
7
8
9
10
X4
1
2
3
4
5
6
7
8
9
12
11
10
X19
X3
F1
24 V-DC
230 V-AC
*
5.8 / 5
*optionally,dependingonconnectionoftheradioreceiver
Key switch
A
C
X3
5.8 / 6
Legend:
A Button / input DOWN
C Button / input UP
(UP inside, with active two-way control)
Installation
16 – Control CS 320 FU / Rev.A 1.01 Control CS 320 FU / Rev.A 1.01 – 17
EN
ON/OFF key switch
NCcontactforinterruptingthedoorfunction(optional).
This switch is part of the safety circuit.
X6X6
5.8 / 9
J
J Jumper(bridge)
The jumper must be connected if the key switch is not
connected.
5.9 5.9 Light grid connectionLight grid connection
Itispossibletoconnectupto2lightgridstotheCS320FU
Lightgrid1isconnectedtotheclosingedgeprotectivedevice
input.Lightgrid2isconnectedtoprogrammableinput2.
Light grid 1
ParameterSKS=MOD4
Theconnectioncable(A)ispluggable.
1
2
3
4
5
6
7
8
9
10
A
BK
BU
WH
BN
X4
GN
GY
11
12
5.9 / 1
Light grid 2
ParameterINPUT2=MOD12
Theconnectioncable(A)ispluggable.
1
2
3
4
5
6
7
8
9
10
A
BK
BU
WH
BN
X4
GN
GY
11
12
5.9 / 2
Legend:
BK Black
GN Green
GY Grey
BU Blue
WH White
BN Brown
R Receiver
T Transmitter
NOTE:
TheGridScan/ProlightgridsfromCedesareshownonan
exemplary basis in this manual.
TheGridScan/Prolightgridscorrespondto
PerformanceLeveld,category2perENISO13849-1
Protection level E per EN 12453:2017
Diagramsfromothermanufacturersoninquiry.
REFERENCE
For a precise description of the function and connection,
refertotheseparatedocumentationforthelightgrid.
18 – Control CS 320 FU / Rev.A 1.01 Control CS 320 FU / Rev.A 1.01 – 19
5.10 Connection of closing edge protective
device 1
WithrstcommissioningandafteraRESET the system of
theclosingedgeprotectivedeviceisautomaticallydetected
andprogrammed.Ifnoclosingedgesystemisconnected,
the input is requested every time the power is switched on
againuntilaclosingedgesystemhasbeendetected.Witha
subsequentchange,therespectivesystemmustbeselected
viaaparametersettingintheINPUToperatingmode.Inthe
caseoflightbarrierswithatestfunction,thismustbe
set manually.
Ô „11.2Inputoperatingmode“
Optoelectronic closing edge protective device (OSE)
ParameterSKS=MOD1
+
-
1
2
3
4
5
6
7
8
9
12
11
10
X4
WH
GN
BN
5.10 / 1
Legend:
WH White
GN Green
BN Brown
Electrical closing edge protection (8.2 kOhm)
ParameterSKS=MOD2
8k2
1
2
3
4
5
6
7
8
9
12
11
10
X4
5.10 / 2
Pneumatic closing edge protection (DW)
ParameterSKS=MOD3/testingautomaticallyactive
+
-
1
2
3
4
5
6
7
8
9
12
11
10
X4
5.10 / 3
Installation
18 – Control CS 320 FU / Rev.A 1.01 Control CS 320 FU / Rev.A 1.01 – 19
EN
5.11 5.11 Connection light barrier 1Connection light barrier 1
Withrstcommissioningandafteraresetthelightbarrieris
automaticallydetectedandprogrammed.Ifnolightbarrier
system is connected, the input is requested every time the
powerisswitchedonagainuntilalightbarriersystemhas
beendetected.Withasubsequentchange,therespective
systemmustbeselectedviaaparametersettingintheinput
operatingmode.
Inthecaseoflightbarrierswithatestfunction,thismustbe
set manually.
Ô „11.2Inputoperatingmode“
Light barrier 4-wire NC
withouttesting parameterLIGHTBARR1=MOD3
withtesting parameterLIGHTBARR1=MOD5
OUT
-
+
-
+
NC
1
2
3
4
5
6
7
8
9
12
11
10
X4
R
T
5.11 / 1
Light barrier MFZ 2-wire
withtesting parameterLIGHTBARR1=MOD1
2
1
2
1
1
2
3
4
5
6
7
8
9
12
11
10
X4
R
T
5.11 / 2
Light barrier 3 wire NPN
withouttesting parameterLIGHTBARR1=MOD2
withtesting parameterLIGHTBARR1=MOD4
OUT
-
+
-
+
NPN
1
2
3
4
5
6
7
8
9
12
11
10
X4
R
T
5.11 / 3
Light barrier 3 wire PNP
withouttesting parameterLIGHTBARR1=MOD3
withtesting parameterLIGHTBARR1=MOD5
OUT
-
+
-
+
PNP
1
2
3
4
5
6
7
8
9
12
11
10
X4
R
T
5.11 / 4
Legend:
R Receiver
T Transmitter
NOTE:
AlllightbarriersareactiveintheUPorDOWNdirection
dependingonthesetting.
Ô „11.2Inputoperatingmode“(ParameterLBFUNC1)
20 – Control CS 320 FU / Rev.A 1.01 Control CS 320 FU / Rev.A 1.01 – 21
5.12 Terminal assignment, relay outputs
Four potential-free relay outputs are available, which can be
programmedwithavarietyoftypesoffunction.
Ô „11.2Inputoperatingmode“
1
2
3
4
5
6
7
8
X5
5.12 / 1
- Relay 1
- Relay 2
- Relay 3
- Relay 4
Internal
relay switch
contacts
There are four potential-free relay outputs able to take a max.
load of 4A at 230 V/1~.
Thetypeoffunctiondependsontheparametersettingforthe
respectiverelayoutputintheINPUToperatingmode.
5.13 5.13 Connection of programmable inputsConnection of programmable inputs
ThecontrollerCS320FUhas3programmableinputs,for
which different functions can be selected.
Thetypeofwiringisdeterminedonthebasisofthe
parametersettingsfortheindividualinputs.
Ô „11.2Inputoperatingmode“(ParameterINPUT1-3)
ATTENTION!
Danger of damage to the circuit board due to
incorrect connection!
Inputs 1, 2 and 3 have different reference potentials and
mustnotbeoperatedfromacommonpotential!
Input 1
OptionalwiringwithNO/NCcontacts.
Reference potential 24V-DC
Ô „11.2Inputoperatingmode“(ParameterINPUT1)
*
X4
5.13 / 1
* optionally
Installation
  • Page 1 1
  • Page 2 2
  • Page 3 3
  • Page 4 4
  • Page 5 5
  • Page 6 6
  • Page 7 7
  • Page 8 8
  • Page 9 9
  • Page 10 10
  • Page 11 11
  • Page 12 12
  • Page 13 13
  • Page 14 14
  • Page 15 15
  • Page 16 16
  • Page 17 17
  • Page 18 18
  • Page 19 19
  • Page 20 20
  • Page 21 21
  • Page 22 22
  • Page 23 23
  • Page 24 24
  • Page 25 25
  • Page 26 26
  • Page 27 27
  • Page 28 28
  • Page 29 29
  • Page 30 30
  • Page 31 31
  • Page 32 32
  • Page 33 33
  • Page 34 34
  • Page 35 35
  • Page 36 36
  • Page 37 37
  • Page 38 38
  • Page 39 39
  • Page 40 40
  • Page 41 41
  • Page 42 42
  • Page 43 43
  • Page 44 44
  • Page 45 45
  • Page 46 46
  • Page 47 47
  • Page 48 48
  • Page 49 49
  • Page 50 50
  • Page 51 51
  • Page 52 52
  • Page 53 53
  • Page 54 54
  • Page 55 55
  • Page 56 56
  • Page 57 57
  • Page 58 58
  • Page 59 59
  • Page 60 60
  • Page 61 61
  • Page 62 62
  • Page 63 63
  • Page 64 64
  • Page 65 65
  • Page 66 66
  • Page 67 67
  • Page 68 68
  • Page 69 69
  • Page 70 70
  • Page 71 71
  • Page 72 72
  • Page 73 73
  • Page 74 74
  • Page 75 75
  • Page 76 76

Marantec CS 320 Owner's manual

Type
Owner's manual
This manual is also suitable for

Ask a question and I''ll find the answer in the document

Finding information in a document is now easier with AI