Page is loading ...

Page 1
REV E
Seaside Casual Furniture | 11 Industrial Drive Coventry, RI 02816 | 800-809-3114 | sales@seasidecasual.com
1 PLEASE READ INSTRUCTIONS COMPLETELY BEFORE BEGINNING.
Carefully remove contents from box. Make sure that all parts and hardware
are included using the Parts List below.
WARRANTY QUESTIONS OR COMMENTS PLEASE CALL TOLL FREE AT 1-800-809-3114
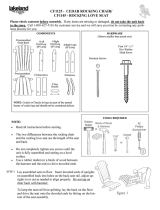
Part Code: 316-3/8x10-80HHL
3/8 X 3” Hex Head Lag
Part Code: 4MMALLEN
4mm Allen Wrench
Part Code: 316-8X1-1/4PFDS
1-1/4” Phillips Head Screw
Back Assembly
x 1
Front Apron
Seat Assembly
Rear Stretcher
80mm Hex Lag
Nylon Dowel
3/8 Flat Washer
Lower Stretcher
x 1 x 1 x 1
x 1
x 1
x 1
x 14 x 4
x 6
x 4
Part Code: 316-3/8FW
x 4
Traditional Porch
Rocker
(035/036)
Right & Left Arm Side Assembly Set
Part Code: 316-1/4x10-80HL
x 1
ASSEMBLY INSTRUCTIONS
4mm Allen Wrench (included); #2 Phillips Head Screwdriver;
9/16” Socket Wrench
Tools Required:
Actual Size
Actual Size
Actual Size
Actual Size
Actual Size
Right Left Right Left
x 2
Rockers

Page 2
REV E
2 FRAME ASSEMBLY
Insert Nylon Dowels into
larger holes in back as-
sembly. Line up Back as-
sembly and Rear Stretcher
with holes in rear legs, us-
ing the dowels to locate the position for
the Back assembly, and align Front
Apron and Lower Front Stretcher with
holes in front legs, ensuring that the
larger sides of the angles are facing for-
ward. Secure using (12) 80mm Hex Lags.
Drop Seat Assembly
into seat box in the
frame as shown. Se-
cure using (4) 1-1/4”
Phillips Head Screws
thru the seat sup-
ports into the side
stretchers of the
frame assembly.
Attach Rockers to Legs us-
ing (4) 3/8 x 3” Hex Lags
and 3/8 Flat Washers thru
counter-bored holes in bot-
tom of rockers into pre-
drilled holes in bottom of
legs using a 9/16” socket wrench.
3 ATTACH SEAT TO FRAME
ASSEMBLY
5 ATTACH ROCKERS TO LEGS
TIGHTEN ALL CONNECTIONS. AVOID OVER TIGHTENING; DOING SO
CAN CAUSE DAMAGE TO THE PRODUCT.
Align insert nut in right arm
with threaded post in right
front leg. Turn clockwise until
tight. Continue turning until
rear of arm is aligned with
rear leg. Repeat process
for left side.
Secure Arms with (2)
80mm Hex Lags thru
predrilled holes in rear
legs, and (2) 1-1/4” Phillips Head Screws
thru underarm support into arm.
4 ATTACH ARMS
6
FOR ASSEMBLED PORCH ROCKER (036) SKIP TO STEP 5
*
/