Page is loading ...

1 of 17
04/16 92-2692-R11
SPEAKMAN SAFETY PRODUCTS
Installation, Maintenance & Operation Instructions
SEF-18XY, EYESAVER
®
FAUCET with SENSORFLOW, Battery or AC POWER
DESCRIPTION
The SEF-18XY, Eyesaver
®
faucet series combines a Gooseneck Faucet with independently operated Eyewash.
Different Models of faucets have an UCM (under counter mixture), or ACM (above counter mixer), or ThV
(thermostatic valve) to adjust temperature for the Faucet, and an Infrared Sensor that controls a Solenoid Valve,
powered either by Batteries or AC/DC adapter. Some models have a MO (manual override to bypass the Solenoid).
The EyeWash is either with cold water or warm water adjusted and set with a TW (thermostatic mixing valve)
SPECIFICATIONS
OPERATION: Eyewash and faucet operate independently of each other
SUPPLY: 3/8 compression male connections for hot and cold inlets
FINISH: Chrome plated brass
EYEWASH ACTIVATION: Pull handle with graphics
EYEWASH SPRAYS: Aerated sprays.
FAUCET FLOW RATE: Autoflo® device controls flow to 2.2 GPM/ 8.3 LPM
EYEWASH FLOW RATE: 2.6 GPM at 30 psi. flowing. See flow data chart for additional information.
PRESSURE: 30 psi. minimum flow pressure, 80 psi. maximum static pressure
APPROVALS: Meets ASME A112.18.1, ANSI Z358.1 and CSA B125-98
VACUUM BREAKER (ST option): Approved ASSE, UPC and CSA. Meets ANSI/ASSE 1035, CSA B64.8, UPC
SHIPPING WEIGHT: 10 LBS.
MODELS available:
With SEF-TW kit (Thermostatic Mixing
With cold water for eyewash Valve SE-370) for eyewash tepid water
SEF-1810 -4” Sensorflow, eyewash faucet, UCM, battery SEF-1810-TW
SEF-1820 -4” Sensorflow, eyewash faucet, UCM, AC/DC SEF-1820-TW
SEF-1811 -4” Sensorflow, eyewash faucet, TMV, battery SEF-1811-TW
SEF-1821 -4” Sensorflow, eyewash faucet, TMV , AC/DC SEF-1821-TW
SEF-1812 -8” Sensorflow, eyewash faucet, UCM, battery SEF-1812-TW
SEF-1822 -8” Sensorflow, eyewash faucet, UCM, AC/DC SEF-1822-TW
SEF-1813 -8” Sensorflow, eyewash faucet, TMV, battery SEF-1813-TW
SEF-1823 -8” Sensorflow, eyewash faucet, TMV, AC/DC SEF-1823-TW
SEF-1814 -8” Sensorflow, eyewash faucet, ACM, battery SEF-1814-TW
SEF-1824 -8” Sensorflow, eyewash faucet, ACM, AC/DC SEF-1824-TW
SEF-1815 -8” Sensorflow, eyewash faucet, UCM, MO, battery SEF-1815-TW
SEF-1825 -8” Sensorflow, eyewash faucet, UCM, MO, AC/DC SEF-1825-TW
SEF-1816 -8” Sensorflow, eyewash faucet, TMV, MO, battery SEF-1816-TW
SEF-1826 -8” Sensorflow, eyewash faucet, TMV, MO, AC/DC SEF-1826-TW

2 of 17
04/16 92-2692-R11
OPTIONS:
With an UCM (under counter mixer) in the assembly, the following parts have been added:
|__ G20-1919 Undercounter Mixer Assy L/C
|__ G56-0030 Ucm Bracket And Screws
|__ 92-6634 Mixing Valve Inst. Instr Sht
OR: With a TMV (Thermo Mixing Valve) in the assembly, the following parts have been added:
|__ G20-1968 Thermo Mixing Valve
|__ G20-1968IMO Thermo Mixing Valve Instr Sht
With an 4” Deck Plate in the assembly, the following parts have been added:
|__ G66-0186-PC 4" Deck Plate Asy
With an 8” Deck Plate in the assembly, the following parts have been added:
|__ G66-0189-PC 8" Deck Plate Asy
|__ G66-0110 Deck Plate Hardwr Asy
With an ACM (above counter mixer) in the assembly, the following parts have been added:
|__ G20-1844 Abovecounter Mixer Assy (no bypass)
|__ G01-0050 Locknut Bag group
|__ G66-0111 Handle assy-Acm mixer
With an 8” Deck Plate in the assembly, the following parts have been added:
|__ G66-0188-PC 8" Deck Plate Asy
With an MO + UCM (or TMV) (manual override) in the assembly, the following parts have been added:
|__ G20-1861 8” div valve assy
|__ G04-0351-PC ADA handle assy –div
|__ 01-0800-PC-P Bearing Sleeve
|__ G02-0006 Tensioner Spring
|__ 92-6638 Instruction card for G02-0006
use |__ G76-0052 Solenoid for MO instead of G76-0033-LBL
OR |__G76-0060 Mini Sol for MO instead of G76-0059-LBL
|__ 24-0285 Brass Tee
With an 8” Deck Plate in the assembly, the following parts have been added:
|__ G66-0187-PC 8" Deck Plate Asy
With a Battery Power Module, use: |__G66-0169 (Batteries are inside the Power Module)
With an AC/DC Power Module, use: |__G66-0169-AC (AC Adaptor inside)
|__66-0010 (Transformer Ac / 12 VDC)
For all models use -Adapter Solenoid: |__05-2361
-Bracket Solenoid: |__56-0168
Solenoid G76-0033-LBL with (RPG 76-0039) or Mini Solenoid G76-0059-LBL with (RPG 76-0059)
For Aerator use: |__G05-0727-PC 2.2Gpm 15/16-27 Anti-Lime Aerator
OR: |__G05-0820-PC-P 0.5Gpm Boca
OR: |__G05-0554-PC 15/16-27 -2Gpm Laminar Flow Outlet
SEF-18XY-TW has SEF-TW kit (with Thermostatic Mixing Valve SE-370) for eyewash tepid water

3 of 17
04/16 92-2692-R11
OPTIONS: for the Faucet
FLOW DATA
BOCA – Vandal-Resistant 0.5 gpm Flow Control AC/DC Transformer with Adaptor
D75 – Diamond 75 Escutcheons 8 – 8” Gooseneck Depth (see figure)
ST – Serrated Tip with Vacuum Breaker TW – Thermostatic Mixing Valve
HS – Supply Hoses to Stops
Flowing Pressure- psi.
(BAR)
30
(2.07)
40
(2.76)
50
(3.45)
60
(4.14)
70
(4.83)
80
(5.52)
Flow Rate- gpm
(LPM)
2.6
(9.8)
2.9
(11)
3.0
(11.4)
2.8
(10.6)
2.8
(10.6)
3.0
(11.4)
Distance Eyewash ins.
Plume, ’A’ - (cm.)
13
(33.0)
14-1/2
(36.8)
15
(38.1)
15
(38.1)
15
(38.1)
16
(40.6)

4 of 17
04/16 92-2692-R11
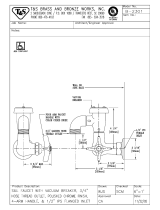
Model SEF-1814 -8” Sensorflow, eyewash faucet, ACM (Above Counter Mixer), battery
IMPORTANT:
The supply line shall provide an uninterruptible flushing fluid at a minimum of 30 psi flow
pressure. If shut off valves are installed in the eyewash supply line for maintenance purposes,
provisions shall be made to prevent unauthorized shut off.

5 of 17
04/16 92-2692-R11
Model SEF-1824 -8” Sensorflow, eyewash faucet, ACM, AC/DC
Is similar to Model SEF-1814 but with AC/DC adapter instead of batteries
For any option, when using 120VAC (alternative current supply), replace the G66-0169 (Battery Power Module)
with G66-0169-AC (AC Power Module). Also add a Transformer 120VAC to 12VDC.
The Transformer supplies 12VDC (direct current) which is further stepped down and filtered to 6VDC by the
AC Adapter for the 6V Solenoid.
Wiring for AC/DC option:

6 of 17
04/16 92-2692-R11
PACKING LIST
Item Description Qty.
I
Item Description Qty.
1 Above Counter Mixer 1 10 Sensor Housing Assembly 1
2 Valve Mounting Hardware Bag Group 1 11 Power Module 1
3 Cold Inlet ½” Tee 1 12 Aerator (BOCA- .5gpm or LF- 2.2gpm) 1
4 Adaptor for Solenoid 1 13
Serrated Tip and Vacuum Breaker for
–ST option, (replaces item #12)
1
5 Base Tee adapter Assembly 1 14 3/8”Compression –to 1/2”NPSM Hose 1
6 Mini Solenoid 6VDC 1 15 3/8”Compression –to 3/8”Compression 1
7 Wall Bracket 1 16 Nipple ½”I.P -1” long 1
8 Sensor Mounting Hardware Group 1 17 05-1860 Threaded Bushing 1/2” x 3/8” 1
9
Gooseneck Mounting Hardware 1 18 05-2271 Adapter 3/8”NPTx 3/8”compr 1
Model SEF-1814 -8” Sensorflow, Eyewash faucet, ACM, battery

7 of 17
04/16 92-2692-R11
INSTALLATION
Step 1: Gooseneck Eyewash Mounting-
a. Place the gasket and deck plate onto the sink bowl or counter
top. Slip the grooved ø2.20” base washer 45-0782 onto the
gooseneck and slip through center hole of sink.
b. The eyewash swivels through 200° of rotation. Position the base
of the gooseneck eyewash so the setscrew hole in the base is
pointing towards the back of the sink or countertop.
Note- For rigid gooseneck, position the gooseneck and tighten
the setscrew in the mounting base. From below the sink slip the
cup washer onto the shank and use the nut to tighten the
assembly down onto the sink or countertop. Important-
Lubricate gooseneck eyewash shank lower O-ring.
c. Next insert the rubber seal into the base adapter and screw the
adapter onto the shank of the gooseneck eyewash until it
bottoms out (Tape may be applied to the shank). If the adapter
needs to be positioned for hose attachment, it can be backed off
up to a max 1/2 turn.
d. Apply tape or sealant and connect the tee and nipples so that the tee outlets are accessible.
1. Attach hot water main supply through the hose to HOT inlet port of Mixer.
2. Attach Base Tee Adaptor to eyewash inlet cold port of the gooseneck assembly.
3. Attach cold water main supply through the hose to the TEE on eye wash inlet.
4. Connect the same TEE to the COLD inlet port of Mixer with another hose.
5. Connect the solenoid outlet port to the side inlet port of the gooseneck faucet, using enclosed Solenoid
adapter and wall mounting bracket. Ensure that the opposite side of the gooseneck inlet is capped off.
6. Connect the solenoid inlet port to the outlet of the Mixer valve.
Step 2:
Valve Hose Installation Instructions
-
Faucet Inle
t
Solenoid Outle
t
Mixer Outle
t
E
y
ewash
Solenoid
Connector
Power Mod
Connector

8 of 17
04/16 92-2692-R11
Step 3: Solenoid Wall Mount Instructions-
a. After hoses are connected, and the wall bracket is in place, securely tighten the screws on the wall in a
convenient place.
b. The IR Sensor comes standard with Battery powered operation. The product can be purchased also with an
option that has AC/DC transformer and an Adapter that goes into Sensor in place of batteries.
Step 4: Unit Flushing-
a. After the assembly is complete, turn the hot and cold water
supplies on and check for leaks.
b. Activate the faucet to flush both the hot and cold sides of fixture.
Check all connections for leaks.
c. Install the aerator into the faucet outlet.
d. Activate faucet and then activate the eyewash by pulling
the handle and assure proper spray formation and no leaks.
OPERATION
Faucet- Place hands in IR sensor zone (Item 10) to activate
the faucet. The sensor housing, located to the left of the faucet,
contains a sensor module. The sensor utilizes a 9– 11 inch long
invisible infrared sensing beam. For optimal use of the faucet,
angle the sensor housing window between 15º and 25º toward
the faucet stream from the center location.
Temp. Control - To achieve the desired temperature, rotate
the above counter mixer to desired comfort zone.
Eyewash- The eyewash is activated by pulling its handle out.
Once the eyewash is activated, the eyewash caps will flip off
and water will come out of the aerated spray heads. The eyewash
will continually discharge water until the handle is manually pushed
back into the off position. The flow of spray heads is controlled by
built-in flow controls. Each spray assembly is tested and aligned in the factory.
NOTE: On the rubber washer under the Sensor Unit there are 2 marks ( ) at 20° apart.
Use them to orient the Sensor Lenses at 20° inclination as a start median suggested point.
From that point you can further adjust the lenses inclination according to your specific needs.
TESTING PROGRAM
ANSI Z358.1 requires that all emergency equipment shall be tested weekly to verify proper operation and
inspected annually to assure conformance with ANSI Z358.1 requirement.
MAINTENANCE (CARE and CLEANING)
Valves are washer-less and require no routine maintenance. The gleaming finish of your SPEAKMAN
Eyesaver
®
faucet can be cleaned by using mild soap and warm water. Rinse thoroughly and dry immediately
with a soft, clean cloth for best results.
TOP view of SENSOR
9”-11”
Focal distance
15°- 25°
IR Senso
r

9 of 17
04/16 92-2692-R11
REPAIR PARTS LISTING
Part or Group Description Refer to Packing List
RPG38-0388 Yellow spray head and aerator repair parts assembly Part of item 11
RPG49-0003 Repair parts for internal seals of the gooseneck eyewash Not shown
G05-0724-PC Faucet 2.2 GPM aerator 15/16-27 Item 12
G05-0820-PC-P Faucet 0.5 GPM aerator 15/16-27 Item 12
G05-0554-PC Faucet with 15/16-27 Laminar Flow Outlet Item 12
RPG04-0366 Eyewash handle with yellow text and set screw Part of item 11
RPG 76-0033-LBL Solenoid Valve Assembly Item 6
RPG76-0039 Solenoid Repair Kit Part of item 6
G66-0201 Infrared Sensor Assembly 9”-11” focal length Part of item 10
RPG66-0044 Solenoid Filter Screen Part of item 6
G66-0169 Battery Power Module Item 17
RPG76-0041 3 volt Lithium Batteries (2) For Battery Module only
G66-0169-AC AC Power Module See wiring for AC
G20-1919 UCM under counter mixer
G20-1968 TMV thermo mixing valve (for Faucet water)
G20-1844 ACM above counter mixer
SEF-TW Kit SE-370 thermostatic mixing valve (for eyewash tepid water)

10 of 17
04/16 92-2692-R11
Rough In
SEF-1810 -4” Sensorflow, eyewash faucet, UCM, battery
SEF-1820 -4” Sensorflow, eyewash faucet, UCM, AC/DC
SEF-1812 -8” Sensorflow, eyewash faucet, UCM, battery
SEF-1822 -8” Sensorflow, eyewash faucet, UCM, AC/DC
92-2977

11 of 17
04/16 92-2692-R11
SEF-1811 -4” Sensorflow, eyewash faucet, TMV, battery
SEF-1821 -4” Sensorflow, eyewash faucet, TMV, AC/DC
SEF-1813 -8” Sensorflow, eyewash faucet, TMV, battery
SEF-1823 -8” Sensorflow, eyewash faucet, TMV, AC/DC
92-2978

12 of 17
04/16 92-2692-R11
SEF-1814 -8” Sensorflow, eyewash faucet, ACM, battery
SEF-1824 -8” Sensorflow, eyewash faucet, ACM, AC/DC
92-2979

13 of 17
04/16 92-2692-R11
1" HOLE
COLD
INLET
HOT
INLET
FLOOR
TIGHTEN THE TEE BEFORE
TIGHTENING TOP NUT ONTO
MANUAL OVERRIDE BRACKET
SEF-1815 -8” Sensorflow, eyewash faucet, UCM, MO, battery
SEF-1825 -8” Sensorflow, eyewash faucet, UCM, MO, AC/DC
SEF-1816 -8” Sensorflow, eyewash faucet, TMV, MO, battery
SEF-1826 -8” Sensorflow, eyewash faucet, TMV, MO, AC/DC
92-2983

14 of 17
04/16 92-2692-R11
HOT
INLET
FLOOR
COLD
INLET
TIGHTEN THE TEE BEFORE
TIGHTENING TOP NUT ONTO
MANUAL OVERRIDE BRACKET
1" HOLE
SEF-1815-TW -8” Sensorflow, eyewash faucet, UCM, MO, battery and Thermostatic Valve for Eyewash
SEF-1825-TW -8” Sensorflow, eyewash faucet, UCM, MO, AC/DC and Thermostatic Valve for Eyewash
SEF-1816-TW -8” Sensorflow, eyewash faucet, TMV, MO, battery and Thermostatic Valve for Eyewash
SEF-1826-TW -8” Sensorflow, eyewash faucet, TMV, MO, AC/DC and Thermostatic Valve for Eyewash
92-2984

15 of 17
04/16 92-2692-R11
SEF-1810-TW -4” Sensorflow, eyewash faucet, UCM, battery and Thermostatic Valve for Eyewash
SEF-1820-TW -4” Sensorflow, eyewash faucet, UCM, AC/DC and Thermostatic Valve for Eyewash
SEF-1812-TW -8” Sensorflow, eyewash faucet, UCM, battery and Thermostatic Valve for Eyewash
SEF-1822-TW -8” Sensorflow, eyewash faucet, UCM, AC/DC and Thermostatic Valve for Eyewash
92-2985

16 of 17
04/16 92-2692-R11
SEF-1811-TW -4” Sensorflow, eyewash faucet, TMV, battery and Thermostatic Valve for Eyewash
SEF-1821-TW -4” Sensorflow, eyewash faucet, TMV, AC/DC and Thermostatic Valve for Eyewash
SEF-1813-TW -8” Sensorflow, eyewash faucet, TMV, battery and Thermostatic Valve for Eyewash
SEF-1823-TW -8” Sensorflow, eyewash faucet, TMV, AC/DC and Thermostatic Valve for Eyewash
92-2987

17 of 17
04/16 92-2692-R11
SEF-1814-TW -8” Sensorflow, eyewash faucet, ACM, battery and Thermostatic Valve for Eyewash
SEF-1824-TW -8” Sensorflow, eyewash faucet, ACM, AC/DC and Thermostatic Valve for Eyewash
92-2986
/