Page is loading ...

www.radialeng.com
True to the Music
®
User Guide
Twinline
™
Effects Loop Router
Radial Engineering Ltd.
1588 Kebet Way, Port Coquitlam
British Columbia, Canada, V3C 5M5
Tel: 604-942-1001 • Fax: 604-942-1010
Email: [email protected]

Table of Contents Page
Introduction .......................................................................... 1
Front and Top Panel Features ............................................. 2
Rear Panel Features ............................................................ 3
Connecting The Two Loops .............................................. 4-5
Getting Started ..................................................................... 6
Polarity Reverse and Mounting ............................................ 7
Remote Controlling the Twinline ..................................... 8-10
Setup Reference Page ....................................................... 11
Block Diagram .................................................................... 12
Specications ..................................................................... 13
Warranty............................................................... Back cover
Thank you for purchasing the Radial Twinline™. The
Twinline is an innovative device that enables you to route
your effects to two amps when using their rear-panel effect
loops.
As the Twinline requires a signicant number of cables and
is equipped with remote controllability, it is well worth taking
the time to read through this manual before you get started.
This will not only ensure proper connections are made, but
it will also help you optimize the signal path for best tone
and least distortion. If after you have read this manual you
still nd yourself asking about a feature or function, please
visit the Twinline FAQ page located on our website. This is
where we post answers to questions and where we often
post product updates. If you still have questions that are
left unanswered, feel free to send a note to info@radialeng.
com and we will do our best to reply in short order.
Now get ready to roll up your sleeves and start patching!
Radial
®
Twinline
™
User Guide

True to the Music
®
Radial Engineering Ltd.
Twinline™ Effects Loop Router
INTRODUCTION
The Twinline is basically a switcher that lets you toggle your pedalboard
and effects between two ampliers using their rear panel effects loop. In
other words, you can have one set of pedals and then route it to either
of your two amps so that you do not need to duplicate your pedalboard
setup.
GUITAR ABY
AMP-A
AMP-B
TWINLINE PEDALS
Before you start to reach for your cables, you should consider your amp
and effects setup and prepare your connections based on how you
intend to use them. Furthermore, it is good practice to turn off all of
your audio equipment and ampliers before making connections. This will
prevent plug-in or power-on transients that could damage more sensitive
components. Once you are ready, and have made the connections, you
can plug in the Twinline’s 15VDC power supply. This turns on the Twinline
as there is no power switch. A handy cable lock may be used to secure
the cable in place.
1

Radial Engineering Ltd.
Twinline™ Effects Loop Router
True to the Music
®
2
1 2 3 4 5 6 7 8
FRONT PANEL FEATURES
1. AMP-A INPUT: Sets the level from the AMP-A effects loop to your
effect pedals.
2. AMP-A RETURN: Sets level from the pedals to the AMP-A effects
return input.
3. PHASE INVERT: Reverses the effects loop polarity coming back
from the AMP-A’s effect loop return.
4. A/B SELECT: Selects active amplier’s effects loop.
5. AMP-B INPUT: Sets the level from the AMP-B effects loop to your
effect pedals.
6. AMP-B RETURN: Sets level from the pedals to the AMP-B effects
return input.
7. PHASE INVERT: Reverses the effects loop polarity coming back
from the AMP-B’s effect loop return.
8. EFX ON : Used to bypass the Twinline effects loop to audition the
dry signal path.
9. GROUND LIFT: Lifts the effects loop ground to help eliminate hum
and buzz caused by ground loops.
TOP PANEL FEATURES
9

True to the Music
®
Radial Engineering Ltd.
Twinline™ Effects Loop Router
11 1312 17 1814 15 16
10
3
REAR PANEL FEATURES
10. CABLE CLAMP: Locking cable clamp lets you secure the power
cable to prevent accidental disconnection.
11. POWER: 15VDC power connection for external power supply.
12. REMOTE JR2: TRS ¼” input connection for optional Radial JR2
remote footswitch.
13. SLINGSHOT OUTPUT: remote ¼” TS contact closure output.
14. UNBAL LOOP: Standard ¼” unbalanced guitar level effects loop
with send and receive to pedalboard.
15. UNB / BAL: Push in to select the balanced send & receive XLR
connectors.
16. BALANCED LOOP: Professional +4dB balanced send & receive
XLRs for studio effects processor.
17. AMP-B EFX LOOP: Connects from and back to the AMP-B
effects loop.
18. AMP-A EFX LOOP: Connects from and back to the AMP-A effects
loop.

Radial Engineering Ltd.
Twinline™ Effects Loop Router
True to the Music
®
4
CONNECTING THE TWO LOOPS
When making connections, ensure you are using high quality coaxial
unbalanced guitar cables with ¼” connectors. Good quality cables help
reduce noise while retaining signal integrity. Try to keep the cables as
short as possible. You will need at least six (6) guitar cables for the basic
hookup.
Start by connecting the two amp’s effects loop to the Twinline:
1. Connect the effects loop SEND from your rst amplier to the Twinline
FROM AMP A input.
2. Connect the TO AMP A from the Twinline to your rst amplier’s effects
loop RECEIVE jack.
FROM AMP A’S EFX LOOP OUTFROM AMP B’S EFX LOOP OUT
TO AMP A’S EFX LOOP INTO AMP B’S EFX LOOP IN
3. Connect the effects loop SEND from your second amplier to the
Twinline FROM AMP B input.
4. Connect the TO AMP A from the Twinline to your second amplier’s
effects loop RECEIVE jack.

True to the Music
®
Radial Engineering Ltd.
Twinline™ Effects Loop Router
5
Next, connect your pedalboard (guitar effects) or studio processors to
and from the Twinline:
1. USING UNBALANCED GUITAR PEDALS:
a. Make sure the rear panel effects select switch is set to the UNB
(unbalanced) OUT position. This switch is recessed to prevent
accidental switching.
b. Connect from the Twinline SEND to the input of your rst pedal.
c. Connect from your last pedal to the Twinline RECV (receive).
2. USING A BALANCED STUDIO PROCESSOR:
a. You will need two balanced XLR cables.
b. Set the rear panel effects select switch to BAL (balanced) IN position.
c. Connect from the Twinline XLR SEND to the input of your processor.
d. Connect from your processor to the Twinline RECV (receive) XLR
input.

Radial Engineering Ltd.
Twinline™ Effects Loop Router
True to the Music
®
6
Select loop-A using the A-B switch on the Twinline front panel. The LED
indicator will illuminate to let you know which channel is active. Bypass
your effects by setting the FX ON switch to the OFF (OUT) position – this
LED will go off. Slowly bring up the volume on your rst amp and test.
Always test at low volumes to ensure things are working before turning
up. This can help eliminate turn-on or connection transients from cables
that may not be seated correctly.
Once you have conrmed the signal is passing, activate the Twinline by
depressing the FX ON switch. The LED will illuminate. You can now play
using your effects. It is a good idea to use a clean effect such as a delay
or chorus to set the levels. If you hear distortion, reduce the SEND level
on the Twinline and then adjust the RECEIVE level for gain make-up. If
the sound seems thin… increase the SEND level to suit. You cannot harm
pedals by overloading them, they will simply distort.
It is important to note that when combining various products together
such as amps, switchers and pedals, it takes a bit of ddling to get the
levels to work properly. Be patient and try different settings. Take notes
on your setups by using the handy setup page at the end of this manual.
This reference will surely come in handy when changing or trying various
setups.
You are now ready to test the second amps effects loop. To do this, select
Amp-B using the front panel AB switch, bypass the effects for testing (FX
switch out) and then if all is good, reactivate the effects (FX switch -in).
Set your levels to suit this amp and you are now ready to rock!
Amp-A
Select
Amp-B
Select
GETTING STARTED
You are now ready to power up. Make sure the volume levels on your
amps are turned down before turning them on. Plug in the Twinline’s
power supply, turn on your amps. Set the send and receive loop controls
on the Twinline to 12 o’clock. If your amp has variable level controls, they
should be set to the manufacturer’s recommended setting to start.

True to the Music
®
Radial Engineering Ltd.
Twinline™ Effects Loop Router
7
THE POLARITY REVERSE
Both of the Twinline effects loops are equipped with a polarity ‘invert’
switch. Some ampliers will invert the phase as it goes through the signal
path. Correct this by depressing the PHASE INVERT switch. When out of
phase, one amp will sound more distant then the other.
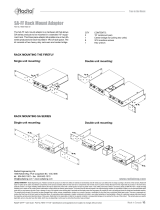
RACK MOUNTING THE TWINLINE
The Twinline may be rack mounted using the optional SA rackmount
kit. This allows either one or two of the Radial Stand-Alone (SA series)
modules to be used side by side and only requires a single 19” rack
space for mounting.

Radial Engineering Ltd.
Twinline™ Effects Loop Router
True to the Music
®
8
REMOTE CONTROLLING THE TWINLINE
There are two ways to toggle the effects loop between the amps. The
easiest is to use the front panel AB select switch. This works great in
the studio when you are not under the pressure of doing quick switches
during a live show. However, if you consider all of these cables going
back and forth to the Twinline and your amps, when playing live, it is best
to keep the Twinline near your amp where you can hide the cable mess
and keep the cables as short as possible in order to reduce susceptibility
to noise.
The Twinline is able to be remotely controlled in a number of ways.
This includes using a standard latching footswitch, a Radial-equipped
Slingshot pedal, using the optional JR2 or SW2 remote footswitches or
the contact closure from a MIDI controller.
USING THE OPTIONAL JR2 REMOTE
The Radial JR2 is a dual footswitch remote that can toggle the AB loops
and bypass the effects altogether. It receives current from the Twinline to
power its LEDs thus providing visual status at your feet. Connection from
the JR2 is accomplished using a standard ¼” TRS cable.

True to the Music
®
Radial Engineering Ltd.
Twinline™ Effects Loop Router
USING A LATCHING FOOTSWITCH
Connect a latching footswitch with ¼” connector to the JR2 jack on the
Twinline. Once depressed, this will toggle the effects loops from Amp-1 to
Amp-2. The LED indicators on the Twinline front panel will let you know
which amp effects loop is active.
9
SLINGSHOT REMOTE
REMOTE
EFX
LOOP
AMP
SIGN
EFX
LOOP
AMP
SIGN
USING THE SLINGSHOT OUT FROM THE TWINLINE
To take things even further, the Slingshot out can be connected to a Radial
device like the Headbone™ which can then switch heads and toggle the
effects loops at the same time. For many this is the ultimate setup. Simply
connect the Slingshot output to the Headbone using a ¼” cable.

Radial Engineering Ltd.
Twinline™ Effects Loop Router
True to the Music
®
10
USING A MIDI SWITCHER
A great way to toggle the Twinline is to use a MIDI footswitch controller.
Simply take the latching contact closure output from your MIDI controller
and connect it to the Twinline remote input. You can also use second
contact closure to bypass the effects loops by creating the following dual
mono to stereo connection.
MIDI
DUAL MONO TO STEREO ¼”

True to the Music
®
Radial Engineering Ltd.
Twinline™ Effects Loop Router
11
SETUP REFERENCE PAGE
Date:
Date:
Notes:
Notes:
Pedals:
Pedals:
Amp A:_________________
Amp A:_________________
SEND
SEND
SEND
SEND
RECV
RECV
RECV
RECV
Amp B:_________________
Amp B:_________________
INPUT
INPUT
OUTPUT
OUTPUT
1.
1.
5.
5.
2.
2.
6.
6.
3.
3.
7.
7.
4.
4.
8.
8.

Radial Engineering Ltd.
Twinline™ Effects Loop Router
True to the Music
®
BLOCK DIAGRAM*
12
* Subject to change without notice.

True to the Music
®
Radial Engineering Ltd.
Twinline™ Effects Loop Router
SPECIFICATIONS*
* Subject to change without notice.
13
Radial Twinline
Audio circuit type: Class-A FET with transformer isolation
Dynamic range: 105dB
Gain - from amp jack to EFX send: Variable from -2.7dB ~ +3.6dB
Equivalent input noise: -103dB
Noise oor: -92dBu
Intermodulation distortion: 0.01%
Common mode rejection ratio: 91dB @ 55Hz
Maximum input - from amp jack: +25dBu
Maximum input - FX input: +8dBu
Total harmonic distortion: 0.005% @ 1kHz
Input impedance - from amp: 10KΩ
Output impedance - to amp: 2200Ω
Input impedance - FX return: 1MΩ
Output impedance - FX send: 1KΩ
Unity gain control position: About 10:00 o’clock on send & return EFX
Features
Controls: Send & return gain for amps A & B
Switches: 180° polarity reverse on each effect loop
Input/output connections: Balanced ¼” TRS or unbalanced ¼”
Ground lift: Both inputs and on the FX loop
Remote controls: Slingshot contact closure in/out
General
Construction: 14 gauge steel chassis & outer shell
Finish: Durable powder coat
Size: (W x H x D) 4.5” x 2” x 6” (114 x 57 x 147mm)
Weight: 2.8lbs (1.3Kg)
Power: 15V 400mA Power Adapter
Conditions: For use in dry locations only between 5°C and 40°C
Warranty: Radial 3-year, transferable

®
www.radialeng.com
THREE YEAR TRANSFERABLE LIMITED WARRANTY
RADIAL ENGINEERING LTD. (“Radial”) warrants this product to be free from defects in
material and workmanship and will remedy any such defects free of charge according
to the terms of this warranty. Radial will repair or replace (at its option) any defective
component(s) of this product (excluding nish and wear and tear on components under
normal use) for a period of three (3) years from the original date of purchase. In the event
that a particular product is no longer available, Radial reserves the right to replace the
product with a similar product of equal or greater value. In the unlikely event that a defect
is uncovered, please call 604-942-1001 or email [email protected] to obtain a RA
number (Return Authorization number) before the 3 year warranty period expires. The
product must be returned prepaid in the original shipping container (or equivalent) to
Radial or to an authorized Radial repair centre and you must assume the risk of loss or
damage. A copy of the original invoice showing date of purchase and the dealer name
must accompany any request for work to be performed under this limited and transferable
warranty. This warranty shall not apply if the product has been damaged due to abuse,
misuse, misapplication, accident or as a result of service or modication by any other than
an authorized Radial repair center.
THERE ARE NO EXPRESSED WARRANTIES OTHER THAN THOSE ON THE FACE
HEREOF AND DESCRIBED ABOVE. NO WARRANTIES WHETHER EXPRESSED
OR IMPLIED, INCLUDING BUT NOT LIMITED TO, ANY IMPLIED WARRANTIES OF
MERCHANTABILITY OR FITNESS FOR A PARTICULAR PURPOSE SHALL EXTEND
BEYOND THE RESPECTIVE WARRANTY PERIOD DESCRIBED ABOVE OF THREE
YEARS. RADIAL SHALL NOT BE RESPONSIBLE OR LIABLE FOR ANY SPECIAL,
INCIDENTAL OR CONSEQUENTIAL DAMAGES OR LOSS ARISING FROM THE USE
OF THIS PRODUCT. THIS WARRANTY GIVES YOU SPECIFIC LEGAL RIGHTS, AND
YOU MAY ALSO HAVE OTHER RIGHTS, WHICH MAY VARY DEPENDING ON WHERE
YOU LIVE AND WHERE THE PRODUCT WAS PURCHASED.
Radial
®
Twinline
™
User Guide - Part #: R870 1003 00 / V2 / 04-2017
Copyright 2017 Radial Engineering Ltd. All rights reserved.
Specications and appearance subject to change without notice.
Radial Engineering Ltd.
1588 Kebet Way, Port Coquitlam, British Columbia, V3C 5M5
Tel: 604-942-1001 • Fax: 604-942-1010 • Email: [email protected]
To meet the requirements of California Proposition 65, it is our responsibility to inform you of the following:
WARNING: This product contains chemicals known to the State of California to cause
cancer, birth defects or other reproductive harm.
Please take proper care when handling and consult local government regulations before discarding.
/