Canon C5235 Operating instructions
- Category
- Laser/LED printers
- Type
- Operating instructions

ENG
Basic Operation Guide
After you finish reading this guide, store it in a safe place for future reference.

2
This manual describes the following functions, operations, and maintenance procedures.
• Functions that can be operated from the touch panel display of the machine
• Remote UI functions that can operate the machine from a computer
• Printing from a computer
• Routine Maintenance Procedures
• Clearing paper jams/staple jams
Store this manual next to the machine so it can be used when the user encounters trouble operating the machine.
* Some functions explained in this manual may require optional equipment.
* Screen shots used in this manual may di er from the ones you actually see.
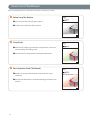
How to Use This Manual
How to Use This Manual
Contents
Before You Start Using This Machine
What This Machine Can Do• • • • • • • • • • • • • • • • • • • • • • • • • • • • • • • • • • • • • • • • • • • • • • • • • • • • • • • • • • • • • • • • • • • • • • • •10
Main Power and Energy Saver Key• • • • • • • • • • • • • • • • • • • • • • • • • • • • • • • • • • • • • • • • • • • • • • • • • • • • • • • • • • • • • • • • • •12
Parts and Their Functions • • • • • • • • • • • • • • • • • • • • • • • • • • • • • • • • • • • • • • • • • • • • • • • • • • • • • • • • • • • • • • • • • • • • • • • • •14
Control Panel and Touch Panel Display • • • • • • • • • • • • • • • • • • • • • • • • • • • • • • • • • • • • • • • • • • • • • • • • • • • • • • • • • • • • • •20
Main Menu Screen Settings • • • • • • • • • • • • • • • • • • • • • • • • • • • • • • • • • • • • • • • • • • • • • • • • • • • • • • • • • • • • • • • • • • • • • • •22
Changing Settings According to Your Needs • • • • • • • • • • • • • • • • • • • • • • • • • • • • • • • • • • • • • • • • • • • • • • • • • • • • • • • • •24
Flow of Basic Operations
How to Make a Copy• • • • • • • • • • • • • • • • • • • • • • • • • • • • • • • • • • • • • • • • • • • • • • • • • • • • • • • • • • • • • • • • • • • • • • • • • • • • •26
Things You Can Do with the Copy Functions • • • • • • • • • • • • • • • • • • • • • • • • • • • • • • • • • • • • • • • • • • • • • • • • • • • • • • • • •28
Sending a Fax • • • • • • • • • • • • • • • • • • • • • • • • • • • • • • • • • • • • • • • • • • • • • • • • • • • • • • • • • • • • • • • • • • • • • • • • • • • • • • • • • •32
Things You Can Do with the Fax Functions • • • • • • • • • • • • • • • • • • • • • • • • • • • • • • • • • • • • • • • • • • • • • • • • • • • • • • • • • • •34
Sending Scanned Data (E-Mail/I-Fax/File Servers) • • • • • • • • • • • • • • • • • • • • • • • • • • • • • • • • • • • • • • • • • • • • • • • • • • • • •38
Things You Can Do with the Scan and Send Functions • • • • • • • • • • • • • • • • • • • • • • • • • • • • • • • • • • • • • • • • • • • • • • • • •40
Storing Scanned Data• • • • • • • • • • • • • • • • • • • • • • • • • • • • • • • • • • • • • • • • • • • • • • • • • • • • • • • • • • • • • • • • • • • • • • • • • • • •44
Things You Can Do with the Scan and Store Functions • • • • • • • • • • • • • • • • • • • • • • • • • • • • • • • • • • • • • • • • • • • • • • • • •46
Printing Stored Data • • • • • • • • • • • • • • • • • • • • • • • • • • • • • • • • • • • • • • • • • • • • • • • • • • • • • • • • • • • • • • • • • • • • • • • • • • • • •48
Sending Stored Data• • • • • • • • • • • • • • • • • • • • • • • • • • • • • • • • • • • • • • • • • • • • • • • • • • • • • • • • • • • • • • • • • • • • • • • • • • • • •50
Things You Can Do with the Access Stored Files Functions (File Operation)• • • • • • • • • • • • • • • • • • • • • • • • • • • • • • • • •52
Things You Can Do with the Access Stored Files Functions (Print) • • • • • • • • • • • • • • • • • • • • • • • • • • • • • • • • • • • • • • • •53
Things You Can Do with the Access Stored Files Functions (Send) • • • • • • • • • • • • • • • • • • • • • • • • • • • • • • • • • • • • • • • •56
Operating the Machine from a Computer (Remote UI) • • • • • • • • • • • • • • • • • • • • • • • • • • • • • • • • • • • • • • • • • • • • • • • • •58
Printing from a Computer • • • • • • • • • • • • • • • • • • • • • • • • • • • • • • • • • • • • • • • • • • • • • • • • • • • • • • • • • • • • • • • • • • • • • • • •60
Routine Maintenance
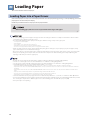
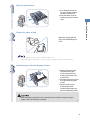
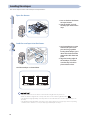
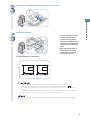
Loading Paper • • • • • • • • • • • • • • • • • • • • • • • • • • • • • • • • • • • • • • • • • • • • • • • • • • • • • • • • • • • • • • • • • • • • • • • • • • • • • • • • • •64
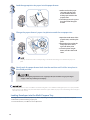
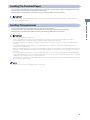
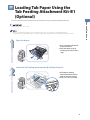
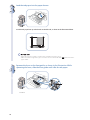
Loading Tab Paper Using the Tab Feeding Attachment Kit-B1 (Optional)• • • • • • • • • • • • • • • • • • • • • • • • • • • • • • • • • • •73
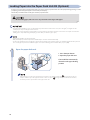
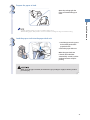
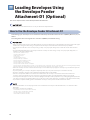
Loading Envelopes Using theEnvelope Feeder Attachment-D1 (Optional)• • • • • • • • • • • • • • • • • • • • • • • • • • • • • • • • •76
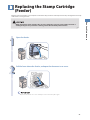
Replacing the Stamp Cartridge (Feeder) • • • • • • • • • • • • • • • • • • • • • • • • • • • • • • • • • • • • • • • • • • • • • • • • • • • • • • • • • • • • •83
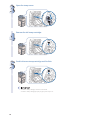
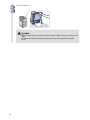
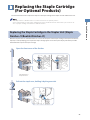
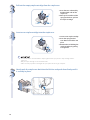
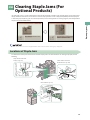
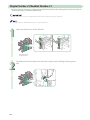
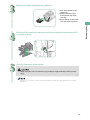
Replacing the Staple Cartridge (For Optional Products) • • • • • • • • • • • • • • • • • • • • • • • • • • • • • • • • • • • • • • • • • • • • • • • •87
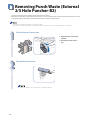
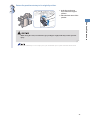
Removing Punch Waste (External 2/3 Hole Puncher-B2) • • • • • • • • • • • • • • • • • • • • • • • • • • • • • • • • • • • • • • • • • • • • • • • •94
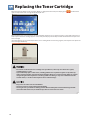
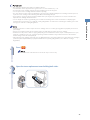
Replacing the Toner Cartridge • • • • • • • • • • • • • • • • • • • • • • • • • • • • • • • • • • • • • • • • • • • • • • • • • • • • • • • • • • • • • • • • • • • • •96
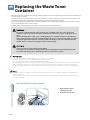
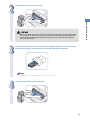
Replacing the Waste Toner Container • • • • • • • • • • • • • • • • • • • • • • • • • • • • • • • • • • • • • • • • • • • • • • • • • • • • • • • • • • • • • •102
Routine Cleaning • • • • • • • • • • • • • • • • • • • • • • • • • • • • • • • • • • • • • • • • • • • • • • • • • • • • • • • • • • • • • • • • • • • • • • • • • • • • • •105
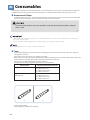
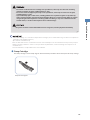
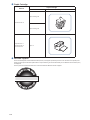
Consumables• • • • • • • • • • • • • • • • • • • • • • • • • • • • • • • • • • • • • • • • • • • • • • • • • • • • • • • • • • • • • • • • • • • • • • • • • • • • • • • • • •114

3
How to Use This Manual
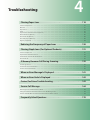
Troubleshooting
Clearing Paper Jams • • • • • • • • • • • • • • • • • • • • • • • • • • • • • • • • • • • • • • • • • • • • • • • • • • • • • • • • • • • • • • • • • • • • • • • • • • • •118
Reducing the Frequency of Paper Jams • • • • • • • • • • • • • • • • • • • • • • • • • • • • • • • • • • • • • • • • • • • • • • • • • • • • • • • • • • • •150
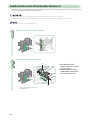
Clearing Staple Jams (For Optional Products)• • • • • • • • • • • • • • • • • • • • • • • • • • • • • • • • • • • • • • • • • • • • • • • • • • • • • • • •151
If Memory Becomes Full During Scanning • • • • • • • • • • • • • • • • • • • • • • • • • • • • • • • • • • • • • • • • • • • • • • • • • • • • • • • • • •159
When an Error Message Is Displayed• • • • • • • • • • • • • • • • • • • • • • • • • • • • • • • • • • • • • • • • • • • • • • • • • • • • • • • • • • • • • • •161
When an Error Code Is Displayed• • • • • • • • • • • • • • • • • • • • • • • • • • • • • • • • • • • • • • • • • • • • • • • • • • • • • • • • • • • • • • • • • •162
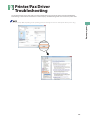
Printer/Fax Driver Troubleshooting • • • • • • • • • • • • • • • • • • • • • • • • • • • • • • • • • • • • • • • • • • • • • • • • • • • • • • • • • • • • • • • •163
Service Call Message• • • • • • • • • • • • • • • • • • • • • • • • • • • • • • • • • • • • • • • • • • • • • • • • • • • • • • • • • • • • • • • • • • • • • • • • • • • •164
Frequently Asked Questions • • • • • • • • • • • • • • • • • • • • • • • • • • • • • • • • • • • • • • • • • • • • • • • • • • • • • • • • • • • • • • • • • • • • •170

4
How to Use This Manual
Refer to the following manuals included with your machine according to your needs.
Before Using This Machine
Describes precautions for using the machine.
Includes the speci cations of the machine.
ENG
Before Using This Machine
Read this guide first.
Please read this guide before operating this product.
After you finish reading this guide, store it in a safe place for future reference.
Describes the settings required before using functions, such as the
network settings for sending e-mail.
Describes how to add applications and update the rmware.
Setup Guide
ENG
Setup Guide
After you finish reading this guide, store it in a safe place for future reference.
Basic Operation Guide (This Manual)
Provides an overview of the functions and describes the basic
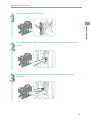
operations.
Describes the maintenance and troubleshooting procedures for the
machine.
ENG
Basic Operation Guide
After you finish reading this guide, store it in a safe place for future reference.

5
How to Use This Manual
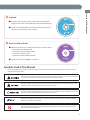
Symbols Used in This Manual
The following symbols are used in this manual to explain procedures, restrictions, handling precautions, and instructions that
should be observed for safety.
Indicates a warning concerning operations that may lead to death or injury to persons if not performed
correctly. To use the machine safely, always pay attention to these warnings.
Indicates a caution concerning operations that may lead to injury to persons if not performed correctly.
To use the machine safely, always pay attention to these cautions.
Indicates operational requirements and restrictions. Be sure to read these items carefully to operate the
machine correctly, and avoid damage to the machine or property.
Indicates a clari cation of an operation, or contains additional explanations for a procedure. Reading
these notes is highly recommended.
Indicates an operation that must not be performed. Read these items carefully, and make sure not to
perform the described operations.
Driver Installation Guide
Provides instructions on installing the printer, fax, and other drivers.
• Printer Driver Installation Guide
• Mac Printer Driver Installation Guide
• Fax Driver Installation Guide
• Network ScanGear Installation Guide
Included on the same CD-ROM as each driver.
e-Manual
Describes all the functions of the machine. Also provided with a
search function that is useful for nding and checking information.
Includes “Practical Work ows,” which introduces ows of practical
operations using functions of the machine.

6
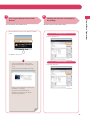
How to Use This Manual (e-Manual)
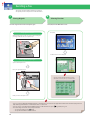
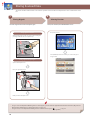
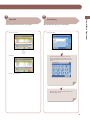
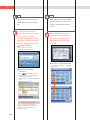
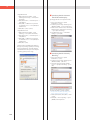
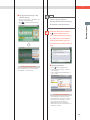
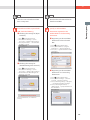
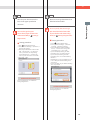
Follow the procedure below to install the e-Manual.
Windows
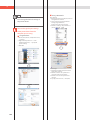
1. Insert the e-Manual CD-ROM into your computer.
2. Select the language for the e-Manual.
3. Select [Install].
If you select [Display Manuals], the e-Manual is displayed without installation.
4. Read the License Agreement, and then click [Yes].
The e-Manual is saved in the [Documents]* folder on your computer. If the shortcut icon is created on the Desktop or if the [index. html] le is
double-clicked, the e-Manual is displayed.
* The folder name di ers, depending on your operating system. The folder name is [Documents] if you are using Windows Vista/7/8 and [My Documents] if you
are using Windows 2000/XP.
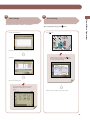
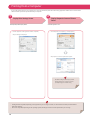
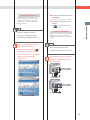
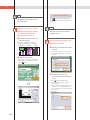
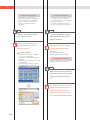
Macintosh
1. Insert the e-Manual CD-ROM into your computer.
2. Drag-and-drop the [iRADV_C5255_Manual_us] folder to the location you want to save it.
3. Double-click the index.html le inside the [iRADV_C5255_Manual_us] folder to display the e-Manual.
• Depending on the operating system you are using, a security protection message may appear. In this case, allow the content to be
displayed.
• When you start the e-Manual, the following page (the top page) appears.
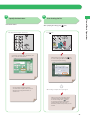
If the e-Manual (CD-ROM) Does Not Start
The CD-ROM auto run function may be disabled. In this case, perform the following procedure.
• Windows 8/Server 2012
1. Show the Desktop click the File Explorer icon on the taskbar.
2. Click [Computer].
3. Double-click the e-Manual icon.
4. Double-click [Maninst.exe].
• Windows Vista/7/Server 2008
1. Click [Start] on the Windows taskbar click [Computer].
2. Double-click the e-Manual icon.
3. Double-click [Maninst.exe].
• Windows XP/Server 2003
1. Click [Start] on the Windows taskbar click [My Computer].
2. Double-click the e-Manual icon.
3. Double-click [Maninst.exe].
• Windows 2000
1. Double-click [My Computer] on the desktop.
2. Double-click the e-Manual icon.
3. Double-click [Maninst.exe].

7
How to Use This Manual
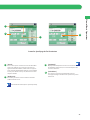
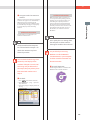
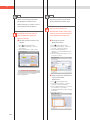
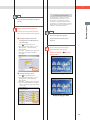
1 7
3
2
4
5
6
8
9
10111213
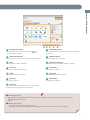
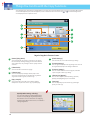
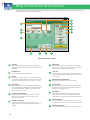
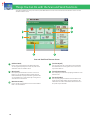
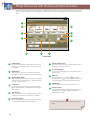
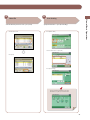
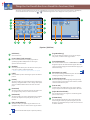
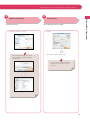
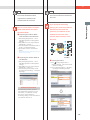
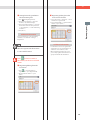
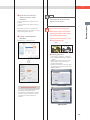
1
Enter keyword(s) here
Enter a keyword in the search dialog box, and press . The
search results page is displayed.
2
Select from functions
The instructions of each function and operation method are described.
3
[Top]
The top page of the e-Manual is displayed.
4
[Site map]
The site map of the e-Manual is displayed.
5
[Help]
The usage of the e-Manual is displayed.
6
[Glossary]
The glossary is displayed.
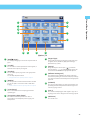
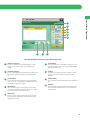
7
First of all…
This section describes the required information to use the machine,
and the information of optional product and software.
8
Select from purpose
This section includes the introduction of functions of the machine for
each purpose.
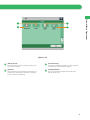
9
[O ce Locations]
Inquiries for the machine are displayed.
10
[Third Party Software]
The information about the third party software is displayed.
11
[Trademarks]
The trademarks are displayed.
12
[Copyright]
The information of copyrights is displayed.
13
[Disclaimers]
The disclaimers are displayed.
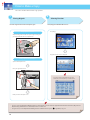
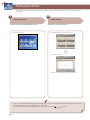
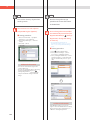
Performing a Search
Enter a keyword in the entry eld which is located at the top of the “Top page” or on the search area in the “Topic page,” and then click
to display the search results.
Printing a Topic Page
• On a topic page, you can print by category or by topic.
• Depending on the settings of the Web browser, the background color and images of the topic page may not be printed.

8
MEMO

1
9
Before You Start Using This
Machine
Before You Start Using This Machine
What This Machine Can Do . . . . . . . . . . . . . . . . . . . . . . . . . . . . . . . . . . . . . . . . 10
Main Power and Energy Saver Key . . . . . . . . . . . . . . . . . . . . . . . . . . . . . . . . . 12
Parts and Their Functions . . . . . . . . . . . . . . . . . . . . . . . . . . . . . . . . . . . . . . . . . 14
External View• • • • • • • • • • • • • • • • • • • • • • • • • • • • • • • • • • • • • • • • • • • • • • • • • • • • • • • • • • • • • • • • • • • • • • • • • • • • • • • • • • • • • • • • • • • • • • • • • • • • 14
Internal View • • • • • • • • • • • • • • • • • • • • • • • • • • • • • • • • • • • • • • • • • • • • • • • • • • • • • • • • • • • • • • • • • • • • • • • • • • • • • • • • • • • • • • • • • • • • • • • • • • • •16
Feeder • • • • • • • • • • • • • • • • • • • • • • • • • • • • • • • • • • • • • • • • • • • • • • • • • • • • • • • • • • • • • • • • • • • • • • • • • • • • • • • • • • • • • • • • • • • • • • • • • • • • • • • • • 18
Control Panel and Touch Panel Display . . . . . . . . . . . . . . . . . . . . . . . . . . . . . 20
Main Menu Screen Settings . . . . . . . . . . . . . . . . . . . . . . . . . . . . . . . . . . . . . . . 22
Changing Settings According to Your Needs . . . . . . . . . . . . . . . . . . . . . . . . 24

10
Before You Start Using This Machine
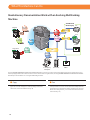
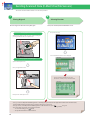
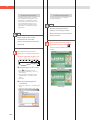
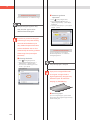
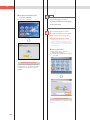
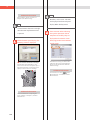
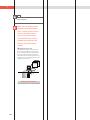
Revolutionary Documentation Work with an Evolving Multitasking
Machine
3
2
3
2
4
1
4
1
Telephone Line
Internet
LAN
Original
Copy/Print
I-Fax
E-Mail
Fax
Color Scan
Function
Copy
Function
MEAP
Function
Print
Function
Remote UI
Function
Send
Function
Fax
Function
In-Company
Computer
File Server
E-Mail
Send Outside
the Company
TheimageRUNNER ADVANCE C5255/C5250/C5240/C5240A/C5235A incorporates a rich array of input and output features that can greatly enhance your
e ciency. Equipped with features that meet the needs of document work in a digitized o ce, theimageRUNNER ADVANCE C5255/C5250/C5240/C5240A/
C5235A represents the ultimate in a color digital multitasking machines.
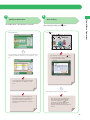
What This Machine Can Do
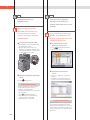
C o p y
You can make two-sided copies from one-sided originals or copy two
pages onto one side of the paper to reduce printing cost. There are
other modes, such as the Collate modes. (p. 26)
F a x
Scanned documents as well as stored les and computer data can be
sent by facsimile. You can also send documents to multiple addresses
and forward received facsimile to another destination. Also, by using
Remote Fax sending function, you can share the Fax function on the
same network. (p. 32)

11
Before You Start Using This Machine
Send Documents (E-Mail/Fax/I-Fax/File
Server/Store in Mail Box)
You can send scanned documents by e-mail or I-fax, as well as store
them on a network le server. You can also store sent documents in
the Mail Box. (p. 38)
Use Memory Media
You can scan and store documents in the memory media connected to
the USB port. You can also print stored les directly from the memory
media. (p. 44, p. 48)
Use Mail Box (Store/Print/Send)
You can store scanned documents or data from a computer in a mail
box. You can print documents stored in a mail box, and sent them to
other destinations. (p. 44, p. 48)
Use Advanced Box
You can set a le format to the scanned document so that it can be
accessed from your computer. You can also store les in the Advanced
Box with a le format that can be used on your computer.
The stored data can be shared by accessing it from a computer.
The Advanced Box can also be accessed from other imageRUNNER
ADVANCE machines for operations, such as printing stored data. (p. 44,
p. 48)
Use Remote Scanner
You can use this machine as a remote scanner by TWAIN compatible
computer software. You can scan up to11” x 17” in size at a resolution
of 600 x 600 dpi. (See e-Manual > Scanner.)
Print Secured File
You can send print data protected with a PIN/password from a
computer to the machine. This data can be printed only by entering
the correct PIN/password on the machine. This enables you to print
without unauthorized people viewing your data. (See e-Manual >
Secure Print.)
Printing a Fax/I-Fax File in the Memory RX
inbox
If Memory RX is set, les received by Fax/I-Fax function are not printed,
but stored in the Memory RX Inbox. You can print the stored les
whenever necessary. This can help prevent outputs being forgotten at
the machine. (See e-Manual > Fax/I-Fax Inbox.)
View Web Page
You can use this machine to browse Web pages from the touch panel
display of the machine or print PDF les on the Web pages. (See
e-Manual > Web Access.)
* Some functions explained in this manual may require optional equipment.

12
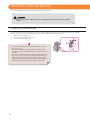
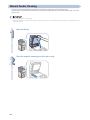
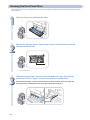
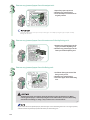
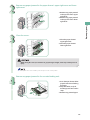
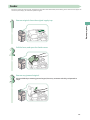
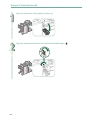
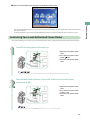
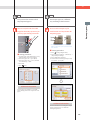
How to Turn ON the Main Power
Make sure that the power plug is rmly inserted into the power outlet and that the Security Key is in the ON positions (turn it to the right) if it is
inserted into the machine, and then turn ON the main power of the machine following the procedure below.
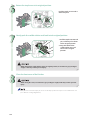
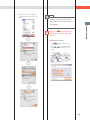
1. Open the main power switch cover.
2. Press the main power switch to the “I” side.
3. Close the main power switch cover.
Main Power and Energy Saver Key
This section describes how to use the main power switch and the Energy Saver key.
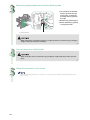
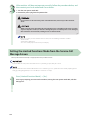
Do not connect or disconnect the power cord with wet hands, as this may result in electrical
shock.
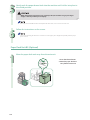
• If you are using a login service, log in using the procedure for the login
service you are using.
• If the main power indicator on the control panel does not light even
though the main power switch is ON, be sure to check the breaker to see
if it is OFF.
• If you want to turn OFF the main power and then back ON again, wait for
at least 10 seconds after the main power indicator is turned OFF before
turning ON the main power. However, when [Quick Startup Settings for
Main Power] is enabled, if you don’t wait more than 20 seconds after the
main power indicator is turned OFF, quick startup is not performed.

13
Before You Start Using This Machine
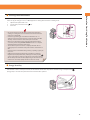
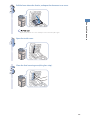
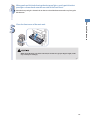
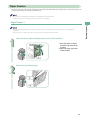
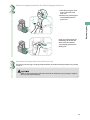
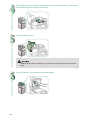
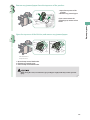
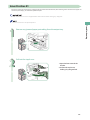
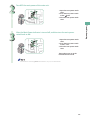
Shutting Down the Machine
This machine performs a procedure to protect hard disk when the machine is shut down. This enables the machine to be shut down safely, even
if there are any jobs being processed, or a MEAP application is running while the machine is shutting down.
1. Open the main power switch cover.
2. Press the main power switch to the “
” side.
3. Close taver.
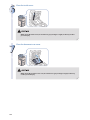
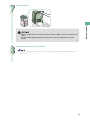
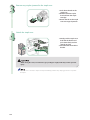
Energy Saver Key
If the machine is idle for a certain period of time, the machine will enter the Auto Sleep mode to minimize energy consumption. Press
(Energy Saver) to cancel the Sleep mode and resume normal machine operations.
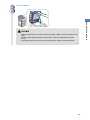
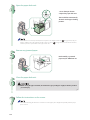
• Do not turn the main power OFF while using the Fax/I-Fax function.
Sending or receiving I-fax or fax documents cannot be done when the
main power is turned OFF.
• If the message <Backing up stored data from the Remote UI...> is
displayed on the touch panel display, do not turn the main power OFF.
This may cause the machine to fail to back up the stored data.
• Data stored in the machine may be damaged if the Advanced Box is
accessed by another imageRUNNER ADVANCE machine or a computer
immediately before the machine shuts down.
• The machine may take some time to completely shutdown. Do not
unplug the power cord until the main power indicator of the machine is
OFF.
• If the main power is turned OFF during scanning or printing, a paper jam
may occur.
• If [Quick Startup Settings for Main Power] in [Preferences] (Settings/
Registration) and [Sleep Mode Alert], which appears when you press
on the control panel, are both set to ‘On’, the tone sounds when turning
OFF the main power of the machine. (Depending on the situations, the
machine does not startup quickly and the tone does not sound.)

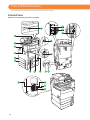
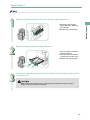
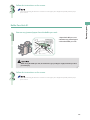
14
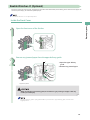
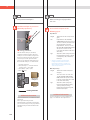
External View
When theCassette Feeding Unit-AD2 is attached
1
14
6
4
7
17
11
9
10
16
5
12
13
15
3
2
20
19
18
21
8
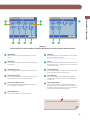
Parts and Their Functions
This section provides you with the names and functions of all the parts of the machine.

15
Before You Start Using This Machine
1
Feeder
Originals placed in the feeder are fed one sheet at a time to the platen
glass for scanning.
2
USB Port (1)
Use the USB port to connect a USB device.
3
Security Key (Optional)
For managing the use of the machine and preventing unauthorized
copies.
4
Main Power Switch
Press to the “I” side to turn the power ON.
5
Main Unit’s Right Cover
Open this cover when clearing a paper jam inside the main unit.
6
Multi-Purpose Tray
Use the multi-purpose tray to feed paper manually, and for loading
nonstandard paper stock, such as envelopes.
7
Paper Drawer’s Right Cover
Open this cover when clearing a paper jam in Paper Drawers 1 and 2.
8
Paper Drawer 2
Holds up to 550 sheets of paper (20 lb bond (80 g/m
2
)).
9
Paper Drawer 1
Holds up to 550 sheets of paper (20 lb bond (80 g/m
2
)).
10
Output Tray
Prints and copies are output to this tray.
11
Output Paper Tray Guide
Tilt the output paper tray guide up to prevent output papers from
falling down.
12
Control Panel
Includes the keys, touch panel display, and indicators required for
operating the machine.
13
LAN Port
Use a LAN cable to connect the machine to a network.
14
USB Port (2)
Use the USB port to connect external hard disks and other devices to
the machine.
15
USB Connector
Use a USB cable to connect the machine to a computer.
16
Test Button
Press this button to test the circuit breaker.
17
Breaker
Detects excess current or leakage current.
18
LINE 4
Use this port to connect theSuper G3 3rd/4th Line Fax Board to the
machine.
19
LINE 3
Use this port to connect theSuper G3 3rd/4th Line Fax Board to the
machine.
20
LINE 2
Use this port to connect theSuper G3 2nd Line Fax Board to the
machine.
21
LINE 1
Use this port to connect a fax line to the machine.

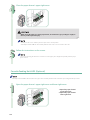
16
Parts and Their Functions
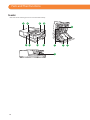
Internal View
When theCassette Feeding Unit-AD2 is attached

17
Before You Start Using This Machine
1
Platen Glass
Use the platen glass when scanning books, thick originals, thin
originals, transparencies, etc.
2
Upper Cover of the Fixing Unit
Open this cover to clear a paper jam in the xing unit.
3
Duplexing Unit
Pull out the duplexing unit to clear a paper jam.
4
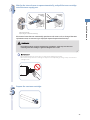
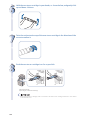
Waste Toner Container
Waste toner accumulates here.
5
Toner Replacement Cover
Open this cover to replace the toner cartridge.
6
Toner Cartridge
When toner runs out, pull out the toner cartridge, and replace it with
a new one.

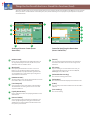
18
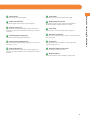
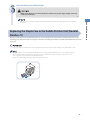
Feeder
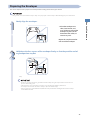
Both sides of two-sided originals can be scanned simultaneously.
1
2
6
4
10
9
5
12
13
3
7
8
11
Parts and Their Functions

19
Before You Start Using This Machine
1
Feeder Cover
Open this cover to remove jammed paper.
2
Original Set Indicator
Lights when originals are placed in the original supply tray.
3
Original Supply Tray
Originals placed here are automatically fed sheet by sheet into the
feeder. Place originals into this tray with the surface that you want to
scan face up.
4
Auxiliary Original Supply Tray
Pull out this tray when feeding large sized paper.
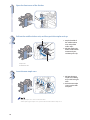
5
Auxiliary Original Output Tray
Pull out this tray when outputting large sized paper. You can pull out
this tray up to 2 levels.
6
Original Output Tray
Originals that have been scanned from the original supply tray are
output into the original output tray in the order that they are fed into
the feeder.
7
Slide Guides
Adjust these guides to match the width of the original.
8
Original Output Indicator
Lights when originals are being output and starts blinking in a
speci ed period after outputting originals is complete.
9
Inner Cover
Open this cover to clean the document feed scanning area.
10
Document Scan Cover
Open this cover to replace the stamp cartridge or clean the document
feed scanning area.
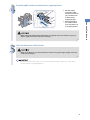
11
Platen Glass
Use the platen glass when scanning books, thick originals, thin
originals, transparencies, etc.
12
Document Feed Scanning Area
Scans documents sent from the feeder.
13
Original Stopper
Holds down originals to support outputting originals neatly.

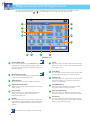
20
19
18
17
16
15
14
2
1
3
12
11
7
5
6
4
8910
13
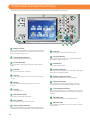
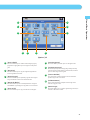
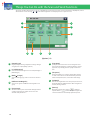
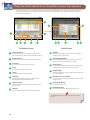
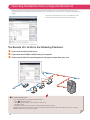
This section provides you with the names and functions of all the parts of the control panel and touch panel display.
1
Energy Saver key
Press to set or cancel the Sleep mode. Lights when the machine enters
the Sleep mode. For information on the Auto Sleep mode, see “Main
Power and Energy Saver Key,” on p. 12.
2
Settings/Registration key
Press to specify settings/registration. (p. 24)
3
Counter Check key
Press to display the copy and print count totals on the touch panel
display.
4
Clear key
Press to clear entered values or characters.
5
Stop key
Press to stop a job in progress, such as a scan, copy, or fax (scanning
only) job.
6
Edit Pen
Use when operating the touch panel display, such as to enter
characters.
7
Start key
Press to start an operation.
8
Main Power Indicator
Lights when the main power is turned ON.
9
Error Indicator
Flashes or lights if there is an error in the machine.
10
Processing/Data Indicator
Flashes or blinks green when the machine is performing operations,
and maintains a steady green light when fax data is stored in memory.
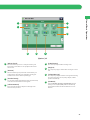
11
Reset key
Press to restore the standard settings of the machine.
12
ID (Log In/Out) key
Press to log in/out when a login service, such as Department ID
Management or SSO-H has been set.
13
Numeric keys
Press to enter numerical values.
14
Touch Panel Display
The settings screen for each function is shown on this display. Eight
function keys are displayed by default.
15
Brightness Adjustment Dial
Use to adjust the brightness of the touch panel display.
16
Volume Settings key
Press to display the screen for adjusting settings such as the
transmission volume and fax sending/receiving alarm volume.
17
Status Monitor/Cancel key
Press to check the status of jobs or to cancel print jobs. Also, press to
check status of the machine, such as checking the amount of paper
remaining.
18
Quick Menu key
Press to retrieve favorite functions stored in Quick Menu.
19
Main Menu key
Press to return to the Main Menu screen, such as when you want to
switch functions.
Control Panel and Touch Panel Display
Page is loading ...
Page is loading ...
Page is loading ...
Page is loading ...
Page is loading ...
Page is loading ...
Page is loading ...
Page is loading ...
Page is loading ...
Page is loading ...
Page is loading ...
Page is loading ...
Page is loading ...
Page is loading ...
Page is loading ...
Page is loading ...
Page is loading ...
Page is loading ...
Page is loading ...
Page is loading ...
Page is loading ...
Page is loading ...
Page is loading ...
Page is loading ...
Page is loading ...
Page is loading ...
Page is loading ...
Page is loading ...
Page is loading ...
Page is loading ...
Page is loading ...
Page is loading ...
Page is loading ...
Page is loading ...
Page is loading ...
Page is loading ...
Page is loading ...
Page is loading ...
Page is loading ...
Page is loading ...
Page is loading ...
Page is loading ...
Page is loading ...
Page is loading ...
Page is loading ...
Page is loading ...
Page is loading ...
Page is loading ...
Page is loading ...
Page is loading ...
Page is loading ...
Page is loading ...
Page is loading ...
Page is loading ...
Page is loading ...
Page is loading ...
Page is loading ...
Page is loading ...
Page is loading ...
Page is loading ...
Page is loading ...
Page is loading ...
Page is loading ...
Page is loading ...
Page is loading ...
Page is loading ...
Page is loading ...
Page is loading ...
Page is loading ...
Page is loading ...
Page is loading ...
Page is loading ...
Page is loading ...
Page is loading ...
Page is loading ...
Page is loading ...
Page is loading ...
Page is loading ...
Page is loading ...
Page is loading ...
Page is loading ...
Page is loading ...
Page is loading ...
Page is loading ...
Page is loading ...
Page is loading ...
Page is loading ...
Page is loading ...
Page is loading ...
Page is loading ...
Page is loading ...
Page is loading ...
Page is loading ...
Page is loading ...
Page is loading ...
Page is loading ...
Page is loading ...
Page is loading ...
Page is loading ...
Page is loading ...
Page is loading ...
Page is loading ...
Page is loading ...
Page is loading ...
Page is loading ...
Page is loading ...
Page is loading ...
Page is loading ...
Page is loading ...
Page is loading ...
Page is loading ...
Page is loading ...
Page is loading ...
Page is loading ...
Page is loading ...
Page is loading ...
Page is loading ...
Page is loading ...
Page is loading ...
Page is loading ...
Page is loading ...
Page is loading ...
Page is loading ...
Page is loading ...
Page is loading ...
Page is loading ...
Page is loading ...
Page is loading ...
Page is loading ...
Page is loading ...
Page is loading ...
Page is loading ...
Page is loading ...
Page is loading ...
Page is loading ...
Page is loading ...
Page is loading ...
Page is loading ...
Page is loading ...
Page is loading ...
Page is loading ...
Page is loading ...
Page is loading ...
Page is loading ...
Page is loading ...
Page is loading ...
Page is loading ...
Page is loading ...
Page is loading ...
Page is loading ...
Page is loading ...
Page is loading ...
Page is loading ...
Page is loading ...
Page is loading ...
Page is loading ...
Page is loading ...
Page is loading ...
Page is loading ...
Page is loading ...
Page is loading ...
Page is loading ...
Page is loading ...
Page is loading ...
Page is loading ...
Page is loading ...
Page is loading ...
Page is loading ...
Page is loading ...
Page is loading ...
Page is loading ...
Page is loading ...
Page is loading ...
Page is loading ...
Page is loading ...
Page is loading ...
Page is loading ...
Page is loading ...
Page is loading ...
Page is loading ...
Page is loading ...
Page is loading ...
Page is loading ...
Page is loading ...
-
 1
1
-
 2
2
-
 3
3
-
 4
4
-
 5
5
-
 6
6
-
 7
7
-
 8
8
-
 9
9
-
 10
10
-
 11
11
-
 12
12
-
 13
13
-
 14
14
-
 15
15
-
 16
16
-
 17
17
-
 18
18
-
 19
19
-
 20
20
-
 21
21
-
 22
22
-
 23
23
-
 24
24
-
 25
25
-
 26
26
-
 27
27
-
 28
28
-
 29
29
-
 30
30
-
 31
31
-
 32
32
-
 33
33
-
 34
34
-
 35
35
-
 36
36
-
 37
37
-
 38
38
-
 39
39
-
 40
40
-
 41
41
-
 42
42
-
 43
43
-
 44
44
-
 45
45
-
 46
46
-
 47
47
-
 48
48
-
 49
49
-
 50
50
-
 51
51
-
 52
52
-
 53
53
-
 54
54
-
 55
55
-
 56
56
-
 57
57
-
 58
58
-
 59
59
-
 60
60
-
 61
61
-
 62
62
-
 63
63
-
 64
64
-
 65
65
-
 66
66
-
 67
67
-
 68
68
-
 69
69
-
 70
70
-
 71
71
-
 72
72
-
 73
73
-
 74
74
-
 75
75
-
 76
76
-
 77
77
-
 78
78
-
 79
79
-
 80
80
-
 81
81
-
 82
82
-
 83
83
-
 84
84
-
 85
85
-
 86
86
-
 87
87
-
 88
88
-
 89
89
-
 90
90
-
 91
91
-
 92
92
-
 93
93
-
 94
94
-
 95
95
-
 96
96
-
 97
97
-
 98
98
-
 99
99
-
 100
100
-
 101
101
-
 102
102
-
 103
103
-
 104
104
-
 105
105
-
 106
106
-
 107
107
-
 108
108
-
 109
109
-
 110
110
-
 111
111
-
 112
112
-
 113
113
-
 114
114
-
 115
115
-
 116
116
-
 117
117
-
 118
118
-
 119
119
-
 120
120
-
 121
121
-
 122
122
-
 123
123
-
 124
124
-
 125
125
-
 126
126
-
 127
127
-
 128
128
-
 129
129
-
 130
130
-
 131
131
-
 132
132
-
 133
133
-
 134
134
-
 135
135
-
 136
136
-
 137
137
-
 138
138
-
 139
139
-
 140
140
-
 141
141
-
 142
142
-
 143
143
-
 144
144
-
 145
145
-
 146
146
-
 147
147
-
 148
148
-
 149
149
-
 150
150
-
 151
151
-
 152
152
-
 153
153
-
 154
154
-
 155
155
-
 156
156
-
 157
157
-
 158
158
-
 159
159
-
 160
160
-
 161
161
-
 162
162
-
 163
163
-
 164
164
-
 165
165
-
 166
166
-
 167
167
-
 168
168
-
 169
169
-
 170
170
-
 171
171
-
 172
172
-
 173
173
-
 174
174
-
 175
175
-
 176
176
-
 177
177
-
 178
178
-
 179
179
-
 180
180
-
 181
181
-
 182
182
-
 183
183
-
 184
184
-
 185
185
-
 186
186
-
 187
187
-
 188
188
-
 189
189
-
 190
190
-
 191
191
-
 192
192
-
 193
193
-
 194
194
-
 195
195
-
 196
196
-
 197
197
-
 198
198
-
 199
199
-
 200
200
-
 201
201
-
 202
202
-
 203
203
-
 204
204


Canon C5235 Operating instructions
- Category
- Laser/LED printers
- Type
- Operating instructions
Ask a question and I''ll find the answer in the document
Finding information in a document is now easier with AI
Related papers
-
Canon i-SENSYS LBP325x User manual
-
Canon imageRunner Advance 6255 Operating instructions
-
-
-
-
Canon LBP351 Owner's manual
-
Canon i-SENSYS LBP253x User manual
-
Canon i-SENSYS LBP151dw User manual
-
-
Canon MF249 User manual
Other documents
-
Toshiba Copier 5520c User manual
-
KYOCERA TASKalfa 550c User guide
-
Winners Only GK351 Operating instructions
-
-
Triumph-Adler 3005ci Owner's manual
-
Copystar TASKalfa 6551ci Operating instructions
-
TA Triumph-Adler 6505ci Operating instructions
-
Microsoft MP C3500 User manual
-
KYOCERA TASKalfa 6551ci Operating instructions
-