Axxess AX-AM-MB92 Installation Instructions Manual

Category
Car video systems
Type
Installation Instructions Manual

Axxess AX-AM-MB92 is a versatile interface that allows you to integrate various video sources, such as front and rear cameras, and an HDMI input, into your Mercedes Benz's factory display screen. It provides easy access to these inputs, enhancing your multimedia experience while ensuring a seamless integration with your vehicle's original system.

Axxess AX-AM-MB92 is a versatile interface that allows you to integrate various video sources, such as front and rear cameras, and an HDMI input, into your Mercedes Benz's factory display screen. It provides easy access to these inputs, enhancing your multimedia experience while ensuring a seamless integration with your vehicle's original system.

CAUTION!
All accessories, switches, climate
controls panels, and especially air bag indicator
lights must be connected before cycling the
ignition. Also, do not remove the factory radio
with the key in the on position, or while the
vehicle is running.
AX-AM-MB92
INSTALLATION INSTRUCTIONS
AxxessInterfaces.com © COPYRIGHT 2018 METRA ELECTRONICS CORPORATION REV. 4/17/18 INSTAX-AM-MB92
INTERFACE FEATURES
INTERFACE COMPONENTS
TOOLS REQUIRED
• Wire cutter • Crimp tool • Solder gun • Tape
• Connectors (example: butt-connectors, bell
caps, etc.)
TABLE OF CONTENTS
Connections to be made .......................................2
Configuring the AX-AM-MB92 ...............................3
Installing the AX-AM-MB92 ...................................4
User guide ..............................................................5
Mercedes Benz (NTG 5.0 with 7” or 8” display)
HDMI and Camera Interface 2014-up*
APPLICATIONS
Provides front and rear camera inputs to the factory display screen
Provides an HDMI input to the factory display screen
Micro “B” USB updatable
MERCEDES
A Class (W176) 2015-up
B Class (W246) 2015-up
C Class (W205) 2014-up
CLA Coupe (C117) 2015-up
CLS Coupe (W218) 2014-up
CLS Shooting Brake
(X218) 2014-up
E Class (W212) 2015-up
GLA Class (X156) 2015-up
GLC Class (X253) 2015-up
GLE Class (C292) 2014-up
ML Class (W166) 2014-up
S Class (W22) 2014-up
V Class (W447) 2014-up
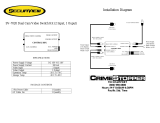
AX-AM-MB92 interface
AX-AM-MB92 harness
6-pin to 4-pin LVDS (video) cable
LVDS extension cable
10-pin harness with RCA jacks
3.5mm extension cable
USB dongle
*Visit AxxessInterfaces.com for up-to-date vehicle specific applications.
2
CONNECTIONS TO BE MADE
If installing a front/rear camera, connect the Black wire labeled “GND”,
to the camera(s) ground wire.
If installing a backup camera, connect the Red wire labeled “Reverse Camera 12v”,
to the backup camera power wire.
If installing a front camera, connect the Red wire labeled “Front Camera 12v”,
to the front camera power wire.
The Red wire labeled “Acc Power Output” is optional if a power source is required while a
camera is active.
If installing a backup camera, connect the RCA jack labeled “Reverse Camera Video Input”
to the camera.
If installing a front camera, connect the RCA jack labeled “Front Camera Video Input”
to the camera.
If adding an HDMI input to the factory display screen, connect an HDMI cable (Axxess part
number AX-HDCABLE, sold separately), to the port on the AX-AM-MB92 labeled “HDMI IN”.
FRONT CAM IN
REAR CAM IN
ACC PWR OUT
REAR CAM PWR
FRONT CAM
PWR
CAM GROUND
HDMI LVDS OUT
LVDS IN
AV IN
POWER
IN
(Connections Diagram)
3
REV. 4/17/2018 INSTAX-AM-MB92
Dip switch settings
Remove the access door located on the top of the AX-AM-MB92 interface to access the dip switches.
Dip 1
If the vehicle is equipped with a factory
backup camera: On: Yes Off: No
Dip 3
If the vehicle has an aftermarket
backup camera
: On: Yes Off: No
Dips 4 & 5
7-inch screen:
Dip 4 Off - Dip 5 Off
8-inch screen:
Dip 4 On - Dip 5 Off
Dip 2
If the vehicle has an aftermarket front
camera:
On: Yes Off: No
CONFIGURING THE AX-AM-MB92
4
INSTALLING THE AX-AM-MB92
Remove the main connector from the radio, then connect the
male
plug from the
AX-AM-MB92 harness
into the radio.
Connect the factory
male
factory connector into the
female
plug from the
AX-AM-MB92 harness
.
Connect the
AX-AM-MB92 harness
into the AX-AM-MB92 interface.
Connect one end of the
3.5mm extension cable
to the
AX-AM-MB92 harness
, then connect
the other end to the
USB dongle
. The
USB dongle
will be discussed later.
Remove the Blue LVDS (video) cable from the radio, then connect it to the AX-AM-MB92
interface (LVDS OUT). (Figure A)
Note:
An LVDS extension cable is provided if more length is required.
Connect the
6-pin to 4-pin LVDS (video) cable
into the radio, and then into the
AX-AM-MB92 interface (LVDS IN).
Connect the 10-pin harness with RCA jacks into the AX-AM-MB92 interface.
(Figure A –
Picture shown for illustration only, actual radio may differ
)
5
REV. 4/17/2018 INSTAX-AM-MB92
Button Configuration
The “BACK ARROW” button in the center console will be used to operate the AX-AM-MB92.
USER GUIDE
HDMI access
Connect the
USB dongle
to the vehicles USB input. The dongle will appear as “USB AUX”.
Select USB as a source from the factory radio.
Press and hold “Button 1” for 2 seconds to switch between the factory screen and the AX-
AM-MB92 screen.
Double tap “Button 1” to disable the video-in-motion warning message.
Note:
There may be a slight delay in HDMI audio lip sync due to the USB audio buffer time of the OEM
system. This is dependent on the manufacturer original equipment specification.
Front camera access
Ensure dip switch 2 is selected to “ON”.
Double tap “Button 1” to activate the front camera.
Rear camera access
The backup camera will automatically activate while the vehicle is in reverse gear.
Deselecting the reverse gear will activate the front camera, if installed and dip switch 2 is
selected to “ON”.
Note:
This camera takes priority over HDMI mode, and front camera mode, but will not deactivate the
front camera. Drive over 10 mph to cancel front camera mode.
View Version Number
Press and hold “Button 1” for 8 seconds to enter the firmware information screen.
6
7
REV. 4/17/2018 INSTAX-AM-MB92
KNOWLEDGE IS POWER
Enhance your installation and fabrication skills by
enrolling in the most recognized and respected
mobile electronics school in our industry.
Log onto www.installerinstitute.com or call
800-354-6782 for more information and take steps
toward a better tomorrow.
®
Metra recommends MECP
certified technicians
IMPORTANT
If you are having difficulties with the installation of this product,
please call our Tech Support line at 1-800-253-TECH. Before doing
so, look over the instructions a second time, and make sure the
installation was performed exactly as the instructions are stated.
Please have the vehicle apart and ready to perform troubleshooting
steps before calling.
AxxessInterfaces.com © COPYRIGHT 2018 METRA ELECTRONICS CORPORATION REV. 4/17/18 INSTAX-AM-MB92
INSTALLATION INSTRUCTIONS
AX-AM-MB92
  • Page 1 1
  • Page 2 2
  • Page 3 3
  • Page 4 4
  • Page 5 5
  • Page 6 6
  • Page 7 7
  • Page 8 8

Axxess AX-AM-MB92 Installation Instructions Manual

Category
Car video systems
Type
Installation Instructions Manual

Axxess AX-AM-MB92 is a versatile interface that allows you to integrate various video sources, such as front and rear cameras, and an HDMI input, into your Mercedes Benz's factory display screen. It provides easy access to these inputs, enhancing your multimedia experience while ensuring a seamless integration with your vehicle's original system.

Ask a question and I''ll find the answer in the document

Finding information in a document is now easier with AI