eroline Prestige CS25U User manual
- Category
- Microwaves
- Type
- User manual
This manual is also suitable for
eroline Prestige CS25U
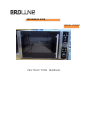
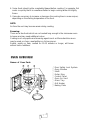
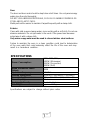
Below you will find brief product information for eroline Prestige CS25U. This versatile microwave oven offers a range of cooking options to suit your needs. With its spacious interior, turntable, and intuitive control panel, the eroline Prestige CS25U makes cooking and reheating meals effortless and efficient.
Key Features:
- Microwave Cooking: Quickly and easily cook or reheat food with adjustable power levels for precise results.
- Grill: Grill your favorite meats, vegetables, and sandwiches for a crispy and flavorful finish.
- Microwave + Grill: Combine the power of microwave and grill functions for faster cooking times and evenly cooked dishes.
eroline Prestige CS25U
Below you will find brief product information for eroline Prestige CS25U. This versatile microwave oven offers a range of cooking options to suit your needs. With its spacious interior, turntable, and intuitive control panel, the eroline Prestige CS25U makes cooking and reheating meals effortless and efficient.
Key Features:
- Microwave Cooking: Quickly and easily cook or reheat food with adjustable power levels for precise results.
- Grill: Grill your favorite meats, vegetables, and sandwiches for a crispy and flavorful finish.
- Microwave + Grill: Combine the power of microwave and grill functions for faster cooking times and evenly cooked dishes.


-
 1
1
-
 2
2
-
 3
3
-
 4
4
-
 5
5
-
 6
6
-
 7
7
-
 8
8
-
 9
9
-
 10
10
-
 11
11
-
 12
12
-
 13
13
-
 14
14
-
 15
15
-
 16
16
-
 17
17
-
 18
18
-
 19
19
-
 20
20
-
 21
21


eroline Prestige CS25U User manual
- Category
- Microwaves
- Type
- User manual
- This manual is also suitable for
eroline Prestige CS25U
Below you will find brief product information for eroline Prestige CS25U. This versatile microwave oven offers a range of cooking options to suit your needs. With its spacious interior, turntable, and intuitive control panel, the eroline Prestige CS25U makes cooking and reheating meals effortless and efficient.
Key Features:
- Microwave Cooking: Quickly and easily cook or reheat food with adjustable power levels for precise results.
- Grill: Grill your favorite meats, vegetables, and sandwiches for a crispy and flavorful finish.
- Microwave + Grill: Combine the power of microwave and grill functions for faster cooking times and evenly cooked dishes.
Ask a question and I''ll find the answer in the document
Finding information in a document is now easier with AI
Other documents
-
 Russell Hobbs RHM2506 User manual
-
De'Longhi D90D25ESLRIII-B1A User manual
-
Prestige SE28W/S User manual
-
Baumatic BMFS3420 - 38000241 User manual
-
 IFB Appliances 25SC2 User manual
-
IFB 34BIC2 User manual
-
Hoover HMC25STB-UK User manual
-
Defy DMO392 Owner's manual
-
Sanyo EM-S3579V User manual
-
Candy CMGE25BS-UK User manual

