Page is loading ...

Tools and Materials
Thank You For Choosing Kohler Company
We appreciate your commitment to Kohler quality. Please take a few
minutes to review this manual before you start installation. If you
encounter any installation or performance problems, please don’t
hesitate to contact us. Our phone numbers and website are listed on
the back cover. Thanks again for choosing Kohler Company.
Before You Begin
Please read all instructions before you begin.
Observe all local plumbing and building codes.
Kohler Co. reserves the right to make revisions in the design of
faucets without notice, as specified in the Price Book.
Screwdrivers
5/32", 5/64" Hex
Wrenches
112979-2-DB 2 Kohler Co.

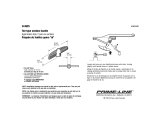
1. Install the Handles
NOTE: Escutcheons are supplied with widespread faucet
applications only. Refer to the valve kit installation instruction for
escutcheon assembly procedures prior to installing handles.
Place a spline adapter on each valve stem.
Place a handle stem/skirt over each valve.
Align the eyelets in each handle stem/skirt so they point to the
other handle.
Fasten each handle stem/skirt to a valve stem using the
lockwashers and screws provided.
Use a 5/32” hex wrench to tighten.
Place each centerpiece onto the handle stem/skirt so the eyelet
holes are clearly visible.
Fasten each centerpiece in place by inserting two screws (flat
surface facing out).
Place one screw into each side of each centerpiece. Use a 5/32”
hex wrench to tighten.
Slip a color ring over the endpiece threads and onto the shoulder
of each endpiece.
NOTE: Use soapy water to lubricate the O-rings.
Slip the O-rings over the endpiece threads and onto the shoulder
of each endpiece.
Lever Handle
Long
Endpiece
Color Ring
O-Ring
Screw
Centerpiece
Short
Endpiece
Color Ring
O-Ring
Screw
Lockwasher
Screw
Eyelets
Valve Stem
Escutcheon
Handle
Stem/Skirt
Centerpiece
Screw
O-Ring
Color Ring
Endpiece
T-Handle
Endpiece
Color Ring
O-Ring
Screw
Spline Adapter
Spline Adapter
Kohler Co. 3 112979-2-DB

Install the Handles (cont.)
Screw the endpieces into each centerpiece until tight.
112979-2-DB 4 Kohler Co.

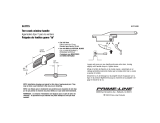
2. Install the Handles
Install vandal-resistant lever and T-handles using the installation
procedures on the previous page.
Thread a long screw through the endpiece until it is tight using a
5/64″ hex wrench.
Press the plug button into the endpiece of each T-handle.
Install a vandal-resistant aerator into the spout using Kohler
Wrench #78868.
Button Cap
Long Screw
Long Screw
Aerator
T-Handle
Aerator
Lever Handle
Wrench
Kohler Co. 5 112979-2-DB

3. Install the Handles
NOTE: Escutcheons are supplied with widespread faucet
applications only. Refer to the valve kit installation instruction for
escutcheon assembly procedures prior to installing the handles.
Place a spline adapter onto each valve stem.
Place the appropriate color ring (red = hot, blue = cold) and
bonnet over each valve and press firmly against the escutcheon or
faucet body.
Partially install the handle adapter onto the spline adapter and
check the alignment of the handle.
Align the external flats of the handle adapter so they are parallel
to the faucet body or back edge of the fixture or wall. This can be
done by careful adjustment of the spline adapter and handle
adapter.
Fasten a handle adapter to each valve stem using a screw.
Set the handles on the handle adapters and thread a bonnet up
onto the handle threads until tight.
Square
Handle
Spline Adapter
(Centerset
Faucet)
Spline Adapter
(Widespread
Faucet)
Handle
Adapter
Valve
Stem
Color
Ring
Swirl
Handle
Screw
Bonnet
Escutcheon
112979-2-DB 6 Kohler Co.
/