
LD100P
INSTRUCTION MANUAL
WARNING:
For your personal safety, READ and UNDERSTAND before using.
SAVE THESE INSTRUCTIONS FOR FUTURE REFERENCE.
Laser Distance Measure
Page is loading ...
Page is loading ...

1
2
4
6
8
3
10
5
7
9
11
1
2
4
3
5
6
7,8,9
10
11
12
13
14
15
16,17,18
19
20
21
22
23
27
24
28
25
29
26
30
min
b
max
a
MENU
TRIPOD
a
b
b
BEEP
RESET
UNIT
ONOFF
TIMER
?
Page is loading ...
Page is loading ...
Page is loading ...
Page is loading ...
Page is loading ...
Page is loading ...
Page is loading ...
Page is loading ...
Page is loading ...
Page is loading ...
Page is loading ...
Page is loading ...
Page is loading ...
Page is loading ...
Page is loading ...
Page is loading ...
Page is loading ...
Page is loading ...
Page is loading ...
Page is loading ...
Page is loading ...

1
Safety Instructions
Makita LD100P
D
GB
F
I
E
NL
P
N
FIN
DK
S
TR
CZ
SK
PL
SLO
HR
H
GR
RUS
LV
EST
LT
ROK
CN
User Manual
English
Congratulations on the purchase of your
Makita LD100P.
Carefully read the Safety Instruc-
tions and the User Manual before
using this product.
The person responsible for the instrument must
ensure that all users understand these directions and
adhere to them.
Contents
Safety Instructions .............................................1
Start-up................................................................5
Menu functions................................................... 7
Operation.............................................................8
Measuring ............................................................9
Functions ...........................................................10
Appendix............................................................14
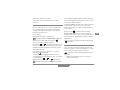
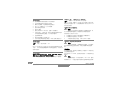
Safety Instructions
Symbols used
The symbols used in the Safety Instructions have the
following meanings:
WARNING:
Indicates a potentially hazardous situation or
an unintended use which, if not avoided, will result in
death or serious injury.
CAUTION:
Indicates a potentially hazardous situation or
an unintended use which, if not avoided, may result
in minor injury and/or in appreciable material, finan-
cial and environmental damage.
)
Important paragraphs which must be adhered
to in practice as they enabled the product to be used
in a technically correct and efficient manner.
Use of the instrument
Permitted use
• Measuring distances
• Computing functions, e. g. areas and volumes
•Measuring tilts

2
Safety Instructions
Makita LD100P
D
GB
F
I
E
NL
P
N
FIN
DK
S
TR
CZ
SK
PL
SLO
HR
H
GR
RUS
LV
EST
LT
ROK
CN
Prohibited use
• Using the instrument without instruction
• Using outside the stated limits
• Deactivation of safety systems and removal of
explanatory and hazard labels
• Opening of the equipment by using tools (screw-
drivers, etc.), as far as not specifically permitted
for certain cases
• Carrying out modification or conversion of the
product
• Use after misappropriation
• Use of accessories from other manufacturers
without the express approval of Makita.
• Deliberate or irresponsible behaviour on scaf-
folding, when using ladders, when measuring
near machines which are running, or near parts of
machines or installations which are unprotected
• Aiming directly into the sun
• Deliberate dazzling of third parties; also in the
dark
• Inadequate safeguards at the surveying site (e.g.
when measuring on roads,
construction sites,
etc.)
Limits of use
)
See section “Technical Data“.
The Makita LD100P is designed for use in areas
permanently habitable by humans, do not use the
product in explosion hazardous areas or in aggressive
environments.
Areas of responsibility
Responsibilities of the manufacturer of the orig-
inal equipment Makita Corporation Anjo, Aichi,
446-8502 Japan:
Makita is responsible for supplying the product,
including the User Manual and original accessories, in
a completely safe condition.
Responsibilities of the manufacturer of non-
Makita accessories:
)
The manufacturers of non-Makita accessories
for the Makita LD100P are responsible for devel-
oping, implementing and communicating safety
concepts for their products. They are also responsible
for the effectiviness of these safety concepts in
combination with the Makita equipment.
Responsibilities of the person in charge of the
instrument:
WARNING
The person responsible for the instrument
must ensure that the equipment is used in accor-
dance with the instructions. This person is also
accountable for the deployment of personnel and for
their training and for the safety of the equipment
when in use.
The person in charge of the instrument has the
following duties:
• To understand the safety instructions on the
product and the instructions in the User Manual.

3
Safety Instructions
Makita LD100P
D
GB
F
I
E
NL
P
N
FIN
DK
S
TR
CZ
SK
PL
SLO
HR
H
GR
RUS
LV
EST
LT
ROK
CN
• To be familiar with local safety regulations
relating to accident prevention.
• To inform Makita immediately if the equipment
becomes unsafe.
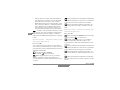
Hazards in use
CAUTION:
Watch out for erroneous distance measure-
ments if the instrument is defective or if it has been
dropped or has been misused or modified.
Precautions:
Carry out periodic test measurements. Particularly
after the instrument has been subject to abnormal
use, and before, during and after important measure-
ments.
Make sure the Makita LD100P optics is kept clean and
that there is no mechanical damage to the bumpers.
CAUTION:
In using the instrument for distance measure-
ments or for positioning moving objects (e.g. cranes,
building equipment, platforms, etc.) unforeseen
events may cause erroneous measurements.
Precautions:
Only use this product as a measuring sensor, not as
a control device. Your system must be configured and
operated in such a way, that in case of an erroneous
measurement, malfunction of the device or power
failure due to installed safety measures (e.g. safety
limit switch), it is assured that no damage will occur.
WARNING:
Flat batteries must not be disposed of with
household waste. Care for the environment and take
them to the collection points provided in accordance
with national or local regulations.
The product must not be disposed of with
household waste.
Dispose of the product appropriately in
accordance with the national regulations in
force in your country.
Always prevent access to the product by unautho-
rized personnel.
Electromagnetic Compatibility
(EMC)
The term "electromagnetic compatibility" is taken to
mean the capability of the product to function
smoothly in an environment where electromagnetic
radiation and electrostatic discharges are present,
and without causing electromagnetic interference to
other equipment.
WARNING:
The Makita LD100P conforms to the most strin-
gent requirements of the relevant standards and
regulations. Yet, the possibility of it causing interfer-
ence in other devices cannot be totally excluded.
CAUTION:
Never attempt to repair the product yourself. In
case of damage, contact the local dealership.

4
Safety Instructions
Makita LD100P
D
GB
F
I
E
NL
P
N
FIN
DK
S
TR
CZ
SK
PL
SLO
HR
H
GR
RUS
LV
EST
LT
ROK
CN
FCC statement (applic. in U.S.)
This equipment has been tested and found to comply
with the limits for a Class B digital device, pursuant to
part 15 of the FCC Rules. These limits are designed to
provide reasonable protection against harmful inter-
ference in a residential installation.
This equipment generates, uses and can radiate radio
frequency energy and, if not installed and used in
accordance with the instructions, may cause harmful
interference to radio communications.
However, there is no guarantee that interference will
not occur in a particular installation.
If this equipment does cause harmful interference to
radio or television reception, which can be deter-
mined by turning the equipment off and on, the user
is encouraged to try to correct the interference by
one or more of the following measures:
• Reorient or relocate the receiving antenna.
• Increase the separation between the equipment
and receiver.
• Connect the equipment into an outlet on a circuit
different from that to which the receiver is
connected.
• Consult the dealer or an experienced radio/TV
technician for help
WARNING:
Changes or modifications not expressly
approved by Makita for compliance could void the
user’s authority to operate the equipment.
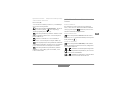
Laser classification
Integrated distancemeter
The Makita LD100P produces a visible laser beam
which emerges from the front of the instrument.
It is a Class 2 laser product in accordance with:
• IEC60825-1 : 2007 "Radiation safety of laser
products"
Laser Class 2 products:
Do not stare into the laser beam or direct it towards
other people unnecessarily. Eye protection is
normally afforded by aversion responses including
the blink reflex.
WARNING:
Looking directly into the beam with optical aids
(e.g. binoculars, telescopes) can be hazardous.
Precautions:
Do not look directly into the beam with optical aids.
CAUTION:
Looking into the laser beam may be hazardous
to the eyes.
Precautions:
Do not look into the laser beam. Make sure the laser
is aimed above or below eye level. (particularly with
fixed installations, in machines, etc.)

5
Start-up
Makita LD100P
D
GB
F
I
E
NL
P
N
FIN
DK
S
TR
CZ
SK
PL
SLO
HR
H
GR
RUS
LV
EST
LT
ROK
CN
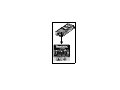
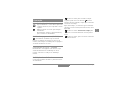
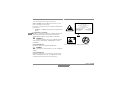
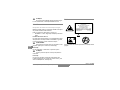
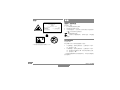
Labelling
Position of the product label see last page!
Start-up
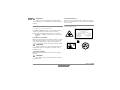
Inserting/replacing batteries
See figure {A}
1 Remove battery compartment lid and attach
handstrap.
2 Insert batteries, observing correct polarity.
3 Close the battery compartment again. Replace
the batteries when the symbol flashes perma-
nently in the display.
)
Use alkaline batteries only.
)
Remove the batteries before any long period
of non-use to avoid the danger of corrosion.
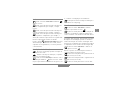
Changing the reference point
(multifunctional endpiece)
See figure {B}
The instrument can be adapted for the following
measuring situations:
• For measurements from an edge, fold out the
positioning bracket until it first locks in place. See
figure {C}.
• For measurements from a corner, open the posi-
tioning bracket until it locks in place, then push
the positioning bracket lightly to the right to fold
it out fully. See figure {D}.
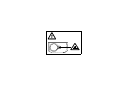
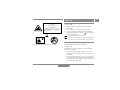
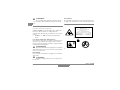
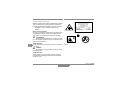
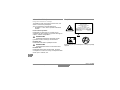
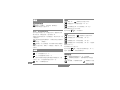
Laser Radiation
Do not stare into the beam
Laser class 2
acc. IEC 60825-1:2007
Maximum radiant power: <1mW
Emitted wavelength: 620-690nm
Beam divergence: 0.16 x 0.6 mrad
Pulse duration: 1 x 10
-9
s

6
Start-up
Makita LD100P
D
GB
F
I
E
NL
P
N
FIN
DK
S
TR
CZ
SK
PL
SLO
HR
H
GR
RUS
LV
EST
LT
ROK
CN
A built-in sensor automatically detects the orienta-
tion of the positioning bracket and adjusts the zero
point of the instrument accordingly.
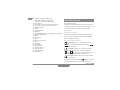
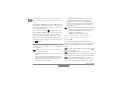
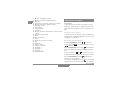
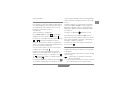
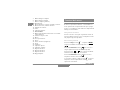
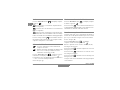
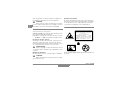
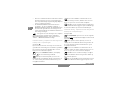
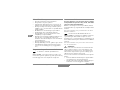
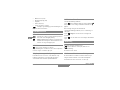
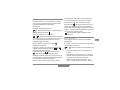
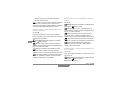
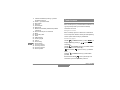
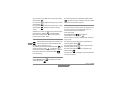
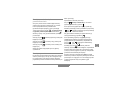
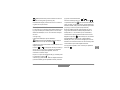
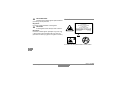
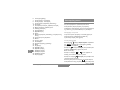
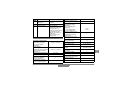
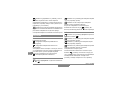
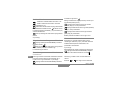
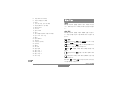
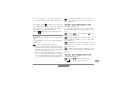
Keypad
See figure {E}:
1 ON (On/measuring) button
2Plus (+) button
3 Minus (-) button
4 Functions button
5Area / volume button
6 Equal / menu button
7 Memory button
8 Indirect measurement (Pythagoras) button
9 Clear / off button
10 Timer button
11 Reference button
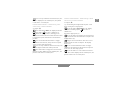
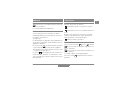
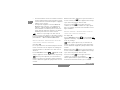
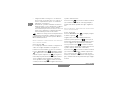
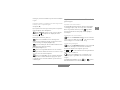
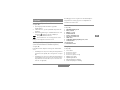
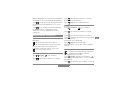
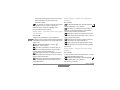
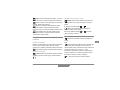
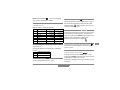
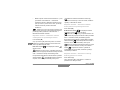
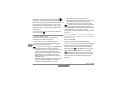
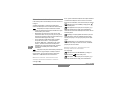
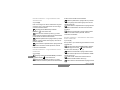
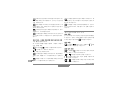
Display
See figure {F}
1Laser active
2 Reference (front)
3 Reference (rear)
4 Reference (corner stop)
5 Measuring with the tripod
6 Stake out function
7 Single Pythagorean measurement
8 Double Pythagorean measurement
9 Double (partial height) measurement
10 Illumination
11 Save constant value, call up constant value
12 Historical memory, call up values
13 Battery status
14 Timer
15 Area/volume
16 Tilt
17 Horizontal distance measurement using tilt
18 Room corner angle function
19 Menu
20 Continuous laser
21 Reset
22 Reference (tripod)
23 Beep
24 Circumference
25 Wall area
26 Ceiling area
27 Intermediate line 1
28 Intermediate line 2
29 Intermediate line 3
30 Summary line

7
Menu functions
Makita LD100P
D
GB
F
I
E
NL
P
N
FIN
DK
S
TR
CZ
SK
PL
SLO
HR
H
GR
RUS
LV
EST
LT
ROK
CN
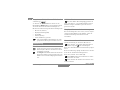
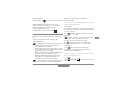
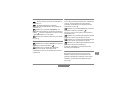
Menu functions
Settings
The menu allows settings to be altered and perma-
nently stored. After switching off the device or
replacing the batteries the settings are stored.
Navigation in the menu
The menu allows settings to be made at the user
level. The instrument can be specifically configured to
your personal requirements.
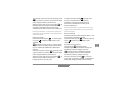
General description
button (pressed long) brings up the , the
set units and the symbol are displayed.
button (pressed short) pages through each
menu item. See figure {G}.
or button to make changes in menu items.
button (pressed short) brings up the next menu
item.
A long press on the button in the menu confirms
the new settings made in the submenu items.
Pressing the button for longer in the menu
allows you to quit the settings function without
saving.
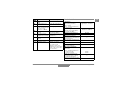
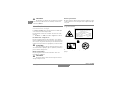
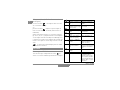
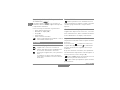
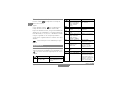
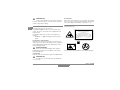
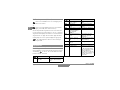
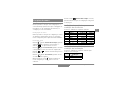
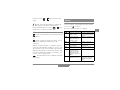
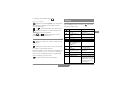
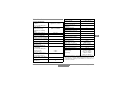
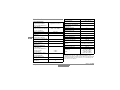
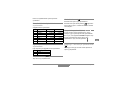
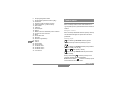
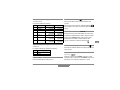
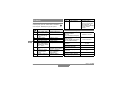
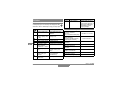
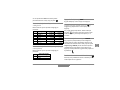
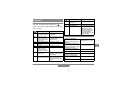
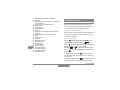
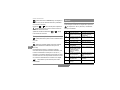
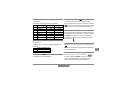
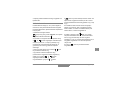
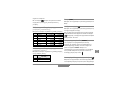
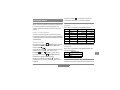
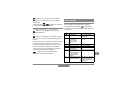
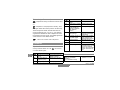
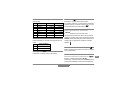
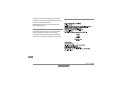
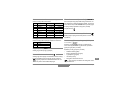
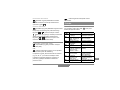
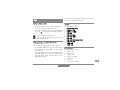
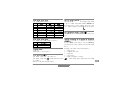
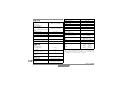
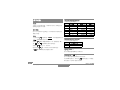
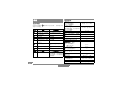
Setting the unit for distance
measurements
The following units can be set:
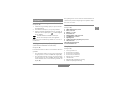
Setting the unit for tilt
measurements
The following units can be set for tilt measurements:
Beep ( )
You can switch the beep on or off.
MENU
Distance Area Volume
1. 0.000 m
0.000 m² 0.000 m³
2. 0.0000 m
0.000 m² 0.000 m³
3. 0.00 m
0.000 m² 0.000 m³
4. 0.00 ft
0.00 ft² 0.00 ft³
5. 0'00''
1
/
32
0.00 ft² 0.00 ft³
6. 0.0 in
0.00 ft² 0.00 ft³
7. 0
1
/
32
in
0.00 ft² 0.00 ft³
Units for tilt
1. +/- 0.0°
2. 0.00%
BEEP

8
Operation
Makita LD100P
D
GB
F
I
E
NL
P
N
FIN
DK
S
TR
CZ
SK
PL
SLO
HR
H
GR
RUS
LV
EST
LT
ROK
CN
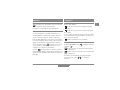
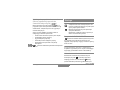
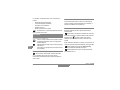
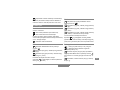
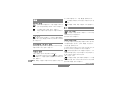
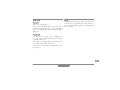
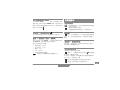
Continuous laser ( )
You can switch the continuous laser function on or
off.
With the continuous laser function set on, each press
of the
button triggers a measurement. The laser
automatically switches off after 15 minutes.
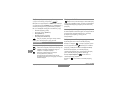
Measuring with the tripod ( )
The reference must be appropriately adjusted in
order to be able to take correct measurements with
a tripod. To do this select the TRIPOD symbol in this
menu item. You can switch the reference on the
tripod on or off. The setting can be seen on the
display .
Display - keypad illumination ( )
Automatic illumination of the display and the keypad
can be switched on or off.
Reset - returning the instrument to
the factory settings ( )
The instrument has a RESET function. When you
select the menu function RESET and confirm, the
instrument defaults to the factory settings.
A reset returns the following values to their factory
settings:
• Reference (rear)
• Display illumination (ON)
•Beep (ON)
• Unit (m(mm))
• Stack and memory are erased
)
All customised settings and stored values are
also lost.
Operation
Switching on and off
Switches on the instrument and laser. The
display shows the battery symbol until the
next button is pressed.
Pressing this button for longer switches the
instrument off.
The instrument switches off automatically
after six minutes of inactivity.
CLEAR button
The last action is cancelled. While making area or
volume measurements, each single measurement can
be deleted and remeasured in series.
TRIPOD

9
Measuring
Makita LD100P
D
GB
F
I
E
NL
P
N
FIN
DK
S
TR
CZ
SK
PL
SLO
HR
H
GR
RUS
LV
EST
LT
ROK
CN
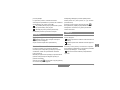
Display / keypad illumination
The instrument has a sensor that automatically
switches the display and keypad illumination on or off
in response to lighting conditions.
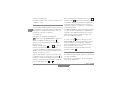
Reference setting
The default reference setting is from the rear of the
instrument.
Press this button to take the next measurement
from the front edge . A special beep sounds when-
ever the reference setting is changed.
After a measurement the reference returns automat-
ically to the default setting (rear reference). See
figure {H}.
Press this button for longer the front reference
is set permanently.
Press this button, the rear reference is set again.
Measuring
Single distance measurement
Press to activate the laser. Press again to trigger
the distance measurement.
The result is displayed immediately.
Minimum/maximum measurement
This function allows the user to measure the
minimum or maximum distance from a fixed
measuring point. It can also be used as to determine
spacings. See figure {I}
It is commonly used to measure room diagonals
(maximum values) or horizontal distances (minimum
values).
Press and hold down this button until you hear
a beep. Then slowly sweep the laser back and forth
and up and down over the desired target point - (e.g.
into the corner of a room).
Press to stop continuous measurement. The
values for maximum and minimum distances are
shown in the display as well as the last measured
value in the summary line.

10
Functions
Makita LD100P
D
GB
F
I
E
NL
P
N
FIN
DK
S
TR
CZ
SK
PL
SLO
HR
H
GR
RUS
LV
EST
LT
ROK
CN
Functions
Addition / subtraction
Distance measuring.
The next measurement is added to the previous
one.
The next measurement is subtracted from the
previous one.
This process can be repeated as required. The result
is always shown in the summary line with the
previous value in the second line.
The last step is cancelled.
Area
Press once. The symbol appears in the
display.
Press this button to take the first length
measurement (e.g. length).
Press it again to take the second length
measurement (e.g. width).
The result is displayed in the summary line.
Press the button for longer to calculate the
circumference.
Volume
Press this button twice. The symbol
appears in the display.
Press this button to take the first length
measurement (e.g. length).
Press this button to take the second length
measurement (e.g. width).
Press this button to take the third length measure-
ment (e.g. height). The value is shown in the second line.
The volume then appears in the summary line.
Press the button for longer to display additional
room information such as ceiling/floor area, surface
area of the walls, circumference.
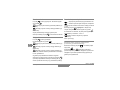
Tilt measurement
)
The inclination sensor measures tilts between
± 45°.
)
During tilt measurement the instrument should
be hold without a transverse tilt (± 10°).
Press this button once to activate the tilt
sensor. The symbol appears in the display. The
tilt is continuously shown as ° or % depending on the
setting.
Press to measure the inclination and the
distance. See figure {J}.

11
Functions
Makita LD100P
D
GB
F
I
E
NL
P
N
FIN
DK
S
TR
CZ
SK
PL
SLO
HR
H
GR
RUS
LV
EST
LT
ROK
CN
Direct horizontal distance
Press this button twice and the following
symbol appears in the display .
Press this button to measure tilt and distance.
The summary line displays the result as the direct
horizontal distance.
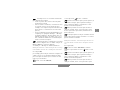
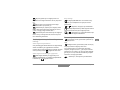
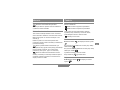
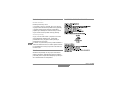
Room corner angle function
The angles in a triangle can be calculated by measuring
the three sides. This function can be used e. g. to
check a right-angled room corner. See figure {K}.
Press this button three times and the room
corner symbol appears in the display .
Mark the reference points to the right and left (d1/
d2) of the angle to be measured.
Press this button to measure the first (short)
side of the triangle (d1 or d2).
Press this button to measure the second (short)
side of the triangle (d1 or d2).
Press this button to measure the third (long)
side of the triangle (d3).
The result is displayed in the summary line as the
room corner angle.
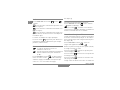
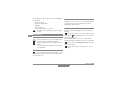
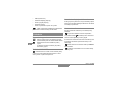
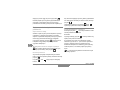
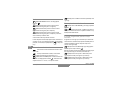
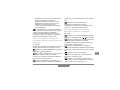
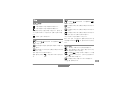
Stake out function
Two different distances (a and b) can be entered into
the instrument and can then be used to mark off
defined measured lengths, e.g. in the construction of
wooden frames.
See figure {L}.
Entering stake out distances:
Press this button four times and the stake out
function symbol appears in the display .
The value (a) and the corresponding intermediate line
flash.
By using and , you can adjust the values
(first a and then b) to suit the desired stake out
distances. Holding the buttons down increases the
rate of change of the values.
Once the desired value (a) has been reached it can be
confirmed with the button.
The value (b) and the intermediate line flashes (the
defined value (a) is automatically adopted). Value (b)
can be entered using and .
The defined value (b) is confirmed with the
button.
Pressing the button starts the laser measure-
ment. The display shows required stake out distance
a
b
b

12
Functions
Makita LD100P
D
GB
F
I
E
NL
P
N
FIN
DK
S
TR
CZ
SK
PL
SLO
HR
H
GR
RUS
LV
EST
LT
ROK
CN
in the summary line between the stake out point
(first a and then b) and the instrument (rear refer-
ence).
If the Makita LD100P is then moved slowly along the
stake out line the displayed distance decreases. The
instrument starts to beep at a distance of 0.1m from
the next stake out point.
The arrows in the display indicate in which direc-
tion the Makita LD100P needs to be moved in order
to achieve the defined distance (either a or b). As
soon as the stake out point is reached the beep
changes and the intermediate line starts to flash.
The function can be stopped at any time by pressing
the button.
Indirect measurement
The instrument can calculate distances using Pythag-
oras’ theorem.
)
Make sure you adhere to the prescribed
sequence of measurement:
• All target points must be in a horizontal or vertical
plane.
• The best results are achieved when the instru-
ment is rotated about a fixed point (e.g. with the
positioning bracket fully folded out and the
instrument placed on a wall).
• The minimum/maximum function can be used -
see explanation in "Measuring -> Minimum/
maximum measurement". The minimum value
must be used for measurements at right angles to
the target; the maximum distance for all other
measurements.
)
Make sure that the first measurement and the
distance to be measured are at right angles.
Use the Minimum/maximum function, as
explained in "Measuring ->
Minimum/maximum measurement".
Indirect measurement - determining a dis-
tance using 2 auxilliary measurements
See figure {M}
e.g. for measuring building heights or widths. It is
helpful to use a tripod when measuring heights that
require the measurement of two or three measure-
ments.
Press this button once, the display shows .
The laser is switched on.
Aim at the upper point (1) and trigger the
measurement. After the first measurement the value is
adopted. Keep the instrument as horizontal as possible.
Press and hold down this button to trigger
continuous measurement, sweep the laser back and
forth and up and down over the ideal target point.
a
b
b

13
Functions
Makita LD100P
D
GB
F
I
E
NL
P
N
FIN
DK
S
TR
CZ
SK
PL
SLO
HR
H
GR
RUS
LV
EST
LT
ROK
CN
Press to stop continuous measurement (2). The
result is displayed in the summary line, the partial
results in the secondary line.
Indirect Measurement - determining a dis-
tance using 3 measurements
See figure {N}
Press this button twice; the display shows the
following symbol . The laser is switched on.
Aim at the upper point (1) and trigger the
measurement. After the first measurement the value
is adopted. Keep the instrument as horizontal as
possible
Press and hold down this button to trigger
continuous measurement, sweep the laser up and
down over the ideal target point.
Press to stop continuous measurement (2). The
value is adopted. Aim at the lower point and
press this button to trigger the measurement
(3). The result is displayed in the summary line, the
partial results in the secondary lines.
Indirect measurement - determining a chain
value using 3 measurements
See figure {O}
e.g. determining the height between point 1 and
point 2 using three target points.
Press this button three times ; the display
shows the following symbol . The laser is
switched on.
Aim at the upper point (1).
Press this button and trigger the measurement.
After the first measurement the value is adopted. The
display flashes (2).
Triggers the measurement. After the second
measurement the value is adopted. The display
flashes (3).
Press and hold down this button to trigger
continuous measurement. Sweep the laser up and
down over the ideal target point.
Press this button to end continuous measure-
ment. The result is displayed in the summary line, the
partial results in the secondary lines.

14
Appendix
Makita LD100P
D
GB
F
I
E
NL
P
N
FIN
DK
S
TR
CZ
SK
PL
SLO
HR
H
GR
RUS
LV
EST
LT
ROK
CN
Storage of constants/historical
storage
Storage of a constant
You can store and recall a frequently used value e.g.
height of a room. Measure the desired distance,
press and hold the button until the device beeps
to confirm storage.
Recalling the constant
Press this button once to recall the constant
and make it available for further calculations by
pressing button .
Historical storage
Press this button twice and the previous 20
results (measurements or calculated results) are
shown in reverse order.
The and buttons can be used for navigation.
Press this button to use a result from the
summary line for further calculations.
Pressing the and buttons at the same time
erases all the values in historical storage.
Timer (self-triggering)
Press this button to set a 5-second time delay.
or
Press and hold down this button until the
desired time delay is reached (max. 60 seconds).
Once the key is released the remaining seconds until
measurement (e.g. 59, 58, 57...) are displayed in a
countdown. The last 5 seconds are counted down
with a beep. After the last beep the measurement is
taken and the value is displayed.
)
The timer can be used for all measurements.
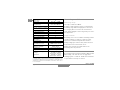
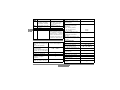
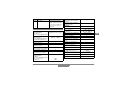
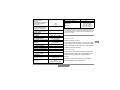
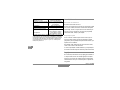
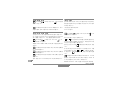
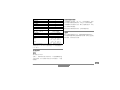
Appendix
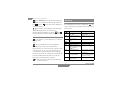
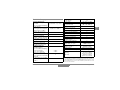
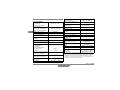
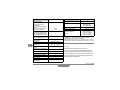
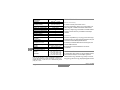
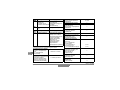
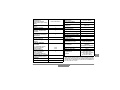
Message codes
All message codes are displayed with either or
"Error". The following errors can be corrected:
Cause Remedy
156
Transverse tilt
greater than 10°
Hold the instrument
without any transverse
tilt
160
Main tilt direction,
angle too high
(> 45°)
Measure angle up to
max. ± 45°
204
Calculation error Repeat procedure

15
Appendix
Makita LD100P
D
GB
F
I
E
NL
P
N
FIN
DK
S
TR
CZ
SK
PL
SLO
HR
H
GR
RUS
LV
EST
LT
ROK
CN
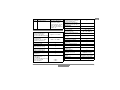
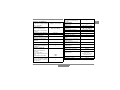
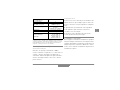
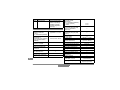
Technical data
252
Temperature too
high
Cool down instrument
253
Temperature too
low
Warm up instrument
255
Receiver signal too
weak, measurement
time too long,
distance > 100 m
Use target plate
256
Received signal too
strong
Target too reflective
(use target plate)
257
Wrong measure-
ment, background
brightness too high
Darken target (measure
in different lighting
conditions)
260
Laser beam inter-
rupted
Repeat measurement
Error Cause Remedy
Error Hardware error Switch on/off the
device several times. If
the symbol still
appears, then your
instrument is defective.
Please call your dealer
for assistance.
Cause Remedy
Distance
measurements:
Measuring accuracy
up to 10 m
(2
σ
, standard deviation)
typically: ± 1.5 mm*
Power Range
Technology™:
Range (use target plate
from about 80m)
0.05 m to 100 m
Smallest unit displayed 0.1 mm
Distance measurement
9
Minimum/maximum
measurement, Continuous
measurement
9
Area/volume calculation of
room data
9
Addition / subtraction
9
Indirect measurement
using Pythagoras
9
Tilt measurements:
Tilt sensor:
Accuracy
(2
σ
, standard deviation)
- to laser beam
- to the housing
± 0.3°
± 0.3°
Indirect measurement
using tilt sensor (direct
horizontal distance)
9
Angle measurement using
tilt sensor(
± 45°)
9

16
Appendix
Makita LD100P
D
GB
F
I
E
NL
P
N
FIN
DK
S
TR
CZ
SK
PL
SLO
HR
H
GR
RUS
LV
EST
LT
ROK
CN
* maximum deviation occurs under unfavourable conditions such
as bright sunlight or when measuring to poorly reflecting or very
rough surfaces. Measuring accuracy between 10 m and 30 m may
deteriorate to approx. ± 0.025 mm/m, for distances above 30 m
to ± 0.1 mm/m.
Measuring conditions
Measuring range
The range is limited to 100 m.
At night or dusk and if the target is in shadow the
measuring range without target plate is increased.
Use a target plate to increase the measurement
range during daylight or if the target has poor reflec-
tion properties.
Target surfaces
Measuring errors can occur when measuring toward
colourless liquids (e.g. water) or dust free glass,
Styrofoam or similar semi-permeable surfaces.
Aiming at high gloss surfaces may deflect the laser
beam and lead to measurement errors.
Against non-reflective and dark surfaces the
measuring time may increase.
Care
Do not immerse the instrument in water. Wipe off dirt
with a damp, soft cloth. Do not use aggressive
cleaning agents or solutions. Handle the instrument
as you would a telescope or camera.
General:
Laser class II
Laser type 635 nm, < 1 mW
Ø laser point
(at distances)
6 / 30 / 60 mm
(10 / 50 / 100 m)
Autom. laser switch-off after 3 min
Autom. instrument switch-
off
after 6 min
Display illumination
9
Keypad illumination
9
Multifunctional endpiece
9
Timer (self-triggering)
9
Save constant value
9
Historical storage
(20 values)
9
Tripod thread
9
Battery life,
Type AAA, 2 x 1.5V
up to
5 000 measurements
Protection against
splashes and dust
IP 54, dust-proof,
splash-proof
Dimensions 126 x 51 x 27 mm
Weight (with batteries) 125 g
Temperature range:
Storage
Operation
-25°C up to +70°C
(13°F up to +158°F)
-10°C up to +50°C
(14°F up to +122°F)

17
Appendix
Makita LD100P
D
GB
F
I
E
NL
P
N
FIN
DK
S
TR
CZ
SK
PL
SLO
HR
H
GR
RUS
LV
EST
LT
ROK
CN
EC Declaration of Conformity
Page is loading ...
Page is loading ...
Page is loading ...
Page is loading ...
Page is loading ...
Page is loading ...
Page is loading ...
Page is loading ...
Page is loading ...
Page is loading ...
Page is loading ...
Page is loading ...
Page is loading ...
Page is loading ...
Page is loading ...
Page is loading ...
Page is loading ...
Page is loading ...
Page is loading ...
Page is loading ...
Page is loading ...
Page is loading ...
Page is loading ...
Page is loading ...
Page is loading ...
Page is loading ...
Page is loading ...
Page is loading ...
Page is loading ...
Page is loading ...
Page is loading ...
Page is loading ...
Page is loading ...
Page is loading ...
Page is loading ...
Page is loading ...
Page is loading ...
Page is loading ...
Page is loading ...
Page is loading ...
Page is loading ...
Page is loading ...
Page is loading ...
Page is loading ...
Page is loading ...
Page is loading ...
Page is loading ...
Page is loading ...
Page is loading ...
Page is loading ...
Page is loading ...
Page is loading ...
Page is loading ...
Page is loading ...
Page is loading ...
Page is loading ...
Page is loading ...
Page is loading ...
Page is loading ...
Page is loading ...
Page is loading ...
Page is loading ...
Page is loading ...
Page is loading ...
Page is loading ...
Page is loading ...
Page is loading ...
Page is loading ...
Page is loading ...
Page is loading ...
Page is loading ...
Page is loading ...
Page is loading ...
Page is loading ...
Page is loading ...
Page is loading ...
Page is loading ...
Page is loading ...
Page is loading ...
Page is loading ...
Page is loading ...
Page is loading ...
Page is loading ...
Page is loading ...
Page is loading ...
Page is loading ...

18
Anexo
Makita LD100P
D
GB
F
I
E
NL
P
N
FIN
DK
S
TR
CZ
SK
PL
SLO
HR
H
GR
RUS
LV
EST
LT
ROK
CN
DECLARAÇÃO DE CONFORMIDADE CE
Page is loading ...
Page is loading ...
Page is loading ...
Page is loading ...
Page is loading ...
Page is loading ...
Page is loading ...
Page is loading ...
Page is loading ...
Page is loading ...
Page is loading ...
Page is loading ...
Page is loading ...
Page is loading ...
Page is loading ...
Page is loading ...
Page is loading ...
Page is loading ...
Page is loading ...
Page is loading ...
Page is loading ...
Page is loading ...
Page is loading ...
Page is loading ...
Page is loading ...
Page is loading ...
Page is loading ...
Page is loading ...
Page is loading ...
Page is loading ...
Page is loading ...
Page is loading ...
Page is loading ...
Page is loading ...
Page is loading ...
Page is loading ...
Page is loading ...
Page is loading ...
Page is loading ...
Page is loading ...
Page is loading ...
Page is loading ...
Page is loading ...
Page is loading ...
Page is loading ...
Page is loading ...
Page is loading ...
Page is loading ...
Page is loading ...
Page is loading ...
Page is loading ...
Page is loading ...
Page is loading ...
Page is loading ...
Page is loading ...
Page is loading ...
Page is loading ...
Page is loading ...
Page is loading ...
Page is loading ...
Page is loading ...
Page is loading ...
Page is loading ...
Page is loading ...
Page is loading ...
Page is loading ...
Page is loading ...
Page is loading ...
Page is loading ...
Page is loading ...
Page is loading ...
Page is loading ...
Page is loading ...
Page is loading ...
Page is loading ...
Page is loading ...
Page is loading ...
Page is loading ...
Page is loading ...
Page is loading ...
Page is loading ...
Page is loading ...
Page is loading ...
Page is loading ...
Page is loading ...
Page is loading ...
Page is loading ...
Page is loading ...
Page is loading ...
Page is loading ...
Page is loading ...
Page is loading ...
Page is loading ...
Page is loading ...
Page is loading ...
Page is loading ...
Page is loading ...
Page is loading ...
Page is loading ...
Page is loading ...
Page is loading ...
Page is loading ...
Page is loading ...
Page is loading ...
Page is loading ...
Page is loading ...
Page is loading ...
Page is loading ...
Page is loading ...
Page is loading ...
Page is loading ...
Page is loading ...
Page is loading ...
Page is loading ...
Page is loading ...
Page is loading ...
Page is loading ...
Page is loading ...
Page is loading ...
Page is loading ...
Page is loading ...
Page is loading ...
Page is loading ...
Page is loading ...
Page is loading ...
Page is loading ...
Page is loading ...
Page is loading ...
Page is loading ...
Page is loading ...
Page is loading ...
Page is loading ...
Page is loading ...
Page is loading ...
Page is loading ...
Page is loading ...
Page is loading ...
Page is loading ...
Page is loading ...
Page is loading ...
Page is loading ...
Page is loading ...
Page is loading ...
Page is loading ...
Page is loading ...
Page is loading ...
Page is loading ...
Page is loading ...
Page is loading ...
Page is loading ...
Page is loading ...
Page is loading ...
Page is loading ...
Page is loading ...
Page is loading ...
Page is loading ...
Page is loading ...
Page is loading ...
Page is loading ...
Page is loading ...
Page is loading ...
Page is loading ...
Page is loading ...
Page is loading ...
Page is loading ...
Page is loading ...
Page is loading ...
Page is loading ...
Page is loading ...
Page is loading ...
Page is loading ...
Page is loading ...
Page is loading ...
Page is loading ...
Page is loading ...
Page is loading ...
Page is loading ...
Page is loading ...
Page is loading ...
Page is loading ...
Page is loading ...
Page is loading ...
Page is loading ...
Page is loading ...
Page is loading ...
Page is loading ...
Page is loading ...
Page is loading ...
Page is loading ...
Page is loading ...
Page is loading ...
Page is loading ...
Page is loading ...
Page is loading ...
Page is loading ...
Page is loading ...
Page is loading ...
Page is loading ...
Page is loading ...
Page is loading ...
Page is loading ...
Page is loading ...
Page is loading ...
Page is loading ...
Page is loading ...
Page is loading ...
Page is loading ...
Page is loading ...
Page is loading ...
Page is loading ...
Page is loading ...
Page is loading ...
Page is loading ...
Page is loading ...
Page is loading ...
Page is loading ...
Page is loading ...
Page is loading ...
Page is loading ...
Page is loading ...
Page is loading ...
Page is loading ...
Page is loading ...
Page is loading ...
Page is loading ...
Page is loading ...
Page is loading ...
Page is loading ...
Page is loading ...
Page is loading ...
Page is loading ...
Page is loading ...
Page is loading ...
Page is loading ...
Page is loading ...
Page is loading ...
Page is loading ...
Page is loading ...
Page is loading ...
Page is loading ...
Page is loading ...
Page is loading ...
Page is loading ...
Page is loading ...
Page is loading ...
Page is loading ...
Page is loading ...
Page is loading ...
Page is loading ...
Page is loading ...
Page is loading ...
Page is loading ...
Page is loading ...
Page is loading ...
Page is loading ...
Page is loading ...
Page is loading ...
Page is loading ...
Page is loading ...
Page is loading ...
Page is loading ...
Page is loading ...
Page is loading ...
Page is loading ...
Page is loading ...
Page is loading ...
Page is loading ...
Page is loading ...
Page is loading ...
Page is loading ...
Page is loading ...
Page is loading ...
Page is loading ...
Page is loading ...
Page is loading ...
Page is loading ...
Page is loading ...
Page is loading ...
Page is loading ...
Page is loading ...
Page is loading ...
-
 1
1
-
 2
2
-
 3
3
-
 4
4
-
 5
5
-
 6
6
-
 7
7
-
 8
8
-
 9
9
-
 10
10
-
 11
11
-
 12
12
-
 13
13
-
 14
14
-
 15
15
-
 16
16
-
 17
17
-
 18
18
-
 19
19
-
 20
20
-
 21
21
-
 22
22
-
 23
23
-
 24
24
-
 25
25
-
 26
26
-
 27
27
-
 28
28
-
 29
29
-
 30
30
-
 31
31
-
 32
32
-
 33
33
-
 34
34
-
 35
35
-
 36
36
-
 37
37
-
 38
38
-
 39
39
-
 40
40
-
 41
41
-
 42
42
-
 43
43
-
 44
44
-
 45
45
-
 46
46
-
 47
47
-
 48
48
-
 49
49
-
 50
50
-
 51
51
-
 52
52
-
 53
53
-
 54
54
-
 55
55
-
 56
56
-
 57
57
-
 58
58
-
 59
59
-
 60
60
-
 61
61
-
 62
62
-
 63
63
-
 64
64
-
 65
65
-
 66
66
-
 67
67
-
 68
68
-
 69
69
-
 70
70
-
 71
71
-
 72
72
-
 73
73
-
 74
74
-
 75
75
-
 76
76
-
 77
77
-
 78
78
-
 79
79
-
 80
80
-
 81
81
-
 82
82
-
 83
83
-
 84
84
-
 85
85
-
 86
86
-
 87
87
-
 88
88
-
 89
89
-
 90
90
-
 91
91
-
 92
92
-
 93
93
-
 94
94
-
 95
95
-
 96
96
-
 97
97
-
 98
98
-
 99
99
-
 100
100
-
 101
101
-
 102
102
-
 103
103
-
 104
104
-
 105
105
-
 106
106
-
 107
107
-
 108
108
-
 109
109
-
 110
110
-
 111
111
-
 112
112
-
 113
113
-
 114
114
-
 115
115
-
 116
116
-
 117
117
-
 118
118
-
 119
119
-
 120
120
-
 121
121
-
 122
122
-
 123
123
-
 124
124
-
 125
125
-
 126
126
-
 127
127
-
 128
128
-
 129
129
-
 130
130
-
 131
131
-
 132
132
-
 133
133
-
 134
134
-
 135
135
-
 136
136
-
 137
137
-
 138
138
-
 139
139
-
 140
140
-
 141
141
-
 142
142
-
 143
143
-
 144
144
-
 145
145
-
 146
146
-
 147
147
-
 148
148
-
 149
149
-
 150
150
-
 151
151
-
 152
152
-
 153
153
-
 154
154
-
 155
155
-
 156
156
-
 157
157
-
 158
158
-
 159
159
-
 160
160
-
 161
161
-
 162
162
-
 163
163
-
 164
164
-
 165
165
-
 166
166
-
 167
167
-
 168
168
-
 169
169
-
 170
170
-
 171
171
-
 172
172
-
 173
173
-
 174
174
-
 175
175
-
 176
176
-
 177
177
-
 178
178
-
 179
179
-
 180
180
-
 181
181
-
 182
182
-
 183
183
-
 184
184
-
 185
185
-
 186
186
-
 187
187
-
 188
188
-
 189
189
-
 190
190
-
 191
191
-
 192
192
-
 193
193
-
 194
194
-
 195
195
-
 196
196
-
 197
197
-
 198
198
-
 199
199
-
 200
200
-
 201
201
-
 202
202
-
 203
203
-
 204
204
-
 205
205
-
 206
206
-
 207
207
-
 208
208
-
 209
209
-
 210
210
-
 211
211
-
 212
212
-
 213
213
-
 214
214
-
 215
215
-
 216
216
-
 217
217
-
 218
218
-
 219
219
-
 220
220
-
 221
221
-
 222
222
-
 223
223
-
 224
224
-
 225
225
-
 226
226
-
 227
227
-
 228
228
-
 229
229
-
 230
230
-
 231
231
-
 232
232
-
 233
233
-
 234
234
-
 235
235
-
 236
236
-
 237
237
-
 238
238
-
 239
239
-
 240
240
-
 241
241
-
 242
242
-
 243
243
-
 244
244
-
 245
245
-
 246
246
-
 247
247
-
 248
248
-
 249
249
-
 250
250
-
 251
251
-
 252
252
-
 253
253
-
 254
254
-
 255
255
-
 256
256
-
 257
257
-
 258
258
-
 259
259
-
 260
260
-
 261
261
-
 262
262
-
 263
263
-
 264
264
-
 265
265
-
 266
266
-
 267
267
-
 268
268
-
 269
269
-
 270
270
-
 271
271
-
 272
272
-
 273
273
-
 274
274
-
 275
275
-
 276
276
-
 277
277
-
 278
278
-
 279
279
-
 280
280
-
 281
281
-
 282
282
-
 283
283
-
 284
284
-
 285
285
-
 286
286
-
 287
287
-
 288
288
-
 289
289
-
 290
290
-
 291
291
-
 292
292
-
 293
293
-
 294
294
-
 295
295
-
 296
296
-
 297
297
-
 298
298
-
 299
299
-
 300
300
-
 301
301
-
 302
302
-
 303
303
-
 304
304
-
 305
305
-
 306
306
-
 307
307
-
 308
308
-
 309
309
-
 310
310
-
 311
311
-
 312
312
-
 313
313
-
 314
314
-
 315
315
-
 316
316
-
 317
317
-
 318
318
-
 319
319
-
 320
320
-
 321
321
-
 322
322
-
 323
323
-
 324
324
-
 325
325
-
 326
326
-
 327
327
-
 328
328
-
 329
329
-
 330
330
-
 331
331
-
 332
332
-
 333
333
-
 334
334
-
 335
335
-
 336
336
-
 337
337
-
 338
338
-
 339
339
-
 340
340
-
 341
341
-
 342
342
-
 343
343
-
 344
344
-
 345
345
-
 346
346
-
 347
347
-
 348
348
-
 349
349
-
 350
350
-
 351
351
-
 352
352
-
 353
353
-
 354
354
-
 355
355
-
 356
356
-
 357
357
-
 358
358
-
 359
359
-
 360
360
-
 361
361
-
 362
362
-
 363
363
-
 364
364
-
 365
365
-
 366
366
-
 367
367
-
 368
368
-
 369
369
-
 370
370
-
 371
371
-
 372
372
-
 373
373
-
 374
374
-
 375
375
-
 376
376
-
 377
377
-
 378
378
-
 379
379
-
 380
380
-
 381
381
-
 382
382
-
 383
383
-
 384
384
-
 385
385
-
 386
386
-
 387
387
-
 388
388
-
 389
389
-
 390
390
-
 391
391
-
 392
392
-
 393
393
-
 394
394
-
 395
395
-
 396
396
-
 397
397
-
 398
398
-
 399
399
-
 400
400
-
 401
401
-
 402
402
-
 403
403
-
 404
404
-
 405
405
-
 406
406
-
 407
407
-
 408
408
-
 409
409
-
 410
410


Ask a question and I''ll find the answer in the document
Finding information in a document is now easier with AI
in other languages
- italiano: Makita LD100P Manuale del proprietario
- français: Makita LD100P Le manuel du propriétaire
- español: Makita LD100P El manual del propietario
- Deutsch: Makita LD100P Bedienungsanleitung
- Nederlands: Makita LD100P de handleiding
- português: Makita LD100P Manual do proprietário
- slovenčina: Makita LD100P Návod na obsluhu
- dansk: Makita LD100P Brugervejledning
- polski: Makita LD100P Instrukcja obsługi
- čeština: Makita LD100P Návod k obsluze
- Türkçe: Makita LD100P El kitabı
- eesti: Makita LD100P Omaniku manuaal
- svenska: Makita LD100P Bruksanvisning
- suomi: Makita LD100P Omistajan opas
- română: Makita LD100P Manualul proprietarului
Related papers
Other documents
-
TFA Distance Laser Measuring Device Owner's manual
-
Laserliner LRM Gi7 Pro Owner's manual
-
Bosch PLR 50 Original Instructions Manual
-
Laserliner LaserRange-Master Gi5 Owner's manual
-
Agatec AgaTape User manual
-
Laserliner LaserRange-Master i5 Owner's manual
-
Bosch DLE 40 Professional Original Instructions Manual
-
VOLTCRAFT IR 900-30S Operating instructions
-
-