Royal Sovereign ARP-900EX Owner's manual
- Category
- Mobile air conditioners
- Type
- Owner's manual
This manual is also suitable for
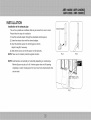
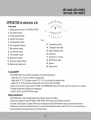
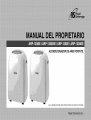
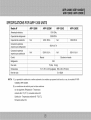
Royal Sovereign ARP-900EX is a versatile, portable air conditioner that can cool, dehumidify, and circulate air in rooms up to 400 square feet. It features three fan speeds, an adjustable thermostat, and a 24-hour timer, allowing you to customize your cooling experience. With its compact design and included window installation kit, the ARP-900EX is easy to set up and move from room to room.
Royal Sovereign ARP-900EX is a versatile, portable air conditioner that can cool, dehumidify, and circulate air in rooms up to 400 square feet. It features three fan speeds, an adjustable thermostat, and a 24-hour timer, allowing you to customize your cooling experience. With its compact design and included window installation kit, the ARP-900EX is easy to set up and move from room to room.


-
 1
1
-
 2
2
-
 3
3
-
 4
4
-
 5
5
-
 6
6
-
 7
7
-
 8
8
-
 9
9
-
 10
10
-
 11
11
-
 12
12
-
 13
13
-
 14
14
-
 15
15
-
 16
16
-
 17
17
-
 18
18
-
 19
19
-
 20
20
-
 21
21
-
 22
22
-
 23
23
-
 24
24
-
 25
25
-
 26
26
-
 27
27
-
 28
28
-
 29
29
-
 30
30
-
 31
31
-
 32
32


Royal Sovereign ARP-900EX Owner's manual
- Category
- Mobile air conditioners
- Type
- Owner's manual
- This manual is also suitable for
Royal Sovereign ARP-900EX is a versatile, portable air conditioner that can cool, dehumidify, and circulate air in rooms up to 400 square feet. It features three fan speeds, an adjustable thermostat, and a 24-hour timer, allowing you to customize your cooling experience. With its compact design and included window installation kit, the ARP-900EX is easy to set up and move from room to room.
Ask a question and I''ll find the answer in the document
Finding information in a document is now easier with AI
in other languages
Related papers
-
Royal Sovereign ARP-1200M User manual
-
Royal Sovereign HFN-50D Owner's manual
-
Royal Sovereign ARP-5008 User manual
-
-
-
Royal Sovereign ARP-9009TL User manual
-
-
-
Royal Sovereign ARP-2210 Owner's manual
-
Royal Sovereign ARP-1314 Owner's manual
Other documents
-
NewAir AC10100E User manual
-
NewAir AC-10100E User guide
-
Everglades EV 9037 Owner's manual
-
Whirlpool YACQ082XK1 Owner's manual
-
Crosley CA18WCL1 Owner's manual
-
-
SPT WA-9061H User manual
-
Dimplex DAC 12005 User manual
-
KoldFront PAC14023CWH User guide
-
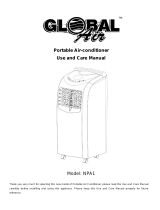 Global Air NPA1-08C User guide
