
BOSCH
Use and Care Manual
for Bosch Electric Built-in
Single & Double Oven
Models HBL 43../44../45../46..
HBN 44../45../46..
Manuel d'utilisation et d'entretien
Four _lectrique Bosch encastr_, simple et double
Modeles HBL 43../44../45../46..
HBN 44../45../46..
Ed. 01-02

Dear Bosch Oven Owner:
Thank you and congratulations on your choice and purchase of a Bosch oven.
Whether you are an expert chef or a beginning cook we believe that you will find your
Bosch oven meets and exceeds your expectations. Bosch engineers have spent years de-
veloping these units to be the most versatile and energy efficient so that you may take
great pride in the quality of construction of these fine ovens.
We also ask that you read this manual thoroughly before using your new oven.
Please pay particular attention to the Safety Instructions printed at the front of the book
and the numerous safety hints and cautions placed throughout this manual. Also, be sure
to familiarize yourself with the proper operation of the oven and its cleaning and main-
tenance procedures. Adherence to these instructions and procedures will assure that you
realize the full potential of your new Bosch oven as well as protect it from damage and
yourself from injury.
BSH Home Appliances
Chef client,
ChOre cliente,
Tous nos remerciements et f_licitations pour avoir choisi d'acquOrir un four Bosch.
Que vous soyez un fin gastronome ou un d_butant clans la matiOre, vous dOcouvrirez que
votre four Bosch r@ond _ routes les exigences qu 'on pourrait avoir _ l'_gard d'un four.
Les ingOnieurs de Bosch ont pass_ des annOes _ mettre au point ces appareils qui sont
parmi les plus polyvalents et les plus _conomiques, sans parler de leur haute qualit_ de
construction.
Nous vous demanderons de bien vouloir lire ce manuel avant d'utiliser votre nou-
veau four, surtout sic 'est la premiOre fois que vous poss_dez un four Bosch. Lisez atten-
tivement les conseils de s_curit_ et les nombreuses raises en garde mentionnOs dans ce
manuel. Prenez soin _galement de vous familiariser avec le fonctionnement de votre ap-
pared et ses procedures d'entretien et de nettoyage. C'est en respectant ces instructions
et procedures que vous tirerez le plus de profit et le plus de plaisir de votre nouveau
four.
BSH Home Appliances

BOSCH
Use and Care Manual
for Bosch Electric Built-in
Single & Double Oven
Models HBL 43../44../45../46..
HBN 44../45../46..
READ ALL INSTRUCTIONS BEFORE USING THIS APPLIANCE

Table of Contents
hnportant Safety Instructions .........................................................................................................
Product Features ...............................................................................................................................
About Your Oven .........................................................................................................................
Cooling Fan ..........................................................................................................................
Racks and Rack Positions ....................................................................................................
Baking Elements ...................................................................................................................
Broiling Elements .................................................................................................................
Convection Element .............................................................................................................
About Convection Ovens .....................................................................................................
Oven Operation ..................................................................................................................................
Oven Models ................................................................................................................................
Using Your Oven .........................................................................................................................
Cooking Function Settings, Table 3 ...........................................................................................
Oven Programmer ........................................................................................................................
Setting the Electronic Clock ................................................................................................
Timer .....................................................................................................................................
Using the Oven Controls ..................................................................................................................
Manual Operation of Oven ..........................................................................................................
Electronic Control of Oven .........................................................................................................
hnmediate Start/Automatic Shut-Off ..................................................................................
Delayed Start/Automatic Shut-Off ......................................................................................
Care and Cleaning ...........................................................................................................................
Using Self Clean Function ..........................................................................................................
Replacing an Oven Light .............................................................................................................
Oven Door Removal ....................................................................................................................
Service and Repair ............................................................................................................................
Problem Solving, Table 4............................................................................................................
If You Need Assistance ...............................................................................................................
Model Information .......................................................................................................................
Model Warranty ................................................................................................................................
3
4
4
4
4
5
5
5
5
6
6
6
8
9
9
9
11
11
12
12
12
15
15
16
17
18
19
20
2O
21

IMPORTANT SAFETY INSTRUCTIONS
WARNING - When using this appliance, basic safety precautions should always be followed to reduce
the risk of fire, electric shock, and/or injury to persons, including the following.
1. Read All Instruction Before Using the Oven.
2. Proper Installation - Be sure your appliance is properly installed and grounded by a qualified
technician. Have the installer show you where the fuse or breaker box is located and how to turn
off the power to the oven.
3. Do Not Operate the Oven if it is Damaged or Not Working Properly.
4. Never Use Your Appliance for Warming or Heating the Room.
5. Do Not Leave Children Alone - Children should not be left alone or unattended in area where the
appliance is in use. They should never be allowed to sit or stand on any part of the appliance.
6. Do Not Touch Heating Elements or Interior Surfaces of Oven - Heating elements may be hot
even though they are dark in color. Interior surfaces of the oven, including racks become hot
enough to cause serious burns. Do not touch or let clothing or other flammable material come into
contact with the heating elements or interior surt:aces or racks of the oven during or immediately
after use. Allow the oven to cool.
7. Wear Proper Apparel - Loose-fitting or hanging garments should never be worn while using the
appliance. Fabric may ignite and result in personal injury.
8. Use Only Dry Potholders - Moist or damp potholders on hot surt:aces may result in burns from
steam. Do not let potholder touch hot heating elements. Do not use a towel or other bulky cloth.
9. User Servicing - Do not repair or replace any part of the appliance unless specifically recom-
mended in the manual. All other service should be referred to a qualified technician.
10. Storage in or on Appliance - Flammable materials should not be stored in an oven or near sur-
face units.
11. Do Not Use Water on Grease Fires - Smother fire or flame or use dry chemical or tk3am type ex-
tinguisher.
12. Use Care When Opening Door - Let hot air or steam escape before removing or replacing food.
13. Do Not Heat Unopened Food Containers - Build-up of pressure may cause container to burst
and result in injury.
14. Keep Oven Vent Ducts Unobstructed
15. Placement of Oven Racks - Always place oven racks in desired location while oven is cool. If
rack must be moved while oven is hot, do not let potholder contact hot heating element in oven.
16. Do Not Clean Door Gasket - The door gasket is essential for a good seal. Care should be taken
not to rub, damage, or move gasket.
17. Do Not Use Oven Cleaners - No commercial oven cleaner or oven liner protective coating of any
kind should be used in or around any part of the oven.
18. Clean Only Parts Listed in Manual
19. Before Self-Cleaning the Oven - Remove oven racks and other utensils.
20. Check for Off When Done - Always check the position of the oven control knobs when you have
finished cooking to make sure they are all in the off positions.
21. "CAUTION" - Do not store items of interest to children in cabinets above the oven - children
climbing on the oven to reach items could be burned or otherwise seriously injured.
22. Ahvays Disconnect the Electrical Supply Before Servicing the Oven.

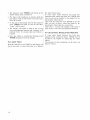
Product Features
Halogen lights
Control pane[
[eve[ no. 4
[eve[ no. 3
[eve[ no. 2
[eve[ no. 1
Broil and top elements
Convection element (not visible)
and fan located on back of oven
cavity (Convection Models Only)
Mode! and serial
number plate
/
Bake elements
(under oven floor)
Figure 1.
About Your Oven
Above you will find an illustration of a Bosch
oven showing the components of the oven.
This manual covers the complete line of Bosch
single and double ovens so some of the features
described may not be available on your oven.
Cooling Fan
All the ovens whether convection type or thermal
type have a cooling fan to cool the control panel.
You may hear this fan continue to run after cook-
ing and/or cleaning has been completed.
The fan will run as long as the oven is hot and the
oven's function selector is turned to any position
other than "OFF'. This is normal operation.
Rack Positions
The oven has rack guides at four levels as shown
in the illustration.
Each level guide consists of paired supports
formed in the sidewalls on each side of the oven
cavity.
The rack should be positioned within the paired
supports. Each oven is provided with the follow-
ing parts and utensils, see Figure 2:
• Rack(s)
Always be sure to position the oven racks, etc. be-
fore turning the oven on.
Make sure that the rack(s) are level once they are
in position.
To remove oven rack from the oven, lift rack at
front and lift out.
To replace oven rack:
1. Place rear of rack between the rack level
guides.
2. While lifting front of rack, slide rack in all
the way, then lower front.
Please refer to illustration if there is any
question as to which side is the front of the
rack.

Baking Elements
The Bosch oven uses two baking elements: one
located at the top of the oven and the second lo-
cated below the floor of oven cavity to provide
ease in cleaning the oven cavity.
Front
Rack
-2 provided with single thermal ovens
=2 provided with single convection ovens
o4 provided with all double ovens
Figure 2.
Broiling Elements
The broiling elements of the Bosch ovens are lo-
cated at the top of the oven cavity.
Do not touch the heating elements or let pothold-
ers touch the broiler elements.
Never use a towel or bulky cloth for a potholder;
they could catch on fire.
Convection Element
If you have purchased one of the convection oven
models you will find the convection element (not
visible) and fan located at the back of the oven
cavity.
This element and tan combination performs the
cooking when in the convection bake mode.
When in any of the convection modes the fan is
on, see Table 3.
About Convection Ovens
Both the single ovens and double ovens are avail-
able as either conventional thermal ovens or as
convection ovens.
Although most people are familiar with the opera-
tion of a conventional thermal oven many are un-
clear as to how a convection oven works or in
what ways it is superior to a conventional thermal
oven.
Below you will find a brief explanation of how a
convection oven works and its advantages.
In Bosch Ovens, the Genuine European Convec-
tion TM system (the 3 elements, tan and venting
panel) circulates even, heated air throughout the
oven. This process:
• Seals in juices and flavor
• Provides even baking and browning
• Saves time and energy
• Baking on multiple levels at the same time
• Dehydrates herbs, fruits and vegetables
• Bakes whole meals at once with no flavor
transfer
• Thaws evenly
The Bosch cookbook provides many helpful tips
and a description of each cooking cycle. It also
has many recipes for each cycle to help you enioy
your new oven.
Many of your own recipes have time and tempera-
ture instruction for the regular bake cycle. As a
rule, most of these recipes can be cooked with
better results in one of the convection cycles. In
general, to convert standard recipes for use in
convection, you reduce the temperature by about
25°F and check for doneness at the minimum sug-
gested cooking time.
When baking on more than 1 rack it may be nec-
essary to increase the cooking time a few minutes
for each additional rack. As individual tastes vary,
you may find you need to adjust the time and tem-
perature to achieve desired results.
You may feel your new oven cooks differently
than your old oven. We recommend you use the
various cooking cycles tk_ra few months and refer
to the Bosch Cookbook to become more familiar
with it.
We do not recommend you use oven thermome-
ters found at many grocery stores to check oven
temperature. They may be inaccurate and are slow
to respond to temperature changes.

Oven Operation
Oven Models
There are 21 different models of Bosch ovens, see
Tables 1 & 2, below. Bosch ovens are available in
27" or 30", in white, black or stainless steel, in
single or double oven configurations as well as
being provided as either standard, thermal-type
ovens or convection type, with the double ovens
being available with either a single convection
oven or with two convection ovens.
Single Oven
Models
HBL 432A UC
HBL 435A UC
HBL 436A UC
HBL 442A UC
HBN 442A UC
HBL 445A UC
HBN 445A UC
HBL 446A UC
HBN 446A UC
Convection
No
No
No
Yes
Wht
X
Colors
SS
X
Yes X
Yes
Blk
X
Table 1.
Double Oven
Models
HBL 452A UC
HBN 452A UC
HBL 455A UC
HBN 455A UC
HBL 456A UC
HBN 456A UC
HBL 462A UC
HBN 462A UC
HBL 465A UC
HBN 465A UC
HBL 466A UC
HBN 466A UC
Convection
(top/bottom)
Yes/No
Yes/No
Yes/No
Yes/Yes
Yes/Yes
Yes/Yes
Wht
X
SS Blk
x
x
x
x
x
Table 2.
Due to the number of models offered not all the
features described below may apply to your oven.
Using Your Oven
It is very important to learn how to properly use
your oven to obtain the best cooking results.
Following you will find important information for
the sate and efficient use of your oven.
Before Using for the First Time
Before using your Bosch oven for the first time
remove all packing and foreign materials from the
oven(s). Any material of this sort left in the
oven(s) may melt and/or burn when the oven(s)
are used.
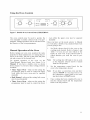
Oven Control Panel
All the ovens have the following controls, as
shown in Figure 3:
• Programmer push-buttons:
- Set Clock button
- Timer button
- Cook Time button
- Start Time button
- Time set + and - buttons.
• Programmer display
• On/Off light
• Heat light
• Door lock light
• Timer/Manual selector knob
• Temperature control knob(s)
• Mode selector knob(s)
The double oven control panel is the upper panel
shown in Figure 3 and the single oven control
panel is the lower panel shown.
Programmer Push-Buttons
The programmer push-buttons are used to set and
program the oven. See sections Timer and Pro-
gramming the Oven for explanation on how to
use the programmer push-buttons.
Programmer Display
The programmer display per%rms many func-
tions. When the electricity to your oven is first
turned on the display will be blank. For informa-
tion on setting the display and its use as a timer or
for programmed cooking see sections Timer and
Programming the Oven, following.
Timer/Manual Selector
The Timer/Manual selector knob is used to set the
oven(s) for Manual or Timer mode.
On Light
The on light will be illuminated whenever the
oven is on.

Double Oven lower oven lights upper oven lights
Control Panel _J'------_
temperature control mode _ = o
selector _ .c_ _°_
Temperature F I
Lower Oven
_,, _ o,f 0 0 0 0 0 0
o0 mmer!
display
lower oven controls programmer
push-buttons
programmer controls
selector temperature control
I I
Upper Oven Temperature F'
timer/manual
selector
J
upper oven controls
Single Oven Control Panel
BOSCH
Figure 3.
timer/manual
selector
s_ @ 0Coo_
pr°gr/mmer I
display
prog rammer
push-buttons
on 0
_t 0
_ 0
mode
selector
Temperature F"
temperature control
o_
Heat Light
The heat light will be lit when you turn on your
oven. When the oven reaches the set temperature
the light will turn off to let you know the oven is
preheated. (Preheat time should take approxi-
mately 12-15 minute when using 240 volts. If
electrical supply is less than 240 volts preheat
times will be longer). The light is connected to
the cooking elements and will turn off and on as
the oven cycles to maintain the set temperature.
Door Lock Light
The door lock light will be illuminated whenever
the oven is in the self-clean mode and the door is
locked.
Temperature Control Knob
The temperature control knob is marked in de-
grees Fahrenheit (°F). This control knob is used to
adjust the oven temperature.
Mode Selector
The mode selector knob is used to set the oven to
Oft, or for Self Clean, or to select the cooking
function desired. A number of modes are avail-
able depending on the model oven you have pur-
chased.
Please see Table 3, Cooking Function Settings,
for intbrmation on selecting a cooking mode.

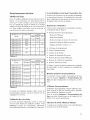
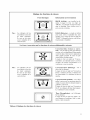
Cooking Function Settings
Thermal Oven Function Information
Broil - Used for broiling.
When set on Broil the top
elements operate whenever
heating.
May be used with door open or
closed.
Note: Lower element shown t\_r
clarity only. Lower ele-
ment actually is located
below floor of cavity
....... i ............
L
Bake (Roast) - This mode is used
for baking, roasting and heating of
casseroles, etc. When set on Bake
the top element and the bottom
element operate whenever heating.
Convection Ovens have following additional cooking functions
Convection Bake - The most
versatile mode for baking and
heating a variety of dishes.
Also recommended l\_rpreparing
large quantities of i\_od on several
racks.
When set on Convection the rear
circular bake element operates
whenever heating. Fan operates.
Note: Lower element shown l\_r
clarity only. Lower ele-
ment actually is located
below floor of cavity
Convection Roast - Use l\_r
roasting.
When set on Convection Roast the
top element and the bottom
element operate whenever heating.
Fan operates.
Convection Broil - Use of fish
and broiling thick cuts of meat.
The door must be closed when
Convection Broiling. When set on
Convection Broil top elements
operate whenever heating. Fan
operates.
Thaw - Use i\_r defrosting.
When set on Thaw no elements
operate, only the fan is on.
Table 3. Cooking Function Settings

Oven Programmer
The oven programmer can be used to electroni-
cally control the cooking in your oven. Figure 4
shows all the call-outs that are available on the
display and their locations. The buttons directly
adjacent to the display are the programming but-
tons. These are used to program the oven, includ-
ing setting the clock.
SET (_)
DELAY _ _ _ $TART _ Time
, T,M_!) O-
Figure 4.
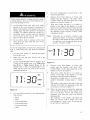
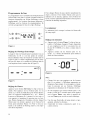
Setting the Electronic Clock
When you first turn on the power to your oven, or
if the power to the oven has been off for a while
the display will come on showing all the call-outs,
as shown in Figure 4, and then will become blank,
with dashes in the display area and the set clock
symbol in the upper right of the programmer dis-
play, as shown in Figure 5.
@
@
\. J
Figure 5.
To set time of day
Press in Set Clock button. A "beep" will be
heard. Then press either the plus (+) or minus (-)
button, to the right of the display, to set the cor-
rect time. If the plus (+) or minus (-) button is
pressed it will advance or decrease the time in 1
minute increments, if the plus (+) or minus (-)
button is held in the minutes will increase or de-
crease in 10 minute increments. Once the time is
properly set depress the Set Clock button again to
enter the time. A "beep" will sound and the Set
Clock symbol, in the upper right, will disappear.
To change the time of day simply repeat the steps
described above. To check the time of day when
the timer is in use depress the Set Clock button.
The time of day will be displayed briefly and then
will return to the timer function.
Timer
The timer acts as a kitchen timer, counting down
from the set time.
To Set Timer
• Press Timer button. A "beep" will be heard
and the display will change from showing the
time of day to read zero (.00) and say SET
TIMER, to the right, as shown in Figure 6.
• Then press either the plus (+) or minus (-) but-
ton, to the right of the display, to set the timer
to the time interval desired.
HR
SET
TINEB
Figure 6.
Notes:
1. Each time the plus (+) or minus (-)
button is depressed the display will in-
crease or decrease in 1 minute incre-
ments. If the plus (+) or minus (-) but-
ton is held in the display will increase
or decrease in 10 minute increments.
2. If the plus (+) or minus (-) button is
not depressed within 5 seconds of de-
pressing the Timer button the Timer
button will have to be depressed again
to again call up the timer mode.
• Once the desired time interval is set release the
buttons.
• The timing interval will start after approxi-
mately 4 seconds.

• The indicator word TIMER will remain in the
display during timer countdown.
• The timer will countdown in minutes until the
last minute when it will switch over and count-
down in seconds.
• At the end of the timing interval the indicator
word TIMER will blink on and off and three
"beeps" will be heard.
• The display will return to time of day or any
active programmed function and "beeping" will
continue every 10 seconds until any button is
touched.
• Once any button is touched the flashing word
TIMER disappears from the display.
To Cancel Timer
With the indicator word TIMER in the display all
that is necessary to cancel the timer is to depress
the Timer button once.
If some other timed function has been pro-
grammed after setting the timer, the TIMER indi-
cator word can be recalled to the display by de-
pressing the Timer button.
Then with the indicator word TIMER in the dis-
play you can, as above, cancel the timer by de-
pressing the Timer button a second time.
Then after 5 seconds the display will return to
time of day or any active programmed function.
To Check Timer During Timed Function
If some other timed function has been pro-
grammed after setting the timer, TIMER may be
recalled to the display by depressing the Timer
button.
The amount of time remaining on the timer can
then be viewed.
10

Using the Oven Controls
Temperature P
Lower Oven Lower Oven Upper Oven
7 o o ok _j 2,o
_"o,, ++'+++@ ®++_ @-
Upper Oven Ternperatuie F'
Figure 7. Double Oven Control Panel, HBL/HBN45..
The oven controls may be used to operate the
oven manually or under control of the oven pro-
grammer. Manual operation will be discussed first
and then use of the oven programmer.
Manual Operation of the Oven
Before turning on your oven, position the racks
properly for their intended use. To change the po-
sition of the racks, lift rack at the front and pull-
out and re-insert at the desired level.
For manual operation of the oven set the
Timer/Manual Selector knob (see Figure 3) to
Manual. If you have a double oven, as shown
above (Figure 7) you have three setting positions
available:
• Timer Upper Oven - when on this setting the
programmer must be used to control the upper
oven while the lower oven may be operated
manually
• Both Manual - when on this setting both ovens
may be used manually.
• Timer Lower Oven - when on this setting the
programmer must be used to control the lower
oven while the upper oven may be operated
manually.
Once you have set the mode selector to Manual
or, if you have a double oven, decided which oven
you are going to use:
, Set Mode selector knob for the oven to the
cooking mode desired. Refer to Figure 3 and
Table 3 if you are not sure which of the
knobs on your oven is the selector knob or
which function you wish the oven to per-
li_rm.
Note: The cooling fan will begin to run as soon
as the function selector knob is turned
from the Off position.
2. Set the temperature control knob for the
oven to the temperature desired.
Note:
If you have a convection oven and have
selected THAW it is not necessary to set
the temperature control knob as no heat-
ing takes place in THAW mode.
3. Once cooking has been completed be sure to
turn the selector knob and the temperature
knob to the Offposition.
11

Electronic Control of Oven
Immediate Start/Automatic Shut-Off
To use the electronic control so that your cooking
starts immediately and then shuts-off automatically:
1. Set the oven rack(s) as desired and place
food in the oven.
2. Make sure that the oven clock is set to the
correct time.
3. Set the Timer/Manual Selector (Figure 3) to
Timer for the single oven or to Timer Upper
Oven or Timer Lower Oven for double
oven, so that oven programmer is enabled for
the oven you wish to use in programmed op-
eration.
SET
I__i COOK
®
TmNE
J
Figure 8.
4. Set oven Mode Selector knob to the cooking
function desired:
- Broil
- Bake
- Convection Bake
- Convection Roast
- Convection Broil
- Thaw
5. Set oven Temperature Control knob to the
desired temperature.
6. Depress Cook Time button, a "beep" will
sound and the display will show SET-
COOK-TIME on the right hand side of the
display, as shown in Figure 8.
®
®
O00K
J
Figure 9.
.
Then press either the plus (+) or minus (-)
button, to the right of the display, to set the
the timer to the time interval desired.
Maximum cooking time is 11 hours and 50
minutes (minimum cooking time is 1 min-
ute).
Note:
.
.
If the plus (+) or minus (-) button is not
depressed within 5 seconds of touching
the Cook Time button the Cook Time
button will have to be depressed again to
call up SET - COOK - TIME.
After the cook time has been set a "beep"
will sound and the indicator word COOK
will appear in the display and the oven will
begin heating. Figure 9 shows what the dis-
play would look like at this time if a cooking
time of 2 hours and 30 minutes had been set.
At the end of the programmed cooking time,
the oven will automatically shut-off and the
indicator word COOK will blink. Three
"beeps" will sound and the oven will con-
tinue to beep every 10 seconds until any but-
ton is pushed.
Be sure to turn the Mode Selector knob and the
Temperature knob to their Off positions after
electronic controlled cooking has been completed.
To Cancel Cook Time
To cancel cook time at any time depress Cook
Time button twice.
Delayed Start/Automatic Shut-Off
The programmer may also be used to have your
oven start at a later time, cook for a preset cook-
ing period and shut itself off automatically. This
function is not recommended for foods that con-
tain baking powder or yeast as these foods will
not rise properly if cooked in this way. Also,
please keep in mind that the time required for the
oven to come up to temperature must be included
in the cooking time. In most cases this means that
approximately 10 minutes should be added to the
cooking time. A preheat time is usually not neces-
sary for convection function, but in all cases fol-
low your recipe.
12

When using delayed cooking special consid-
eration must be given to avoid potential sick-
ness and spoiling of food:
1. Avoid using foods that will spoil while
placed in the oven waiting for cooking to
begin. In particular avoid using foods con-
taining eggs and dairy products in delayed
cooking. In addition unfrozen cooked or
uncooked meats, poultry and fish should
not be placed in the oven if they will be
there tbr more than two hours.
2. Do not allow food to remain in the oven
more than one hour after the end of the
cooking cycle.
To use the programmer so that your cooking will
start at some later time and shut-off automati-
cally:
1. Set the oven rack(s) as desired and place
food in the oven.
2. Make sure that the oven clock is set to the
correct time.
3. Set the Timer/Manual Selector (Figure 3) to
Timer, for the single oven, or to Timer Up-
per Oven or Timer Lower Oven, for the
double oven, so that oven programmer is en-
abled for the oven you wish to use in pro-
grammed operation.
SET
START
TmIV]E
Figure 10.
,
Set oven Selector knob to the cooking func-
tion desired:
- Broil
- Bake
- Convection Bake
- Convection Roast
- Convection Broil
- Thaw
5. Set oven Temperature Control knob to the
desired temperature.
6. Depress Start Time button. A "beep" will
sound and the display will show SET-
START-TIME on the right hand side of the
display, as shown in Figure 10.
7. Then press either the plus (+) or minus (-)
button, to the right of the display, to set the
timer to the start time desired. After the time
has been entered a "beep" will be heard and
the indicator words DELAY-START-TIME
will appear briefly.
Note:
If the plus (+) or minus (-) button is not
depressed within 5 seconds of touching
the Start Time button the Start Time but-
ton will have to be depressed again to call
up SET - START - TIME.
Figure ll.
8. Depress Cook Time button. A "beep" will
sound and the display will show SET-
COOK-TIME on the right hand side of the
display as shown in Figure 8.
9. Then press either the plus (+) or minus (-)
button, to the right of the display, to set the
the timer to the time interval desired.
Maximum cooking time is 11 hours and 50
minutes (minimum cooking time is 1 minu-
te).
The display will return to the time of the day
with the word DELAY appearing to the left
of the day, as shown in Figure 11.
10. When the start time is reached the indicator
word COOK will appear in the display with
the set cook time. At the end of the pro-
grammed cook time the oven will shut-off
automatically.
The indicator word COOK will blink and
three (3) "beeps" will be heard. The oven
will continue to "beep" every 10 seconds un-
til any button is depressed.
13

Be sure to turn the Mode Selector knob and the
Temperature knob to their Off positions after the
programmed cooking has been completed.
To Check Start Time/before cooking
begins
Depress Start Time button. The start time will be
displayed briefly and then the display will return
to time of day.
To Change Start Time/before Cooking
begins
Depress Start Time button. A "beep" will sound
and the display will show SET - START - TIME
on the right hand side of the display. Then press
either the plus (+) or minus (-) button to the right
of the display, to set the timer to the start time de-
sired.
After the time has been entered a "beep" will be
heard and the indicator words DELAY-START-
TIME will appear briefly and then the display will
return to time of day with the word DELAY ap-
pearing to the left of the time of day, as shown
Figure 11.
To Check Cook Time
Depress Cook Time button. The cook time will be
displayed briefly, then the display will return to
on-going program.
To Change Cook Time
Depress Cook Time button. A "beep" will sound
and the display will show SET - COOK - TIME
on the right hand side of the display, see Figure 8.
Then press either the plus (+) or minus (-) button,
to the right of the display, to set the timer to the
time interval desired. Maximum cooking time is
11 hours and 50 minutes (minimum cooking time
is 1minute).
To Cancel Delay Start
Depress Start Time button twice.
To Cancel Cook Time
Depress Cook Time button twice.
14

Care & Cleaning
The Bosch line of ovens feature a pyrolytic self-
cleaning function that eliminates the difficult and
time consuming manual scrubbing of the oven in-
terior. During self-cleaning the oven uses very
high temperature (approx. 850°F) to burn away
soil and grease. The fumes produced during this
function of the oven are then filtered and ex-
pelled. You will note however that a powder ash
residue will be left on the bottom of the oven after
completion of self cleaning. Once the oven has
cooled sufficiently the residue may be removed
using a damp cloth or sponge. See the following
instruction on use of the self clean function.
Make sure all controls are Off and the oven is
cool betk_re cleaning. Failure to do so can re-
sult in burns or electrical shock.
For parts of the oven other than the oven cavity
the following cleaning methods are recom-
mended:
* Control Panel
Use warm soapy water or spray glass cleaner to
clean the control panel. With a soft cloth or
sponge wash, rinse and dry the control panel
thoroughly. DO NOT use abrasive cleaners or
steel wool pads. These will damage the surface.
• Stainless Steel
To clean, use a standard cleaner designed for
stainless steel such as: Cameo(R_', Bar Keepers
Friend(R) or Bon-Ami,_R). Follow manufacture in-
structions. When clean, a polish such as Twin-
kle(R_'or Stainless Steel Magic(R_' can be applied.
DO NOT USE ABRASIVE MATERIALS
SUCH AS STEEL WOOL OR ROUGH
SPONGES. IT WILL SCRATCH THE SUR-
FACE.
• Front of Oven Door(s) and Handle(s)
Use warm soapy water or spray glass cleaner to
clean the glass door surface. With a soft cloth
or sponge wash, rinse and dry the door front(s)
and handle(s) thoroughly. DO NOT use abra-
sive cleaners or steel wool pads. These will
damage the surface.
• Broiler Pan and Rack(s)
Use warm soapy water. With a steel wool pad
wash, rinse and thoroughly dry the pan and/or
rack(s). DO NOT clean the broiler pans or
racks by leaving them in the oven when run-
ning the Self Clean function.
Frame Outside Door Gasket Area
Make sure oven is cool, then use warm soapy
water. With a non-abrasive, plastic scrubbing
pad clean the frame surface outside the door
gasket area. This area must be cleaned by hand
because the area outside the gasket does not get
hot enough to burn offthe soil (see Figure 12).
DO NOT
Hand clean gasket
Hand clean frame
area outside gasket
-" 0 ::_: _ 0 0
o
Figure 12.
• Door Outside gasket Area
Make sure oven is cool, then use warm soapy
water. With a non-abrasive, plastic scrubbing
pad clean the area outside the door gasket area.
This area must be cleaned by hand because the
area outside the gasket does not get hot enough
to burn offthe soil (see Figure 12).
Using the Self Clean Function
The Self Clean function is a timed function and
theretk_re is used just as if using the oven in Im-
mediate Start/Automatic Shut-Off or Delayed
Start/Automatic Shut-Off. There are a few
preparations that must be made however as well
as some post function clean-up that you will find
described below:
1. Before using Self Clean be sure to remove
the racks. Also, if you have placed any alu-
minum foil in the oven this should also be re-
moved.
Note: If items are left in the oven during self
cleaning they may become damaged and
racks will become discolored. Also, the
racks will become difficult to slide in and
out.
2. Clean soil from the frame around the door,
outside the door gasket (see Figure 12). Do
not clean the door gasket by hand as this
15

,
could move or damage the gasket. The areas
outside the gasket area must be cleaned by
hand because these areas do not become hot
enough during Self Clean to burn away the
soiled spots.
Also wipe up excess grease and other food
spills with a damp cloth. This will minimize
the amount of smoke created during self
cleaning.
SET
Figure 13.
4. Make sure that the oven door is completely
closed and the oven clock is set to the correct
time.
5. Set the Timer/Manual Selector knob (see
Figure 3) to Timer, for single oven, or to
Timer Upper Oven or Timer Lower Oven,
for double oven, so that oven programmer is
enabled for the oven you wish to have self
clean.
6. Set the Function Selector to Self Clean. The
display will change to say SET - CLEAN -
TIME with an initial setting of 3 hours. If the
plus (+) or minus (-) buttons are not de-
pressed within a few seconds the display will
revert to CLEAN function, as shown in Figu-
re 14.
7. Set the Temperature Control to Clean.
8. If you wish to change to a cleaning time of
other than 3 hours depress the COOK TIME
button. A "beep" will sound and the display
will show SET - CLEAN - TIME on the
right hand side of the display as shown in
Figure 13. The programmer setting is in-
itially for a duration of 3 hours. The cleaning
time can be set for 2 hours and 30 minutes to
4 hours depending on how soiled the oven
cavity has become:
> Use 2:30 - to - 3:30 hours for light soil.
Use 3:00 - to - 3:30 hours for medium soil.
Use 3:30 - to - 4:00 hours for heavy soil.
9. To adjust the cleaning time press the plus (+)
or minus (-) button, to the right of the dis-
play.
CLEAN
Figure 14.
Note: If the plus (+) or minus (-) button is not
depressed within 5 seconds of touching
the COOK TIME button the COOK
TIME button will have to be depressed
again to call up SET - CLEAN - TIME.
10. After the Clean Time has been set a "beep"
will sound and the indicator word CLEAN
will appear in the display and the oven will
begin the self cleaning process. As the oven
heats past 560°F the automatic door lock will
operate to lock the door of the oven that is in
Self Clean. The Door Lock indicator light
will become illuminated to show that the
door is locked. The door will remain locked
and the indicator light will remain on
throughout the self cleaning process until the
temperature drops below the 560°F tempera-
ture noted above.
11. At the end of the programmed clean time the
oven will automatically shut-off. Allow the
oven to cool.
12. Open the door. Then after making sure that
the oven has cooled to a sate temperature,
use a damp cloth or sponge to clean out the
powder ash residue left in the oven. If white
spots remain in the oven they can be re-
moved with a damp sponge. These white
spots are normally just salt spots that cannot
be removed by self cleaning.
13. Reinstall the oven racks and broiler pan.
Be sure to turn the selector knob and the tempera-
ture knob to the Off position after the electronic
controlled self cleaning has been completed.
Replacing an Oven Light
Each oven is equipped with two halogen lights lo-
cated in the back wall of the oven. The lights are
switched on when the door is opened or when the
oven is in a cooking cycle. The oven lights are not
illmninated during SELF CLEAN. Each light as-
16

sembly consists of a removable lens, a light bulb
as well as a light socket housing that is fixed in
place, see Figure 15. Light bulb replacement is
considered to be a routine maintenance item.
To replace a light bulb:
1. Read WARNING on this page.
2. Turn off power at the main power supply
(your fuse or breaker box).
Screws Fan cover
BuHbsocket
(fixed in pmace)-_
Halogen
bumb
Lens
Figure 15.
Make sure the oven and lights are cool and
power to the oven has been turned off before
replacing the light bulb(s). Failure to do so
could result in electrical shock or burns.
The lenses must be in place when using the
oven.
The lenses serve to protect the light bulb from
breaking.
The lenses are made of glass. Handle carefully
to avoid breakage. Broken glass could cause
an injury.
3. In multifunction ovens remove the t:an cover
by unscrewing the four screws.
4. Remove the lens by unscrewing it.
5. Remove the light bulb from its socket by
pulling it.
6. Replace the bulb with a new one taking care
to don't touch it with naked fingers.
Their grease can damage the bulb when it be-
cames hot.
The bulb is halogen 12V-20W.
7. Screw the lens back on.
8. Replace the fan cover if the cavity is pro-
vided with.
9. Turn the power back on at the main power
supply (your fuse or breaker box).
Oven Door Removal
The oven door can be removed for hand cleaning
if needed.
Make sure oven is cool and power to the oven
has been turned off before removing the door.
Failure to do so could result in electrical
shock or burns.
The oven door is heavy and fragile. Use both
hands to remove the oven door. The door front
is glass. Handle carefully to avoid breakage.
Broken glass could cause an injury.
Grasp only the sides of the oven door. Do not
grasp the handle as it may swing in your hand
and cause damage or injury.
Failure to grasp the oven door firmly and
properly could result in personal injury or
product damage.
To remove the door for 30" models HBL4..
1. Be sure to read the above WARNING before
attempting to remove oven door.
2. Open the door completely.
3. Lift up the hinge bracket on each hinge as
shown in Figure 16.
17

/Hinge
bracket
o
Figure 16.
c_
4. Hold the door firmly on both sides using
both hands and pull the door straight out of
the hinge slots pressing it in the direction of
closing. Hold firmly; the door is heavy.
5. Place the door in a convenient location for
cleaning.
After cleaning the door can be replaced by revers-
ing the above procedure.
Be sure to slide the door straight into the slots, as
shown in Figure 17.
After moving the hinge brackets back down into
position be sure to close and open the door slowly
to assure that it is correctly and securely in place.
Figure 17.
To remove the door for 27" models HBN4..
1. Be sure to read the above WARNING before
attempting to remove oven door.
2. Open the door completely.
3. Lift up the hinge bracket (1, Fig. 18) into the
slot (2, Fig. 18).
1
Figure 18.
4. Hold the door firmly on both sides using
both hands and close the door.
Hold firmly; the door is heavy.
5. Place the door in a convenient location for
cleaning.
After cleaning the door can be replaced by revers-
ing the above procedure.
Be sure to slide the hinge parts (1, Fig. 19) into
their slots properly.
After moving the hinge brackets back down into
position be sure to close and open the door slowly
to assure that it is correctly and securely in place.
Figure 19.
Service and Repair
The Bosch oven(s) require no special care other
than the care and cleaning noted above.
If service becomes necessary, contact your dealer
or installer or the Bosch Authorized Service Con-
tractor in your area.
Do not attempt to repair the appliance yourself.
Any work performed by unauthorized personnel
may void the warranty.
If your appliance should fail to operate, before
calling for service please review Table 4 "Prob-
lem Solving".
You could save the cost of a service call.
18
Page is loading ...
Page is loading ...
Page is loading ...
Page is loading ...
Page is loading ...
Page is loading ...
Page is loading ...
Page is loading ...
Page is loading ...
Page is loading ...
Page is loading ...
Page is loading ...
Page is loading ...
Page is loading ...
Page is loading ...
Page is loading ...
Page is loading ...
Page is loading ...
Page is loading ...
Page is loading ...
Page is loading ...
Page is loading ...
Page is loading ...
Page is loading ...
Page is loading ...
Page is loading ...
Page is loading ...
Page is loading ...
-
 1
1
-
 2
2
-
 3
3
-
 4
4
-
 5
5
-
 6
6
-
 7
7
-
 8
8
-
 9
9
-
 10
10
-
 11
11
-
 12
12
-
 13
13
-
 14
14
-
 15
15
-
 16
16
-
 17
17
-
 18
18
-
 19
19
-
 20
20
-
 21
21
-
 22
22
-
 23
23
-
 24
24
-
 25
25
-
 26
26
-
 27
27
-
 28
28
-
 29
29
-
 30
30
-
 31
31
-
 32
32
-
 33
33
-
 34
34
-
 35
35
-
 36
36
-
 37
37
-
 38
38
-
 39
39
-
 40
40
-
 41
41
-
 42
42
-
 43
43
-
 44
44
-
 45
45
-
 46
46
-
 47
47
-
 48
48


Ask a question and I''ll find the answer in the document
Finding information in a document is now easier with AI
in other languages
Related papers
Other documents
-
Bosch Appliances HEI8054U User manual
-
Bosch Benchmark HBLP451RUC User guide
-
-
-
-
-
-
Thermador POD301 User manual
-
GE Convection Oven ZET2 User manual
-
 GoFit GF-UPCWS Exercise Equipment User guide
