Trendnet TE100-P1P User guide

Category
Networking
Type
User guide

Trendnet TE100-P1P is a compact print server that connects your printer to your network, allowing multiple users to share the printer and print from anywhere on the network. It features a Web-based configuration utility for easy setup and management, and supports various operating systems including Windows and Mac. With its 10/100Mbps Ethernet port, it provides fast and reliable printing performance.

Trendnet TE100-P1P is a compact print server that connects your printer to your network, allowing multiple users to share the printer and print from anywhere on the network. It features a Web-based configuration utility for easy setup and management, and supports various operating systems including Windows and Mac. With its 10/100Mbps Ethernet port, it provides fast and reliable printing performance.

0
-1-
TABLE OF CONTENTS
ABOUT THIS GUIDE ..................................................................................... 3
INTRODUCTION .......................................................................................... 4
PACKAGE CONTENTS ...................................................................................... 5
SYSTEM REQUIREMENTS .................................................................................. 5
GENERAL FEATURES ....................................................................................... 6
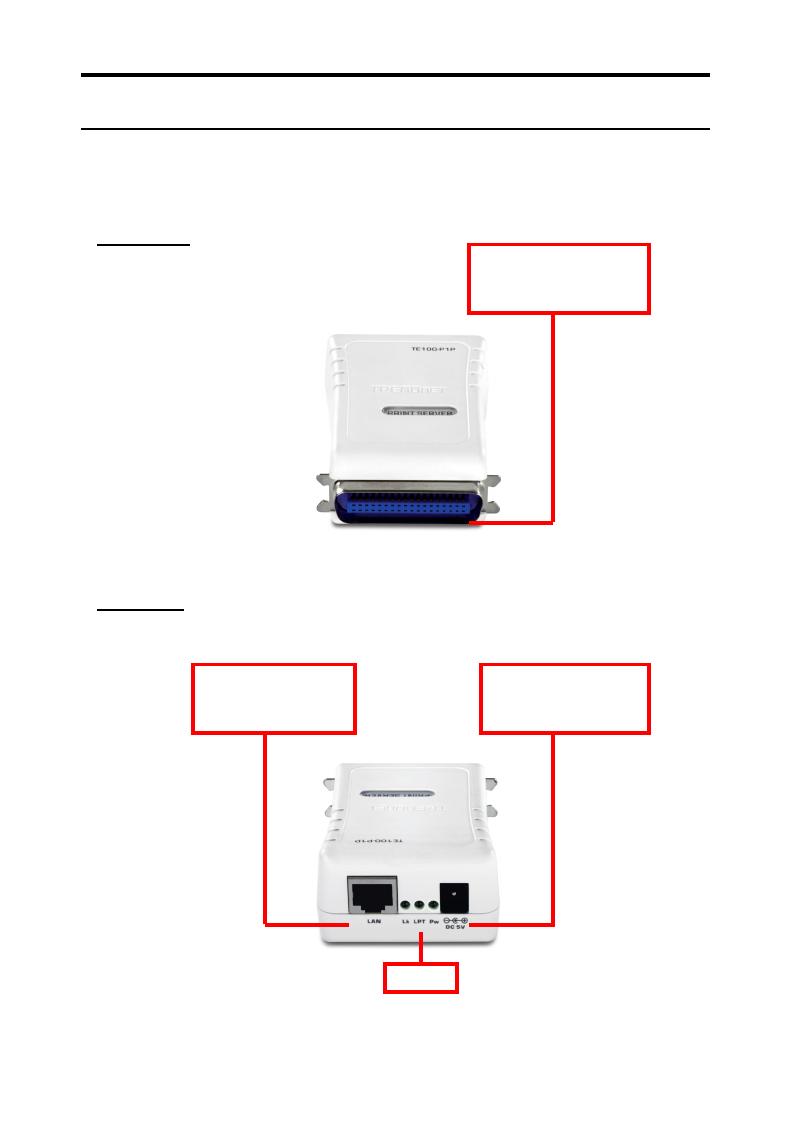
PRODUCT VIEW ............................................................................................ 7
HARDWARE INSTALLATION ........................................................................ 9
NETWORKING APPLICATION ............................................................................. 9
INSTALLING THE PRINT SERVER ........................................................................ 10
USING THE UTILITIES ................................................................................. 11
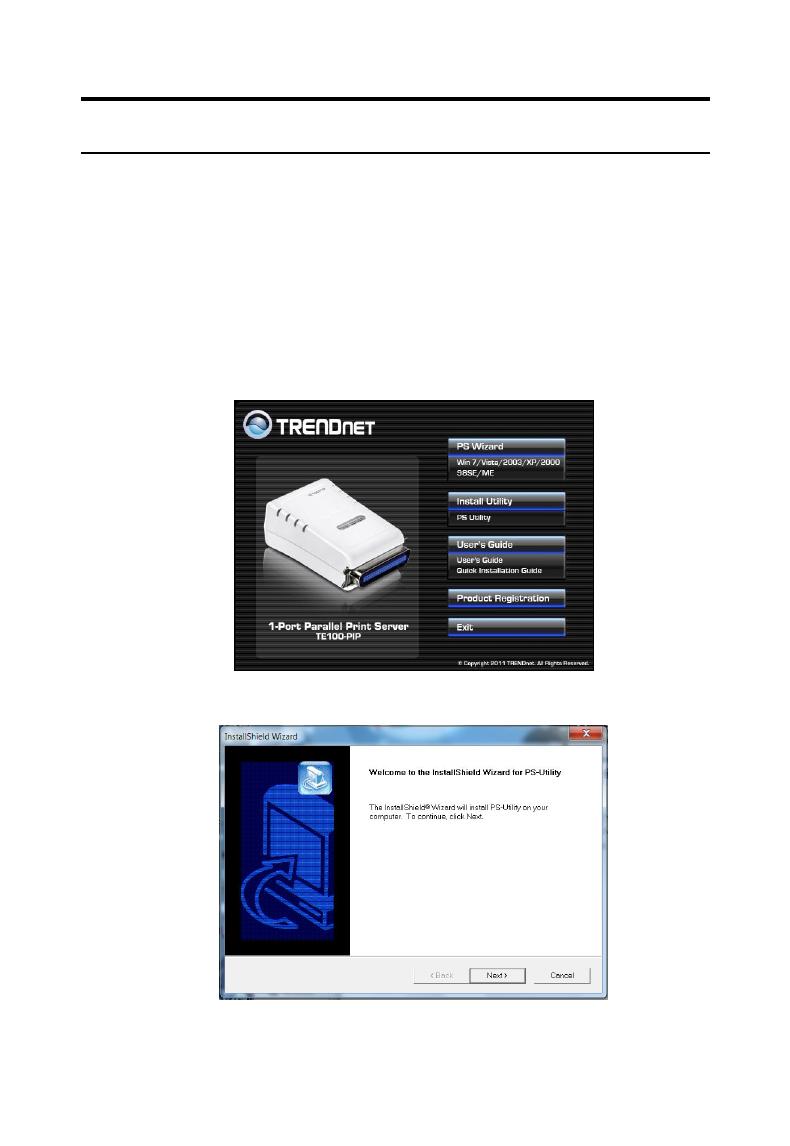
AUTO-RUN INSTALLATION ............................................................................. 11
PS-UTILITY ................................................................................................ 13
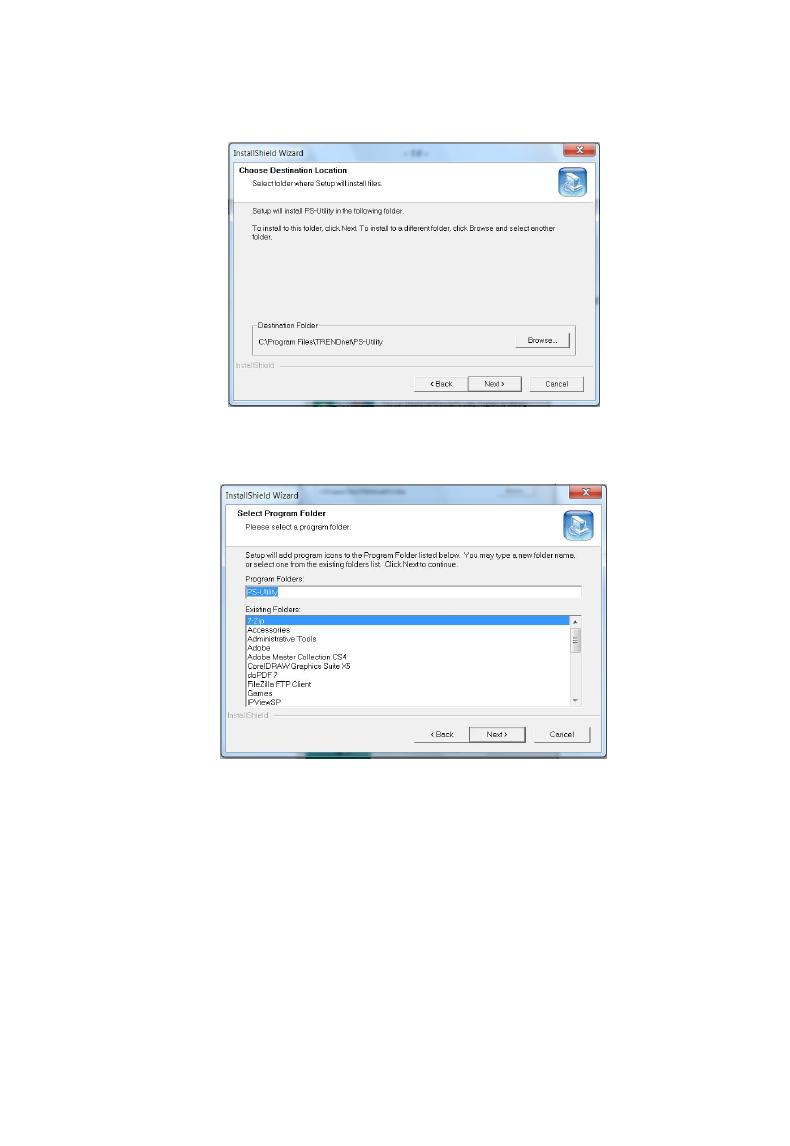
Installing PS-Utility .............................................................................. 13
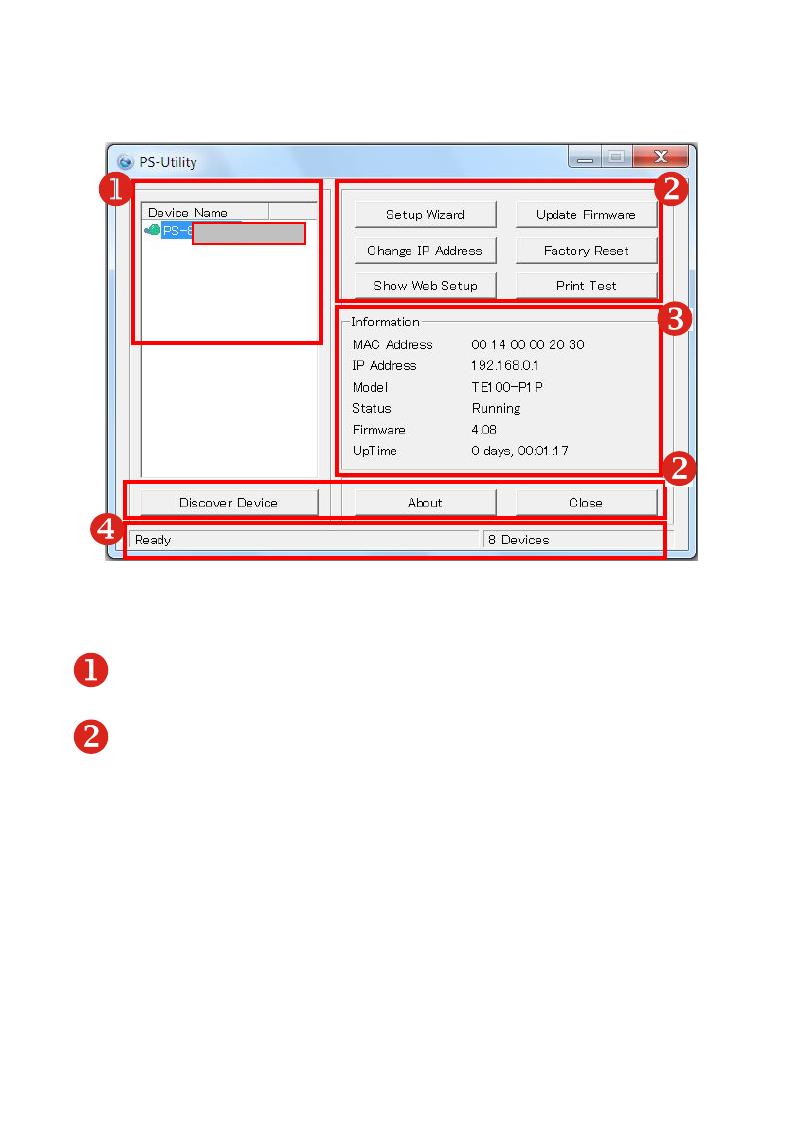
Using PS-Utility ................................................................................... 15
PS WIZARD ............................................................................................... 18
WEB CONFIGURATION .............................................................................. 24
WEB CONFIGURATION UTILITY ........................................................................ 24
HOME ...................................................................................................... 25
SETUP WIZARD ........................................................................................... 26
Second HTTP Port ................................................................................ 28
Save to Print Server ............................................................................. 29
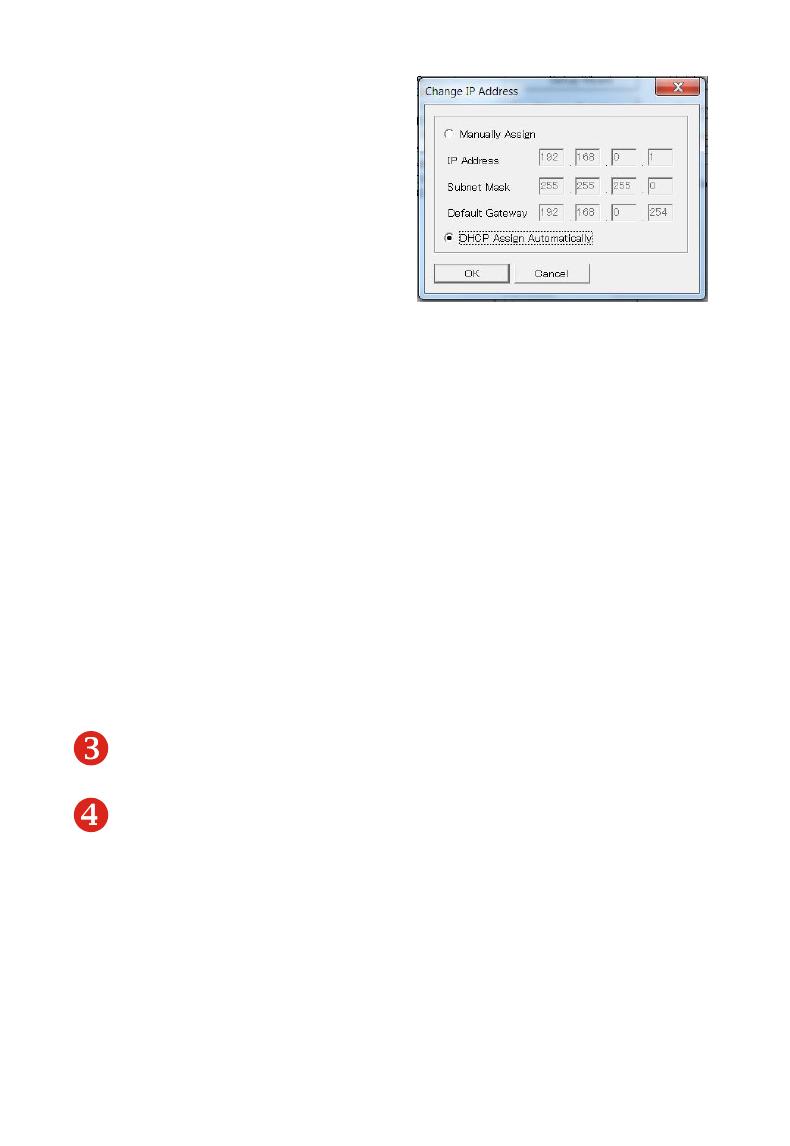
CHANGE IP ADDRESS .................................................................................... 30
PRINTER INFORMATION ................................................................................. 31
FACTORY RESET .......................................................................................... 32
FIRMWARE UPGRADE ................................................................................... 33
ABOUT ..................................................................................................... 34
PRINTING IN WINDOWS 98SE/ME ......................................................... 35
INSTALLING THE LPR FOR TCP/IP PRINTING CLIENT ............................................. 36
ADDING LPR PRINTER PORTS ......................................................................... 38
PRINTING FROM WINDOWS 98SE/ME ............................................................. 40
2
SETTING TCP/IP PRINTING SETTINGS ............................................................... 43
PRINTING IN WINDOWS 7/VISTA/2003/XP/2000 ..................................... 45
SETTING UP WINDOWS 7/VISTA TCP/IP PRINTING ............................................. 45
SETTING UP WINDOWS XP TCP/IP PRINTING .................................................... 51
SETTING UP WINDOWS 2000 TCP/IP PRINTING ................................................. 58
PRINTING IN MAC OS................................................................................ 65
MAC 10.6 SNOW LEOPARD USER ............................................................. 65
MAC 10.5 LEOPARD USER ....................................................................... 74
MAC OS 10.4 TIGER USER ........................................................................ 83
MAC OS 10.3 PANTHER USER .................................................................. 93
RENDEZVOUS USES IN MAC OS 10.2 .............................................................. 99
LIMITED WARRANTY ............................................................................... 102
-3-
ABOUT THIS GUIDE
This manual provides instructions and illustrations on how to use
your 10/100Mbps Parallel Print Server, including:
Chapter 1, Introduction, provides the general information on
the product.
Chapter 2, Hardware Installation, describes the hardware
installation procedure for the product.
Chapter 3, Using the Utilities, helps you to install and use the
software.
Chapter 4, Web Configuration, completes the configuration
using the web browser.
Chapter 5, Printing in Windows 98SE/ME, lets you complete
printing task through your print server in Windows 95 and 98SE
environment.
Chapter 6, Printing in Windows 7/Vista/2003 Server/XP/ 2000,
lets you complete printing task through your print server in
Windows 7, Vista, 2003 Server, XP and 2000 environment.
Chapter 7, Printing in MAC OS, lets you complete printing task
through your print server in MAC OS environment.
Please note that the illustrations or setting values in this manual are
FOR YOUR REFERENCE ONLY. The actual settings and values
depend on your system and network. If you are not sure about the
respective information, please ask your net work administrator or
MIS staff for help.
4
1
INTRODUCTION
Congratulations on purchasing TE100-P1P 10/100Mbps Parallel Print
Server, the easiest and fastest way to deploy printers on your
network.
This compact print server can connect your network through a switch
or hub between PC/Notebook and print server anywhere you wish to
locate printer services. It manages the flow of print files from your
workstation or file server to its connected printers, delivering print
jobs to high-performance printers much faster than a file server or a
PC acting as a print server can.
The 10/100Mbps Parallel Print Server features a Web-based
Configuration Utility, which allows you to set up the print server
through the web browser easily and quickly. It also includes a
simple software utility PS-Utility, a user-friendly program that allows
you to complete settings for the print server.
-5-
Package Contents
Unpack the package and check all the items carefully, and inspect
that you have the following:
TE100-P1U
Multi-Language Quick Installation Guide
CD-ROM (Utility & User’s Guide)
Power Adapter (5V DC, 2.5A)
If any item contained is damaged or missing, please contact your
local dealer immediately. Also, keep the box and packing materials
in case you need to ship the unit in the future.
System Requirements
Operating System:
Microsoft Windows 7/Vista/2003 Server/XP/2000/ME/98SE
Apple Mac OS 10.1~10.6
For Web Configuration:
Java-enabled web browser, such as Microsoft® Internet
Explorer 5.0 and Netscape Navigator 6.0.
6
General Features
Equipped 10/100 auto-MDIX Fast Ethernet LAN port
Multi protocol support is ideal for shared printing in mixed-LAN
environments
Windows-based program makes it possible to set up in a few
minutes.
Offer LPR program for Windows 98SE/ME TCP/IP printing
IP assignment support for DHCP
Support Web configuration
Provide Flash memory for easy firmware upgrade
Support IPP for Windows 7/Vista/2003 Server/XP/2000
Support second http port for remote web configuration.
-7-
Product View
This section describes the externally visible features of the print
server.
Front View
Rear View
Power Connector
plug the AC Power
Adapter to this jack.
LAN Connector
plug your LAN cable
to this connector.
LEDs
Parallel Printer Port
connect the print server
to a Printer Port
8
* There are three green LED indicators on the rear panel:
LEDs Description
Power Steady light confirms that the Print Server is
powered on.
LPT When it is blinking, the printer connected is
printing.
Link/Act Steady light confirms that the print server has a
good connection to your network.
When it is blinking (briefly dark), the print server is
receiving/ transmitting data from/to the network.
-9-
2
HARDWARE INSTALLATION
Networking Application
The following diagram explains the application of your print server.
10
Installing the Print Server
Follow these steps for a trouble-free start of print server operations
with your pocket-sized Print Server.
1. Confirm proper operation of the printer to be connected to the
print server.
2. When you have confirmed proper operation of the printer, turn
off the power.
3. Confirm that your network is operating normally.
4. Connect the print server to the network (through the RJ-45
connector of the print server).
5. While the printer is powered off, connect the print server to the
printer’s port.
6. Turn on the printer’s power.
7. Connect the DC end of the AC Power adapter to the DC power
input socket of the print server and the AC end to the wall outlet.
This will supply power to the print server immediately.
NOTE: This print server is built with a default IP Address. To prevent
from any conflict in your network, it is recommended to use the PS-
Utility program to change the IP setting when there is some other
device’s IP Address is the same as the print server’s default IP Address.
-11-
3
USING THE UTILITIES
This chapter describes the software utilities for the print server,
including how to set up your print server with these utility. The PS-
Utility is designed with a user-friendly interface that allows you to set
up and administer the print server easily.
Auto-Run Installation
Insert the Installation CD-ROM into your computer’s CD-ROM drive to
initiate the Auto-Run program, and the menu screen will appear as
below.
12
PS Wizard – click to setup printer port connectivity
Install Utility click to install PS-Utility. Please refer to the
next section for detailed information on installing the utility.
User's Guide click to preview the User's Guide in PDF format
for detailed information of the Print Server.
Product Registration– click to register your product on-line
Exit – click to close the Auto-Run program.
-13-
PS-Utility
To avoid the conflict in your network, you can use PS-Utility to change
the related settings of your print server (such as the IP address) after
finishing the installation.
Installing PS-Utility
1. Insert CD-ROM into CD-ROM drive. Click Install Utility > PS
Utility.
2. Click Next > in the welcome screen of InstallShield Wizard.
14
3. Choose the destination location. If no specific requirement,
leave the default setting and click Next >.
4. Click Next > to select Program folder
5. The InstallShield Wizard starts to install the software, and the
Progress bar indicates the installation is proceeding.
-15-
6. When completed, click Finish.
After installing the utility, the application program for the print server
is automatically installed to your computer, and creates a folder in
Start\Programs\TRENDnet\PS-Utility.
Using PS-Utility
This section describes the operation of PS-Utility. To launch PS-
Utility:
1. Click Start -> Programs -> TRENDnet -> PS-Utility
16
2. The main screen will appear as below, and it starts to search the
connected print server within the network.
Component Features:
1. Device List: Display the connected print server within the
network.
2. Control Buttons
- Setup Wizard: Click this button to setup the configuration
- Update Firmware: Click this button to update the firmware of
the selected print server.
- Factory Reset: Click this button to reload the factory settings
of the print server.
Your print server
-17-
- Change IP Address: Click
this button to bring up the
following dialog box,
allowing you to change
the IP Address. In this
dialog box, you can select
either Manually Assign or
DHCP Assign
Automatically. When
completed, click OK.
- Show Web Setup: Click this button to open your web
browser and launch the Configuration Utility. Alternately,
you can double-click the print server in the Device List to
launch the Configuration Utility.
- Print Test: Once the printer has been setup, click this button
to test a page
- Discover Device: Click this button to search the connected
print server again.
- About: Click this button to bring up a window containing the
basic information of PS-Utility.
- Close: Click this button to exit PS-Utility.
3. Information Field: Display the basic information of the selected
print server in the Device List.
4. Status Bar: Display the system status.
18
PS Wizard
PS Wizard is a convenient utility that allows you to set up the print
server’s port connection.
Windows 7/Vista/2003 Server/2000
1) Insert the Installation CD-ROM into your computer’s CD-ROM
drive. Click PS Wizard and then click
Win7/Vista/2003/XP/2000 from the Auto-Run menu screen.
-19-
2) Select the print server, select the desired port and then click
Add Printer.
3) Click Select from manufacturer list. Select the appropriate
driver for your printer and then click Next.
  • Page 1 1
  • Page 2 2
  • Page 3 3
  • Page 4 4
  • Page 5 5
  • Page 6 6
  • Page 7 7
  • Page 8 8
  • Page 9 9
  • Page 10 10
  • Page 11 11
  • Page 12 12
  • Page 13 13
  • Page 14 14
  • Page 15 15
  • Page 16 16
  • Page 17 17
  • Page 18 18
  • Page 19 19
  • Page 20 20
  • Page 21 21
  • Page 22 22
  • Page 23 23
  • Page 24 24
  • Page 25 25
  • Page 26 26
  • Page 27 27
  • Page 28 28
  • Page 29 29
  • Page 30 30
  • Page 31 31
  • Page 32 32
  • Page 33 33
  • Page 34 34
  • Page 35 35
  • Page 36 36
  • Page 37 37
  • Page 38 38
  • Page 39 39
  • Page 40 40
  • Page 41 41
  • Page 42 42
  • Page 43 43
  • Page 44 44
  • Page 45 45
  • Page 46 46
  • Page 47 47
  • Page 48 48
  • Page 49 49
  • Page 50 50
  • Page 51 51
  • Page 52 52
  • Page 53 53
  • Page 54 54
  • Page 55 55
  • Page 56 56
  • Page 57 57
  • Page 58 58
  • Page 59 59
  • Page 60 60
  • Page 61 61
  • Page 62 62
  • Page 63 63
  • Page 64 64
  • Page 65 65
  • Page 66 66
  • Page 67 67
  • Page 68 68
  • Page 69 69
  • Page 70 70
  • Page 71 71
  • Page 72 72
  • Page 73 73
  • Page 74 74
  • Page 75 75
  • Page 76 76
  • Page 77 77
  • Page 78 78
  • Page 79 79
  • Page 80 80
  • Page 81 81
  • Page 82 82
  • Page 83 83
  • Page 84 84
  • Page 85 85
  • Page 86 86
  • Page 87 87
  • Page 88 88
  • Page 89 89
  • Page 90 90
  • Page 91 91
  • Page 92 92
  • Page 93 93
  • Page 94 94
  • Page 95 95
  • Page 96 96
  • Page 97 97
  • Page 98 98
  • Page 99 99
  • Page 100 100
  • Page 101 101
  • Page 102 102
  • Page 103 103
  • Page 104 104
  • Page 105 105

Trendnet TE100-P1P User guide

Category
Networking
Type
User guide

Trendnet TE100-P1P is a compact print server that connects your printer to your network, allowing multiple users to share the printer and print from anywhere on the network. It features a Web-based configuration utility for easy setup and management, and supports various operating systems including Windows and Mac. With its 10/100Mbps Ethernet port, it provides fast and reliable printing performance.

Ask a question and I''ll find the answer in the document

Finding information in a document is now easier with AI