
1
BAKERLUX SHOP.Pro™ Go
BAKERLUX SHOP.Pro™ Led
OPERATION MANUAL

2
BAKERLUX SHOP.Pro™
Dear Customer,
We thank you for having purchased an oven / complementary accessory from the BAKERLUX SHOP. Pro™line.
These ovens are the result of Unox's research, and require a minimum amount of space for excellent performance while offering
outstanding cooking management under any condition of use and load.
The BAKERLUX SHOP.Pro™ ovens use UNOX's finest patented technology, which is the result of collaborations with master
chefs and the world's leading research institutions.
A wide array of available accessories make these ovens extremely versatile and streamline everyday kitchen duties.

3
BAKERLUX SHOP.Pro™
INDEX
SAFETY REGULATIONS FOR USE ................................................................................... 4
GENERAL OPERATING INSTRUCTIONS ......................................................................... 5
Cooking/leavening advice ............................................................................................................................................. 5
USE: THE CONTROL PANEL ................................................................................................. 6
USE: SOME CONCEPTS .................................................................................................... 7
Manual and automatic cooking .................................................................................................................................... 7
What are cooking steps? .............................................................................................................................................. 7
How to set values? ....................................................................................................................................................... 7
MANUAL COOKING .......................................................................................................... 8
Guided use procedure (GO version) ............................................................................................................................. 8
Guided use procedure (LED version) ............................................................................................................................ 10
AUTOMATIC COOKING .................................................................................................... 12
Changing a saved recipe .............................................................................................................................................. 13
USING THE PROVER (ONLY THE LED VERSION) ........................................................... 14
ALARMS ............................................................................................................................. 15
ORDINARY AND AFTER-SALES MAINTENANCE .......................................................... 16
External steel structures, oven cavity seal ................................................................................................................... 16
Internal part of the oven cavity .................................................................................................................................... 16
Plastic surfaces and control panels .............................................................................................................................. 16
Inside and outside oven door window glass ................................................................................................................. 16
After-sales assistance ................................................................................................................................................... 17
AFTER-SALES ASSISTANCE ................................................................................................ 17

4
-
Following procedures other than those indicated in this manual to use and clean the appliances is considered inappropriate and may
cause damage, injury or death; in addition to invalidating the wa rra nty * a nd re li ev in g Ca dco, Ltd. of all liability.
-
Children must not play with the appliance. Cleaning and maintenance to be implemented by the user must not be carried out by
children without supervision.
-
Children must be supervised to ensure they do not play with the appliance.
-
This appliance can only be used by qualified personnel, who have completed scheduled training courses, for cooking food in
industrial and professional kitchens. All other uses are not compliant with the scope of use and are therefore hazardous.
-
If the appliance does not function or if you notice any functional or structural alterations, disconnect the electricity and water
supplies and contact a Cadco, Ltd. authorized customer assistance service. Do not attempt to repair the appliance yourself.
Request Cadco, Ltd. original spare parts for any repairs.
-
Failure to observe these regulations may cause damage, injury or death, and also invalidates the warranty*.
-
To ensure that the appliance is in perfect condition in terms of use and safety, maintenance and inspections should be
performed yearly.
-
When navigating and setting parameters only use your dry and clean finger; avoid the use of tools such as forks, spoons, etc.
RISK OF BURNS AND INJURY!
-
While cooking and during cooling of all appliance parts, be careful to only touch the appliance control components or handle,
because the external parts are extremely hot (temperature above 60°C (140°F).
-
Open the door (where necessary) slowly and with the utmost caution, while being careful of extremely hot steam released from
the oven cavity.
-
Wear heat-resistant clothing appropriate to the use at hand to move containers, accessories and other objects inside the oven
cavity.
-
Be extremely careful when removing trays from the oven cavity.
-
Do not remove or touch the protective fan covering, the fans or the heating elements while the appliance is turned on.
-
For no reason should the water circuit of the oven be tampered with because this could cause damage, injury or death. The
water circuit of the oven begins with a 3/4” fitting, with a built-in non-return valve, and includes all the piping and accessories
downstream of this.
RISK OF FIRE!
-
Before using the appliance, make sure that there are no non-compliant objects (instruction manuals, plastic bags, etc.) or
detergent residue inside the oven cavity. Also make sure that the flue is free of obstructions and that there are no flammable
materials in the vicinity.
-
Do not place sources of heat (e.g. grills, fryers, etc.), highly flammable substances or fuels (e.g. gasoline, petrol, bottles of
alcohol, etc.) in the vicinity of the appliance.
-
Do not use highly flammable food or liquids while cooking (e.g. alcohol).
-
Always keep the oven cavity clean, performing daily cleaning after each cooking cycle: fats or food residue left inside the
appliance could ignite!
RISK OF ELECTRIC SHOCK
-
Do not open the compartments marked with these symbols: access is reserved to qualified personnel authorized by Cadco, Ltd.
Failure to observe this regulation invalidates the warranty* and may cause damage or (fatal) injuries.
*
Please see back cover or visit the Warranty section of the Cadco Ltd. Website (www.cadco-ltd.com) for further details
BAKERLUX SHOP.Pro™
Safety regulations for use

5
Before using the appliance carefully read the section “Safety regulations for use”
-
When using the appliance for the first time, be sure to clean the inside of the oven cavity and the accessories thoroughly (see
page 16); let the oven run empty at maximum temperature for 1 hour to eliminate any unpleasant odors caused by protective
factory grease.
-
If the appliance was left running for more than 15 minutes without selecting an operating mode, stand-by is automatically
engaged for energy savings. To exit STAND-BY MODE, simply touch the START/STOP button.
-
Operate the appliance at a room temperature between +5°C (41°F) and +35°C (95°F).
-
In the event of a black-out or shut down of the machine, on restart the appliance resumes the program previously in progress.
The duration of the cooking cycle may be extended by a maximum of 2 minutes.
- For safety reasons, the last tray should NEVER be placed at a height greater than 160 cm (63”). If necessary to do so, it is
mandatory to post the sticker contained in the "Starter Kit" at the height of 160 cm (63”).
COOKING/LEAVENING ADVICE
-
Try to distribute food uniformly on the pans while avoiding stacking and overloading with excessive quantities.
-
Do not salt food inside the oven cavity. If this is not possible, clean the oven as soon as possible.
-
Do not use highly flammable food or liquids while cooking (e.g. alcohol or wine).
-
It is always better to preheat the oven to a temperature at least 30°C (85°F) higher than is required for cooking, in order to
reduce the effects of heat lost when opening the door.
-
Open the door as little as possible when cooking.
-
Try to evenly place the food on the trays, avoid overlapping food or overloading the trays with food (maximum 10 kg (22 lbs.) per
tray). Distribute the trays evenly over the entire height of the oven cavity, respecting the maximum number indicated for each
appliance.
-
Always respect the loading instructions for your oven.
-
Take care when touching the external and internal parts of the oven during cooking and until the complete cooling (it could reach
temperatures above 60°C (140°F).
-
To prevent boiling, do not fill containers with liquids or foods that liquefy with heat in quantities exceeding those that can easily
be kept under control.
When navigating and setting parameters, only use your dry and clean finger; avoid the use of tools such as forks, spoons, etc.
BAKERLUX SHOP.Pro™
General operating instructions

6
Model
GO
Preheating step
Cooking steps;
Setting the cooking duration
Set temperature
Programs with recipes already
stored
automatic cooking
A) Start cooking
B) The machine turns off if
p
ressed for 5 seconds
BAKERLUX SHOP.Pro™
Use: the control panel
Model
LED
Preheating step
Cooking steps;
Set temperature
Set steam
Setting the cooking duration
Setting fan speed
A) Start cooking
B) The machine turns off if
p
ressed for 5 seconds
Programs with recipes already
stored
automatic cooking
Oven selection
Proofer selection
With the "LED" models it is possible to check if the oven and proofer are connected by acting on a single control panel.
When you want to use the oven, touch the "
OVEN SELECTION" icon on the left; to use the proofer, touch the "PROOFER
SELECTION
" icon on the right.
Then continue as normal.
settings
manual cooking
settings
manual cooking

7
STEP 1 STEP 2 STEP 3
MANUAL AND AUTOMATIC COOKING
The oven you purchased can carry out either manual or automatic cooking.
During manual cooking, the user, based on experience, must set the following cooking parameters for one or more cooking
steps (up to a maximum of three):
cooking time (in hours.minutes);
temperature in the oven cavity (°F);
steam input (only LED version ovens);
fan speed (only LED version ovens).
During the automatic cooking, recipes pre-set by the Manufacturer or previously stored by the user after setting them
manually are used.
The oven can hold up to 99 recipes (from P1 to P99).
WHAT ARE COOKING STEPS?
Each manual cooking is made up of an initial preheating (“PRE” - optional but always recommended) and cooking steps
(from a minimum of 1 and a maximum of 3), each featuring different cooking parameters. Set multiple cooking steps instead of
one only; it allows for a proper balance between temperature, cooking time and humidity. This translates into better results.
To enable use, a cooking cycle must contain at least one STEP.
Cooking does not necessarily require all steps: set only those steps which are required.
The appliance automatically passes from one STEP to the next.
HOW TO SET VALUES?
GO model LED model
Values are set:
by pressing the "+" and "-" buttons until
the desired value is reached;
by using the "scroll" function, or rather,
by sliding your finger over the bar (GO
version) or over the display (LED
version). In this latter case advancement
will be faster.
01.30
00.30
00.30
350°F
400°F
300°F
+60%
+20%
+20%
50%
100%
50%
PREHEATING
150°C
BAKERLUX SHOP.Pro™
Use: some concepts
2
1
1
2
1
2

8
7
Repeat these steps to set STEP 2 and 3 (if needed)
During manual cooking, the user, based on experience, must set the following cooking parameters for one or more cooking
steps (up to a maximum of three):
cooking time (in hours.minutes);
Oven cavity temperature (°F)
steam input (only LED version ovens);
fan speed (only LED version ovens).
After setting the cooking parameters (duration, temperature, etc.), you can start cooking directly or save the set recipe. This will
allow you to reuse it every time you want, without having to reset the parameters each time.
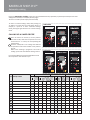
GUIDED USE PROCEDURE (GO VERSION)
SET PREHEATING (OPTIONAL)
Select the "PRE" icon if you want to set a
preheating.
Set the desired temperature value for the
preheating (we recommend a temperature
that is 85°F more than the temperature used
for cooking).
SETTING COOKING PARAMETERS
Select icon "
1": it is now possible to set the
parameters of cooking STEP "1".
For more information on cooking
steps see page 7
Select the "
CLOCK
" icon to set the
cooking time.
Set the desired value in hours.minutes (the
example shows one hour and thirty minutes).
-
Use the method used to set the cooking
time to insert the oven cavity temperature
(from 175°F to 500°F);
SET THE NEXT STEPS (OPTIONAL)
If needed, repeat the operations from
point to point to set cooking STEPS
"2" and "3".
Warning, at point
, touch icon "2" to set
STEP "2" and icon "3" to set STEP "3".
BAKERLUX SHOP.Pro™
Manual cooking
A
1
2
B
3
4
5
6
C
3
7
3
3
7
1
2
B
A
3
4
5
6
7
C

9
STARTING COOKING/SAVING COOKING
After having set the cooking parameters (duration
and time), you can:
-
directly start the cooking: at the end of cooking
the set parameters will NOT be saved;
-
s a v e t h e s e t c o o k i n g a n d t h e n s t a r t c o o k i n g : a t t h e
end of cooking, the set parameters are saved
and the recipe can be
used again subsequently
whenever need
ed without having to pre-set the
parameters each time.
Directly start cooking
Press the “START/STOP” icon: cooking starts
with the set parameters and all the red LEDs
of the positions turn off.
Save cooking and then start it
If you want to save the recipe before starting
it,
search for a free position by looking at the
LEDs:
free position: LED not turned on (e.g. P7)
occupied position: LED turned on (e.g. from P1 to
P6).
NOTE: if you select this although it is occupied,
you will overwrite the recipe previously saved
and will delete it irreversibly.
NOTE: To select positions from P12 to P99, press
P12 for 5 sec. (it will start flashing), press the
"+" key repeatedly until the screen shows the
desired position, then press it for 5 seconds to
save the recipe.
Press the selected button for 5 seconds: you
will hear a beep indicating that the cooking is
saved.
Press the "
START/STOP" icon to start cooking.
COOKING IN PROGRESS!!!!
If the cooking requires a pre-heating, the oven starts to heat the oven cavity to bring it to the set temperature (in the
example 192°C). DO NOT place the food in the oven during this phase.
At the end of the preheating, the oven emits a beep and the oven LED light flashes: it is time to cook the food. When the
door is closed, STEP 1 automatically starts according to the set parameters.
During cooking the set parameters are seen on the screen when the icon of interest it touched:
shows the set cooking time alternating with the time remaining until the end of cooking;
shows the set oven cavity temperature alternating with the current temperature.
The set temperatures can be changed at any time by acting as explained on the previous page (points
from
to
6
). Cooking ends at the end of the set time, if you want to interrupt cooking before the
end of the set time, hold down the "
START/STOP" button.
COOKING END
At the end of the cooking, the oven emits a beep and the oven light flashes: the food is ready. The light turns off when the
door is opened.
D
1A
1B
2B
3B
E
4
5
6
3
F
D
E
1A
5
4
6
2B
5 sec.
1B
1A
_
_
3B

10
4
11
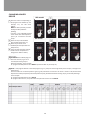
GUIDED USE PROCEDURE (LED VERSION)
SELECT THE APPLIANCE
Select the "
OVEN" icon: the control panel is now
enabled to use this appliance.
SET PREHEATING (OPTIONAL)
Select the "PRE" icon if you want to set a
preheat temperature.
Set the desired temperature value for the
preheating (we recommend a temperature
that is 30°C (85°F) more than the temperature
used for cooking).
SETTING COOKING PARAMETERS
Select icon "1": it is now possible to set the
parameters of cooking STEP "1".
For more information on cooking
steps see page 7
...
11
Use the method to set the cooking time to
insert the values for:
oven cavity temperature
(from 175°F to 500°F)
steam input
(from 0% to 100% in increments of 20)
fan speed
1: reduced speed;
2: maximum speed
SET THE NEXT STEPS (OPTIONAL)
If needed, repeat the operations from
point to point to set cooking STEPS
"2" and "3".
Warning, at point
touch icon "
2" to set
STEP "2" and icon "
3" to set STEP "3".
5
Select the "CLOCK" icon to set the
cooking time.
6
Set the desired value in hours.minutes (the
example shows one hour and thirty minutes).
D
Repeat these steps to set STEP 2 and 3 (if needed)
A
1
B
2
3
C
4
7
D
4
11
4
2
3
6 8
4
5 7
10 12
91
1
B
A

11
START/SAVE COOKING
After having set the cooking parameters (duration,
time, etc...), you can:
-
directly start the cooking: at the end of cooking
the set parameters will NOT be saved;
-
save the set cooking and then start cooking: at
the end of cooking, the set parameters are
saved and the recipe can be used again
subsequently when- ever needed without
having to pre-set the parameters each time.
Directly start cooking
Press the “START/STOP” icon: cooking starts
with the set parameters and all the red LEDs of
the positions turn off.
Save cooking and then start it
If you want to save the recipe before starting it,
search for a free position by looking at the LEDs:
free position: LED not turned on (e.g. P7)
occupied position: LED turned on (e.g.. from
P1 to P6
NOTE: if you select this although it is occupied,
you will overwrite the recipe already saved
and will delete it irreversibly.
Note: to select positions from P12 to P99, press
P12 for 5 sec. (it will start flashing), press the
"+" key repeatedly until the screen shows the
desired position, press it for 5 seconds. to save
the recipe
.
Press the selected button for
5 seconds
: you
will hear a beep indicating that the recipe is
saved.
Press the "
START/STOP" icon to start cooking.
COOKING IN PROGRESS!!!!
If the cooking requires a pre-heating, the oven starts to heat the oven cavity to bring it to the set temperature
(in the example 192°C). DO NOT place the food in the oven during this phase.
At the end of the preheating, the oven emits a beep and the oven LED light flashes: it is time to cook the food. When the
door is closed, STEP 1 automatically starts according to the set parameters.
During cooking the set parameters are seen on the screen when the icon of interest it touched:
shows the set cooking time alternating with the time remaining until the end of cooking;
shows the set oven cavity temperature alternating with the current temperature;
s h o w s t h e s e t steam input;
shows the set fan speed.
The set temperatures can be changed at any time by acting as explained on the previous page (points
from
to
11
). Cooking ends when the set time has elapsed, if you want to interrupt cooking before
the end of the set time, hold down the "
START/STOP" button.
COOKING END
At the end of the cooking, the oven emits a beep and the oven light flashes: the food is ready. The light turns off when the
door is opened.
3B
1A
2B
5 sec.
1B
E
1A
1B
2B
3B
F
4
5
6
4
G
4
6
5
E
F
_

12
During the automatic cooking, recipes pre-set by the Manufacturer (if provided) or previously stored by the user after
setting them manually are used (see previous pages).
The oven can hold up to 99 recipes (from P1 to P99).
To return to "manual cooking" mode, after pressing any
"P" button, you must press the same button again; For
example, if I press P1 to enter "automatic cooking"
mode, pressing P1 again will return to "manual cooking"
mode.
CALLING UP A SAVED RECIPE
Press the button of interest (to access positions
from P13 to P99, select the P12 position
and move
forward with the "
+
" button)
: the corresponding LED
starts flashing.
Press the “
START/STOP” icon: cooking starts with the
set parameters and all the red LEDs of the positions
turn off.
Refer to the "Cooking in progress!!!" and "End of
cooking" parts under the "Manual cooking" section.
It is recommended that you use the table below to find
the recipe that is most relevant to you.
Pos.
Recipe name
PRE STEP 1 STEP 2 STEP 3
P1
P2
P3
P4
P5
P6
P7
P8
P9
P10
P11
P12
P13
BAKERLUX SHOP.Pro™
Automatic cooking
1
2
LED model
1
2
GO model
1
2

13
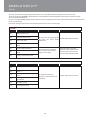
CHANGING A SAVED
RECIPE
1
Press the button corresponding to
the program to be modified (in the
example, P7): the LED starts
flashing.
Note:
to select positions from
P12
to P99, press P12 (it will start
flashing),
press the "+" key repeatedly until the
screen shows
the desired position,
press it for 5 seconds to save the
recipe.
2
Select the step to be modified
(the example shows STEP "1").
3
Select the parameter to be
modified (the example shows the
temperature).
4
Insert the new value (the example
GO
model
shows how the temperature is
brought from 180°C to 200°C).
Now you can:
5A
overwrite the modified program.
Press the same key e.g. P7 for 5
seconds (the existing recipe is
deleted irreversibly). In the example:
P7: program with temperature set to 200°C (instead of 180°C as previously set).
5B
save a new program identical to the initial program (e.g. P7), except for the changes made (in the example, a change to the
temperature).
Press the button for the desired position again (e.g. P8) and hold for 5 seconds: if the name is shown in red, this means that
t h e p o s i t i o n i s a l r e a d y o c c u p i e d . I f y o u c h o s e t h e p o s i t i o n a n y way, this will overwrite the existing recipe, permanently deleting it.
In the example:
P7: program with temperature set to 180°C
P8: program identical to P7, except the STEP 1 temperature has been set to 200°C.
PRE STEP 1 STEP 2 STEP 3
Pos. Recipe name
LED model
GO model

14
Your BAKERLUX SHOP.Pro™ LED version appliance can control a proofer of the same series, connected to it.
SELECT THE APPLIANCE
Select the "
PROOFER" button: the control panel is now
enabled to use this appliance.
SETTING LEAVENING PARAMETERS
Select the "
CLOCK" button to set the leavening
cycle time.
Set the desired value in hours.minutes (the example
shows 5 hours and 30 minutes).
Select the "
TEMPERATURE" button to set the
leavening temperature.
Set the desired value in °C (the example shows:
50°C).
START LEAVENING
Press the "
START/STOP" button: leavening will start
with the set parameters.
STEAM INPUT
If steam is needed during the leavening process in
progress, press the "
STEAM
" button: steam is injected
until the button is released.
D
7
BAKERLUX SHOP.Pro™
Using the proofer (only the LED version)
A
1
B
2
3
4
5
C
6
D
7
1
C
B
A
3
5

15
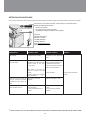
The ovens show alarm/warning messages relative to the oven or installed accessories (only LED version) on the screen.
The warning messages (WARNING) signal malfunctions that nevertheless allow the appliance and accessories to operate, though
with a restricted set of functions.
The alarm messages (ALARM) identify situations that fail to allow any appliance/accessories operation whatsoever, and therefore must
be put into STOP mode.
If the alarm messages strictly refer to the connected accessories, the oven can still be used.
ALARMS
Display Description Effect Solution
A01 Motor thermal alarm
The oven stops any operating cycle
and blocks any screen display
configuration
Contact Cadco Customer Service
A02 Safety thermostat alarm
A03 Oven cavity alarm
A04
Hood communications failure
alarm
A07 Prover cavity probe alarm
The prover stops any operating
cycle and stops any successive
display screen settings
Check the power cord of the
appliance, if the problem persists
even after the corrective action,
contact Cadco Customer service
A08
Presence of prover power
alarm
A09 Prover communication alarm
WARNING
Display Description Effect Solution
U01
Warning: oven temperature board
The appliance continues to
operate, but some functions may
be disabled
Contact Cadco Customer Service
U07
Warning prover temperature
board
U13
Warning: hood temperature
board
U14
Warning: hood temperature
board probe
U15 AC power missing
U16 Communication error
BAKERLUX SHOP.Pro™
Alarms

16
Any routine maintenance procedure must be performed:
-
after disconnecting the appliance from the power and water supplies;
-
after having put on the proper personal protective equipment (gloves, etc.).
Clean the oven cavity daily to maintain proper levels of hygiene and to keep the stainless steel inside the oven cavity from
getting ruined or corroding.
When cleaning any component or accessory NEVER use:
-
abrasive or powder detergents;
-
aggressive or corrosive detergents (e.g. hydrochloric/muriatic or sulphuric acid). Caution! Never use these substances when
cleaning the appliance substructure and floors either;
-
abrasive or sharp tools (abrasive sponges, scrapers, steel bristled brushes, etc.);
-
water jets.
EXTERNAL STEEL STRUCTURES, OVEN CAVITY SEAL
Wait for the surfaces to cool off.
Use a soft cleaning cloth dampened with a little soap and water only. Rinse and dry completely.
INTERNAL PART OF THE OVEN CAVITY
Failure to clean the oven cavity daily can cause the accumulated fatty substances or food residues
inside the cavity to catch fire – risk of fire!
Clean the oven cavity daily to maintain high levels of hygiene and to preserve the brilliance of the steel and performance
of the equipment through time. Fat particles or food residues may also catch fire during cooking, causing damage to people and
the equipment. Cleaning should always be carried out with a cold oven cavity using a soft cloth soaked in warm soapy water.
Finish cleaning by rinsing and thoroughly drying.
PLASTIC SURFACES AND CONTROL PANELS
Use only a very soft cleaning cloth and a small amount of detergent for cleaning delicate surfaces. Follow the detergent manufacturer's
directions.
INSIDE AND OUTSIDE OVEN DOOR WINDOW GLASS
Wait for the glass to cool off.
Use only a soft cleaning cloth dampened with a little soap and water or specific glass cleaners. Rinse and dry completely.
FOR OVENS WITH A SIDE OPENING DOOR: when cleaning the oven DO NOT remove the internal
glass as it may break.
BAKERLUX SHOP.Pro™
Ordinary and after-sales maintenance

17
AFTER-SALES ASSISTANCE
In case of any malfunctions, disconnect the appliance from its power and water supply. Consult the solutions proposed in the table.
If the solution is not listed in the table, contact Cadco, Ltd. Customer Service.
Provide the following information:
-
the date of purchase;
-
the appliance data on the serial plate;
-
any warning messages that appear on the display.
Cadco, Ltd.
200 International way
Winsted, CT 06790
Tel. (860) 738-2500
Fax (860) 738-9772
Email: [email protected]
Website: www.cadco-ltd.com
Malfunction Possible cause Possible solution Solution
The oven is completely
switched off.
- No mains power.
- Appliance out of order.
Make sure the appliance is
connected to the electricity
mains.
Contact Cadco Customer
Service.
No steam is produced inside
the oven cavity.
- Water inlet closed.
- Appliance plumbed into the
water mains or the tank
incorrectly.
- No water in the tank (if
water is taken from the
tank).
- Water supply filter clogged
with impurities.
- Open water inlet.
- Make sure the appliance is
plumbed into the water
mains or the tank correctly.
- Fill the tank with water.
- Clean the filter.
After the time has been set
and the "
START/STOP" button
pressed, the oven does not
start.
Door open or not shut
properly.
Make sure the door is shut.
Water escapes from the seal
when the door is shut.
- Seal dirty.
- Seal damaged.
- The handle mechanism is
loose.
- Clean the seal using a damp
cloth.
- Contact Cadco Customer
Service.
*
Please see back cover or visit the Warranty section of the Cadco Ltd. Website (www.cadco-ltd.com) for further details
INT:
Made by: UNOX S.p.A. Via Majorana 22, 35010 Cadoneghe - Padova (ITALY)
3902067143
3902067143
MOD. 1
S/N
06-2017BakerLux
TM
GROSS WEIGHT: 62 kg NET WEIGHT: 50 kg
XEFT-04EU-xx
Pe: 6,3 kW 220-240V 1N˜ 220-240V 3˜/380-415V 3N˜50/60 Hz 1 50-600 kPa IP X3

18
INACTIVITY
During periods of inactivity, take the following precautions:
-
disconnect the appliance from the power and water supplies;
-
rub a soft cloth lightly doused with mineral oil on all stainless steel surfaces;
-
keep the appliance door slightly ajar.
Before reusing the appliance:
clean the appliance and its accessories thoroughly (see the chapter “” on page 16);
-
connect the appliance to the power and water supplies;
-
inspect the appliance;
-
switch on the appliance at minimum temperature for 50 minutes without any food inside of it.
To ensure that the appliance is in perfect condition in terms of use and safety, maintenance and inspections should be
performed yearly.
CERTIFICATION
EU declaration of conformity for electrical appliances
Manufacturer: UNOX S.p.A.
Address: Via Majorana, 22 - 35010 Cadoneghe, Padua, Italy Declares, under its own responsibility, that the product
BAKERLUX SHOP.Pro™
complies with the Machinery Directive 2006/42/EC through the following standards: EN 60335-1: 2014
+ A11:2014
EN 60335-2-42: 2003 + A1: 2008 + A11:2012
EN62233: 2008
EN 60335-2-102:2006 + A1:2010
comply with the Electromagnetic Compatibility Directive 2014/30/EC through the following standards: EN 55014-1: 2006 +
A1: 2009 + A2: 2011
EN 55014-2: 1997 + A1: 2001 + A2: 2008
EN 61000-3-2: 2006 + A1: 2009 + A2: 2009
EN 61000-3-3: 2008
EN 61000-3-11: 2000
EN 61000-3-12: 2011
EN 61000-6-2: 2005
EN 61000-6-3: 2007
WARRANTY
Cadco, Ltd. warrants all products (in the United States and Canada) to be free from defects in material and workmanship for a
period of one year from date of purchase, unless otherwise noted below.***
Warranty does not apply in cases of misuse, abuse or damage from external service or repair attempts by unauthorized personnel.
Copy of original invoice is required for proof of purchase date for warranty coverage.
ALL WARRANTY / SERVICE ISSUES MUST BE AUTHORIZED FIRST! PLEASE CALL TOLL-FREE (877) 603-
7393.
WARRANTY PERIODS:
XAFT BAKERLUX DIGITAL CONVECTION OVENS:
Two Year Limited Warranty (One year On-site service & parts, 2nd year parts only)***
***ALL OVENS:
• 90 day warranty on all light bulbs and gaskets. NOTE: These items are easily changeable on-site by
user and do not qualify for service center warranty assistance. Call Cadco directly for warranty
replacement of these items.
• NOTE: Using a Cadco oven without a gasket or with one in disrepair may cause the hinges to
seize, as well as limit the oven’s ability to maintain the proper temperature. Doing so will void the
warranty on the hinges. Please inspect and clean the door gaskets daily.
• 30 day warranty on glass.
• ALL CONVECTION OVEN MOTORS ARE BACKED BY A ONE YEAR WARRANTY
WARRANTY PROCEDURE: Please do not take your unit to the store where you purchased it for warranty
repair. For the Cadco authorized US service agent nearest you, please contact:
Cadco, Ltd., 200 International Way, Winsted, CT 06098
Tel. (860) 738-2500, Fax (860) 738-9772 E-mail: info@cadco-ltd.com, Web site: www.cadco-ltd.com
8/14/2018 RV02
-
 1
1
-
 2
2
-
 3
3
-
 4
4
-
 5
5
-
 6
6
-
 7
7
-
 8
8
-
 9
9
-
 10
10
-
 11
11
-
 12
12
-
 13
13
-
 14
14
-
 15
15
-
 16
16
-
 17
17
-
 18
18


