Page is loading ...

Installation Requirements
Tools and Parts
Gather these required tools and parts before starting installation.
Read and follow the instructions provided with any tools listed
here.
Location Requirements
Parts Supplied
Gas pressure
regulator/hose assembly
set for 11” WCP LP gas
Side shelf, left
Side burner assembly
“AA” Battery (1)
Tools needed
Phillip screwdriver
Wrench or pliers
Pipe wrench
Scissors or cutting pliers (to
remove tie-downs)
Noncorrosive leak-detection
solution
Parts Needed
Warming rack
Cooking grids with hole
Main burner grease tray
Sear burner grease tray
Flame tamers
Natural gas orifice for sear
burner, side burner and rear
burner
Parts Needed
20 lb LP gas fuel tank-approximately 18” (45.7cm) height.
Parts Needed for Conversion to Natural Gas
Natural gas conversion kit Part Number 710-0003. See
“Assistance” section to order. The conversion kit includes:
• Natural gas regulator 4" W.C. (marked “Natural Gas
Regulator”)
• 10 ft (3.0 m) Natural gas hose with quick connector
• 5.9" (150 mm) Natural gas regulator hose
• 6 mm nut driver
• 6 mm wrench
• Hex key
Gas line shutoff valve
1/2" male pipe thread nipple for connection to pressure regulator.
LP gas-resistant pipe-joint compound
CSA design-certified outdoor flexible stainless steel appliance
connector (4-5 ft [1.2-1.5 m]) or rigid gas supply line as needed.
Select a location that provides minimum exposure to wind
and traffic paths. The location should be away from strong
draft areas.
Do not obstruct flow of combustion and ventilation air.
Clearance to combustible construction for grill:
A minimum of 24” (61 cm) must be maintained between
the front of the grill hood, sides and back of the grill
and any combustible construction.
A 24” (61 cm) minimum clearance must also be
maintained below the cooking surface, and the grill
shall not be used under overhead combustible
construction.
5

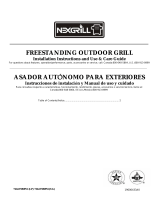
Product Dimension
A. Model/Serial number plate
A
Electrical Requirements
Unplug from the outlet when not in use and before cleaning.
Allow to cool before attaching or taking off parts.
Do not operate any outdoor cooking gas appliance with a
damaged cord, damaged plug, or after the appliance
malfunctions or has been damaged in any manner. Contact the
manufacturer for repair.
Do not let the cord hang over the edge of a table or touch hot
surfaces.
Do not use an outdoor cooking appliance for purposes other
than intended.
When connecting, first connect plug to the outdoor cooking gas
appliance then plug appliance into the outlet.
Use only a Ground Fault Interrupter (GFI) protected circuit with
this outdoor cooking gas appliance.
Do not remove the ground prong or use with an adapter of 2
prongs.
Use extension cords with a 3 prong grounding plug rated for
the power of the equipment and approved for outdoor use with
a W-A marking.
The model/serial number rating plate is located on the inside of the
left cabinet door. See the following illustration.
2
5
3
/
5
"
(
6
5
C
M
)
4
8
4
/
5
"
(
1
2
4
C
M
)
1
2
3
/
5
"
(
3
2
C
M
)
4
6
"
(
1
1
7
C
M
)
7
0
3
/
1
0
"
(
1
7
8
.
5
C
M
)
Electrical Requirements
If codes permit and a separate ground wire is used, it is
recommended that a qualified electrician determine that the
ground path is adequate.
Check with a qualified electrician if you are not sure whether the
grill is properly grounded.
A 120-volt, 60-Hz, AC-only, 15-amp, fused electrical supply is
required.
It is recommended that a separate circuit servicing only this grill
be provided.
To avoid electrical shock, do not immerse cord or plugs in
water or other liquid.
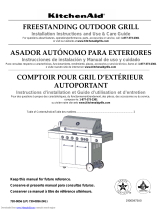
Recommended Ground Method
The outdoor grill, when installed, must be electrically grounded
in accordance with local codes or, in the absence of local
codes with the National Electrical Code ANSI/NFPA 70, or
Canadian Electrical Code, CSA C22.1.
Copies of the standards listed above may be obtained from:
CSA International
8501 East Pleasant Valley Rd.
Cleveland, Ohio 44131-5575
National Fire Protection Association
One Batterymarch Park
Quincy, Massachusetts 02269
A. 3-prong ground plug
B. 3-prong polarized type outdoor GFI outlet
C. Ground prong
6

Gas Supply Requirements
Observe all governing codes and ordinances.
IMPORTANT: This installation must conform with all local codes
and ordinances. In the absence of local codes, installation must
conform with either the National Fuel Gas Code, ANSI
Z223.1/NFPA54, Natural Gas and Propane Installation Code,
CSA B149.1, Propane Storage And Handling Code, B149
.2, or
CSA B149.1, Propane Storage And Handling Code, B149.2, or
the Standard for Recreational Vehicles, ANSI A119.2/NFPA
1192 and CSA Z240 RV Series Recreational Vehicle Code as
applicable.
IMPORTANT: Grill must be connected to a regulated gas supply.
Refer to the model/serial rating plate for information on the type
of gas that can be used. If this information does not agree with
the type of gas available, check with your local gas supplier.
Gas Conversion:
No attempt shall be made to convert the grill from the gas
specified on the model/serial rating plate for use with a different
gas type without consulting the serving gas supplier. The
conversion kit supplied with grill must be used. See “Gas
Conversions” section for instructions.
Gas Pressure Regulator
The gas pressure regulator supplied with this grill must be used.
The inlet (supply) pressure to the regulator should be as follows
for proper operation:
LP Gas:
Operating pressure: 11" (27.9 cm) WCP
Inlet (supply) pressure: 11" to 14" (27.9 cm to 35.5 cm) WCP
Natural Gas:
Operating pressure: 4" (10.2 cm) WCP
Inlet (supply) pressure: 7" to 14" (17.8 cm to 35.5 cm) WCP
maximum.
Contact local gas supplier if you are not sure about the inlet
(supply) pressure.
7

20 lb LP Gas Fuel Tank
This grill is equipped for use with a 20 lb LP gas fuel tank (fuel
tank not supplied). A gas pressure regulator/hose assembly is
supplied.
Any brand of 20 lb LP gas fuel tank is acceptable f
or use with the
Burner Requirements for High Altitude
Input ratings shown on the model/serial rating plate are for
elevations up to 2,000 ft (609.6 m).
For elevations above 2,000 ft (609.6 m), ratings are reduced at a
rate of 4% for each 1,000 ft (304.8 m) above sea level. Orifice
conversion is required. See “Assistance” section to order.
Gas Supply Line Pressure Testing
Testing above 1/2 psi (3.5 kPa) or 14" (35.5 cm) WCP (gauge):
The grill and its individual shutoff valve must be disconnected
from the gas supply piping system during any pressure testing of
that system at test pressures greater than 1/2 psi (3.5 kPa).
Testing below 1/2 psi (3.5 kPa) or 14" (35.5 cm) WCP (gauge)
or lower:
The grill must be isolated from the gas supply piping system by
closing its individual manual shutoff valve during any pressure
testing of the gas supply piping system at test pressures equal to
or less than 1/2 psi (3.5 kPa).
3. Place the 20 lb LP gas fuel tank bottom collar into the
mounting hole in the tank tray.
4. Tighten the locking screw against the bottom collar of the
Natural Gas Conversion 20 lb LP gas fuel tank to secure.
5. Slide the drawer with the 20 lb LP gas fuel tank back into
the cabinet. Turn the tank tray locking bracket clockwise 90˚
to tighten.
A
A. Tank tray locking bracket
Gas Connection Requirements
A. Locking screw
B. Mounting hole
C. Bottom collar
A
C
B
Any brand of 20 lb LP gas fuel tank is acceptable for use with the
grill, provided that it is compatible with the grill’s retention means
(tank tray included).
It is also design-certified by CSA International for local LP gas
supply or for Natural gas with appropriate conversion.
The 20 lb LP gas fuel tank must be mounted and secured.
Door style Tank Tray
1. Open cabinet doors.
2. Slide the tank tray locking bracket counterclockwise
90˚ and pull out the tray.
A. Gas pressure regulator/hose assembly
A
A. Tank tray locking bracket
A
Natural Gas Conversion
The qualified Natural gas technician shall provide the Natural
gas supply to the selected grill location in accordance with the
National Fuel Gas Code ANSI Z223.1/NFPA 54 - latest edition,
and local codes. For conversion to Natural gas, the Natural Gas
Conversion Kit supplied with the grill (on some models) or the
Natural Gas Conversion Kit Part Number 710-0003 must be
used. See “Assistance” section for information on ordering.
IMPORTANT: The gas installation must conform with local
codes, or in the absence of local codes, with the National Fuel
Gas Code, ANSI Z223.1/NFPA 54 - latest edition.
Follow instructions for converting to Natural gas in the “Gas
Conversions” section of this manual or the instructions supplied
with Natural Gas Conversion Kit Part Number 710-0003.
The gas supply line shall be equipped with an approved shutoff
valve. This valve should be located in the same area as the grill
and should be in a location that allows ease of opening and
closing. Do not block access to the shutoff valve. The valve is
for turning on or shutting off gas to the grill.
A. Gas supply line
B. Shutoff valve “open” position
C. To grill
8
/