1) APAGUE LA ALIMENTACIÓN DE ENERGÍA ELÉCTRICA.
IMPORTANTE: antes de comenzar, NUNCA trate de trabajar
sin antes desconectar la corriente hasta que el trabajo se
termine.
a) Vaya a la caja principal de fusibles o interruptor
automático de su casa. Coloque el interruptor de la
corriente principal en posición de apagado “OFF”.
b) Desenrosque los fusibles o lleve a la posición de
apagado “OFF” los interruptores automáticos que
controlan la corriente del artefacto o de la habitación
donde usted se encuentra.
c) Coloque el interruptor de pared en posición de apagado
“OFF”. Si el artefacto que se va a reemplazar tiene un
interruptor o cadena que se jala, colóquelos en la
posición de apagado “OFF.
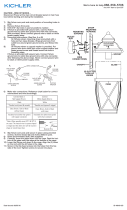
2) Encuentre los agujeros roscados apropiados en la
abrazadera de montaje que se alinean con la distancia del
agujero en el escudete. Enrosque los tornillos de montaje en
los agujeros roscados empezando del lado de la caja de
salida.
3) Fije la abrazadera de montaje a la caja de salida con los
tornillos de montaje de la abrazadera. La abrazadera de
montaje puede ajustarse para acomodar la posición del
artefacto.
4) Instrucciones de conexión a tierra (vea la ilustracion A o B):
A) En artefactos donde se suministra la abrazadera de
montaje con un agujero y dos depresiones onduladas.
Envuelva el conductor de tierra de la caja de salida
alrededor del tornillo de conexión a tierra verde y
atornille en el agujero.
B) En artefactos donde se suministra una arandela
cóncava. Fije el conductor de tierra de la caja de salida
debajo de la arandela cóncava y el tornillo de conexión
a tierra verde y enrosque en la abrazadera de montaje.
Si se suministra el artefacto con conductor de tierra, conecte el
conductor de tierra del artefacto al conductor de tierra de la caja
de salida con conector de tierra después de seguir los pasos
anteriores. Nunca conecte el conductor de tierra a los alambres
de alimentación eléctrica negros o blancos.
5) Haga las conexiones de cables. Consulte la gráfica de abajo
con las conexiones correctas y haga el cableado que
corresponde.
Fecha de publicación: 29 de junio de 2017 IS-49686-US
ARANDELA
CONCAVA
TIERRA DE LA
CAJA DE SALIDA
TORNILLO DE TIERRA,
VERDE
DEPRESIONES
TIERRA
ARTEFACTO
CONECTOR DE ALAMBRE
TIERRA DE LA
CAJA DE SALIDA
TORNILLO DE TIERRA,
VERDE
TIERRA
ARTEFACTO
SEE OTHER SIDE FOR ENGLISH TRANSLATIONS.
VERSIÓN EN INGLÉS EN EL REVERSO.
We’re here to help 866-558-5706
Hrs: M-F 9am to 5pm EST
6) Empuje el artefacto al techo, pasando cuidadosamente los
tornillos de montaje a través de los agujeros en el escudete.
Asegúrese de que todos los cables estén dentro del
escudete y que no se pellizquen entre el escudete y el
techo.
7) Enrosque las perillas de sujeción en los tornillos de montaje
y apriete para asegurar el artefacto a la pared.
8) Inserte la bombilla recomendada (no se incluye).
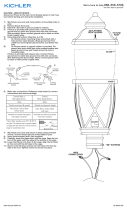
9) Suba la jaula hasta el artefacto. Encaje el borde superior de
la jaula dentro del techo del artefacto.
10) Desde abajo del borde de la jaula, enrosque los tornillos a
través de los agujeros en el borde de la jaula en los agujeros
en el techo. Apriete los tornillos para asegurar la jaula en su
lugar.
NOTA: El cristal viene con una junta de vinilo en la parte
superior e inferior y necesita permanecer en su lugar para
evitar que el vidrio de chirrido. NO retire las juntas de vinilo del
vidrio.
INSTRUCCIONES PARA MONTAR EL ARTEFACTO AFUERA
O EN LUGARES HÚMEDOS
11) La superficie de montaje deberá estar limpia, seca, plana y
ser ¼ de pulgada más grande que el escudete en todos los
lados. Cualquier espacio libre entre la superficie de montaje
y el escudete que exceda 3/16 de pulgada deberá ser
corregido según sea requerido.
12) Con masilla de silicona, calafatee completamente alrededor
donde la parte de atrás del escudete se junta con la
superficie de la pared para evitar que el agua se filtre en la
caja de salida.
Conectar el alambre de
suministro negro o rojo al
Conectar el alambre de
suministro blanco al
Negro Blanco
*Cordon paralelo (redondo y liso)
*Cordon paralelo (cuadrado y estriado)
Claro, marrón, amarillio o negro
sin hebra identificadora
Claro, marrón, amarillio o negro
con hebra identificadora
Alambre aislado (diferente del verde)
con conductor de cobre
Alambre aislado (diferente del
verde) con conductor de plata
*Nota: Cuando se utiliza alambre paralelo
(SPT I y SPT II). El alambre neutro es de forma
cuadrada o estriada y el otro alambre será de
forma redonda o lisa. (Vea la ilustracíón).
Hilo Neutral
Canopy/Escudete
Fixture roof
Techo del
artefacto
Socket
Portalámparas
Lock-up knobs
Perillas de sujeción
Mounting screws
Tornillos de montaje
Outlet box
Caja de salida
Bulb (not
included)
Bombilla (no se
incluye)
Mounting strap
Abrazadera de montaje
Strap mounting
screws
Tornillos de montaje
de la abrazadera
Wire
connectors
Conectores
de cable
Screws
Tornillos
Cage
Jaula


