Kichler 49743WZCL18 Installation guide

Type
Installation guide

Kichler 49743WZCL18 is a versatile lighting fixture suitable for both indoor and outdoor use, offering various features for customized lighting solutions. It allows for easy installation with a mounting strap and includes a canopy to conceal the mounting hardware, providing a clean and seamless appearance. The fixture supports a wide range of bulbs, including recommended bulbs, and features a glass shade to evenly distribute light. Additionally, it has a bottom trim with a foam pad to ensure a secure fit and prevent rattling.

Kichler 49743WZCL18 is a versatile lighting fixture suitable for both indoor and outdoor use, offering various features for customized lighting solutions. It allows for easy installation with a mounting strap and includes a canopy to conceal the mounting hardware, providing a clean and seamless appearance. The fixture supports a wide range of bulbs, including recommended bulbs, and features a glass shade to evenly distribute light. Additionally, it has a bottom trim with a foam pad to ensure a secure fit and prevent rattling.

CAUTION – RISK OF SHOCK – Disconnect power at the main
circuit breaker panel or main fuse box before starting and
during the installation.
1) Attach mounting strap to outlet box. NOTE: The mounting
strap should be positioned so the tab with holes in it is
positioned on the side of the mounting strap.
2) Grounding instructions: (See Illus. A or B).
A) Onxtureswheremountingstrapisprovidedwith
a hole and two raised dimples: wrap ground wire from
outlet box around green ground screw, and thread
into hole.
B) Onxtureswhereacuppedwasherisprovided:
attach ground wire from outlet box under cupped
washer and green ground screw, and thread into
mounting strap.
Ifxtureisprovidedwithgroundwire:connectxture 
ground wire to outlet box ground wire with wire connector.
DO NOT connect ground wire to black or white power
supply wires.
3) Make wire connections. Reference chart below for correct
connections and wire accordingly.
4) Pushxturetowall.Placecanopyofxtureovertabson
mounting bracket. NOTE: Be certain wires do not get
pinched between canopy and mounting strap.
5) Align holes in sides of canopy with holes in side tabs of
mounting strap. Thread screws into hole in sides of canopy.
 Tightenscrewstosecurextureinplace.
6) Insert recommended bulb. (Not included)
7) Raiseglassuptoxture.Carefullytglassinsidecage.
 Passholeintopofglassoverbulbandsocketinsidecage.
8) Raisebottomtrimupwithfoampadtoxturewithlipoftrim
facing up. Place trim up against bottom of glass with foam
pad resting between trim and glass.
9) Thread one screw into each hole along trim and into holes in
bottom of cage. Tighten screws to secure ring in place.
INSTRUCTIONS FOR MOUNTING FIXTURE OUTDOORS AND/
OR IN WET LOCATIONS.
10)Mountingsurfaceshouldbeclean,dry,atand1/4"larger
than the canopy on all sides. Any gaps between the
 mountingsurfaceandcanopyexceeding3/16"shouldbe
corrected as required.
11) With silicone caulking compound, caulk completely around
 wherebackofcanopymeetsthewallsurfacetoprevent
water from seeping into outlet box.
IS-49743-US
Were here to help 866-558-5706
Hrs: M-F 9am to 5pm EST
GREEN GROUND
SCREW
CUPPED
WASHER
OUTLET BOX
GROUND
FIXTURE
GROUND
DIMPLES
WIRE CONNECTOR
OUTLET BOX
GROUND
GREEN GROUND
SCREW
FIXTURE
GROUND
AB
Connect Black or
Red Supply Wire to:
Connect
White Supply Wire to:
Black White
*Parallel cord (round & smooth) *Parallel cord (square & ridged)
Clear, Brown, Gold or Black
without tracer
Clear, Brown, Gold or Black
with tracer
Insulated wire (other than green)
with copper conductor
Insulated wire (other than green)
with silver conductor
*Note: When parallel wires (SPT I & SPT II)
are used: the neutral wire is square shaped
or ridged and the other wire will be round in
shape or smooth. (See illus.) Neutral Wire
MOUNTING
SCREWS
GLASS
STRAP
MOUNTING
SCREWS
MOUNTING STRAP
WIRENUTS
BOT TOM TRIM
CANOPY
SCREWS
CAGE
DateIssued:5/18/16
PRECAUCIÓN – RIESGO DE DESCARGA ELÉCTRICA –
Desconecte la electricidad en el panel principal del interruptor
automático o caja principal de fusibles antes de comenzar y
durante la instalación.
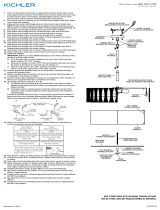
1) Fije la abrazadera de montaje a la caja de salida. NOTA: se debe
colocar la abrazadera de montaje de manera que las lengüetas
con los agujeros en ella estén colocadas del lado de la abrazadera.
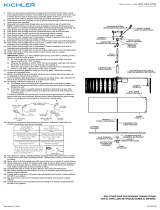
2) Instrucciones para poner a tierra: (Ver Ilustraciones A o B).
A) En artefactos donde se suministra la abrazadera de montaje
con un agujero y dos depresiones onduladas, envuelva el
conductor de tierra de la caja de salida alrededor del tornillo
de conexión a tierra verde y atorníllelo en el agujero.
B) En los artefactos provistos de arandela cóncava, pase el
conductor de tierra desde la caja de salida entre la
arandela cóncava y el tornillo de conexión a tierra verde, y
atorníllelo en la abrazadera de montaje.
Si se suministra el artefacto con conductor de tierra, conecte el
conductor de tierra del artefacto al conductor de tierra de la caja de
salida con conector de cable después de seguir los pasos
anteriores. NUNCA conecte el conductor de tierra a los cables de
alimentación eléctrica negros o blancos.
3) Haga las conexiones de cables. Consulte la gráca de abajo
con las conexiones correctas y haga el cableado.
4) Empuje el artefacto a la pared. Coloque el escudete del
artefacto sobre las lenguetas en la abrazadera de montaje.
NOTA: Asegúrese de que los cables no queden apretados entre
el escudete y la abrazadera de montaje.
5) Alinee los agujeros en los lados del escudete con los agujeros
en los lados de las lengüetas de la abrazadera de montaje.
Atornille los tornillos en los agujeros en los lados del escudete.
Apriete los tornillos para asegurar el artefacto en su lugar.
6) Inserte la bombilla recomendada. (No se incluye)
7) Suba el vidrio hasta el artefacto. Encaje cuidadosamente el
vidrio dentro de la jaula. Pase el agujero en la parte superior
del vidrio sobre la bombilla y el portalámparas dentro de la jaula.
8) Suba el adorno inferior con la almohadilla de espuma al
artefacto, con el reborde del artefacto hacia arriba. Coloque
el adorno contra la parte inferior del vidrio, con la almohadilla
de espuma entre el adorno y el vidrio.
9) Atornille un tornillo en cada agujero del adorno y en los agujeros
en el fondo de la jaula. Apriete los tornillos para asegurar el
anillo en su lugar.
INSTRUCCIONES PARA MONTAR EL ARTEFACTO AFUERA Y/O EN
LUGARES HÚMEDOS.
10) La supercie de montaje deberá estar limpia, seca, plana y ser
1/4 pulgadas mayor que la del escudete. Si es necesario,
cubra los espacios libres entre la supercie de montaje y el
escudete que excedan de 3/16 pulgadas.
11) Calafatee completamente con masilla de silicona alrededor de la
cara posterior del escudete que entra en contacto con la pared
para evitar el ltrado de agua en la caja de salida.
Date Issued: 5/18/16 IS-49743-US
Were here to help 866-558-5706
Hrs: M-F 9am to 5pm EST
ARANDELA
CONCAVA
TIERRA DE LA
CAJA DE SALIDA
TORNILLO DE TIERRA
VERDE
DEPRESIONES
TIERRA
ARTEFACTO
CONECTOR DE ALAMBRE
TIERRA DE LA
CAJA DE SALIDA
TORNILLO DE TIERRA
VERDE
TIERRA
ARTEFACTO
AB
Conectar el alambre de
suministro negro o rojo al
Conectar el alambre de
suministro blanco al
NegroBlanco
*Cordon paralelo (redondo y liso) *Cordon paralelo (cuadrado y estriado)
Claro, marrón, amarillio o negro
sin hebra identificadora
Claro, marrón, amarillio o negro
con hebra identificadora
Alambre aislado (diferente del verde)
con conductor de cobre
Alambre aislado (diferente del
verde) con conductor de plata
*Nota: Cuando se utiliza alambre paralelo
(SPT I y SPT II): El alambre neutro es de forma
cuadrada o estriada y el otro alambre será de
forma redonda o lisa. (Vea la ilustracíón) Hilo Neutral
TORNILLOS
DE
MONTAJE
VIDRIO
TORNILLO
DE MONTAJE
DE LA
ABRAZADERA
ABRAZADERA DE
MONTAJE
TUERCAS DE
MARIPOSA
MOLDURA DE
FONDO
ESCUDETE
TORNILLOS
JAULA
  • Page 1 1
  • Page 2 2

Kichler 49743WZCL18 Installation guide

Type
Installation guide

Kichler 49743WZCL18 is a versatile lighting fixture suitable for both indoor and outdoor use, offering various features for customized lighting solutions. It allows for easy installation with a mounting strap and includes a canopy to conceal the mounting hardware, providing a clean and seamless appearance. The fixture supports a wide range of bulbs, including recommended bulbs, and features a glass shade to evenly distribute light. Additionally, it has a bottom trim with a foam pad to ensure a secure fit and prevent rattling.

Ask a question and I''ll find the answer in the document

Finding information in a document is now easier with AI

in other languages