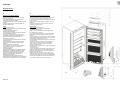
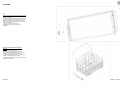
V-ZUG 923 is a high-end refrigerator with innovative features designed to keep your food fresher for longer. With its precise temperature control and advanced air circulation system, it ensures optimal storage conditions for all your perishable items. The V-ZUG 923 also features a spacious interior with adjustable shelves and compartments, providing flexible storage options to meet your needs.
V-ZUG 923 is a high-end refrigerator with innovative features designed to keep your food fresher for longer. With its precise temperature control and advanced air circulation system, it ensures optimal storage conditions for all your perishable items. The V-ZUG 923 also features a spacious interior with adjustable shelves and compartments, providing flexible storage options to meet your needs.


-
 1
1
-
 2
2
-
 3
3
-
 4
4
-
 5
5
-
 6
6
-
 7
7
-
 8
8


V-ZUG 923 Installation guide
- Type
- Installation guide
V-ZUG 923 is a high-end refrigerator with innovative features designed to keep your food fresher for longer. With its precise temperature control and advanced air circulation system, it ensures optimal storage conditions for all your perishable items. The V-ZUG 923 also features a spacious interior with adjustable shelves and compartments, providing flexible storage options to meet your needs.
Ask a question and I''ll find the answer in the document
Finding information in a document is now easier with AI
in other languages
- français: V-ZUG 923 Guide d'installation
- Deutsch: V-ZUG 923 Installationsanleitung
- русский: V-ZUG 923 Инструкция по установке
- Nederlands: V-ZUG 923 Installatie gids
- svenska: V-ZUG 923 Installationsguide