Page is loading ...

1. Parts Checklist
1 Allen Key
10 Screw Bolts (50mm)
1 Bottom
1 Top
8 Knobs and small bolts
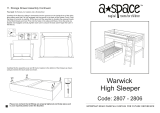
3. Attach the bun feet
You need:
4 x foot
bolts,
Allen
Key
9. The drawers - 2
(Outer Holes)
2. Attach bottom to sides
1 Left Side 1 Right Side
2 Back
Panels
1 Joining
Strip
You need:
6 screw bolts,
allen key.
IMPORTANT:-
Please Take a few moments
to lay the parts out on a
smooth surface and check
that you have all those
listed in the Parts checklist.
Please do not dispose of
any packaging until you
are sure that you have
everything.
4. Insert the back
Groove to
the back
joining strip
panel
panel
5. Prepare the top and sides
screw 6 cam
pins into the
smaller holes
arrow
6. Attach the top
Gently lower the top onto the sides,
ensuring that all pins and dowels engage
in their correct holes. The upper back
panel must also enter the groove in the
rear of the top. Using a screwdriver,
tighten the cams by giving a turn clockwise
insert the 6
cams into the
large holes near the
top of the inside faces
of the 2 sides. Notice the
arrow on the outer surface of
each cam. These must point towards
the side’s upper edge (as shown).
You need:
2 screw bolts,
allen key.
6 Cam pins6 Cam pins
6 Cams
4 Foot bolts (50mm)
4 Dowels
Insert 4 dowels
into the “blind” holes
7. Attach the upstand
4 drawer fronts
4 left sides
4 right sides
4 backs
4 bottoms
16 cam pins
16 cams
FOR THE DRAWERS
Screw in the cam pins
(4 on each drawer front)
cam (note
that the ‘arrow’
ended slot must
point to the front
of the drawer side).
front
Insert 2 cams in each drawer side
10. The drawers - 3
Attach the
drawer sides.
(groove in
front and
side must
align).
Tighten
cams by
turning
clockwise.
cam
Slide in the
drawer bottom
11. The drawers - 4
8. The drawers - 1
You will need a “Phillips” screwdriver
A
step 1
step 2
step 3
C
2x screw
bolts
2 Upstand Sides (left & right)
1 Upstand
back
8 Screw Bolts
4 Collared screws
B
4x Collared
screws

12. The drawers - 5
Attach the drawer back
using 2 screw bolts. Ensure
the drawer bottom locates in
the groove, and the dowels
fit in the holes in the sides.
IMPORTANT. RETAIN FOR
FUTURE REFERENCE -
READ CAREFULLY
Belgravia Dresser Chest
User Guide
Your Child's Safety Is Your Responsibility
If you have a problem with this product or require replacement parts, please telephone the
Mothercare Customer Care Line on
08453 30 40 30
Alternatively write to:
Mothercare Customer Care, Cherry Tree Road, Watford, Herts. WD24 6SH
Made in England
Periodically check all fittings to ensure that none have come loose. All assembly fittings should
always be tightened properly. Care should be taken that no screws are loose, because the child
could trap parts of the body or clothing which would pose a risk of strangulation.
The chest must be set up on an even and stable surface.
Clean the chest by wiping with a damp cloth & drying with a soft cloth.
Never clean with abrasives, chemical cleaners or household polishes.
Keep away from direct sources of heat, such as electric, gas or coal fires.
Take care when handling or moving the wardrobe. Careless handling can damage wooden
furniture. Try to lift rather than drag.
Using this furniture other than for its intended purpose could cause damage to the structure or
serious injury to your child.
A Mothercare changing mat is recommended for use with dresser chest, with maximum
dimensions of 75cm x 46cm (29½ x 18 in.)
- NEVER LEAVE A CHILD UNATTENDED ON THE CHANGER SURFACE
15. Care & Safety
14. Insert the drawers
Hook the 2 wheels
on each side of
the back of the drawer
over the wheels of
the runners attached
to the carcase sides.
Check that the drawer
closes and opens
again smoothly.
13. Attach the knobs
Do Not Overtighten
You need:
The short bolts
/