Page is loading ...

For English Version Version française Versión en español
See page 2 Voir page 12 Ver la página 12
Operating/Safety Instructions
Consignes de fonctionnement/sécurité
Instrucciones de funcionamiento y seguridad
IMPORTANT: IMPORTANT : IMPORTANTE:
Read Before Using Lire avant usage Leer antes de usar
1-877-SKIL999 (1-877-754-5999) www.skil.com
Call Toll Free for
Consumer Information
& Service Locations
Pour obtenir des informations et
les adresses de nos centres de
service après-vente,
appelez ce numéro gratuit
Llame gratis para
obtener información
para el consumidor y
ubicaciones de servicio
3100

2.
General Safety Rules
“
READ ALL INSTRUCTIONS” Failure to follow the safety rules listed below and other basic safety precautions
may result in serious personal injury.
THINK SAFETY Safety is a combination of operator common sense and alertness at all times when the X-Bench is being used.
Work Area
KEEP CHILDREN AWAY
Do not let visitors contact tool or extension cord. All visitors
s
hould be kept away from work area.
KEEP WORK AREAS CLEAN
Cluttered areas and benches invite accidents.
MAKE WORKSHOP CHILD-PROOF
With padlocks, master switches.
AVOID DANGEROUS ENVIRONMENTS
Don’t use power tools in damp or wet locations. Keep work
area well lit. Do not expose power tools to rain. Do not use
tool in presence of flammable liquids or gases.
Personal Safety
KNOW YOUR POWER TOOL
Read and understand the owner’s manual and labels affixed
to the tool. Learn its application and limitations as well as the
specific potential hazards peculiar to this tool.
DON’T OVERREACH
Keep proper footing and balance at all times.
STAY ALERT
Watch what you are doing. Use common sense. Do not op-
erate tool when you are tired. Do not operate while under
medication or while using alcohol or other drug.
DRESS PROPERLY
To avoid being pulled into a blade, do not wear loose
clothing, loose fitting gloves, necktie or jewelry. Tie back long
hair or wear protective hair covering and roll long sleeves
above the elbow. Rubber gloves and non-skid footwear are
recommended when working outdoors.
USE SAFETY GOGGLES
Use safety goggles (head protection). Wear safety goggles
(must comply with ANSI Standard Z87.1) at all times. Wear
non-slip footwear and a hard hat, if appropriate. Also, use
face or dust mask if cutting operation is dusty, and ear
protectors (plugs or muffs) during extended periods of
operation.
GUARD AGAINST ELECTRIC SHOCK
Prevent body contact with grounded surfaces. For example:
pipes, radiators, ranges, refrigerator enclosures.
DISCONNECT TOOL FROM POWER SOURCE
When not in use, before servicing, when changing blades,
bits, cutters, etc.
KEEP GUARDS IN PLACE
In working order, and in proper adjustment and alignment.
REMOVE ADJUSTING KEYS AND WRENCHES
When not in use, before servicing, when changing blades,
bits, cutters, etc.
AVOID ACCIDENTAL STARTING
Make sure the switch is in the “OFF” (“O”) position before
plugging in tool.
NEVER STAND ON TOOL OR ITS STAND
Serious injury could occur if the tool is tipped or if the cutting
tool is accidentally contacted. Do not store materials on or
near the tool such that it is necessary to stand on the tool or
its stand to reach them.
CHECK DAMAGED PARTS
Before further use of the tool, a guard or other part that is
damaged should be carefully checked to ensure that it will
operate properly and perform its intended function. Check for
alignment of moving parts, mounting and any other condi-
tions that may affect its operation. A guard or other part that
is damaged should be properly replaced.
ALL REPAIRS, ELECTRICAL OR MECHANICAL,
SHOULD BE ATTEMPTED ONLY BY TRAINED
REPAIRMEN.
Contact the nearest Skil Factory Service Center, Authorized
Service Station or other competent repair service.
USE ONLY SKIL REPLACEMENT PARTS;
Any others may create a hazard.
THE USE OF ANY OTHER ACCESSORIES NOT SPECI-
FIED IN THE CURRENT SKIL CATALOG MAY CREATE A
HAZARD.
Tool Use
DON’T FORCE TOOL
It will do the job better and safer at the rate for which it was
designed.
USE THE RIGHT TOOL
Don’t force small tool or attachment to do the job of a heavy-
duty tool. Don’t use tool for purpose not intended — for ex-
ample; don’t use circular saw for cutting tree limbs or logs.
SECURE WORK
Use clamps or a vise to hold work. It’s safer than using your
hand and it frees both hands to operate the tool.
DIRECTION OF FEED
Feed work into a blade or cutter against the direction of
rotation of the blade or cutter only.
NEVER LEAVE TOOL RUNNING UNATTENDED
Turn power off. Don’t leave tool until it comes to a complete
stop. Be aware of the location and setting of the switch “ON"
position. Never leave the switch in the “ON” position. Be
aware of switch location and know how to shut off the tool in
emergency situations. Accidental start-ups could cause
injury.
DON’T ABUSE THE CORD
Never use the cord to carry the tools or pull the plug from an
outlet. Keep cord away from heat, oil, sharp edges or moving
parts. Replace damaged cords immediately. Damaged cords
increase the risk of electric shock.
Tool Care
DO NOT ALTER OR MISUSE TOOL
These tools are precision built. Any alteration or modification not
specified is misuse and may result in dangerous conditions.
WARNING
!

3.
Read and understand all instructions for use of X-
Bench and insert plates with tools.
Failure to follow all
instructions listed below may result in serious personal
injury.
Use only with Skil accessory insert plates (jig saw,
drill press, belt sander and router).
The stamped rails or clamps may have sharp edges.
Be careful in handling the bench to prevent being cut.
Fully assemble and tighten all the fasteners required
for this stand.
Also remember to occasionally check the
stand and make sure it is still tight. A loose stand is
unstable and may shift in use and cause serious injury.
Turn tool switch and table switch control off and
disconnect power before mounting tools to the stand.
Unintended startup during assembly can cause injury.
Know how to shut off the power to the tool in an
emergency.
Position yourself such that you can reach
the switch control box while using the cut channel or the
tool attachments.
Before operating make sure the entire unit is placed
on a solid, flat, level surface.
Serious injury could occur
if tool is unstable and tips.
Never stand on table or use as ladder or scaffolding.
Serious injury could occur if the table is tipped or the
cutting tool is accidentally contacted. Do not store
materials on or near the table such that it is necessary to
stand on the table to reach them.
Do not load with more than 250 lbs. This table when
fully set and clamps are tightened is maximum rated to
250 lbs. Table could collapse under additional loads.
Do not use as storage shelf. This table is not intended
to be a storage shelf.
Do not store X-Bench in damp locations. Use only in
dry locations.
Humidity will cause the table top to distort
or the locks to become loose.
Use only Skil replacement parts. Any others may create
a hazard.
Don’t use with work pieces that cannot be properly
secured to the X-Bench, or that covers the table so
you cannot access accessory control box switch.
Oversized work pieces may cause instability while cutting
and you may not be able to shut off the power in an
emergency.
Insure wood/workpiece is properly positioned before
cutting. Incorrectly positioned workpiece may cause you to
inadvertently cut into the X-Bench top, clamps or frame.
Specific Safety Instructions for X-Bench
AVOID GASEOUS AREAS
D
o not operate electric tools in gaseous or explosive atmo-
s
pheres. Motors in these tools normally spark, and may re-
sult in a dangerous condition.
MAINTAIN TOOLS WITH CARE
Keep tools sharp and clean for better and safer performance.
F
ollow instructions for lubricating and changing accessories.
Inspect tool cords periodically and if damaged, have repaired
by authorized service facility. Inspect extension cords
periodically and replace if damaged. Keep handles dry, clean
and free from oil and grease.
CONNECTING THE TOOL
Before connecting the tool to a power source (receptacle,
outlet, etc.), be sure voltage supplied is the same as that
specified on the nameplate of the tool. A power source with
voltage greater than that specified for the tool can result in
serious injury to the user — as well as damage to the tool.
If in doubt, DO NOT PLUG IN THE TOOL. Using a power
source with voltage less than the nameplate rating is harmful
to the motor.
Some dust created by power sanding,
sawing, grinding, drilling, and other
construction activities contains chemicals known to
cause cancer, birth defects or other reproductive harm.
Some examples of these chemicals are:
• Lead from lead-based paints,
• Crystalline silica from bricks and cement and other masonry
products, and
• Arsenic and chromium from chemically treated lumber.
Your risk from these exposures varies, depending on how often
you do this type of work. To reduce your exposure to these
chemicals: work in a well ventilated area, and work with
approved safety equipment, such as those dust masks that are
specially designed to filter out microscopic particles.
This product contains a chemical known to the
S
tate of California to cause cancer.
Read all safety warnings and all
instructions provided with the working
stand and the power tool to be mounted.
Failure to follow
the warnings and instructions may result in electric shock,
f
ire and /or serious injury.
Save all warnings and instructions for future reference.
The term “power tool” in the warnings refers to your mains-
operated (corded) power tool or battery-operated (cordless_)
power tool.
Disconnect the plug from the power source and/or the
battery pack from the power tool before making any
adjustments or changing accessories.
Accidental starting
of the power tool is a cause of some accidents.
Properly assemble the working stand before the
mounting the tool.
Proper assembly is important to prevent
risk of collapse.
Securely fasten the power tool the working stand before
use.
Power tool shifting on the working stand can cause
loss of control.
Place the working stand on a solid, flat and level
surface.
When the working stand can shift or rock, the
power tool or work piece cannot be steadily and safely
controlled.
Do not overload the working stand or use as ladder or
scaffolding.
Overloading or standing on the working stand
cause the stand to be “top-heavy” and likely to tip over.
Use only Skil replacement parts. Any others may create a
hazard.
W
ARNING
!
WARNING
!
W
ARNING
!

Replace damaged cords immediately.
Use of damaged cords can shock, burn
or electrocute.
Always use proper extension cord. If an
extension cord is necessary, a cord
with adequate size conductors should be used to
prevent excessive voltage drop, loss of power or over-
heating. The table shows the correct size to use, de-
pending on cord length and nameplate amperage
rating of tool. If in doubt, use the next heavier gauge.
Always use U.L. and CSA listed extension cords.
NOTE:
The smaller the gauge number, the heavier the cord.
RECOMMENDED SIZES OF EXTENSION CORDS
120 VOLT ALTERNATING CURRENT TOOLS
Double Insulation is a design concept used in electric
power tools which eliminates the need for the three wire
grounded power cord and grounded power supply system. It
is a recognized and approved system by Underwriter’s Lab-
oratories, CSA and Federal OSHA authorities.
IMPORTANT: Servicing of a tool with double insulation
requires care and knowledge of the system and
should be performed only by a qualified service
technician.
WHEN SERVICING, USE ONLY IDENTICAL REPLACE-
MENT PARTS.
POLARIZED PLUGS. If your tool is equipped with a polar-
ized plug (one blade is wider than the other), this plug will fit
in a polarized outlet only one way. If the plug does not fit fully
in the outlet, reverse the plug. If it still does not fit, contact a
qualified electrician to install the proper outlet. To reduce the
risk of electric shock, do not change the plug in any way.
Double Insulated Tools
Extension Cords
“SAVE THESE INSTRUCTIONS!”
Grounded Tools
Grounded tools must be plugged into an outlet properly
installed and grounded in accordance with all codes and
ordinances. Never remove the grounding prong or
modify the plug in any way. Do not use any adaptor
plugs. Check with a qualified electrician if you are in
doubt as to whether the outlet is properly grounded.
If the tools should electrically malfunction or break down,
grounding provides a low resistance path to carry electricity
away from the user. Improper grounding can shock, burn or
electrocute. Grounded tools are equipped with three
conductor cord and three prong type plugs. Before plugging
in the tool be certain the outlet voltage supplied is within the
voltage marked on the nameplate. Do not use “AC only”
rated tools with a DC power supply.
4.
WARNING
!
X-Bench Accessory Control Box
Accessory Control Box
Only use the accessory control box for power tools designed
for use with accessory insert plates and suggested power
tools in this manual.
It is intended to be the mains switch for benchtop
applications if your Skil power tool is used in the insert plate.
I
t is also intended as a convenience outlet for use with your
S
kil Circular Saw and Miter Saw.
Accessory Switch
The accessory control box has an accessory On/Off switch
with lock off key. Be aware of your position while using the X-
Bench for fast emergency shut off power. Remove lock off
key to disable switch when not in use.
WARNING
!
Tool’s
Ampere
Rating
Cord Size in A.W.G.
Wire Sizes in mm
2
3-6
6-8
8-10
10-12
12-16
25 50 100 150 15 30 60 120
18 16 16 14 .75 .75 1.5 2.5
18 16 14 12 .75 1.0 2.5 4.0
18
16
14
12
.75
1.0 2.5 4.0
16 16 14 12 1.0 2.5 4.0 —
14
12
—— ——— —
Cord Length in Feet
Cord Length in Meters

5.
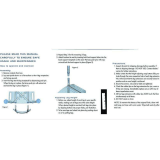
1. Opening the X-Bench
a
.
T
he X-Bench comes in the folded position and no assembly is
r
equired. In order to open the X-Bench, the user must pull and
twist the main knob, located by the handle, to the open position (Fig. 1a).
b. After the table has been opened, the knob must be turned back
into the locked position before extending the legs or placing the
table upright. To lock the table in place, twist the main knob back
into the closed position. Once the main knob is in the closed
position, the user can now safely extend the legs and then place
the table upright.
Table lock must be in the locked position, the
bench may collapse in use if not fully locked.
(Fig. 1b).
2. Extending the Legs
a.
Once the table is opened and the main knob is in the locked
position, the user can now extend the legs of the work station.
While the table is on its side or inverted, extend the legs completely
and make sure the leg braces are straightened and locked. The
pin will lock in place to ensure that the leg brace is fully secured
(Fig. 2).
3. Adjusting Leg Height
a
.
W
ith the table still on its side or inverted, the user can adjust the
t
able height to his/her preference. In order to adjust the table
height the user must:
b. Fully open the leg locking lever. By positioning the lever in the
open position (Fig. 3), it will allow the user to adjust the leg to a
d
esired height marked on the leg. After the leg is positioned at a
desired height, the user must close the lever locking mechanism to
half way and allow the pin to snap into the lock position. You can
visually make sure the pin is depressed correctly and ensure the
leg cannot slide at this point. (Fig. 4).
If the pin is not depressed into the hole, the leg clamp will be very
difficult to close. Damage may occur to the leg clamp if too much
force is applied without the pin being in the correct location.
Each leg lock pin must be fully engaged and
clamped fully closed before use.
Table may
collapse if leg locks are not secure..
Table must be level and stable for use. If the
lever does not close completely or is difficult to
depress, this means the pin is not in the correct location. You
MUST adjust the leg to position the pin into the correct height
marking (Fig. 5). Close the clamp fully with pin in hole before use.
Table must be level and stable for use.
WARNING
!
Fig. 1a
Pins are not
engaged in
hole, unit is
now open.
Fig. 1b
Pins are
engaged in
hole, the
table is now
locked.
Using Your X-Bench Work Station – No Assembly Required
Fig. 2
Pin is shown in the
locked position.
WARNING
!
Fig. 4
Pin is fully
depressed = leg
is locked in
position
Fig. 3
WARNING
!

c. Once the user sets one leg at the desired height, follow the
same steps for the remaining three legs.
4. Adjustable Foot – for Leveling Bench
a.
If you are working in an area that is not level, we have provided
a solution. We have an adjustable foot that will extend 1.75”
inches to level your bench (Fig. 6).
Before operating make sure the entire unit is
placed on a solid, flat, level surface.
Serious
injury could occur if tool is unstable and tips.
5. Opening the Cut Channel
Cut channel must be fully open for sawing.
a
. To open your cut channel there are four latches you need to
open first.
b. Unlock the four latches by pulling them upward and extend the
table outward (Fig. 7).
Do not use the dog holes to pull the table
outward. Once the table is extended, the
latches MUST be locked in order to use the cut channel
correctly.
Failure to lock the latches while the table is in the open
position could cause the table top to move while cutting, which can
result in misaligned cuts or personal injury.
Use only with 7-1/4” or smaller circular saws.
Larger size saws may be able to cut thru brackets.
c
.
T
he cut channel is 2-3/4” deep and can be used with a
m
aximum 7 -1/4” Circular Saw. The cutting channel can be used
for cross cuts or rip cuts. The user must secure the work piece
with the wedge dogs provided or other clamping devices (Fig. 8).
Do not rip parallel to X-Bench dogs,.
6. Wedge Dogs
a.
Dog holes are throughout the table top surface and are meant to
hold work pieces in place while cutting (Fig. 9). Two wedge dogs
come with the X-Bench. These dogs are made specifically for the
X-Bench. Note feed direction while cutting in wedge dog position.
Blank insert plate must be in table top during top applications.
See
reference guide figure 28 for hole pattern identification of
wedge dogs.
7. Miter Saw Mounting
a.
There are three mounting holes that support most miter saw
dimensions (Fig. 10). If you use a miter saw on this table, we
require you mount the miter saw to the X-Bench for safety. Note:
close cut channel for miter saw use.
6
.
Fig. 6
Fig. 5
Pin is not
depressed = leg is
not secured in
locked position
WARNING
!
WARNING
!
10
11
9
8
12
13
14
15
16
17
17
18
21
20
22
23
24
25
26
27 28
29
30
31
32
33
34
35
36
37
38 39 40
41
42
43
44
45
46 47 48
Fig. 7
Latch is now in the
locked position.
Latch is now in the
open position.
Fig. 8
Fig. 9
Fig. 10
WARNING
!
WARNING
!
Direction of
Cut
Direction of
Cut

7
.
M
ake sure X-Bench is not plugged in and
m
ain outlet is off.
8. Power Switch
a.
The female plug is located on the bottom of the switch and the
m
ale plug is located on the side of the switch box (Fig. 11).
C
onnect the switch box to an electrical outlet by using an
e
xtension cord. Plug the desired tool into the female plug and
turn the switch box for power on by raising the tab. Power is
now activated to the tool that is plugged into the switch box.
b
.
T
o deactivate the power, the user can push the bump off
s
witch located on the front of the switch box. When leaving the
workstation it is recommended that the user removes the lock off
key, to prevent unauthorized usage. (15 A maximum use for
switch box.)
9. Folding the Unit for Storage/Transportation
a.
Position the table on its side or inverted and compress all four
legs to the zero position (Fig. 12)
b. To place the legs inside of the table, the user must press the
lock-pin located in the middle of the leg brace and pull on the
brace (Fig. 13).
T
he brace and leg can now be folded into the table. Follow this
s
tep for each of the legs.
Keep hands clear of the pivot areas when folding
the legs inward as this can cause pinching.
c. Once all the legs are inside the table, unlock the table by
turning the main knob to keep unlocked. See Section
1a for
more details. While the table is unlocked, this will allow the user
to fold the table in half.
Keep hands and other body parts from
folding area.
Pinch points may occur during this
s
tep.
d. Once the table is folded in half, the knob must be turned back
t
o the locked position. See Section
1
b
f
or more details. If this
step is not done, the table can open while the user is carrying
the product.
Accessory Installation
(Each Insert and Tool Sold separately)
10. Downdraft Table (Sold Separately)
a.
Unlock the blank universal insert plate by releasing the latch
in the front and remove the plate (Fig.14).
b. Place downdraft table over the opening by placing the back
end into the open area first.
c. The downdraft table should be seated flush against the table
(Fig. 15).
d. Lock the latch of the downdraft table. If the latch cannot be
locked, the table is not seated correctly. Re-position and lock.
Fig. 13
Fig. 12
Push pin and pull on brace to
release.
Fig. 11
WARNING
!
WARNING
!
WARNING
!
Fig. 14
Fig. 15
Extension
Cords
Extension
Cords

11. Tail Vise (Sold Separately)
a.
Locate the following parts:
(1) Clamp block (MDF), (2) Guide rods, (1) Threaded rod, (6)
Bolts and (6) Bolt covers.
b. Position clamp block (MDF) over guide rods, and threaded
r
od as shown in figure 16
c. Securely attach guide block to the rods with (6) washer and
bolts provided (Fig. 16).
d. Place one bolt cover over each screw head making sure it’s
flush to the table (Fig. 16).
e. Locate the following parts:
(1) Threaded rod insert (2) Guide rod inserts, (3) Insert nuts, (2) Rod
blocks, (4) Screws, (4) Nuts and (1) Pin.
f. Insert rod inserts from the backside of frame completely into
the three holes provided (Fig. 17).
g. Secure rod inserts to frame with the three large nuts provided
from the front side of frame (Fig. 18).
Make sure the orientations of the mating nuts
are as indicated in the figures.
h. Place the rod block from backside of frame as shown, insert
two screws from the front side of frame into rod block and
secure with two nuts from backside of frame. Repeat this
procedure on other side of frame (Fig. 18).
i. Insert guide rods and threaded rod into nuts and rod insert
making sure guide rods go thru rod blocks on each side of frame
while slowly threading rod with the knob into the frame like a
vise (Fig. 19).
j. Once the tail vise has been threaded into rod inserts, attach
the pin provided onto the end of the threaded rod (Fig. 20).
k. Place the selected object between the tail vise and table edge
and secure it by rotating the tail vise knob clockwise. Maximum
weight load is 40lbs.
When clamping small work pieces, the tail vise
only works when the work piece is in the middle
of the vise (Fig. 21).
12. Clamping Kit (Sold Separately)
a.
Dog hole clamps are placed in the dog holes to hold the work
pieces in place during cutting (Fig. 22).
8.
CAUTION
!
Fig. 16
Fig. 17
Fig. 18
F
ig. 19
Fig. 20
Fig. 21
CAUTION
!
Rod Block

15. Shelf and Tool Bag (Sold Separately)
a.
Shelf and tool bag come fully assembled.
b. There are four hooks under the work bench (Fig. 23.)
c. Attach the Velcro straps located on the shelf to the hooks
under the table (Fig. 23).
Note: Unit can fold up with shelf and bag attached. Maximum
weight load is 20lbs.
13. Finishing Tray (Sold Separately)
a.
Locate the following parts:
(1) Knob, (1) Large washer, (2) U-brackets and (2) Screws.
Insert the tray into the three holes provided. From the back side
of frame thread large washer and knob into the middle hole in
tray until snug. (Fig. 24).
Do not over tighten the knob as it may damage
the plastic body.
b. Secure both sides of tray using the (2) U-brackets and screws
(Fig 25).
c. Remove the cup/tape dispenser by turning and matching the
shape (Fig. 26).
d. Remove and mount the paper towel dispenser into the vertical
slot Fig. 27. Maximum weight load is 10lbs.
14. Wedge Dog Supports:
a.
Two wedge dog clamps are included with your X-Bench
product. These wedge dogs are placed into the dog holes on
the surface of the X-Bench to hold pieces of wood during cutting.
The wedge dogs are capable of holding 1x and 2x material.
9
.
Fig. 23
Fig. 24
Fig. 22
CAUTION
!
Fig. 25
Fig. 26
Fig. 27
Direction
of Cut

10
.
15. Universal Insert Plate:
a.
A blank insert plate is provided with the X-Bench. This area is
meant to be used only with the Skil insert plate technology which
is sold separately. The insert plates which can be purchased
separately are a jigsaw insert plate, sander insert plate, router
insert plate and a drill press insert plate.
Use only X-Bench inserts and dedicated
t
ools.
A
ny others may cause loss of control and
personal injury.
Maintaining Your X-Bench
Maintenance
C
ertain cleaning agents and solvents can
d
amage plastic parts.
S
ome of these are:
gasoline, carbon tetrachloride, chlorinated cleaning solvents,
ammonia and household detergents which contain ammonia.
Avoiding use of these and other types of cleaning agents will
minimize the possibility of damage.
A
ll repairs, electrical or mechanical, should
be attempted only by trained repairmen.
Contact the nearest Factory Service Center or Authorized
Service Station or other competent repair service. Use only
identical replacement parts, any other may create a hazard.
CAUTION
!
WARNING
!
W
ARNING
!
Fig. 28
Never place dogs on opposite sides of cut channel. Support must be on one side of table.
WARNING
!
Cutting Suggestions
2" x 10"
1" x 12"
1" x 4"
2" x 4"
1" x 6"
2" x 8"
1" x 10"
2" x 6"
1" x 8"
Wedge
Dog 1
Wedge
Dog 2

11
.
Direction of Cut
Direction of Cut
/