Page is loading ...

DVD/DivX PLAYER
Model: DXP-1000 G2
INSTRUCTION MANUAL
DivX / MPEG4 / DVD / MP3 / WMA / CD / Photo CD
Please read this manual before installation and use.

2

Table of Contents
TABLE OF CONTENTS .................................................................................................. 3
WARNINGS ..................................................................................................................... 5
IMPORTANT - READ THIS! ............................................................................................ 5
GENERAL INFORMATION ............................................................................................. 6
1. DIVX CERTIFICATION ................................................................................................................ 6
2. NERO DIGITAL™ STANDARD CERTIFICATION ............................................................................... 6
3. DISC AND FORMAT COMPATIBILITY ............................................................................................. 6
4. DISC INFORMATION ................................................................................................................... 7
5. FEATURES OF A DVD DISC ........................................................................................................ 7
6. FIRMWARE UPDATES ................................................................................................................. 8
7. CARE OF DISCS ........................................................................................................................ 8
PREPARING FOR INSTALLATION ............................................................................... 9
1. UNPACK THE PLAYER ................................................................................................................ 9
2. LOAD BATTERIES INTO THE REMOTE CONTROL ............................................................................ 9
PANEL DESCRIPTION ................................................................................................. 10
1. FRONT PANEL ........................................................................................................................ 10
2. REAR PANEL .......................................................................................................................... 10
3. REMOTE CONTROL ................................................................................................................. 11
SYSTEM CONNECTIONS ............................................................................................. 12
1. CONNECTING TO A TV SET ...................................................................................................... 12
2. CONNECTING TO A STEREO AMPLIFIER ...................................................................................... 13
3. CONNECTING TO A 5.1 CHANNEL AMPLIFIER .............................................................................. 14
4. CONNECTING TO AN AC3 OR DTS DECODING AMPLIFIER ........................................................... 15
USING YOUR DXP-1000 G2 ....................................................................................... 16
1. HOW TO PLAY A DISC .............................................................................................................. 16
2. HOW TO USE THE MEMORY CARD READER AND USB PORT ........................................................ 16
3. VIDEO SETUP ......................................................................................................................... 17
4. GENERAL SETUP PAGE ............................................................................................................ 18
TV DISPLAY ......................................................................................................................... 18
ANGLE MARK ...................................................................................................................... 18
OSD LANG (ON SCREEN DISPLAY LANGUAGE) ............................................................. 19
CAPTIONS ........................................................................................................................... 19
SCREEN SAVER (SCREEN SAVER) .................................................................................. 19
LAST MEMORY ................................................................................................................... 19
5. AUDIO SETUP PAGE ................................................................................................................. 20
SPEAKER SETUP ................................................................................................................ 20
DOWNMIX ............................................................................................................................ 20
CENTER ............................................................................................................................... 20
SPDIF SETUP ...................................................................................................................... 21
DOLBY DIGITAL SETUP ..................................................................................................... 21
DUAL MONO ........................................................................................................................ 21
DYNAMIC ............................................................................................................................. 21
CHANNEL DELAY................................................................................................................ 22
EQUALIZER ......................................................................................................................... 22
3D PROCESSING ................................................................................................................ 22
HDCD ................................................................................................................................... 23
6. VIDEO SETUP PAGE ................................................................................................................. 23
TV MODE ............................................................................................................................. 23
QUALITY .............................................................................................................................. 24
DivX VOD ............................................................................................................................. 24
7. PREFERENCE PAGE ................................................................................................................. 25
TV TYPE .............................................................................................................................. 25
PBC ...................................................................................................................................... 25
LANGUAGE SELECTION .................................................................................................... 26
PARENTAL CONTROL ........................................................................................................ 26
3

8. PASSWORD SETUP PAGE ......................................................................................................... 27
9. MPEG4 SUBTITLE SETUP PAGE ............................................................................................... 28
EXIT ..................................................................................................................................... 29
BASIC OPERATION ..................................................................................................... 30
FUNCTION KEYS .......................................................................................................... 31
PLAYBACK CONTROL (only for VCD playback) ...................................................................... 31
CONFIRM AN ENTRY .............................................................................................................. 31
CURSOR .................................................................................................................................. 31
RETURN TO THE MAIN MENU WHILE PLAYING VCD .......................................................... 31
PROGRAM NUMBER ACCESS ............................................................................................... 31
GOTO SEARCH ....................................................................................................................... 32
REPEAT PLAYBACK................................................................................................................ 32
CHAPTER / TITLE (TRACK / DISC) ......................................................................................... 32
REPEAT SECTION A Æ B ....................................................................................................... 33
PROGRAM SETTING ............................................................................................................... 33
DISC MAIN MENU .................................................................................................................... 33
TURN OFF THE VOLUME ....................................................................................................... 34
ZOOM PICTURE ...................................................................................................................... 34
SLOW MOTION ........................................................................................................................ 34
TO PLAY THE DISC IN STEP MODE ...................................................................................... 34
GO TO DVD DISC TITLE MENU (DVD DISC ONLY) ............................................................... 34
SUB TITLE LANGUAGE ........................................................................................................... 34
VIEW ANGLE ........................................................................................................................... 34
DVD AUDIO TRACK ................................................................................................................. 34
CHOOSE TO PLAY FILES IN USB DEVICES .......................................................................... 35
GO TO SETUP MENU .............................................................................................................. 35
AUDIO VOLUME ...................................................................................................................... 35
TROUBLESHOOTING AND CUSTOMER SUPPORT ................................................. 36
SPECIFICATIONS ......................................................................................................... 38
AVAYON TECHNOLOGIES DVD PLAYER ONE-YEAR LIMITED WARRANTY ........ 39
4

WARNINGS
TO REDUCE THE RISK OF FIRE AND ELECTRIC SHOCK, DO NOT EXPOSE THIS
LAYER TO RAIN OR MOISTURE! P
CAUTION
RISK OF ELECTRIC SHOCK
DO NOT OPEN
CAUTION:
To reduce the risk of fire and
electric shock, do not remove the cover of
the player. Refer servicing of the player to a
qualified service technician only!
This lightning flash arrow symbol in a triangle is intended to alert users to
the presence of non-insulated high voltage within the player’s enclosure
that may be of sufficient magnitude to constitute a risk of electric shock
to a person.
The exclamation point symbol in a triangle is intended to alert users to
the presence of important operating and maintenance instructions in the
literature accompanying the player.
The marking of products using lasers is shown at the rear panel of the
player and means the player has been classified as a Class 1 laser
product utilizing laser beams that are of a weaker class. There is no
danger of hazardous radiation outside the player.
CLASS 1
LASER
PRODUCT
REFER ALL SERVICING TO A QUALIFIED SERVICE TECHNICIAN ONLY!
IMPORTANT - READ THIS!
Read through this instruction manual before installing and using the player.
Do not touch the power plug with wet hands.
When disconnecting the power cord from the power outlet, hold the plug. Do not pull the
power cord.
Before moving the player, remove the disc from the player’s tray.
Do not open the cover or touch any of the components inside the player.
Do not install or operate the player under direct exposure to sunlight, or near objects that radiate
heat. Doing so may lead to overheating and damage the player.
Do not install or operate the player in overly moist or humid environments. Doing so may
adversely affect the laser head.
Install the player on flat surface with good air circulation. Do not cover the ventilation holes
on the case. Doing so may cause the player to overheat and malfunction.
Wipe the panel and case with a soft dry cloth only. Do not apply any kind of thinner, alcohol,
or sprays, as they will damage the finish.
5

GENERAL INFORMATION
1. DivX Certification
By displaying the DivX® logo, we are demonstrating that AVAYON products have been tested and
certified by DivXNetworks, the creators of DivX® video technology, and are capable of playing all
versions of DivX® video content. DivX® Certified ensures that the DivX® content you attain and create
can be played on your AVAYON DivX® Certified product.
Supports DivX V3.11, V4.x, V5.x and later files (without QPEL and GMC).
2. Nero Digital Standard Certification
The Nero Digital™ Standard Certified logo ensures consumers that the Nero Digital™ Standard content
they create or download will play on the specified consumer electronics product. Nero Digital™
Standard is a revolutionary audio and video format based on MPEG-4 standard which reduces video to
a fraction of their original size making it easier to share with family and friends while providing the
highest quality playback on certified home electronics.
3. Disc and Format Compatibility
This player can play the following types of discs and formats:
DVD single-sided/single-layer or single-sided/double-layer
DVD-R / DVD-RW
DVD+R / DVD+RW / DVD+R DL
DivX® version 3.11, 4.xx, or 5.xx
XviD
CD-DA
MP3
CD-R
CD-RW
Photo CD (JPEG)
WMA
Nero Digital™ Standard
6

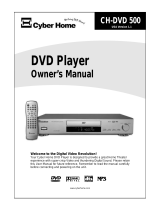
4. Disc Information
Disc type
DVD VCD DIVX CD
Recording method
Digital / MPEG II Digital / MPEG I MPEG 4 Digital
Capacity
single-sided/single-layer
4.7GB = 2 hr
single-sided/double-layer
8.5GB = 4 hr
650MB
650MB
74min
Disc size
12cm / 8cm 12cm 12cm / 8cm
Horizontal resolution
500 lines up 240 lines up -
Subtitles
32 - - -
Sound tracks
8 2 - -
Symbol
COMPACT
DIGITAL AUDIO
5. Features of a DVD Disc
Each DVD disc contains different combinations of features depending on the design and production of the disc.
The following symbols represent some DVD features:
Regional Code / Video Output System
DOLB
Y
D I G I T I A L
Dolby Digital Surround
DTS Digital OUT
2
Number of audio tracks
2
Number of subtitles
Screen modes
16 : 9
L B
Child lock
R E S T R I C T E D
2
Number of angles
7

6. Firmware Updates
There are several reasons why the firmware on the DXP-1000 G2 might require updating:
• To make an improvement to the player such as a new feature or function.
• To maintain compatibility with any future changes to the DivX or other disc formats.
• To address any incompatibilities or inconsistencies between various discs available in today’s
market.
As these improvements are made, a firmware update may be required. Go to www.avayon.com
for
firmware updates.
The unit can be updated by either of two methods:
• Download the updated firmware and record it to a CD. Then read the CD with the DXP-1000 G2.
Complete the update by following the instructions on the TV screen.
• Download the updated firmware to a USB memory stick or MP3 player. Then connect the USB
memory stick or MP3 player to the DXP-1000 G2 via the USB port. Complete the update by
following the instructions on the TV screen.
NOTE: Be sure the DXP-1000 G2 remains powered on during the updating process, or the DVD
player will be damaged and cannot be used again.
NOTE: Some features of this player are related to the DVD disc’s software. Some
features of this player cannot be performed if the disc does not support those features, or
the required special settings. Check the features of the disc before playing it, or follow the
instructions on the on-screen menu for the disc.
7. Care of Discs
Video discs contain high-density compressed data that need proper handling.
Hold the disc with fingers and thumb, holding the hole at center and the edge. Do not touch the disc
surface!
Do not bend or press the disc.
Do not expose the disc to direct sunlight or any heat source.
Store discs vertically in a cabinet, and under dry conditions.
Clean the disc with a soft dry cloth only. Wipe the surface gently from the center to the edge. Do not
apply thinner, alcohol, or sprays when cleaning.
8

PREPARING FOR INSTALLATION
Your Avayon DXP-1000 G2 comes carefully packaged from the factory with all the accessories you need to
start enjoying high quality video entertainment right away.
1. Unpack the Player
The standard package contains the following items:
DXP-1000 G2 DVD player
Infrared remote controller
AV cables
Two AAA batteries
Instruction manual
Warranty Registration Card
2. Load Batteries into the Remote Control
To load batteries into the supplied remote control, do the following:
Remove the battery compartment cover.
Load two AAA batteries into the battery compartment.
Make sure that the batteries have been inserted with the correct polarities matching the symbols +, - as
indicated inside the battery compartment.
When replacing batteries, always replace both batteries. Do not mix new and used batteries, or the
operating lifetime of the remote may be shortened.
Do not dispose of batteries in normal rubbish. Be environmentally friendly and dispose of batteries
according to your local government regulations.
Remove the batteries if you do not intend to use the remote for a prolonged period of time.
9

PANEL DESCRIPTION
Familiarize yourself with the front panel and rear panel connections and controls before attempting to connect the
DXP-1000 G2 to your audio/video system.
1. Front Panel
NOTE: There are three types of memory cards supported by the DXP-1000 G2 card reader: SD,
MMC, and MS. Please be sure to properly orient the card before gently inserting it into the card
reader. The USB port can be used to connect either a USB memory stick, or an MP3 player.
NOTE: The DXP-1000 G2 can play MP3, WMA, and JPEG files only through its USB and
memory card reader. It cannot play video files through those ports.
2. Rear Panel
10

3. Remote Control
11

SYSTEM CONNECTIONS
DO NOT connect the AC power plug to the wall outlet before the system
connections are completed.
1. Connecting to a TV Set
NOTE: One set of standard AV cables is included with the player.
Connect the player’s Video output to the TV’s Video input terminal using the yellow plugs of the supplied
AV cable. You may alternately connect the S-Video output of the player to the S-Video input of the TV
using an S-Video cable.
Connect the player’s Front Left (FL) and Front Right (FR) audio outputs to the TV’s Left and Right audio
inputs.
If your TV has built-in YCbCr or YPbPr (Progressive Scan), you may connect these three sets of cables
from unit’s YCbCr/YPbPr video output to the TV’s related video input. These connections allow you to
enjoy higher quality video. If you want to select the Progressive Scan function, simply press VIDEO on the
remote control for this mode of video output. Ensure that you have selected YPbPR as your VIDEO
OUTPUT on the PREFERENCES PAGE.
NOTE: S-video and YUV (YPbPr/YCbCr) cables are not included with the player.
12

2. Connecting to a Stereo Amplifier
Connect the player’s Video output to the TV’s Video input terminal using the yellow plugs of the supplied
AV cable. You may alternately connect the S-Video output of the player to the S-Video input of the TV
using an S-Video cable (not supplied).
Connect the player’s Front Left (FL) and Front Right (FR) audio outputs to stereo amplifier’s Left and Right
audio inputs.
13

3. Connecting to a 5.1 Channel Amplifier
Connect the player’s Video output to the TV’s Video input terminal using the yellow plugs of the supplied
AV cable. You may alternately connect the S-Video output of the player to the S-Video input of the TV
using an S-Video cable (not supplied).
Connect the player’s 5.1 channel surround audio output (FL, FR, SL, SR, CEN, SW) to the 5.1 channel
amplifier’s audio input terminals, Front Left, Front Right, Surround Left, Surround Right, Center, and Sub-
Woofer.
NOTE: An amplifier with 6-channel input and output is required. An AC3 decoder is not
required.
NOTE: Connecting AC3/DTS digital outputs (Optical or Coaxial) to an AC3 or DTS
decoding amplifier is also possible. See further instructions on the next page.
14

4. Connecting to an AC3 or DTS Decoding Amplifier
Your Avayon DXP-1000 G2 features a dedicated Digital Output. This important connection carries data to
your receiver that processes multi-channel home theatre or music playback.
DTS (Digital Theater Systems)
In order to experience DTS Digital Surround, you will need a DTS-capable receiver (or add-on decoder plus
amplifier) and 5.1 Channel speakers (Left, Center, Right, Stereo Surround, plus an LFE/subwoofer).
AC-3
Surround sound technology that delivers high-quality digital audio for up to 5.1 discrete channels (Left,
Center, Right, Left Surround, Right Surround, Low-Frequency Effects). The five speaker channels produce a
directional and more realistic effect. The Low-Frequency Effects (LFE) channel (usually reproduced through a
subwoofer) can often be felt as well as heard.
Connect the player’s Video output to the TV’s Video input terminal using the yellow plugs of the supplied
AV cable. You may alternately connect the S-Video output of the player to the S-Video input of the TV
using an S-Video cable (not supplied).
Connect the player’s digital audio output (Optical or Coaxial) to the AC3 or DTS decoding amplifier’s digital
audio input.
Press the SETUP button on the remote control to enter the player’s SETUP MENU.
Press ^ / v buttons on the Remote Control to select AUDIO SETUP.
Press ^ / v buttons again to select SPDIF OUTPUT.
Press the > button and then the ^ / v buttons to select SPDIF/RAW.
Press the ENTER button to confirm the setting.
15

USING YOUR DXP-1000 G2
Once you have your player properly connected to your TV, or to your TV and amplifier, you can begin to play
discs immediately. However, you may wish to customize your video and audio experience by selecting various
options using the on-screen menus. Setup of these options is explained in the following sections.
1. How to Play a Disc
Switch on the power
Push the Power button on the front panel.
Setup the basic system connections
Once you have completed your basic system connections, ensure that you can observe the AVAYON screen on
your TV. If you do not, visually check your cable connections and ensure that the correct settings have been
selected on your TV for an external device like your player.
Load a disc
Press the OPEN/CLOSE button on the remote, or the OPEN/CLOSE button on the front panel to open the disc
tray. Load a disc into the tray and press the OPEN/CLOSE button again to close the disc tray. (Be sure to place the
disc’s label side up.)
Automatic Play
The player will take several seconds to read the disc data, display the disc type logo at the left upper corner of the
TV screen, and then start playing automatically. (MP3 discs take longer to upload data on SMART NAVI Menu when
loading.)
If a Disc Menu is displayed on the screen, do the following:
1. Press the ► button to start playing, or
2. Press cursor on the remote control to select the desired item and then press the ENTER button to confirm.
NOTE: A different kind of Disc Menu may be displayed on the TV screen depending on the design and
production of the disc.
2. How to Use the Memory Card Reader and USB Port
The DXP-1000 G2 comes with a front-panel memory card reader, as well as a USB port. These features allow you
to playback image and audio files directly from MMC, MS, and SD memory cards, as well as from USB flash drives
and MP3 players.
NOTE: Before connecting or disconnecting a USB device, ensure that there is no disc in the disc tray.
Make sure that your USB device is adequately powered (if required) to work properly and is switched on and ready
BEFORE you turn on the DXP-1000 G2.
When a USB device or memory card is connected, you will be presented with the same menu structure as you
would if you using a CD/DVD.
NOTE: Avayon tries very hard to achieve the highest compatibility; however we cannot guarantee that all
USB devices and memory cards will work properly due to their designs and variety.
16

NOTE: With a USB device or memory card connected to the USB port or card reader, the DXP-1000 G2
can play MP3, WMA, and JPEG files. The player will play certain video files using the USB port and
Memory Card reader.
3. Video Setup
The player’s TV output color is selectable to either
PAL or NTSC.
If the TV set is NOT a multi video system, and the following is observed on the TV screen, it could be a result
of the wrong color system matched to the TV set. Symptoms of a mismatch are,
Picture is distorted
Picture is black and white with no color
Picture is not full screen, or the border portion of the picture is blocked
NOTE: The DVD Player is set to NTSC system output by default. If you are not playing in
the U.S.A. or know you are on a PAL system, please change the output system of the
player using the steps below.
1. Set the TV set’s system to the proper setting, or
2. Change the DVD player’s output system setting as following:
• Press Open on the remote control and keep the DVD tray open, and then
• Press SETUP on remote control,
• Go to the PREFERENCES page
• Select the TV Mode then choose Pal, NTSC, or Auto
NOTE: If the above steps DO NOT fix the problem, see the TROUBLESHOOTING
section of this manual.
17

4. General Setup Page 4. General Setup Page
1. Press the SETUP button on the remote control during STOP or PLAY mode to enter the on-screen SETUP MENU. 1. Press the SETUP button on the remote control during STOP or PLAY mode to enter the on-screen SETUP MENU.
2. Use the cursor to select GENERAL SETUP. Press ENTER to display the GENERAL SETUP page. 2. Use the cursor to select GENERAL SETUP. Press ENTER to display the GENERAL SETUP page.
TV DISPLAY
Use the cursor to move to the desired setting and
press ENTER to confirm.
NORMAL/PS – 4x3 Pan Scan
Full screen picture on TV. Normally, left and
right edges are cropped.
NORMAL/LB – 4x3 Letter Box
Original aspect ratio with no cropping.
WIDE – 16:9 Widescreen
ANGLE MARK
This feature functions only for discs which support
the ANGLE function.
When the ANGLE MARK is set ON, the screen
displays the mark.
When the ANGLE MARK is set OFF, the mark is
not displayed.
After you set the ANGLE MARK to ON, you can
press the Angle button to change the view angle
of the screen.
18

OSD LANG (ON SCREEN DISPLAY LANGUAGE)
This feature allows you to choose from one of
four
languages that will be used to display menus and
functions on the screen.
CAPTIONS
This feature allows you to turn on the CLOSED
CAPTION feature. Closed Caption displays
the spoken audio portion of a video as text on the
screen if the disc supports it.
Select ON to display captions.
Select OFF to disable the display of captions.
SCREEN SAVER (SCREEN SAVER)
d
When the player is stopped, and there is no
operation, or a function button is pressed within
one minute, the screen saver will appear.
The screen saver is useful for protecting the
TV screen from a phenomenon call burn-in.
Select ON to activate the screen saver.
Select OFF to disable the screen saver.
LAST MEMORY
When you choose ON under this item, the unit
will resume to the prior playing content after
power off.
19

ISDF
5. Audio Setup Page
SPEAKER SETUP
1. Press the SETUP button on the remote control during STOP or PLAY mode to enter the on-screen Audio Setup
page.
the remote control during STOP or PLAY mode to enter the on-screen Audio Setup
page.
2. Use the cursor to select SPEAKER SETUP. Press ENTER to display the SPEAKER SETUP page. 2. Use the cursor to select SPEAKER SETUP. Press ENTER to display the SPEAKER SETUP page.
DOWNMIX
The DOWNMIX feature allows you to combine (mix) several discrete digital channels of audio into two channels. You
would enable DOWNMIX if you did not have a 5.1 Channel audio system.
LT/RT: Left and Right output mode ( Either Left or Right channel Audio output while playing )
V SURR: Virtual Surround: Stereo output mode
OFF: Turn off the DOWNMIX mode. 5.1 Channel audio can be enabled only if DOWNMIX is set off and the rest
of speaker setup is activated.
NOTE: The selections below allow for 5.1ch audio. These settings are only available if
DOWNMIX is OFF and CENTER, REAR, and SUBWOOFER are ON. For 5.1ch audio, all
connections including CEN, SW, SL, SR, FL, and FR have to connect between the DXP-1000 G2
Player and your amplifier by either optical or coaxial cable and SPDIF OUTPUT on the Audio
Setup Page must be set to SPDIF/RAW.
CENTER
Set CENTER, REAR, and SUBWOOFER to ON only if you
have your player connected to a 5.1ch surround sound
system.
These speaker settings are used in conjunction with the
DELAY settings on the next page to enhance the surround
sound audio experience.
DTS 6.1ch output is supported using the six audio outputs, the
optical connection, or the coaxial connection. Use the coaxial
for best results. You must select SPDIF/RAW on the Audio
Setup Page.
20
/