Hotpoint HUG52G Operating instructions

Category
Cookers
Type
Operating instructions

This manual is also suitable for

Contents
Introduction, 2
For Your Safety, 3
Installation Instructions, 4-6
Electrical Connection, 7
Burner and Nozzle Specifications, 8
Features, 8
Control Panel, 9
Electronic Minute Minder, 10
Hotplates, 11
Grill, 12
Top Oven, 13
Top Oven Cooking Charts, 14
Main Oven, 15
Main Oven Cooking Chart, 16
Using the Main Oven for Other Functions, 17
Care and Cleaning, 18-20
Cooking Results Not Satisfactory?, 21
Something Wrong with your cooker?, 21
Disposal of the appliance, 22
Guarantee Information, 23
Service Information, 24
Operating Instructions
50 cm Gas Cooker
GB
English, 1
GB
HUG 52X
HUG 52P
HUG 52K
HUG 52G
50HGP
Please phone us on
08448 24 24 24
to activate you
r
guarantee
PLEASE PHONE US TO REGISTER YOUR APPLIANCE AND ACTIVATE YOUR PARTS GUARANTEE ON 08448 24 24 24
2
GB
PLEASE PHONE US TO REGISTER YOUR APPLIANCE AND ACTIVATE YOUR PARTS GUARANTEE ON 08448 24 24 24
Introduction
To the Installer:
Before installation, fill in the product details on the back
cover of this book.
The information can be found on the rating plate.
To the User:
You must read the instructions prior to installing and using
the appliance and then retain them for future reference.
! Before operating your new appliance please read this
instruction booklet carefully. It contains important
information concerning the safe operation, installation and
maintenance of the appliance.
! Please keep these operating instructions for future
reference. Pass them on to possible new owners of the
appliance.
Retention of this Instruction Book
This Instruction Book must be kept handy for reference as
it contains important details on the safe and proper use of
the appliance.
If you sell or pass the appliance to someone else, or move
house and leave it behind, make sure this Book is also
provided so the new owner can become familiar with the
appliance and safety warnings.
Your new appliance is guaranteed* and will give lasting
service. This guarantee is only applicable if the appliance
has been installed in accordance with the installation
instructions detailed in this booklet.
To help make best use of your cooking equipment, please
read this booklet carefully.
The cooker is designed specifically for domestic use and
responsibility will not be accepted for use in any other
installation.
When the cooker is first used an odour may be emitted,
this will cease after a period of use.
When first using the cooker ensure that the room is well
ventilated (e.g. open a window or use an extractor fan) and
that persons who may be sensitive to the odour avoid any
fumes.
It is suggested that any pets be removed from the room
until the smell has ceased. This odour is due to temporary
finish on oven liners and elements and also any moisture
absorbed by the insulation.
Your new cooker is guaranteed and will give lasting
service.
The guarantee is only applicable if the cooker has been
installed in accordance with the Installation Instructions.
The cooker is designed specifically for domestic use and
responsibility will not be accepted for use in any other
installation.
* The guarantee is subject to the provisions that the
appliance:
(a)Has been used solely in accordance with the Users
Instruction Book.
(b)Has been properly connected to a suitable
supply voltage as stated on the rating plate
attached to this equipment.
(c) Has not been subjected to misuse or
accident or been modified or repaired by
any person other than the authorised
employee or agent.
(d) Has been correctly installed.
Our policy is one of continual improvement in design and
development, therefore strict accuracy of illustrations and
descriptions cannot be guaranteed.
This appliance conforms with the following
European Economic Community directives:
- 2006/95/
EC EC
EC EC
EC of 12/12/06 (Low Voltage) and subsequent
modifications;
- 2004/108/
ECEC
ECEC
EC of 15/12/04 (Electromagnetic Compatibility) and
subsequent modifications;
- 2009/142/
ECEC
ECEC
EC of 30/11/09 (Gas) and subsequent modifications (only
for models which use gas);
- 93/68/
EECEEC
EECEEC
EEC of 22/07/93 and subsequent modifications.
- 2002/96/
ECEC
ECEC
EC
- 1275/2008 (Stand-by/ Off Mode)
Technical Characteristics
Top Oven
Usable Volume: 28 Litres
heating mode: Conventional
Main Oven
Usable Volume: 54 Litres
heating mode: Conventional
Voltage and Frequency
220-240V~ 50Hz
Mains frequency and voltage of the electric section and
characteristics of the gas section
Model Gas section
Class
Rated power
kW (1)
HUG 52X
HUG 52P
HUG 52K
HUG 52G
50HGP
II2H3+ 12,30 (894 g/h - G30)
(878 g/h - G31)
(1) The values in g/h refer to the capacities with liquid gas (Butane,
Propane).
3
GB
PLEASE PHONE US TO REGISTER YOUR APPLIANCE AND ACTIVATE YOUR PARTS GUARANTEE ON 08448 24 24 24
Please read the precautions below before using your
cooker.
ALWAYS . . .
ALWAYS make sure you understand the controls before using
the cooker.
ALWAYS check that all controls on the cooker are turned off
after use.
ALWAYS stand back when opening an oven door to allow
heat to disperse.
ALWAYS use dry, good quality oven gloves when removing
items from the ovens.
ALWAYS take care when removing items from the top oven/
grill when the main oven is on, as the contents may
be hot.
ALWAYS keep the oven and grill doors closed when the cooker
is not in use.
ALWAYS place pans centrally over the hotplate burners and
position them so that the handles cannot accidentally
be caught or knocked or become heated by other
burners.
ALWAYSALWAYS
ALWAYSALWAYS
ALWAYS
keep the cooker clean, as a build up ofkeep the cooker clean, as a build up of
keep the cooker clean, as a build up of
grease or fat from cooking can cause a fire.grease or fat from cooking can cause a fire.
grease or fat from cooking can cause a fire.
ALWAYS allow the cooker to cool before cleaning.
ALWAYS follow the basic principles of food handling and
hygiene to prevent the possibility of bacterial growth.
ALWAYS keep ventilation slots clear of obstructions.
ALWAYS turn off the electricity supply before cleaning or
replacing an oven lamp.
ALWAYS refer servicing to CORGI registered appliance service
engineers.
ALWAYS The appliance must be used by adults only for the
preparation of food, in accordance with the
instructions outlined in this booklet. Any other use
of the appliance (e.g. for heating the room)
constitutes improper use and is dangerous. The
manufacturer may not be held liable for any damage
resulting from improper, incorrect and unreasonable
use of the appliance.
SAFETY ADVICE IN CASE OF A CHIP-PAN FIRE
In the event of a chip pan fire or any other pan fire.
1.TURN OFF THE COOKER APPLIANCE AT THE WALL
SWITCH.
2.COVER THE PAN WITH A FIRE BLANKET OR DAMP
CLOTH, this will smother the flames and extinguish the fire.
3.LEAVE THE PAN TO COOL FOR AT LEAST 60 MINUTES
BEFORE MOVING IT. Injuries are often caused by picking up
a hot pan and rushing outside with it.
NEVER USE A FIRE EXTINGUISHER TO PUT OUT A PAN
FIRE as the force
of the extinguisher is likely to tip the pan over.
Never use water to extinguish oil or fat fires.
NEVER . . .
NEVER leave children unsupervised where the cooker is
installed as all surfaces will get hot during and after
use.
For your Safety
NEVER allow anyone to sit or stand on any part of the cooker.
NEVER store items that children may attempt to reach above
the cooker.
NEVER heat up unopened food containers as pressure can
build up causing the container to burst.
NEVER store chemicals, food stuffs, pressurised containers in
or on the cooker, or in cabinets immediately above or
next to the cooker.
NEVER fill a deep fat frying pan more than 1/3 full of oil, and
never use a lid. DO NOT LEAVE UNATTENDED WHILE
COOKING.
NEVER place flammable or plastic items on or near the hotplate.
NEVER use proprietary spillage collectors on the hotplate.
NEVER use the cooker as a room heater.
NEVER dry clothes or place other times over or near to the
hotplate or oven/gril doors.
NEVER wear garments with long flowing sleeves whilst cooking.
NEVER let children play with the appliance.
NEVER should the appliance be operated by people (including
children) with reduced physical, sensory or mental
capacities, by inexperienced individuals or by anyone
who is not familiar with the product. These individuals
should, at the very least, be supervised by someone
who assumes responsibility for their safety or receive
preliminary instructions relating to the operation of the
appliance.
NOTE:NOTE:
NOTE:NOTE:
NOTE: The use of a gas cooking appliance results in the
production of heat and moisture in the room in which it is
installed. Always ensure that the kitchen is well ventilated; keep
natural ventilation holes open or install a mechanical ventilation
device (mechanical extractor hood).
In particular when using the grill or more than one hotplate burner,
open a window if a mechanical ventilation device is not operating.
! ATTENTION
DURING INSTALLATION
THE FEET OF THE APPLIANCE
MUST BE LOWERED SO THAT
AN AIR GAP OF AT LEAST
10MM (1CM) IS LEFT BETWEEN
THE BASE OF THE APPLIANCE
AND THE FLOOR.
! VERY HOT SURFACES
YOU MUST KEEP THE OVEN
AND GRILL CAVITIES CLEAN
FOOD OR GREASE ON THESE
SURFACES COULD CAUSE
SMOKE AND POSSIBLY EVEN BURN
! ATTENTION
WHEN USING THE MAIN OVEN
YOU MUST ENSURE THAT THE
BASE OF THE CAVITY IS NOT
COVERED WITH ALUMINUM
FOIL, UTENSIL OR ANY OTHER
FORM OF COVERING. FAILURE
TO DO THIS MAY RESULT IN
THE CAVITY BEING DAMAGED.
10 mm
! ATTENTION! ATTENTION
! ATTENTION ! ATTENTION
! VERY HOT SURFACES! VERY HOT SURFACES
4
GB
PLEASE PHONE US TO REGISTER YOUR APPLIANCE AND ACTIVATE YOUR PARTS GUARANTEE ON 08448 24 24 24
Installation
The appliance must only be installed by a
competent person. In the UK, CORGI registered
installers undertake to work to safe and satisfactory
standards.
Before moving your cooker check that it is cool, and
switch off at the cooker control unit. Movement of
your cooker is most easily achieved by lifting the
front as follows:
Open the grill door sufficiently to allow a comfortable
grip on the underside front edge of the oven roof,
avoiding any grill elements. (FIG. C)
! !
! !
! Take care in moving the cooker as it is heavy.
Take care to ensure that any floor covering is not
damaged.
Splashplate optional, apply to Parts Department
(see Back Cover for contact number.)
The following instructions should be read by a
qualified technician to ensure that the appliance is
installed, regulated and technically serviced
correctly in compliance with current regulations.
! Remember to unplug the appliance from the! Remember to unplug the appliance from the
! Remember to unplug the appliance from the
mains before regulating the appliance ormains before regulating the appliance or
mains before regulating the appliance or
carrying out any maintenance work.carrying out any maintenance work.
carrying out any maintenance work.
Positioning
Important:Important:
Important: this unit may be installed and used only
in permanently ventilated rooms according to the
British Standards Codes Of Practice: B.S. 6172/B.S.
5440, Par. 2 and B.S. 6891 Current Editions. The
following requirements must be observed:
a)a)
a)a)
a ) The cooker should not be installed in a bed
sitting room with a volume of less than 20m
3
. If it is
installed in a room of volume less than 5m
3
an air
vent of effective area of 110cm
2
is required, if it is
installed in a room of volume between 5m
3
and 10m
3
a supplementary airvent area of 50cm2 is required, if
the volume exceeds 11m
3
no airvent is required.
However, if the room has a door or a window which
opens directly to the outside no air vent is required
even when the volume is between 5m
3
and 11m
3
.
b)b)
b)b)
b ) During prolonged use of the appliance you
may consider it necessary to open a window to the
outside to improve ventilation.
c)c)
c)c)
c ) If there are other fuel burning appliances in
the same room, B.S.5440 Part 2 Current Edition,
should, be consulted to determine the requisite air
vent requirements.
Installation of the cooker
For a correct installation of the cooker the following
precautions must be followed:
The height of the cooker can be adjusted by means
of adjustable feet in the plinth (900mm - 930mm).
Adjust the feet by tilting the cooker from the side.
Then install the product into position.
NOTE: This appliance must not be fitted on a
platform.
The cooker is designed to fit between kitchen
cabinets spaced 500mm apart. The space either
side need only be sufficient to allow withdrawal of
the cooker for servicing. It can be used with
cabinets one side or both as well as in a corner
setting. It can also be used free-standing.
Adjacent side walls which project above hob level,
must not be nearer to the cooker than 150mm or
65mm (Fig. A) and should be protected by heat
resistant material. Any overhanging surface or
cooker hood should not be nearer than 750mm(FigA)
a)a)
a)a)
a ) The cooker may be located in a kitchen, a
kitchen/diner or bed sitting room, but not in a
bathroom or shower room.
b)b)
b)b)
b ) The hoods must be installed according to
the requirements in the hood handbook.
c)c)
c)c)
c ) The wall in contact with the back of the
cooker must be of flameproof material.
dd
dd
d
))
))
) The cooker is fitted with a safety chain that
must be attached to a hook, secured to the wall
behind the appliance.
!!
!!
! Some models can have their
gas connection inverted. It is
important to make sure the safety
chain is always situated on the
side which corresponds to the
hose holder (Fig. B).
65 mm min
500 mm min
400 mm min400 mm min
750 mm min
Tall cupboard on the left hand
side of 50cm gas cooker
65 mm min
65 mm min
150 mm min
500 mm min
750 mm min
Tall cupboard on the right hand
side of 50cm gas cooker
Fig.A
5
GB
PLEASE PHONE US TO REGISTER YOUR APPLIANCE AND ACTIVATE YOUR PARTS GUARANTEE ON 08448 24 24 24
Fig. B Fig. C
Moving the Cooker
Gas connection
The cooker should
be connected to the
gas-supply by a
corgi registered
installer. During
installation of this
product it is
essential to fit an
approved gas tap to
isolate the supply
from the appliance
for the convenience of any subsequent removal or
servicing. Connection of the appliance to the gas
mains or liquid gas must be carried out according to
the prescribed regulation in force, and only after it is
ascertained that it is adaptable to the type of gas to
be used. If not, follow the instructions indicated in
the paragraph headed “Adaptation to different gas
types”. In the case of connection to liquid gas, by
tank, use pressure regulators that conform to the
regulation in force. The gas supply must be
connected to the left of the appliance. Be sure that
the hose does not pass through the rear of the
cooker touching hot parts.
!!
!!
! make sure the supply pressure conforms with the
values shown in the table entitled “Caracteristics of
the burners and nozzles”.
When the cooker is installed betweenWhen the cooker is installed between
When the cooker is installed between
cabinets (recessed), the gas connectioncabinets (recessed), the gas connection
cabinets (recessed), the gas connection
must be effected by an approved flexiblemust be effected by an approved flexible
must be effected by an approved flexible
hose with bayonet fittinghose with bayonet fitting
hose with bayonet fitting
(BS 669 Current Edition). The gas inlet for(BS 669 Current Edition). The gas inlet for
(BS 669 Current Edition). The gas inlet for
the cookers is a threaded G 1/2 gas femalethe cookers is a threaded G 1/2 gas female
the cookers is a threaded G 1/2 gas female
fitting.fitting.
fitting.fitting.
fitting.
HOT PARTS
600 mm
Connecting the gas supply
To make the connection, a flexible hose should be
used corresponding to the current gas regulations
which are:
the hose must never be at any point in its
lenght in contact with the “hot” parts
of the cooker;
the hose must never be longer than 1,5
metre;
the hose must not be subject to any tension
or torsional stress and it must not
have any excessively narrow
curves or bottlenecks;
the hose must be easy to inspect along its
entire length to check its condition;
the hose must always be in good condition,
never attempt to repair.
!!
!!
! the installation must comply with gas safety
(installation and use) regulations 1984. In all cases
for the above, by low, a qualified, corgi approved
engineer must be called for installation.
Disposing of the appliance
When disposing of the appliance please remove the
plug by cutting the mains cable as close as
possible to the plug body and dispose of it as
described above.
Adapting the cooker to different types of gas
In order to adapt the cooker to a different type of
gas with respect to the gas for which it was
produced (indicated on the label attached to the lid),
follow these steps:
a)a)
a)a)
a) replace the hose holder mounted on the
appliance with that supplied in the bag of “cooker
accessories”.
b)b)
b)b)
b) Replacing the burner nozzles on the hob:
•remove the grids and slide the burners from their
housings;
unscrew the nozzles
using a 7 mm socket
spanner, and replace
them with nozzles for
the new type of gas
(see table 1 “Burner and
nozzle characteristics”).
•replace all the
components by
repeating the steps in
reverse order.
Installation
6
GB
PLEASE PHONE US TO REGISTER YOUR APPLIANCE AND ACTIVATE YOUR PARTS GUARANTEE ON 08448 24 24 24
c)c)
c)c)
c ) Minimum regulation of the hob burners:
turn the tap to minimum;
remove the knob and adjust
the regulation screw, which is
positioned in or next to the tap
pin, until the flame is small
but steady.
! !
! !
! In the case of liquid gas, the
regulation screw must be screwed in to the bottom.
check that the flame does not turn off when
you turn the tap quickly from high to low.
d)d)
d)d)
d ) Regulating the primary air of the burners:
The primary air of the burners requires no regulation.
Adapting to different types of gas (main and top
oven)
In order to adapt the oven to a different type of gas
with respect to the gas for which it was
manufactured (indicated on the label), follow these
simple steps:
a)a)
a)a)
a) Replacing the oven burner nozzle
open the oven door fully
pull out the sliding oven bottom
V
V
Z
Pry the fixing tab “V” and remove the oven burner
• Unscrew the oven burner nozzle using the socket
spanner for the nozzles
“Z”“Z”
“Z”“Z”
“Z”, or a 7 mm socket
spanner, and replace it with a nozzle suited to the
new type of gas (see Table 1).
Take particular care handling the spark plugTake particular care handling the spark plug
Take particular care handling the spark plug
wires and the thermocouple pipes.wires and the thermocouple pipes.
wires and the thermocouple pipes.
Replace all the parts, following the steps
described above in the reverse order.
b)b)
b)b)
b ) Minimum regulation of the main and top gas
oven burner with thermostat:
light the burner as described in the
paragraph the oven knob” of the
instruction booklet.
turn the knob to
MaxMax
MaxMax
Max for about 10 minutes
and then turn the knob to the
MinMin
MinMin
Min
setting;
remove the knob;
regulate the screw positioned outside the
thermostat pin until the flame is
small but steady.
! !
! !
! In the case of liquid gas, the regulation screw
must be screwed in to the bottom.
check that the burner does not turn off
whenwhen
whenwhen
when
you turn the knob from Maxyou turn the knob from Max
you turn the knob from Max
to Minto Min
to Minto Min
to Min and and
when you open and close the oven door quickly.
Adapting the gas grill to different types of gas
Replacing the nozzle of the grill burner:
Remove the enamelled baffle at the front of
the grill (2 screws).
Remove the screw on the right hand side of the
burner and gently slide the burner off the injector.
Using a 7mm socket, replace the grill injector as
appropriate (see table 1).
Re-assemble the burner and baffle.
!On completion of the operation, replace the old
rating sticker with one indicating the new type of gas
used. This sticker is available from our Service
Centres.
NoteNote
NoteNote
Note
Should the pressure of the gas used be different (or
vary) from the recommended pressure, it is
necessary to fit a suitable pressure regulator onto
the inlet pipe in compliance with current National
Regulations relative to “regulators for channelled
gas”.
Installation
7
GB
PLEASE PHONE US TO REGISTER YOUR APPLIANCE AND ACTIVATE YOUR PARTS GUARANTEE ON 08448 24 24 24
Electrical Connection
Power supply voltage and frequency: 230-240V a.c.
50/60 Hz.
!!
!!
! The supply cable must be positioned so that it
never reaches at any point a temperature 50°C
higher than the room temperature. The cable must
be routed away from the rear vents. Should you
require it, you may use a longer cable, however, you
must ensure that the cable supplied with the
appliance is replaced by one of the same
specifications in accordance with current standards
and legislation.Your appliance is supplied with a 13
amp fused plug that can be plugged into a 13 amp
socket for immediate use. Before using the
appliance please read the instructions below.
WARNING - THIS APPLIANCE MUST BE EARTHED.
THE FOLLOWING OPERATIONS SHOULD BE
CARRIED OUT BY A QUALIFIED ELECTRICIAN.
Replacing the fuse:
When replacing a faulty fuse, a 13 amp ASTA
approved fuse to BS 1362 should always be used,
and the fuse cover re-fitted. If the fuse cover is lost,
the plug must not be used until a replacement is
obtained.
Replacement fuse covers:
If a replacement fuse cover is fitted, it must be of
the correct colour as indicated by the coloured
marking or the colour that is embossed in words on
the base of the plug. Replacements can be obtained
directly from your nearest Service Depot.
Removing the plug:
If your appliance has a non-rewireable moulded plug
and you should wish to remove it to add a cable
extension or to re-route the mains cable through
partitions, units etc., please ensure that either:
the plug is replaced by a fused 13 amp re-
wireable plug bearing the BSI mark of approval.
or:
the mains cable is wired directly into a 13 amp
cable outlet, controlled by a switch, (in
compliance with BS 5733) which is accessible
without moving the appliance.
!!
!!
! For appliances with a rating greater than 13 amp
(eg: electric hob, double ovens and freestanding
electric cookers etc.) the mains cable must be wired
into a cooker output point with a rating of 45 amp. In
this case the cable is not supplied.
Disposing of the plug:
Ensure that before disposing of the plug itself, you
make the pins unusable so that it cannot be
accidentally inserted into a socket. Instructions for
connecting cable to an alternative plug:
!!
!!
! The wires in the mains lead are coloured in
accordance with the following code:
Green & Yellow - Earth
Blue - Neutral
Brown - Live
If the colours of the wires in the mains lead do not
correspond with the coloured markings identifying
the terminals in your plug, proceed as follows:
Connect Green & Yellow wire to terminal marked “
EE
EE
E”
or
66
66
6 or coloured Green or Green & Yellow.
Connect Brown wire to terminal marked “
LL
LL
L” or
coloured Red.
Connect Blue wire to terminal marked “
NN
NN
N” or
coloured Black.
If a 13 amp plug (BS 1363) is used it must be fitted
with a 13 amp fuse. A 15 amp plug must be
protected by a 15 amp fuse, either in the plug or
adaptor or at the distribution board. If you are in any
doubt about the electrical supply to your machine,
consult a qualified electrician before use.
How to connect an alternative plug:
The wires in this mains
lead are coloured in
accordance with the
following code:
BLUEBLUE
BLUEBLUE
BLUE
NEUTRALNEUTRAL
NEUTRALNEUTRAL
NEUTRAL”
(“
NN
NN
N”)
BROWNBROWN
BROWNBROWN
BROWN
LIVELIVE
LIVELIVE
LIVE”
(“
LL
LL
L”)
GREEN ANDGREEN AND
GREEN ANDGREEN AND
GREEN AND
YELLOWYELLOW
YELLOWYELLOW
YELLOW
EARTHEARTH
EARTHEARTH
EARTH” (
EE
EE
E”)
GREEN &
YELLOW
BROWN
BLUE
13 amp fuse
CROSS-BAR
CORD GRIP
8
GB
PLEASE PHONE US TO REGISTER YOUR APPLIANCE AND ACTIVATE YOUR PARTS GUARANTEE ON 08448 24 24 24
Burner and Nozzle
Specifications
* At 15°C and 1013 mbar- dry gas
** Propane P.C.S. = 50,37 MJ/Kg
S
S
R
A
Table 1 Liquid Gas Natural Gas
Burner Diameter Thermal Power
kW (p.c.s.*)
By-Pass
1/100
Nozzle
1/100
Flow*
g/h
Thermal Power
kW (p.c.s.*)
Nozzle
1/100
Flow*
l/h
(mm) Nominal Reduced (mm) (mm) ** * * * Nominal Reduced (mm)
Fast
(Large)(R)
100 94 2,60 0,7 41 80 189 186 2,60 0,7 118 248
Semi Fast
(Medium)(S)
75 69 1,90 0,4 30 70 138 136 1,90 0,4 104 181
Auxiliary
(Small)(A)
51 46 1,00 0,4 30 52 73 71 1,00 0,4 76 95
Main Oven - - 2,60 0,6 34 71 189 186 2,60 0,6 115 248
Grill - - 2,30 2,0 - 75 167 164 2,30 1,3 114 219
Top Oven - - 2,00 0,6 34 66 145 143 2,00 0,6 104 (X) 190
Supply
Pressures
Nominal (mbar)
Minimum (mba r)
Ma ximum (mb ar)
28-30
20
35
37
25
45
20
17
25
HUG 52X
HUG 52P
HUG 52K
HUG 52G
50HGP
*** Butane P.C.S. = 49,47 MJ/Kg
Natural P.C.S. = 37,78 MJ/m
3
TOP OVEN/GRILL DOOR
CONTROL
PANEL
MAIN OVEN
WIREWORK
SHELF
SUPPORTS
OVEN ROD
SHELVES
TOP OVEN/GRILL
1900W
1900W
1000W
2600W
GRILL/MEAT PAN
WITH REMOVABLE
HANDLE AND WIRE
FOOD SUPPORT
MODEL & SERIAL
NUMBER
REMOVABLE
INNER GLASS
DOOR
HOB VENTILATION SLOTS
GLASS COVER
REMOVABLE
INNER GLASS
DOOR
TOP OVEN
SHELF
SUPPORTS
TOP OVEN/
GRILL DOOR
'STAY CLEAN' LINERS
'STAY CLEAN' LINERS
Features
9
GB
PLEASE PHONE US TO REGISTER YOUR APPLIANCE AND ACTIVATE YOUR PARTS GUARANTEE ON 08448 24 24 24
Control Panel
Electronic Ignition for the Gas Hob
To light a specific burner push the corresponding
knob all the way in and turn it counter-clockwise to
maximum maximum
maximum maximum
maximum
keeping it pressed down until the
burner lights.
Important: Should the burner flamesImportant: Should the burner flames
Important: Should the burner flames
accidentally go out, turn off the control knobaccidentally go out, turn off the control knob
accidentally go out, turn off the control knob
and wait at least 1 minute before trying toand wait at least 1 minute before trying to
and wait at least 1 minute before trying to
relight.relight.
relight.relight.
relight.
Control Knobs for the gas burners
The position of the gas burner controlled by each
one of the knobs is shown by a solid ring
. To
light one of the burners, press down
and turn the
corresponding knob counter clockwise to the
maximum maximum
maximum maximum
maximum
setting. Each burner can be operated
at its maximum, minimum or intermediate power.
Shown on the knob are the different symbols for off
(the knob is on this setting when the symbol
corresponds with the reference mark on the control
knobl), for
maximum maximum
maximum maximum
maximum
and
minimum minimum
minimum minimum
minimum
..
..
. To obtain
these settings, turn the knob counter clockwise with
respect to the off position. To turn off the burner,
turn the knob clockwise until it stops (corresponding
again with the
symbol).
LEFT
FRONT
BURNER
RIGHT
REAR
BURNER
LEFT
REAR
BURNER
RIGHT
FRONT
BURNER
MAIN
OVEN
TOP OVEN/
GRILL
ELECTRONIC
TIMER
HUG 52
Slow cooking ‘S’
The main oven has a ‘
SS
SS
S’ setting specially designed
to reduce energy usage. Full details of this can be
found in the Slow cooking section of this book.
Electronic timer*
The electronic timer displays the time and the timer
function with countdown.
Models with Hob Gas Burner Safety Devices to
Prevent Leaks*
These models can be identified by the presence of
the device itself.
! Since the hob burners are equipped with a safety
device, you must hold the control knob in for about
3-7 seconds after the burner has been lighted to
allow the gas to pass until the safety thermocouple
has heated.
HOB GAS BURNER
SAFETY DEVICE
ELECTRONIC
LIGHTING DEVICE
*Concerns certain models only*Concerns certain models only
EXPERIENCE
LEFT
FRONT
BURNER
RIGHT
REAR
BURNER
LEFT
REAR
BURNER
RIGHT
FRONT
BURNER
MAIN
OVEN
TOP OVEN/
GRILL
LIGHTING
DEVICE
50HGP
HUG 52X
HUG 52P
HUG 52K
HUG 52G
10
GB
PLEASE PHONE US TO REGISTER YOUR APPLIANCE AND ACTIVATE YOUR PARTS GUARANTEE ON 08448 24 24 24
Electronic Minute Minder
Electronic Timer*
The electronic timer displays the time and the timer
function with countdown.
To set the clock
Note: This may be set while the oven is switched
off or while it is switched on.
1. Press the
button several times until the
icon and the first two numerical digits on the watch
displaystart to flash.
2. Use the “+” and “-” buttons to adjust the hour
value.
3. Press the
button again so that the other two
numerical digits on the DISPLAY begin to flash.
4. Use the “+” and “-” buttons to adjust the minute
value.
5. Press the
button again to confirm.
Note: If none of the buttons are pressed, the
settings will be confirmed automatically after 10
seconds have passed.
To set the minute minder
!!
!!
! This function does not interrupt cooking and
does not affect the oven; it is simply used to
activate the buzzer when the set amount of time
has elapsed.
1. Press the
button several times until the
icon and the first two numerical digits on the
display start to flash.
2. Use the “+” and “-” buttons to adjust the hour
value.
3. Press the
button again so that the other two
numerical digits on the DISPLAY begin to flash.
4. Use the “+” and “-” buttons to adjust the minute
value.
5. Press the
button again to confirm.
The countdown will then be displayed; at the end of
this period of time the buzzer will sound (this may
be stopped by pressing any of the buttons, or it will
stop of its own accord after one minute).
To cancel a previous setting
Press the
button and then “-” up until
00
00
0 :
0000
0000
00.
*Concerns certain models only
11
GB
PLEASE PHONE US TO REGISTER YOUR APPLIANCE AND ACTIVATE YOUR PARTS GUARANTEE ON 08448 24 24 24
Hotplates
Gas Cut Off
This cooker has a safety cut out feature which
switches off the burners when you close the cover.
This device is provided as a safety feature in case
the cover is lowered with the burners on.
Practical Advice on Using the Burners
To use the burners as efficiently as possible, some
basic guidelines should be followed:
Use cookware that is the right size for each
burner (see table) in order to prevent the flame from
spreading beyond the bottom of the cookware.
Only use cookware with flat bottoms.
As soon as the boiling point is reached, turn
the knob to the lowest setting.
Always use lids with pots and pans.
Burner ř Cookware diameter (cm)
Fast (R) 20 - 24
Semi Fast (S) 16 - 20
Auxiliary (A) 10 - 14
! !
! !
! On models equipped with a reduction grid, the
grid should only be used with the auxiliary burner
when cookware with a diameter of less than 12 cm is
used.
1. To light a specific burner push the
corresponding knob all the way in and turn it
counter-clockwise to
maximum maximum
maximum maximum
maximum
keeping it
pressed down until the burner lights.
2. Turn the control knob anti-clockwise to the
desired setting. Only turn the control knob between
the large flame symbol and the small flame symbol
for adjusting the setting.
3. To turn off, turn the control knob fully
clockwise to the symbol
OO
OO
O.
DO NOTDO NOT
DO NOTDO NOT
DO NOT use the hotplate unless all pan
supports are in position.
DO NOTDO NOT
DO NOTDO NOT
DO NOT use mis-shapen pans which may be
unstable.
DO NOTDO NOT
DO NOTDO NOT
DO NOT use round base woks directly on the
pan supports.
DO NOTDO NOT
DO NOTDO NOT
DO NOT use the glass lid (if fitted) as a
working surface.
Each burner is fitted with a spark ignitor for lighting
the gas. To ensure rapid lighting of the burners
every time they are used, the ignitors must be kept
clean and dryclean and dry
clean and dry. Remove any food spillage or
cleaning materials from the electrode using a small
nylon brush such as a tooth brush. Access to the
electrode can be achieved by lifting off the loose
burner parts carefully when the burners are cool.
When the hotplate burner bodies and caps are
removed for cleaning, be careful not to drop any
food particles or cleaning materials into the burner
bases, to avoid the possibility of blocking the gas
jets.
If aluminium based pans are used, a silvery deposit
may appear on the top edge of the pan support
fingers. See 'Care and Cleaning' section for cleaning
information.
SAFETY REQUIREMENTS FOR DEEP FATSAFETY REQUIREMENTS FOR DEEP FAT
SAFETY REQUIREMENTS FOR DEEP FAT
FRYINGFRYING
FRYINGFRYING
FRYING
1. Never fill chip pans more than one third full
with oil or fat.
2. Never leave oil or fat unattended during the
heating or cooling period.
3. Never heat fat or fry with a lid on the pan.
4. Always dry food thoroughly before frying,
and
lower it slowly into the hot oil or fat. Frozen
foods in particular will cause frothing and
spitting if added too quickly.
5. Always keep the outside of the pan clean
and
free from streaks of oil or fat.
HOW TO DEAL WITH A FAT FIRE
1. Do not move the pan.
2. Turn off the hotplate burners.
3. Smother the flames with a fire blanket or
damp cloth to extinguish the fire. Do not use
water or a fire extinguisher as the
force of it may spread the
burning fat or oil over the
edge of the pan.
4. Leave the pan for at least 60 minutes before
moving it.
!!
!!
! After prolonged used of the gas hob there may be
some small amount of discolouration in the area
around the large burners. This is normal and can be
easily removed using propriety stainless steel
cleaning agents.
12
GB
PLEASE PHONE US TO REGISTER YOUR APPLIANCE AND ACTIVATE YOUR PARTS GUARANTEE ON 08448 24 24 24
Grill
CAUTION - ACCESSIBLE PARTS MAY BECOME
HOT WHEN THE GRILL IS USED.
YOUNG CHILDREN SHOULD BE KEPT AWAY.
The grill is fitted with a safety device that will cut off
the gas supply to the burner if the flame is
extinguished for any reason. Each time the grill is
used, the safety device has to be activated by
pushing and holding in the control knob for 3
seconds after the gas has lit.
Grill Pan Handle
The grill pan handle is detachable from the pan to
facilitate cleaning and storage. Fix the pan handle
securely before use:
1. Fit the handle to the grill pan so that the external
‘hooks’ embrace the edge of the pan (fig. 1)
2. Make sure that the middle part of the handle fits
exactly the protruding support of the pan (fig .2)
and holds the pan from the bottom.
The food must be placed on the rack in the grill pan.
Position the grill pan on top of the oven rack. The
best results are achieved by placing the oven rack
on the uppermost shelves. Pouring a little water into
the grill pan will make the collection of grease
particles more efficient and prevent the formation of
smoke.
The grill pan can be stored in the top compartment
with the handle attached by placing the shelf in the
middle or lower position and tilting the grill pan over
the rear edge of the shelf.
TO USE THE GRILL
1. Open the top oven/grill door and remove the grill pan.
2. Place the shelf in the appropriate position.
3. Push and turn the control knob clockwise to the
large flame symbol. Continue to push in the control
knob for a further 3 seconds after the gas has lit, to
allow time for the safety device to operate. If the burner
extinguishes when the control knob is released,
repeat the procedure ensuring the control knob is fully
depressed and allowing more time for the safety
device to operate.
4. Slide the grill pan along the shelf towards the rear of
the grill compartment until it stops.
5. Turn the control knob anti-clockwise to reduce the heat
input. Only turn the control knob between the large
flame symbol and the small flame symbol when
adjusting the setting.
6. To turn off, turn the control knob anti-clockwise to the
symbol .
The grill cannot be used at the same time as the top
oven. If for any reason the grill burner has not lit
after 15 seconds, turn the control knob to the off
position, leave the grill door open and wait for at
least one minute before attempting to light the
burner again. An odour may be noticed when first
using the grill - this should cease after a short
period of use.
DO NOT use the grill with the door closed.
DO NOT cover the grill pan or grid with aluminium
foil as this can hold fat, intensify the heat
and create a fire hazard.
RELIGHTING THE BURNER
In the event of the burner flames being accidentally
extinguished, turn off the burner control and do not
attempt to re-ignite the burner for at least one minute.
Grilling can be started from cold but for best results
preheat for approximately two minutes. Most cooking
is done with the heat on full, but it may be desirable to
reduce it for thicker pieces of meat or for keeping food
warm.
For au gratin dishes eg. Macaroni Cheese and
meringue toppings eg. Baked Alaska, place the dish
on the floor of the grill compartment. The base of the
grill pan can be used for warming fruit garnishes on the
reduced setting.
NOTE: Strong detergents used in dishwashers may
damage the grill pan grid finish; clean in soapy water
as described in CARE AND CLEANING section.
Always ensure that the grill pan handle is correctly
fitted to the grill pan.
1
2
13
GB
PLEASE PHONE US TO REGISTER YOUR APPLIANCE AND ACTIVATE YOUR PARTS GUARANTEE ON 08448 24 24 24
Top Oven
The top oven can be used to cook small quantities
of food or used in conjunction with the main oven to
provide additional cooking space.
The top oven is fitted with a safety device that will
cut off the gas supply to the burner if the flame is
extinguished for any reason. Each time the top oven
is used, the safety device has to be activated by
pushing and holding in the control knob for 5
seconds after the gas has lit.
A gentle flow of air will be blown from underneath the
control panel when the grill or top oven is in use.
TO USE THE TOP OVEN
1 Place the top oven shelf in the appropriate
position (refer to cooking chart).
2 Push in and turn the control knob fully anti-
clockwise. Continue to push in the control knob
for at least a further 5 seconds after the gas has
lit to allow time for the safety device to operate. If
the burner extinguishes when the control knob is
released, repeat the procedure ensuring the
control knob is fully depressed and allowing more
time for the safety device to operate.
3 Turn the control knob clockwise to the required
setting. (refer to cooking chart).
4 To turn off, turn the control knob clockwise to the
symbol
.
5 The oven temperature control marking are gas
marked 0 to 8.
Always push the door firmly closed to ensure that
there is no loss of heat through the door seal.
The equivalent degrees Celsius (sometimes called
Centigrade) and degrees Fahrenheit are shown
below as a guide.
GUIDANCE ON USING THE TOP OVEN
1 Best results are obtained by pre-heating the oven
for about 15 minutes.
2 Food which is higher than or will rise above
125mm (5”) cannot be cooked in the top oven.
Never place dishes over the burner.
An odour may be noticed when first using the oven–
this should cease after a short period of use.
Upper Oven Setting Temperature °C Temperature °F
1 120 250
2 140 285
3 160 320
4 175 350
5 190 380
6 205 401
7 215 419
8 225 437
14
GB
PLEASE PHONE US TO REGISTER YOUR APPLIANCE AND ACTIVATE YOUR PARTS GUARANTEE ON 08448 24 24 24
The following times and setting are
for guidance only. You may wish to
alter the setting to give a result more
to your satisfaction. When a different
setting to that shown below is given
in a recipe, the recipe instructions
should be followed. Allow 15 minutes
preheat for best results. Always turn
the thermostat knob to Mark 8 first,
before turning back to the required
Gas Mark.
Shelf position 1 is the highest.
Top Oven Cooking Chart
Gas Shelf
Food Mark Position Approx. Cooking Time and Comments
FISH
Oily and white fish 5 2 20-30 mins.
MEAT AND POULTRY
Beef (medium) 4 or 5 3 25-30 mins per lb + 25-30 mins
Ham (covered in foil) 5 3 40 mins per lb + 40 mins
Lamb 5 3 30-35 mins per lb + 30 mins
Pork 5 3 40 mins per lb + 40 mins
Chicken 5 3 25 mins per lb + 25 mins
Duckling & Goose 5 3 25 mins per lb + 25 mins
Turkey 4
3
15-20 mins per lb + 15-20 mins
Casseroles 3 3 2-4 hrs. depending on meat used.
VEGETABLES
Baked jacket potatoes 5 2 1
1
/
2
- 2 hrs.
PUDDINGS
Milk Puddings (500ml/1pt) 3 2 1
1
/
2
- 2 hrs.
Baked Custard (500ml/1pt) 3 2
45 mins - 1 hr. in bain-marie of cold water.
Baked Sponge Puddings 4 2 30 - 45 mins
Baked Apples 3 2 45 mins - 1 hr. depending on size
Meringue Topped Puddings 1 2 25 mins until tinged with brown
Apple Tart (1 x 205mm/8Ó) 6 2 60 mins
Fruit Crumble 5 2 45 - 50 mins
Push dish right to
back of shelf.
If using aluminium foil:
1 Remember it is important to increase the
cooking time by one third.
2 Do not allow the foil to touch the sides of
the oven.
3 Do not cover the oven interior with foil.
4 Do not cover the oven shelves with foil.
Soft Margarine Soft Margarine
Soft Margarine – Use the oven settings
recommended by the margarine
manufacturer and
not not
not not
not those indicated on
the cooking chart.
Gas Shelf
Food Mark Positions Approx. Cooking Time and Comments
CAKES, PASTRIES AND BISCUITS
Small Cakes (16 per tray) 5 2 20 - 25 mins.
Victoria sandwich (2 x 180mm / 7Ó)
4 2 25 - 30 mins.
Swiss Roll (3 egg quantity) 6 2 10 - 12 mins.
Christmas cake (1 x 205mm / 8Ó) 2 2 4 - 5 hrs depending on recipe
Madeira cake (1 x 180mm / 7Ó) 4 2 1 hr.
Rich Fruit cake (1 x 180mm / 7Ó) 2 2 2
1
/
4
- 2
1
/
2
hrs.
Gingerbread 3 2 1
1
/
2
- 1
3
/
4
hrs.
Scones - 16 per tray 7 2 12 - 15 mins.
Shortbread (1 x 180mm / 7Ó) 2 2 45 mins. Ð 1 hr. depending on thickness
Biscuits 4-6 2 15 - 25 mins.
Shortcrust Pastry 6 2 15 mins. Ð 1 hr. depending on recipe
Rich Short Crust 5 2 20 - 30 mins.
Flaky/Puff Pastry 7 2 10 - 30 mins. depending on recipe
Choux Pastry 6 2 25 - 35 mins.
YEAST MIXTURES
Bread - rolls, plait 7 2 or 3 25 - 35 mins
Tea breads etc. 5 2 25 - 30 mins
MISCELLANEOUS
Yorkshire Pudding - small 7 2 20 - 25 mins
- large 7 2 30 - 40 mins
Meringues 1 3 2
1
/
2
- 4 hrs. turn when necessary
15
GB
PLEASE PHONE US TO REGISTER YOUR APPLIANCE AND ACTIVATE YOUR PARTS GUARANTEE ON 08448 24 24 24
The main oven is fitted with a safety device that will
cut off the gas supply to the burner if the flame has
been extinguished for any reason. Each time the
main oven is used, the safety device has to be
activated by pushing and holding in the control knob
for 3 seconds after the gas has lit.
The oven has different heat zones - the thermostat
settings refer to the temperature on the middle shelf
position; above this shelf it is hotter and below it is
cooler. Two shelves provide five possible cooking
levels enabling full use of the different temperatures
inside the oven.
The maximum size of baking tray that should be
used is 325mm x 350mm (13" x 14").
TO USE THE MAIN OVEN
1. Place the oven shelves in the appropriate positions
(refer to cooking charts).
2. Push in and turn the control knob fully anti-clockwise.
Continue to push in the control knob for a further 3
seconds after the gas has lit to allow time for the
safety device to operate. If the burner extinguishes
when the control knob is released, repeat the proce-
dure ensuring the control knob is fully depressed and
allowing more time for the safety device to operate.
3. Turn the control knob clockwise to the required setting
(refer to cooking chart).
4. To turn off, turn the control knob fully clockwise the
the symbol “o” .
5. The oven temperature control marking are gas
marked 0 to 9.
The equivalent degrees Celsius (sometimes called
Centigrade) and degrees Fahrenheit are shown
below as a guide.
If for any reason the oven burner has not lit after 15
seconds, turn the control knob to the OFF position.
Leave the main oven door open and wait for at least
1 minute before attempting to light the burner again.
Main Oven
Gas Mark
MAIN OVEN
(Centre Oven Temperature)
Celsius
°C
Fahrenheit °F
S 110 229
1 145 290
2 160 320
3 180 355
Ť
195 385
Never place dishes over the burner.
An odour may be noticed when first using the oven -
this should cease after a short period of use.
RELIGHTING THE BURNER
In the event of the burner flames being accidentally
extinguished, turn off the burner control and do not
attempt to re-ignite the burner for at least one minute.
COLD START COOKING
Anything requiring long slow cooking such as
casseroles and rich fruit cakes can be put into a
cold oven. Satisfactory results can also be obtained
with creamed mixture, rich pastries or yeast
mixtures, but for perfection we recommend
preheating the oven for about 15 minutes at the gas
mark you require for cooking.
ROASTING OF LARGE POULTRY
The maximum weight of poultry that can be
accommodated is 11.5kg (25 lbs) of suitable shape.
It is important to check that the bird DOES NOT
overhang the burner at the back of the oven.
STORAGE AND RE-HEATING OF FOOD
It is vitally important to strictly adhere to the basic
principles of food handling and hygiene to prevent
the possibility of bacterial growth.
1. If food is to be frozen or not served immediately,
cool it in a clean container as quickly as possible.
2. Completely thaw frozen food in the refrigerator
before re-heating.
3. Re-heat food thoroughly and quickly either on the
hotplate or in a hot oven, Mk. 6, and then serve
immediately.
4. Only re-heat food once.
'COOK CHILL' DISHES
These should always be placed in a pre-heated oven
ideally on the first or second shelf position. Follow
the packet instructions for cooking time.
ALUMINIUM FOIL
If using Aluminium Foil:
1. Remember that it is important to increase the
cooking time by one third.
2. Never allow the foil to touch the sides of the oven.
3. Never cover the oven interior with foil.
4. Never cover the oven shelves with foil.
Gas Mark
MAIN OVEN
(Centre Oven Temperature)
Celsius
°C
Fahrenheit °F
5 210 410
Ť
220 430
7 230 445
Ť
240 465
9245475
16
GB
PLEASE PHONE US TO REGISTER YOUR APPLIANCE AND ACTIVATE YOUR PARTS GUARANTEE ON 08448 24 24 24
The following times and setting are for guidance
only. You may wish to alter the setting to give a
result more to your satisfaction. When a different
setting to that shown below is given in a recipe, the
recipe instructions should be followed.
Main Oven Cooking Chart
Allow 15 minutes preheat for best results.
Always turn the thermostat knob to Mark 9 first,
before turning back to the required Gas Mark.
Shelf position 1 is the highest.
Food Gas
Mark
Shelf
Position
Approx. Cooking Time and Comments
Fish
Oily and white fish 3 or 4 4 25-60 mins. depending on recipe
Meat and Poultry
Beef 4 or 5 4 25-30 mins per 450g (1 Ib) + 25 mins. extra
Ham 5 4
40 mins per 450g (1 Ib) covered in foil plus 40 mins.
extra
Lamb 5 4 30 mins per 450g (1 Ib) + 30 mins extra
Pork 5 4 40 mins per 450g (1 Ib) + 40 mins extra
Chicken 5 4 25 mins per 450g (1 Ib) + 25 mins extra
Duckling & Goose 5 4 25 mins per 450g (1 Ib) + 25 mins extra
Turkey 4 or 5 4 or 5 15-20 mins per 450g (1 Ib) + 20 mins
Casseroles 3 3or4 2-6 hrs. depending on cut of meat
Vegetables
Baked jacket potatoes 4 or 5 3 1½ - 3 hrs. until soft, depending on size
Puddings
Milk Puddings (500ml/1 pt) 3 4
-2½ stand dish on baking tray and started with
warm milk
Baked Custard (500ml/1 pt) 3 4 45-60 mins. bain-marie
Baked Sponge Puddings 4 3 40-50 mins
Baked Apples 3 3 30-45 mins depending on type and size of apples
Meringue Topped Puddings 1 3or4 15 mins or until "tinged" with brown
Apple Tart (1 x205mm/8
//
) 6 2 45-60 mins
Fruit Crumble 5 2 35 -45 mins
Cakes, Pastries & Biscuits
Small Cakes 2 trays 5 2 and 4 15-25 mins.
1 tray 5 2 15-22mins.
Victoria sandwich (2 x
7"
)
4 2 and 4 20-30 mins
Swiss Roll (3 egg quantity) 5 2 15-20 mins.
Meringues 1 3 2-3 hrs
Christmas cake (1 x 205mm / 8") 2 3 Time depending on recipe
Madeira cake (1 x 180mm /
7")
44 1¼-1½ hrs.
Rich Fruit cake (1 x 180mm /
7") 2 4 Time depending on recipe
Scones 7 1 and 3 10-20 mins.
Shortbread (1 x 180mm /
7") 2 3 55 -65 mins.
Biscuits 4 1 and 3 10-20 mins.
Shortcrust Pastry 6 2 15 - 60 mins depending on use.
Rich Short Crust 5 1 and 3 20-30 mins.
Flaky/Puff Pastry 7 2 10-30 mins.
Choux Pastry 6 2 20-30mins.
Yeast Mixtures
Bread - rolls 7 2 and 4 20-30 mins.
Miscellaneous
Yorkshire Pudding:- large 7 1 30-40 mins
individual 7 2 20-30mins
When baking with two trays or tins on two levels, the top tray is removed first and the lower tray moved up to
the top position for a few minutes longer.
Soft Margarine -
Use the oven settings recommended by the margarine manufacturer and
not not
not not
not those indicated on the cooking
chart.
17
GB
PLEASE PHONE US TO REGISTER YOUR APPLIANCE AND ACTIVATE YOUR PARTS GUARANTEE ON 08448 24 24 24
Using the Main Oven for Other
Functions
‘S’SLOW Setting
This is used for slow cooking, keeping food warm
and warming plates for short periods. Extra care
should be taken when warming bone china, as it
may be damaged in a hot oven.
DO NOT place food or plates directly on theDO NOT place food or plates directly on the
DO NOT place food or plates directly on the
oven floor as this could oven floor as this could
oven floor as this could damage both the oven
lining and the plates which are being warmed.
Advantages of “SLOW” cooking are:
The oven stays cleaner because there is less
splashing.
Timing of food is not as critical, so there is less fear
of overcooking.
Inexpensive joints of meat are tenderised.
Fully loading the oven can be economical.
Cooking times can be extended in some cases by
up to 2 hours.
Operation:
1. Place the prepared food in the main oven and
ensure the door is fully closed.
2. Select ‘S’ (Slow Cooking Temperature) by turning
the Main Oven Control clockwise ensuring the oven
door is fully closed.
Storage and re-heating of food:
1. If food is to be frozen or not used immediately,
place it in a clean container and cool as soon as
possible.
2. Always thaw frozen food completely in the
refrigerator before re-heating.
3. Always reheat food thoroughly and ensure it is
piping hot before serving.
4. Only re-heat food
once.
Points to consider when preparing food for
“SLOW” cooking:
1. Make sure that the dishes to be used will fit
into the oven ensuring enough room for air to
circulate.
2. All dishes cooked on the slow setting will
require a minimum of 6 hours, however,
if if
if if
if they are
cooked for 1 -2 hours longer then deterioration in
their appearance may be noticed.
3. Never cook joints of meat over 2.7kg (6 Ib) or
poultry over 2.0kg (4lb 8oz).
We do not recommend that joints of meat or poultry
are stuffed before cooking on the slow setting.
4. To seal in the meat juices, always cook meat or
poultry at 170°C for 30 minutes before wrapping in
foil and placing on a rack over a tin (to allow good
air circulation) before turning the control to the slow
setting and cooking immediately.
5. Always ensure that joints of pork and poultry are
thoroughly cooked by checking with a meat
thermometer before serving.
6. Always thaw frozen foods completely before
cooking. We do not recommend placing frozen
food in the oven to cook.
7. Always bring soups, liquids and casseroles to
the boil before placing in the oven.
8. Ensure that casserole dishes have a good seal
(not airtight) and cover to the top with foil to
prevent loss of moisture.
9. Ensure that fruit and vegetables are cut into
even sized small pieces to cook properly.
10
..
..
. Always adjust seasoning before serving.
11. If using dried red kidney beans it is important
that the beans are soaked and then boiled for a
minimum of 10 minutes before using in any dish to
destroy any toxins.
12. When cooking fish or egg dishes it may be
necessary to check during cooking to avoid
overcooking
18
GB
PLEASE PHONE US TO REGISTER YOUR APPLIANCE AND ACTIVATE YOUR PARTS GUARANTEE ON 08448 24 24 24
Care and Cleaning
s
Grill
Remove the grill pan and the wire grid food support,
it is best to wash these items immediately after use
to prevent stains from being burnt on when used
again. Wipe out the Grill compartment, use a fine
steel wool soap pad to remove stubborn stains from
the grill runners and the floor of the compartment.
Wipe over the control panel with a damp cloth and
polish with a dry cloth.
Control Panel
Do not use Do not use
Do not use cream cleaners, oven cleaners or
aerosols, scouring pads or abrasive powder for
cleaning the plastic knobs as damage will occur.
Decorative Trims
It is advisable to clean the decorative trims regularly
to prevent any build up of soiling. The
recommended method of cleaning is to wipe over
the trims with a soft cloth wrung out in warm water or
mild non-abrasive cleaner. (If in doubt try the cleaner
on a small area of trim which is not noticeable in
normal use). Then, after wiping with a cloth wrung
out in clear water, dry with a soft clean cloth.
Ovens
Remove the rod shelves and grill pan. Use a fine
steel wool soap pad to remove stubborn stains from
the rod shelves, grill pan and the floor of the oven.
Clean the glass part of the oven door using a
sponge and a non-abrasive cleaning product, then
dry thoroughly with a soft cloth. Do not use rough
abrasive material or sharp metal scrapers as these
could scratch the surface and cause the glass to
crack.
Oven Shelf Supports
The shelf supports are removable and dishwasher
safe.
To remove To remove
To remove To remove
To remove hold the support at the front lift and pull
away from the oven side, this can then be cleaned in
a sink or a dishwasher. When removed it allows
access to the oven side, which can be cleaned with
warm soapy water.
To refit To refit
To refit To refit
To refit the support, insert the longer leg into the
rear fixing hole and push in the front leg.
'Stay Clean' Panel
'Stay Clean' panels are covered with a special enamel
which absorbs cooking soils. At higher temperatures
the soiling is slowly destroyed. In most cases normal
cooking at higher temperatures will permit this cleaning
to take place automatically. However, if higher cooking
temperatures are not used regularly then it may be
necessary, in order to prevent heavy soiling, to run the
oven at maximum temperature for at least two hours,
from time to time. The 'Stay Clean' panel can be
washed in warm soapy water followed by rinsing in
clear water. Dry well with a soft cloth.
NOTE: Do not use enzyme washing powder, harsh
abrasives or chemical oven cleaners of any kind.
Oven Lamp Replacement
Open the oven door and remove the rod shelves.
Using a suitable cloth to protect the fingers grip the
light glass dome, unscrew anti-clockwise and lift.
Reach into the aperture with fingers, and unscrew
the lamp anticlockwise. Fit replacement lamp (25W
300°C rated SES), refit dome.
! To avoid electric shock please ensure that the
electricity supply to the appliance is switched off
and the appliance is fully cold, before removing the
lamp lens.
! Never use steam cleaners or pressure cleaners
on the appliance.
!
Clean the glass part of the oven door using a sponge
and a non-abrasive cleaning product, then dry
thoroughly with a soft cloth. Do not use rough abrasive
material or sharp metal scrapers as these could
scratch the surface and cause the glass to crack.
! The accessories can be washed like everyday
crockery (even in your dishwasher).
! Switch off the electricity supply and allow to
cool before cleaning the cooker.
! Clean the cooker regularly and wipe up spills
soon after they occur to prevent them from
becoming burnt on. Never use biological
washing powder, caustic cleaners, harsh
abrasives, scouring pads, steam cleaners,
aerosol cleaners or oven chemical cleaners of
any kind.
! If it is necessary to remove the cooker for
cleaning, ensure that it is cool and beware that it
is heavy (approximately 70 kg 155 lbs).
! To move the cooker forward, open the top oven/grill
door and with both hands positioned under the roof
of the compartment, lift and pull forward. Replace by
pushing the cooker backwards.
! Check that the cooker is level. Take care not to
damage any floor coverings.
19
GB
PLEASE PHONE US TO REGISTER YOUR APPLIANCE AND ACTIVATE YOUR PARTS GUARANTEE ON 08448 24 24 24
COOKER FINISH CLEANING METHOD
Vitreous Enamel
Door inner panels, pan supports, burner caps,
roasting dish, grill pan, main oven base, inside of
grill compartment.
Hotplate
Cloth wrung out in warm soapy water. Stubborn stains can be
removed with a cream paste, liquid cleaner or by rubbing with fine
steel wool soap pads.
Check that the cleaning agent is approved by the Vitreous Enamel
Association.
Paint
Side panels.
Control panel, lid front trim
Wash with a cloth wrung out in warm soapy water only.
DO NOT USE ABRASIVES.
Aluminium
Hotplate burner bodies, lid rear trim.
Similar to paint cleaning above. Use a nylon brush to remove any
cleaning materials, water or dirt from the hotplate burner bodies.
Glass
As for enamel cleaning. Polish with a clean dry cloth or kitchen roll.
Chromium Plating
Oven shelves, grill pan grid, grill pan handle
support.
Wipe with a cloth wrung out in warm soapy water. A fine steel wool
soap pad e.g. Brillo, Ajax, or a chrome or stainless steel cleaner
may be used.
Plastic
Control knobs.
Wipe with a cloth wrung out in warm soapy water.
Stainless Steel
Hotplate, control panel ,grill pan handle,
Wipe with a cloth wrung out in warm soapy water. Polish with a
clean dry cloth or kitchen towel. For stubborn stains, use a
proprietary stainless steel cleaner and follow the instructions on the
container.
Care and Cleaning
Doors
Wipe over the outer door glass panels with a cloth
wrung out in warm soapy water, then after wiping
with a cloth wrung out in clear water, dry with a soft
clean cloth.
Ensure that glass doors are notEnsure that glass doors are not
Ensure that glass doors are not
subjected to any sharp mechanical blows.subjected to any sharp mechanical blows.
subjected to any sharp mechanical blows.
Glass Inner Door Panel (where fitted) Glass Inner Door Panel (where fitted)
Glass Inner Door Panel (where fitted) –
open the door fully and
carefully slide the inner
glass towards you,
taking care not to allow
the glass to fall.
The glass panel may now be washed at the sink.
Stubborn stains can be removed by using a fine
steel wool soap pad.
Ensure the glass panel isEnsure the glass panel is
Ensure the glass panel is
not subjected to any sharp mechanicalnot subjected to any sharp mechanical
not subjected to any sharp mechanical
blows. blows.
blows. blows.
blows. Take particular care not to damage the inner
surface which is coated with a heat reflective layer.
After cleaning, rinse and dry with a soft cloth. For
slight soiling the inner glass panel may be cleaned,
while still warm, without removing it from the door.
Warning: Oven must not be operated with inner door
glass removed.
SIDE OPENING DOORS
Cleaning the door glass is the same as the drop
down doors, except take care to support the weight
of the inner glass when removing and refitting.
Take care Take care
Take care Take care
Take care during cleaning not to damage or distort
the door seals. Do not lift the door seal from the
oven chassis, if necessary remove the seal by
carefully unhooking the corner clips.
Take care Take care
Take care Take care
Take care that the rating label edges are not lifted
during cleaning, and furthermore that the lettering is
not blurred or removed.
When refitting the glass make sure it is fitted
correctly i.e. reflective face is fitted the right way
round.
20
GB
PLEASE PHONE US TO REGISTER YOUR APPLIANCE AND ACTIVATE YOUR PARTS GUARANTEE ON 08448 24 24 24
Care and Cleaning
BURNER MAINTANANCE INSTRUCTIONSBURNER MAINTANANCE INSTRUCTIONS
BURNER MAINTANANCE INSTRUCTIONS
Before cleaning the burners ensure the appliance is switchBefore cleaning the burners ensure the appliance is switch
Before cleaning the burners ensure the appliance is switch
off and isolated from the electriacl supply and theoff and isolated from the electriacl supply and the
off and isolated from the electriacl supply and the
appliance is cold.appliance is cold.
appliance is cold.
MAIN OVENMAIN OVEN
MAIN OVENMAIN OVEN
MAIN OVEN
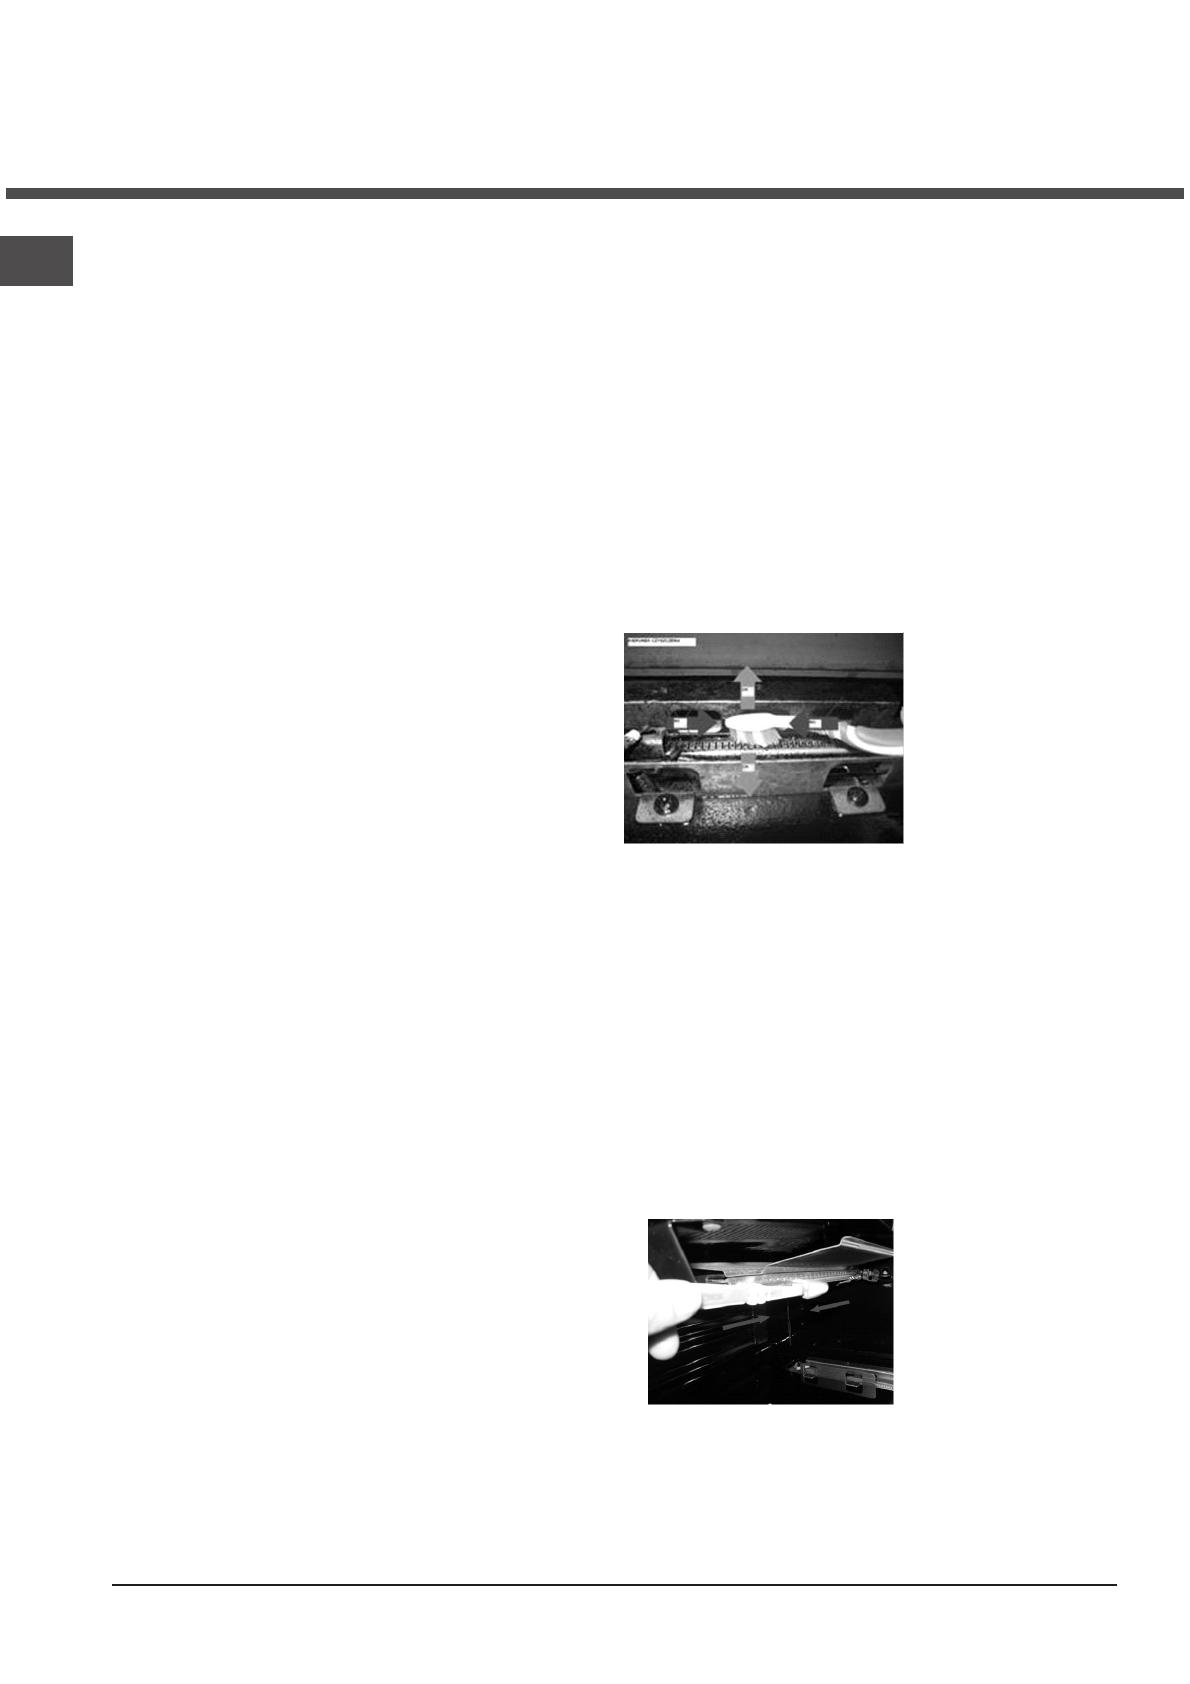
When the main oven is used regularly, its burner is
susceptible to being covered with grease and dirt.
This might result in problems with the burner’s ignition as
well as the uneven or disappearing flame.
To solve the problem clean the burner with a small amount
of water- diluted cleaner (e.g. CIF) using a small brush (e.g.
a toothbrush). After cleaning wipe the burner with a cloth
to remove the detergent waste and let it dry for at least 2
hours.
WARNING!WARNING!
WARNING!WARNING!
WARNING!
1. Brush the burner in the directions indicated
below.
2. DO NOT re-ignite the burner with the detergent
residue.
TOP OVEN/ MAIN OVENTOP OVEN/ MAIN OVEN
TOP OVEN/ MAIN OVEN
When the Top oven/grill is used regularly, its burner is
susceptible to being covered with grease and dirt.
This might result in problems with the burner’s ignition as
well as the uneven or disappearing flame.
To solve the problem clean the burner with a small amount
of water- diluted cleaner (e.g. CIF) using a small brush (e.g.
a toothbrush). After cleaning wipe the burner with a cloth
to remove the detergent waste and let it dry for at least 2
hours.
WARNING!WARNING!
WARNING!WARNING!
WARNING!
1. Brush the burner in the directions indicated
below.
2. DO NOT re-ignite the burner with the detergent
residue.
GRILLGRILL
GRILLGRILL
GRILL
CLEANING THE DOORS
(model: 50HGP)
Take particular care not to damage the innerTake particular care not to damage the inner
Take particular care not to damage the inner
surface of the door inner glass that is coatedsurface of the door inner glass that is coated
surface of the door inner glass that is coated
with a heat reflective layer. Do not usewith a heat reflective layer. Do not use
with a heat reflective layer. Do not use
scouring pads, or abrasive powder,which willscouring pads, or abrasive powder,which will
scouring pads, or abrasive powder,which will
scratch the glass. Ensure that the glassscratch the glass. Ensure that the glass
scratch the glass. Ensure that the glass
panel is not subjected to any sharppanel is not subjected to any sharp
panel is not subjected to any sharp
mechanical blows.mechanical blows.
mechanical blows.
Stubborn stains can be removed by using a fine
steel wool soap pad. For slight soiling theinner glass
panel may be cleaned, while still warm, without
removing it from the door. Aftercleaning, rinse and
dry with a soft cloth.
SIDE OPENING DOORS
Cleaning the door glass is the same as theCleaning the door glass is the same as the
Cleaning the door glass is the same as the
drop down doors, except take care todrop down doors, except take care to
drop down doors, except take care to
support the weight of the inner glass whensupport the weight of the inner glass when
support the weight of the inner glass when
removing and refitting.removing and refitting.
removing and refitting.
DROP DOWN DOORS
Wipe over the outer door glass panels with a cloth
wrung out in warm soapy water, then after wiping
with a cloth wrung out in clear water, dry with a soft
clean cloth.
Ensure that glass doors are notEnsure that glass doors are not
Ensure that glass doors are not
subjected to any sharp mechanical blows.subjected to any sharp mechanical blows.
subjected to any sharp mechanical blows.
Glass Inner Door Panel (where fitted) Glass Inner Door Panel (where fitted)
Glass Inner Door Panel (where fitted) – open
the door fully and unscrew the two screws securing
the glass panel, taking care not to allow the glass to
fall. The glass panel may now be washed at the
sink. Stubborn stains can be removed by using a
fine steel wool soap pad.
Ensure the glass panelEnsure the glass panel
Ensure the glass panel
is not subjected to any sharp mechanicalis not subjected to any sharp mechanical
is not subjected to any sharp mechanical
blows. blows.
blows. blows.
blows. Take particular care not to damage the inner
surface which is coated with a heat reflective layer.
After cleaning, rinse and dry with a soft cloth. For
slight soiling the inner glass panel may be cleaned,
while still warm, without removing it from the door.
Warning: Oven must not be operated with inner door
glass removed.
Take care Take care
Take care Take care
Take care during cleaning not to damage or distort
the door seals. Do not lift the door seal from the
oven chassis, if necessary remove the seal by
carefully unhooking the corner clips.
Take care Take care
Take care Take care
Take care that the rating label edges are not lifted
during cleaning, and furthermore that the lettering is
not blurred or removed.
1 / 1

Hotpoint HUG52G Operating instructions

Category
Cookers
Type
Operating instructions
This manual is also suitable for

Ask a question and I''ll find the answer in the document

Finding information in a document is now easier with AI

Ask the document