Page is loading ...

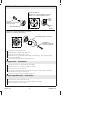
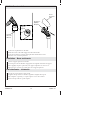
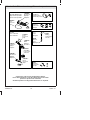
Tools/Outils/Herramientas
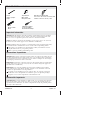
Important Information
IMPORTANT! The slide bar must be mounted to stud framing supports at both the
top and bottom mounting locations. Plastic wall anchors will not support the slide
bar. Do not use or depend on plastic wall anchors to attach the slide bar.
NOTE: The slide bar should not be installed in an area 24″ (61 cm) to 48″ (121.9 cm)
from the floor (the critical support area as defined in ASTM F446).
NOTE: Plumbing codes may require a vacuum breaker (such as Kohler Part K-13056)
be installed in line to handshowers. Please consult with local plumbing officials.
This guide covers installation for fixed holders, holders, and slide bars. Follow
only the instructions for your specific product.
Observe all local plumbing and building codes.
Informations importantes
IMPORTANT! La barre coulissante doit être montée aux support du cadrage de l’axe
aux deux emplacements de montage hauts et bas. Les ancrages muraux en plastique
ne supporteront pas la barre coulissante. Ne pas utiliser ni compter sur des ancrages
en plastique pour attacher la barre coulissante.
REMARQUE: Cette barre coulissante ne doit pas être installée dans un emplacement
compris entre 24″ (61 cm) et 48″ (121,9 cm) du sol (l’endroit critique de support tel
que défini dans l’ASTM F446).
REMARQUE: Les codes de plomberie peuvent exiger l’installation d’un robinet
casse-vide (tel que la pièce Kohler K-13056) en ligne avec les douchettes. Prière de
consulter les représentants locaux de plomberie.
Ce guide couvre l’installation pour les supports fixes, les supports et les barres
coulissantes. Suivre uniquement les instructions pour votre produit spécifique.
Respecter tous les codes de plomberie et de bâtiment locaux.
Información importante
¡IMPORTANTE! La barra deslizante se debe montar a los soportes de una estructura
de postes de madera, tanto arriba como abajo. Los anclajes de pared de plástico no
soportarán la barra deslizante. No utilice ni dependa de anclajes de pared de plástico
para fijar la barra deslizante.
Drill with 1/4" and 3/8" Bits
Percer avec des forets de 1/4 et de 3/8"
Taladre con brocas de 1/4" y 3/8"
Level
Niveau à bulle
Nivel
Pencil
Crayon à papier
Lápiz
Tape Measure
Mètre ruban
Cinta para medir
Phillips Screwdriver
Tournevis Phillips
Destornillador Phillips
1148058-2-A 2 Kohler Co.

Información importante (cont.)
NOTA: La barra deslizante no se debe instalar en un área de 24″ (61 cm) a 48″ (121,9
cm) desde el piso (el área de soporte crítico según lo define la norma ASTM F446).
NOTA: Es posible que las normas de plomería requieran que se instale una válvula
rompevacío (como la K-13056 de Kohler) en línea con la ducha de mano. Consulte las
normas de plomería locales.
Esta guía cubre la instalación de soportes portadores fijos, soportes portadores y
barras deslizantes. Siga solamente las instrucciones para su producto específico.
Cumpla con todos los códigos locales de plomería y construcción.
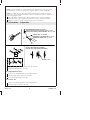
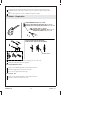
1. Fixed Holder – Preparation
Using the base, mark the mounting holes onto the wall.
Verify the marked locations are level.
For Drywall Between Studs:
Using a 3/8″ drill bit, predrill at each marked location.
Press the toggle anchor shown into the wall.
Use a nail to expand the anchor legs.
For Ceramic Tile:
Using a 1/4″ drill bit, predrill at each marked location.
Press the anchor shown into the wall.
3.2.1.
Drywall Between Studs: 3/8" Drill Bit
Cloison sèche entre les montants: Mèche de 3/8"
Panel de yeso entre postes de madera: Broca de 3/8"
Ceramic Tile: 1/4" Drill Bit
Carrelage en céramique: Mèche de 1/4"
Azulejo de cerámica: Broca de 1/4"
Nail/Clou/Clavo
Drywall Between Studs:
Cloison sèche entre les montants:
Panel de yeso entre postes de madera:
Kohler Co. 3 1148058-2-A
Page is loading ...

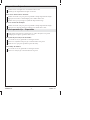
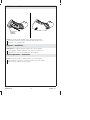
2. Fixed Holder – Installation
Slide the base onto the pin lock.
Orient the base assembly with ″TOP″ up.
Secure to the wall with the two screws.
Ensure the arrows on the back of the holder are pointing up, then slide the holder
onto the base assembly.
Secure the holder with the hex washer and screw.
Support fixe – Installation
Faire glisser la base sur la cheville de verrouillage.
Orienter la base avec la mention ″TOP″ vers le haut.
Fixer sur le mur avec les deux vis.
S’assurer que les flèches situées sur l’arrière du support sont tournées vers le haut,
puis faire glisser le support sur la base.
Sécuriser la poignée avec une rondelle et une vis.
Soporte portador fijo – Instalación
Deslice la base sobre el cierre de clavija.
Oriente el montaje de la base con la palabra ″TOP″ hacia arriba.
Fije a la pared con los dos tornillos.
Screws
Vis
Tornillos
TOP
Orient with TOP up.
Orienter avec la mention TOP vers le haut.
Oriente con las letras TOP hacia arriba.
Orient with arrows pointing up.
Orienter avec les flèches tournées vers le haut.
Oriente con las flechas hacia arriba.
Base
Base
Base
Holder/Support/Soporte portador
Hex Washer
Rondelle hexagonale
Arandela hexagonal
Base/Base/Base
Pin Lock
Goupille de verrouillage
Cierre de clavija
Kohler Co. 5 1148058-2-A

Soporte portador fijo – Instalación (cont.)
Asegúrese de que las flechas de la parte posterior del soporte portador estén
apuntando hacia arriba, luego deslice el soporte portador sobre el montaje de la
base.
Fije el soporte portador con la arandela hexagonal y tornillo.
1. Holder – Preparation
Using the escutcheon, mark the mounting holes onto the wall.
Verify the marked locations are plumb.
For Drywall Between Studs:
Using a 3/8″ drill bit, predrill at each marked location.
Press the toggle anchor shown into the wall.
Use a nail to expand the anchor legs.
For Ceramic Tile:
Using a 1/4″ drill bit, predrill at each marked location.
Press the anchor shown into the wall.
1. 2. 3.
Drywall Between Studs: 3/8" Drill Bit
Cloison sèche entre les montants: Mèche de 3/8"
Panel de yeso entre postes de madera: Broca de 3/8"
Ceramic Tile: 1/4" Drill Bit
Carrelage en céramique: Mèche de 1/4"
Azulejo de cerámica: Broca de 1/4"
Nail/Clou/Clavo
Drywall Between Studs:
Cloison sèche entre les montants:
Panel de yeso entre postes de madera:
1148058-2-A 6 Kohler Co.
Page is loading ...

2. Holder – Installation
NOTE: The holder can be installed with or without the escutcheon.
Secure the escutcheon (optional) and holder with the three screws.
Press the cover onto the holder.
Support – Installation
REMARQUE: Le support peut être installé avec ou sans l’applique.
Fixer l’applique en place (optionnel) et le support avec les trois vis.
Appuyer sur le couvercle pour l’enfoncer sur le support.
Soporte portador – Instalación
NOTA: El soporte portador se puede instalar con o sin el chapetón.
Fije el chapetón (opcional) y el soporte portador con los tres tornillos.
Presione la tapa sobre el soporte portador.
Escutcheon
Applique
Chapetón
1148058-2-A 8 Kohler Co.

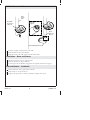
1. Slide Bar – Installation
Using the escutcheon, mark the mounting holes for the bottom bracket onto the
wall.
Mark the centerlines for the top bracket mounting holes. Refer to the illustration
above for measurements.
Verify the marked locations are both level and plumb.
Verify all marked locations are over a stud or other sufficient backing.
IMPORTANT! Predrill through the wall surface only, not into the studs.
Using a 3/16″ drill bit, predrill at each marked location.
NOTE: The slide bar can be installed with or without the escutcheons.
Secure the escutcheon (optional) and bottom bracket with the three screws.
Press the cover onto the bottom bracket.
Installation – Barre coulissante
Utiliser l’applique et marquer les trous de fixation pour le support inférieur sur le
mur.
Marquer les lignes centrales pour les trous de fixation du support supérieur. Voir
l’illustration ci-dessus pour les mesures.
Vérifier que les emplacements marqués sont à niveau et d’aplomb.
Vérifier que tous les emplacements marqués se trouvent par-dessus un goujon ou
un autre renfort suffisant.
Bracket
Support
Soporte
Escutcheon
Applique
Chapetón
Cover
Couvercle
Tapa
22-7/16"
(57cm)
23-3/4"
(60.3 cm)
Escutcheon
Applique
Chapetón
Kohler Co. 9 1148058-2-A
Page is loading ...

2. Slide Bar – Installation
Slide the soap dish onto the bottom of the tube.
Insert the tube into the bottom bracket.
Ensure the notch of the tube engages the tab in the bracket.
Installation – Barre coulissante
Faire glisser le porte-savon sur le bas du tube.
Insérer le tube dans le support inférieur.
S’assurer que l’encoche du tube s’engage dans la languette située dans le support.
Barra deslizante – Instalación
Deslice la jabonera sobre la parte inferior del tubo.
Inserte el tubo en el soporte inferior.
Asegúrese de que la muesca del tubo enganche la lengüeta del soporte.
Tube
Tuyau
Tubo
Bracket/Support/Soporte
Tab
Languette
Lengüeta
Notch
Encoche
Muesca
Soap Dish
Porte-savon
Jabonera
Kohler Co. 11 1148058-2-A

3. Slide Bar – Installation
Position the top bracket onto the tube.
Ensure the notch of the tube engages the tab in the bracket.
Secure the escutcheon (optional) and top bracket with the three screws.
Press the cover onto the top bracket.
Installation – Barre coulissante
Placer le support supérieur sur le tube.
S’assurer que l’encoche du tube s’engage dans la languette située dans le support.
Fixer l’applique en place (optionnel) et le support supérieur avec les trois vis.
Appuyer sur le couvercle pour l’enfoncer sur le support supérieur.
Barra deslizante – Instalación
Coloque el soporte superior sobre el tubo.
Asegúrese de que la muesca del tubo enganche la lengüeta del soporte.
Fije el chapetón (opcional) y el soporte superior con los tres tornillos.
Presione la tapa sobre el soporte superior.
Tab
Languette
Lengüeta
Notch
Encoche
Muesca
Cover
Couvercle
Tapa
Escutcheon
Applique
Chapetón
1148058-2-A 12 Kohler Co.

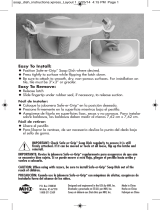
Care and Cleaning
For best results, keep the following in mind when caring for your KOHLER product:
•
Use a mild detergent such as liquid dishwashing soap and warm water for
cleaning. Do not use abrasive cleaners that may scratch or dull the surface.
•
Carefully read the cleaner product label to ensure the cleaner is safe for use on the
material.
•
Always test your cleaning solution on an inconspicuous area before applying to
the entire surface.
•
Do not allow cleaners to sit or soak on the surface.
•
Wipe surfaces clean and rinse completely with water immediately after cleaner
application. Rinse and dry any overspray that lands on nearby surfaces.
•
Use a soft, dampened sponge or cloth. Never use an abrasive material such as a
brush or scouring pad to clean surfaces.
For detailed cleaning information and products to consider, visit www.kohler.com/clean.
To order Care & Cleaning information, call 1-800-456-4537.
Entretien et nettoyage
Pour obtenir les meilleurs résultats possibles, prendre ce qui suit en considération lors de
l’entretien de votre produit KOHLER:
•
Utiliser un détergent doux tel que liquide pour vaisselle et de l’eau chaude pour
nettoyer. Ne pas utiliser de nettoyants abrasifs car ils pourraient rayer ou abîmer
la surface.
•
Lire attentivement l’étiquette du produit de nettoyage pour vérifier qu’il soit
adéquat à utiliser sur le matériau.
•
Toujours tester la solution de nettoyage sur une surface non visible avant de
l’appliquer sur l’ensemble de la surface.
•
Ne pas permettre aux nettoyants de reposer sur la surface.
•
Essuyer les surfaces et rincer complètement avec de l’eau immédiatement après
l’application du nettoyant. Rincer et sécher tout éclaboussement sur les surfaces
avoisinantes.
•
Utiliser une éponge ou un chiffon doux et humide. Ne jamais utiliser de matériau
abrasif tel qu’une brosse ou une éponge à récurer pour nettoyer les surfaces.
Pour obtenir des informations détaillées sur le nettoyage et les produits à considérer,
consulter le site www.kohler.com/clean. Pour commander des informations d’entretien &
et de nettoyage, appeler le 1-800-456-4537.
Cuidado y limpieza
Para obtener los mejores resultados, tenga presente lo siguiente al limpiar su producto
KOHLER:
•
Para la limpieza, utilice solamente un detergente suave como el jabón líquido para
lavar platos y agua tibia. No utilice limpiadores abrasivos que puedan rayar u
opacar la superficie.
•
Lea atentamente la etiqueta del producto de limpieza para asegurar que no
presente riesgos al usarse en el material.
•
Siempre pruebe la solución de limpieza en un área oculta antes de aplicarla a toda
la superficie.
•
No deje por tiempo prolongado los limpiadores en la superficie.
•
Limpie con un trapo y enjuague completa e inmediatamente con agua después de
aplicar limpiadores. Enjuague y seque las superficies cercanas que se hayan
rociado.
•
Utilice una esponja o trapo suave y húmedo. Para limpiar las superficies nunca
utilice materiales abrasivos como cepillos o estropajos de tallar.
Kohler Co. 13 1148058-2-A

Cuidado y limpieza (cont.)
Para obtener información detallada de limpieza y los limpiadores a considerar, visite
www.kohler.com/clean. Para solicitar información sobre el cuidado y la limpieza, llame
al 1-800-456-4537.
Warranty
KOHLER
®
Faucet Lifetime Limited Warranty
Kohler Co. warrants its Faucets* manufactured after January 1, 1997, to be leak and drip
free during normal residential use for as long as the original consumer purchaser owns
his or her home. If the Faucet should leak or drip during normal use, Kohler Co. will,
free of charge, mail to the purchaser the cartridge necessary to put the Faucet in good
working condition. This warranty applies only to Kohler Faucets installed in the United
States of America, Canada or Mexico (″North America″).
Kohler Co. also warrants all other aspects of the faucet or accessories (″Faucet″)*, (except
gold, non-Vibrant
®
, non-chrome finishes) to be free of defects in material and
workmanship during normal residential use for as long as the original consumer
purchaser owns his or her home. This warranty applies only to Kohler Faucets installed
in North America. If a defect is found in normal residential use, Kohler Co. will, at its
election, repair, provide a replacement part or product, or make appropriate adjustment.
Damage to a product caused by accident, misuse, or abuse is not covered by this
warranty. Improper care and cleaning will void the warranty**. Proof of purchase
(original sales receipt) must be provided to Kohler Co. with all warranty claims. Kohler
Co. is not responsible for labor charges, installation, or other incidental or consequential
costs. In no event shall the liability of Kohler Co. exceed the purchase price of the
Faucet.
If the Faucet is used commercially or is installed outside of North America, or if the
finish is gold, non-Vibrant or a painted or powder coated color finish, Kohler Co.
warrants the Faucet to be free from defects in material and workmanship for one (1) year
from the date the product is installed, under Kohler Co.’s standard one-year limited
warranty.
If you believe that you have a warranty claim, contact Kohler Co., either through your
Dealer, Plumbing Contractor, Home Center or E-tailer, or by writing Kohler Co., Attn.:
Customer Care Center, 444 Highland Drive, Kohler, WI 53044, USA. Please be sure to
provide all pertinent information regarding your claim, including a complete description
of the problem, the product, model number, color, finish, the date the product was
purchased and from whom the product was purchased. Also include your original
invoice. For other information, or to obtain the name and address of the service and
repair facility nearest you, call 1-800-4-KOHLER (1-800-456-4537) from within the USA
and Canada, and 001-800-456-4537 from within Mexico, or visit www.kohler.com within
the USA, www.ca.kohler.com from within Canada, or www.mx.kohler.com in Mexico.
KOHLER CO. AND/OR SELLER ARE PROVIDING THESE WARRANTIES IN LIEU
OF ALL OTHER WARRANTIES, EXPRESSED OR IMPLIED, INCLUDING BUT NOT
LIMITED TO THE IMPLIED WARRANTIES OF MERCHANTABILITY AND
FITNESS FOR A PARTICULAR PURPOSE. KOHLER CO. AND/OR SELLER
DISCLAIM ALL LIABILITY FOR SPECIAL, INCIDENTAL OR CONSEQUENTIAL
DAMAGES. Some states/provinces do not allow limitations of how long an implied
warranty lasts or the exclusion or limitation of such damages, so these limitations and
exclusions may not apply to you. This warranty gives the consumer specific legal
rights. You may also have other rights that vary from state/province to state/province.
This is Kohler Co.’s exclusive written warranty.
*Trend
®
faucets, MasterShowerTM tower, BodySpaTM systems and components;
WaterHavenTM tower, systems and components; TripointTM faucets, Polished Gold,
non-Vibrant and painted or powder coated finishes, fittings; all items within the ″Fixture
Related″ section of the Kohler Faucets Price Book, drains, Duostrainer
®
sink strainers,
1148058-2-A 14 Kohler Co.
Page is loading ...
Page is loading ...
Page is loading ...

Service Parts/Pièces de rechange/Piezas de repuesto
1140858**
Slide Bar
Barre coulissante
Barra deslizante
**Finish/color code must be specified when ordering.
**Vous devez spécifier les codes de la finition et/ou de la couleur
quand vous passez votre commande.
**Se debe especificar el código del acabado/color con el pedido.
Wall Mount
Montage mural
Montura de pared
1140861**
1140862**
Adjustable Wall Bracket
Support mural ajustable
Soporte mural ajustable
1140867**
Cover
Couvercle
Tapa
1140882**
Escutcheon
Applique
Chapetón
1140882**
1140867**
1140860**
Escutcheon
Applique
Chapetón
Cover
Couvercle
Tapa
Slider
Glissière
Corredera
1140882**
Escutcheon
Applique
Chapetón
1140867**
Cover
Couvercle
Tapa
O-Ring
Joint torique
Arosello
34353
Gasket
Joint
Empaque
79003
Hose
Tuyau
Manguera
58461**
88083
Hardware
Boulonnerie
Herrajes
1140870
Soap Dish
Porte-savon
Jabonera
1023365
Hardware
Boulonnerie
Herrajes
1148058-2-A 18 Kohler Co.
Page is loading ...
Page is loading ...
-
 1
1
-
 2
2
-
 3
3
-
 4
4
-
 5
5
-
 6
6
-
 7
7
-
 8
8
-
 9
9
-
 10
10
-
 11
11
-
 12
12
-
 13
13
-
 14
14
-
 15
15
-
 16
16
-
 17
17
-
 18
18
-
 19
19
-
 20
20


Ask a question and I''ll find the answer in the document
Finding information in a document is now easier with AI
in other languages
- français: Kohler K-9516-CP Guide d'installation
- español: Kohler K-9516-CP Guía de instalación
Related papers
-
Kohler K-9515-AF Installation guide
-
-
Kohler 14791-SN Installation guide
-
-
Kohler 11050-CP Installation guide
-
-
-
Kohler 45906-BN Installation guide
-
Kohler T97331-4-BN Installation guide
-
Kohler K-T97328-4-CP Installation guide
Other documents
-
WaterWorks HGPH31 Installation guide
-
Fleurco AURA VA21105 Installation and User Manual
-
 Best Value 8517 Installation guide
-
Delta Faucet Faucet Contemporary Corner Shelf/Assist Bar Owner's manual
-
Delta 41416-BL Installation guide
-
Delta Faucet 41319-SS Installation guide
-
 Safe-er-Grip 10786 User guide
-
 ClosetMaid 3462 Operating instructions
-
Moen CSR2164BL Owner's manual
-


