Page is loading ...

INS #
Brand Logo
reversed out of
black
INS #
ADL141353
Installation Instructions – ASPEN 1900 Series Mid-Sized Bollard
1900-OA 1900-IL

2
Installation Instructions – ASPEN 1900 Series Mid-Sized Bollard
Installation Instructions – ASPEN 1900 Series Mid-Sized Bollard
ADL141353 www.eaton.com
WARNING
Make certain power is OFF before starting installation
or attempting any maintenance.
WARNING
Risk of fire/electric shock. If not qualified, consult an
electrician. This equipment to be installed by trained
and qualified personel.
WARNING
Risk of Electric Shock - Disconnect power at fuse or
circuit breaker before installing or servicing.
WARNING
Risk of Burn - Disconnect power and allow fixture to cool
before servicing.
WARNING
Risk of Personal Injury - Fixture may become damaged
and/or unstable if not installed properly.
WARNING
Risk of Burn - Disconnect power and allow fixture to cool
before servicing.
NOTE: These instructions do not claim to cover all details
or variations in the equipment, proocedure, or
process described, nor to provided directions for
meeting every possible contingency during instal-
lation, operation or maintenance. When additional
information is desired to satisfy a problem not cov-
ered sufficiently for user’s purpose, please contact
your nearest representative.
NOTE: Care must be taken not to set lighting fixture down
on optical lenses or lift fixture in lens area.
NOTE: To prevent wiring damage or abrasion, do not
expose wiring to edges of sheet metal or any
sharp objects. Proper grounding is required to
ensure personal safety.
NOTE: Specifications and dimensions subject to change
without notice.
NOTE: Replace removable parts after servicing.
IMPORTANT: Read carefully before installing fixture. Retain for future reference.
GENERAL: Upon receipt of the fixture, thoroughly inspect for any freight damage which should be brought to the
attention of the delivery carrier. Compare the catalog description listed on the packing slip with the fixture label on the
housing to assure you have received the correct material.
SAFETY: This fixture must be wired in accordance with the National Electrical Code and applicable local codes and
ordinances. Proper grounding is required to insure personal safety. Carefully observe grounding procedure under
installation section.
APPLICATIONS: This lighting fixture is designed for outdoor lighting services, and should not be used in area of limited
ventilation or inside high ambient temperature enclosures. It must be stored in a dry location prior to installation. Do not
expose lighting fixture to rain, dust or other environmental conditions prior to installation. Best results will be obtained if
installed and maintained according to the following recommendations.
IMPORTANT LISTINGS AND CERTIFICATIONS SPECIFIC TO FIXTURE:
z
SUITABLE FOR WET LOCATIONS.
z
SUITABLE FOR GROUND MOUNT ONLY.
z
SUITABLE FOR OPERATION NOT EXCEEDING 40°C AMBIENT
Installation Instructions – ASPEN 1900 Series Mid-Sized Bollard

3
Installation Instructions – ASPEN 1900 Series Mid-Sized Bollard
Figure 1.
1. Unpack ASPEN Series Bollard and ensure that all
included parts are present. (Figure 1 and Figure 2.)
ote:N Anchor bolt assembly components may have
shipped ahead of fixture for early installation..
Step 1: Review Package Contents
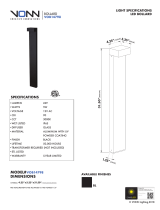
ASPEN 1900-OA Series Mid-Sized Bollards
INSTALLATION
Installation Instructions – ASPEN 1900 Series Mid-Sized Bollard
ADL141353 www.eaton.com
Mid-Size Bollard
External Sleeve
with factory
sealed optical
assembly
Component Frame
Assembly Options
Base Mounting Pad
Anchor Bolt
Assembly with Bolt
Plate
LED
MR16 PAR20
Figure 2.
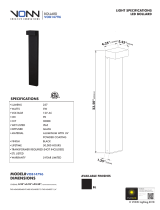
ASPEN 1900-IL Series Mid-Sized Bollards
Mid-Size Bollard
External Sleeve
with factory
sealed optical
assembly
Component Frame
Assembly
Base Mounting Pad
Anchor Bolt
Assembly with Bolt
Plate
CFL

4
Installation Instructions – ASPEN 1900 Series Mid-Sized Bollard
ADL141353 www.eaton.com
Figure 3.
Step 2: Anchor Bolt Installation
1. Disconnect or turn fixture power OFF prior to
performing all installation and maintenance activities.
Trench as appropriate and place conduit as required
by the National Electric Code and any other applicable
rules, regulations, and requirements. Ensure that
there is enough depth in trench to accept anchor bolt
assembly.
2. Remove the external sleeve from the fixture base.
Locate anchor bolt assembly.
3. Place anchor bolt assembly (three anchor bolts
attached to pad plate with nuts) over conduit and
secure for concrete pour. Make sure that the pad
plate is flush with the concrete surface, and that the
assembly will not be dislodged during concrete pour
operations. (Figure 3.) The base has been designed
to accept two (2) conduits for daisy chaining when
necessary.
ote:N Ensure that there is enough thread length above
the pad plate to accept the fixture base and
neoprene pad, and to allow 2” to protrude from the
top of the base. (Figure 4.)
4. Pour concrete. Make sure that pad plate is as level as
possible. Allow concrete to cure.
2”
Conduit
Figure 4.
Pad Plate on surface
of concrete
Figure 5.
1. To level the base, adjust the top three lock nuts.
2. As you tighten the nuts, the base compresses the
underlying neoprene pad for quick and easy leveling.
Step 4: Leveling Base
1. Pull line-voltage wire leads through the conduit and
fixture base and make connection to component
frame assembly input leads (LED module shown)
(Figure 6.) Connect supply wires to appropriate
luminaire leads.
• Supply side ground wire to green luminaire lead.
• Supply side neutral wire to white luminaire lead.
• Supply side line voltage
wire to black luminaire lead.
2. Secure the external sleeve
to the base by tighten
the three (3) counter-
sink screws. (Figure 7.)
Recommend tightening
by hand as to not strip the
screw
Step 5: Connecting to Power
1. Remove the top three nuts from the anchor bolts.
(Figure 5.)
2. Place the base mounting pad and base onto the bolts.
3. Replace the top three nuts with the supplied lock nuts
to ensure that the base remains secure to the anchor
bolts.
Step 3: Base Installation
Base
Base Mounting Pad
Figure 6.

5
Installation Instructions – ASPEN 1900 Series Mid-Sized Bollard
Installation Instructions – ASPEN 1900 Series Mid-Sized Bollard
ADL141353 www.eaton.com
Figure 7.
Figure 8.
3X Screws 120°
Apart
1. Disconnect or turn fixture power OFF prior to
performing all maintenance activities.
2. Remove external sleeve from base by removing three
screws and placing in a safe location (Figure 8).
3. ATTENTION: Do not try to unscrew optical
assembly to access lamp. Tampering with optical
assembly will void fixture warranty.
4. Cat. 1900-OA (MR16): Align and insert the two pins
at the bottom of the lamp with the two in GU5.3
socket. Make sure base of lamp touches the base
of the socket. Do not rotate lamp when installing or
removing from socket.
5. Cat. 1900-OA (PAR20): Thread lamp clockwise into
socket until firmly seated. This fixture only accepts
PAR20, 50W max incandescent lamps.
6. Cat. 1900-OA (LED): See LED Module Section (Figure
9).
7. Cat. 1900-IL (Compact Fluorescent Lamp): Align pins
with socket. Place the lamp in the socket and turn
clockwise to snap lamp into place. This fixture accepts
either 26W, 32W or 42W compact flourescent lamps.
8. Place external sleeve over component frame assembly
and secure to base using the three counter-sink
screws.
Step 6: Relamping
Remove external
sleeve to access
lamp or LED
Figure 9.
1. Push button enables switching between four light
output modes (100%, 80%, 55% and 18%). Module
is factory set to 100%.
2. The selected setting is stored in memory. The device
automatically switches to selected mode after power
has been interrupted. If the module is connected to a
dimmer, the push button is automatically de-activated
and the dimmer will be the sole control method of the
light output.
REVIEW: LED Module
Push Button
Location
DO NOT REMOVE
OPTICAL ASSEMBLY
TO ACCESS LAMP.
THIS IS FACTORY
SEALED.
Optical Assembly
B.C.
2.10
1.0
.57
.33
3.0
.50
Reference: Anchor Bolt Pad Plate Template
1. Template is not to scale and to be used as a reference
only (Figure 10).
Figure 10.
Shown in inches

Eaton is a registered trademark.
All trademarks are property of their
respective owners.
Eaton est une marque de commerce
déposée. Toutes les autres marques
de commerce sont la propriété de leur
propriétaire respectif.
Eaton es una marca comercial
registrada. Todas las marcas
comerciales son propiedad de sus
respectivos propietarios.
Eaton
1000 Eaton Boulevard
Cleveland, OH 44122
United States
Eaton.com
Eaton’s Cooper Lighting Business
18001 East Colfax Avenue
Aurora, CO 80011
Cooperlighting.com
© 2014 Eaton
All Rights Reserved
Printed in USA
Imprimé aux États-Unis
Impreso en los EE. UU.
Publication No. ADL141353
Rev Date: December 2014
Warranties and Limitation of Liability
Please refer to www.cooperlighting.com/WarrantyTerms for our terms and conditions.
Garanties et limitation de responsabilité
Veuillez consulter le site www.cooperlighting.com/WarrantyTerms pour obtenir les conditions générales.
Garantías y Limitación de Responsabilidad
Visite www.cooperlighting.com/WarrantyTerms para conocer nuestros términos y condiciones.
/