Page is loading ...

PSC2080579 SWINGARM (END MOUNT)
PSC2060260 SWINGARM (SIDE MOUNT)
INSTRUCTIONS
Product Intended Use:
These instructions are intended to illustrate the installation and operation of the Hubbell
Power Systems, Inc. (“Hubbell”) PSC2080579 and PSC2060260 swingarm into a suitable
Hubbell vault. This swingarm was designed to be compatible with the Corning LCPe clo-
sure and is independent from Corning Inc.
PSC2080579 (END MOUNT) PSC2060260 (SIDE MOUNT)
Single End Mount
shown in PG3060
Hubbell vault
Dual End Mount
shown in PG3060
Hubbell vault
Dual Side Mount
shown in PG3660
Hubbell vault
Triple Side Mount
shown in 36x60
Hubbell Torsion Assist
PSC2080579 & PSC2060260 Swingarm

2
PSC2080579 & PSC2060260 Swingarm
TABLE OF CONTENTS:
Introduction 1
Table of Contents 2
Guide To Warnings 3
Product Information & Pre-Installation Instructions 4
Product Installation & Use Instructions 5 - 10
PAGE NO.

3
PSC2080579 & PSC2060260 Swingarm
! NOTICE
GUIDE TO WARNINGS WITHIN MANUAL
The following is a list of warnings used within this manual and should be read in their entirety to
ensure safe practices.
GUIDE TO WARNINGS FOR THE HUBBELL
TM
CORNING LCPE SWINGARM
! CAUTION
A NOTICE refers to information that is considered
important, but not hazard-related.
! WARNING
A WARNING refers to operating procedures, techniques,
etc., that, if not followed carefully, could RESULT IN
INJURIES OR DEATH.
A CAUTION refers to operating procedures, techniques,
etc., that, if not followed carefully, could RESULT IN
DAMAGE TO EQUIPMENT or LOSS OF SERVICE to
customer.
! CAUTION
The equipment covered in these instructions must be used and serviced only by competent, trained personnel
familiar with and following approved work and safety practices. This equipment is for use by such personnel and
these instructions are not intended as a substitute for adequate training and experience in safe procedures for this
type of equipment.
These instructions neither cover all details or situations in equipment use, nor do they provide for every possible
contingency to be encountered in relation to installation, operation or maintenance. Should additional information
or details be desired or if situations arise which are not covered adequately for the user’s purpose, the specifics
should be referred to Hubbell Power Systems, Inc.
! WARNING
When retracting equipment from an extended position, ensure handle on outer tube is firmly held when actuating
the spring pin to prevent damage to cables, closure or personal injury.
! NOTICE
Before operating the Corning LCPe Swingarm, thoroughly read, understand and follow these instructions. Keep
these instructions for future reference.

4
PSC2080579 & PSC2060260 Swingarm
PRODUCT INFORMATION
PRE-INSTALLATION INSTRUCTIONS
When installing the swingarm in a Hubbell vault that is operational in the field, remove the dirt from
the outside of the vault in the desired swingarm mounting location. Ensure vault is not damaged in
the dirt removal process.
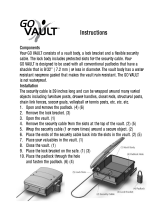
1. Backing Plate
2a. Mounting Bracket PSC2080579 (end mount)
2b. Mounting Bracket PSC2060260 (side mount)
3. Inner Tube
4. Outer Tube
5. Stainless Steel Strap
1
2a
3
4
5
2b

5
PSC2080579 & PSC2060260 Swingarm
PRODUCT INSTALLATION AND USE INSTRUCTIONS
1. Disassemble the mounting bracket from the inner tube assembly as shown below in FIGURE 1 (optional)
2. PSC2080579 (END MOUNT):
a. For single swingarm: Mark the centerline of the top mounting holes 6.5” from the lid lip as shown in
FIGURE 2. Center the mounting holes on the centerline of the vault.
NOTE: Ensure placement of mounting bracket allows vault lid to close and avoids structural ribs of
vault.
b. For dual swingarm: Mark the centerline of the top mounting holes 6.5” from the lid lip. Mark the
centerline of the hole closest to the centerline of the vault 4.25” from the centerline of the vault (see
FIGURE 3).
NOTE: Ensure placement of mounting bracket allows vault lid to close, avoids structural ribs of vault,
and avoids second swingarm.
c. For torsion assist cover: No drilling required.
Inner Tube
Mounting Bracket
(shown - PSC2080579 End Mount)
FIGURE 1
Lid Lip Lid Lip
FIGURE 2
End Mount
Single Mount
FIGURE 3
End Mount
Double Mount

6
PSC2080579 & PSC2060260 Swingarm
3. PSC2060260 (SIDE MOUNT)
a. For single swingarm: Mark the centerline of the top mounting holes 4.0” from the lid lip and 11.0” from
the inside end wall as shown in FIGURE 4.
NOTE: Ensure placement of mounting bracket allows vault lid to close and avoids structural ribs of
vault.
b. For dual swingarm: Repeat step a. on the opposite side wall (see FIGURE 4).
NOTE: Ensure placement of mounting bracket allows vault lid to close, avoids structural ribs of vault,
and avoids second swingarm.
c. For torsion assist cover: No drilling required.
4. Use the mounting bracket as a template to mark (4) hole locations per swingarm mount (see FIGURE 5 and
FIGURE 6)
5. Drill four ø7/16” holes per the layout given in. FIGURE 5 and FIGURE 6.
Lid Lip
FIGURE 4
Side Mount
FIGURE 5
PSC2080579
(END MOUNT)
FIGURE 6
PSC2060260
(SIDE MOUNT)

7
PSC2080579 & PSC2060260 Swingarm
6. Use the provided mounting hardware (3/8” carriage bolts, round washers, lock washers, and hex nuts) to
install the mounting bracket as shown in FIGURE 7 or 8
a. Polymer concrete enclosure with NO torsion assist cover
i. Place the backing plate flush on the outside of the vault
ii. Place the head of the bolts on the outside of the vault and through the backing plate
iii. Install round washer, lock washer, and hex nut
b. Torsion assist cover
i. Place heads of (4) 3/8” x 1” carriage bolts into the slots of the desired swingarm location of the vault
torsion cover
ii. Install round washer and hex lock nut
Backing Plate
Carriage Bolt (3/8”x2”)
Lock Washer
Hex Nut
Round Washer
FIGURE 7
(shown - PSC2080579 End Mount)
Carriage Bolt (3/8”x1”)
Round Washer
Hex Lock Nut
FIGURE 8
(shown - PSC2060260 Side mount on
torsion assist cover)

8
PSC2080579 & PSC2060260 Swingarm
7. Install tube assembly if removed in Step 1.
8. Install stainless steel strap by centering over the top strap bracket on the outer tube with the provided 1/4”
bolt and lock nut (see FIGURE 9)
9. Install Corning LCPe (purchased separately) onto swingarm per manufacturer’s recommended installation
procedure. Mounting hardware provided with Corning LCPe closure (see FIGURE 10)
Outer Tube
FIGURE 9
FIGURE 10
Stainless Steel Strap

9
PSC2080579 & PSC2060260 Swingarm
FIGURE 11
Retracted position
(shown - PSC2080579 End Mount)
FIGURE 12
Extended position
(shown - PSC2080579 End Mount)
10. Extend/Retract swingarm by gripping swingarm handle and pulling spring pin. Fully retracted and extended
positions are shown below in FIGURES 11 & 12.
NOTE: Swingarm was designed to have optional hard stops at 3”, 6” or 9” extensions when using the
provided 3/8” bolt and lock nut.
! WARNING
When retracting equipment from an extended position, ensure handle on outer tube is firmly held while actuating
the spring pin to prevent damage to cables, closure, and/or personal injury.
! CAUTION
When Lowering the swingarm into the vault ensure the fiber cable is coiled as shown in Figure 13 to ensure the
minimum bend ra
dius is not violated and to prevent damage to the cables and/or closure.
FIGURE 13
(
shown - PSC2060260 Side Mount)

10
PSC2080579 & PSC2060260 Swingarm
11. Lower swingarm into the vault by grasping handle and lifting swingarm latch
12. Maintenance
a. Ensure all hardware is securely fastened before operation
b. Ensure spring pin slides freely
! CAUTION
When lower equipment into vault, ensure
handle on outer tube is firmly held while actuating the swingarm latch
to prevent damage to cables, closure, and/or vault. SEE FIGURE 14
FIGURE 14
(shown - PSC2080579 End Mount)
Swingarm Latch
These instructions do not claim to cover all details or variations in equipment nor to provide for all possible conditions to be met with
concerning installation, operation, or maintenance of this equipment. If further information is desired or if particular problems are encountered
which are not suciently covered in this guide, contact Hubbell Power Systems.
/