
Installation Notice
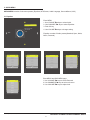
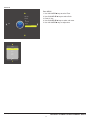
Instant Channel Programming Feature
Complete the Signal / Power Connections and
Press 0001 to Begin Channel Programming Scan
15.6 NTSC / ATSC / QAM
700 - 0351
Core Health & FITNESS
PERSONAL VIEWING SCREEN
OWNER’S MANUAL


February, 2016(Version 2)
PERSONAL VIEWING SCREEN OWNER’S GUIDE
2
CONTENTS
page(s) page
GENERAL SAFETY and CARE 3-5
FCC Statement………………………………….
In the Box……………………………………......
4
5
1 Connection Identication 5
2 Main Setup and Operation
2 - 1 Menu Operation.............................
5
5
3 Channel Menu 6-7
3-1
3-3
Air/Cable..….....................…………
Show/Hide...............................…...
6
7
3-2
3-4
Auto Scan.…........................….
DTV Signal............................…
6
7
4 Picture Menu 8 - 9
4-1
4-3
Picture Mode…..................………..
Aspect Ratio……...............………..
8
9
4-2Color Mode…...................…….. 8
5 Audio Menu 10 - 12
5-1
5-3
Equalizer…...................……………
Surround Sound....……..………….
10
11
5-2
5-4
Audio Language…......…………
AVC...................…...........……..
11
12
6 Time Menu 13 - 15
6-1
6-3
6-5
Sleep Timer.…........………………..
DST………..............……………….
Auto Sync…………………………...
13
14
14
6-2
6-4
6-6
Time Zone…….............….…….
Time Format………....…………
Clock……......................……....
13
14
15
7 Setup Menu 16 - 18
7-1
7-3
7-5
Menu Language…….............……..
Close Caption……………...............
USB Update.....………................…
16
17
18
7-2
7-4
Transparent………..............…..
Restore Default………….......…
16
18
8 Lock Menu 19 - 22
8-1
8-3
8-5
Change Password….............……..
Input Block….....…………...............
Canada…….........……................…
19
20
22
8-2
8-4
8-6
System Lock…….................…..
US…....................……….......…
Unrated….......….......................
20
21
22
9 Custom Feature Access 23 - 25
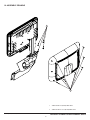
10 Assembly Drawing 26

February, 2016(Version 2)
PERSONAL VIEWING SCREEN OWNER’S GUIDE
3
Thank you for your purchase of the Core Health & Fitness personal viewing screen.
This product has been designed specically for use in the health & tness industry, ensuring maximum
performance and longevity in the harsh tness club environment. Properly cared for, this product will
provide years of high-quality entertainment.
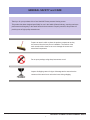
Prepare an area in which to place the product components as they
are removed from the box prior to installation. The surface of the
work area should be clean so as not to damage the screen and
associated components.
Do not open package using sharp instruments or tool.
Inspect all shipping carton for signs of damage and to ensure that the
contents of the carton have not broken loose during shipping.
GENERAL SAFETY and CARE

February, 2016(Version 2)
PERSONAL VIEWING SCREEN OWNER’S GUIDE
4
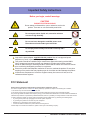
Important Safety Instructions
FCC Statement
Before you begin, read all warnings.
CAUTION!
RISK OF ELECTRICAL SHOCK
Do not attempt to disassemble, open or otherwise service the
product. There are no user-serviceable parts inside.
Do not expose unit to liquid, rain, excessive moisture
or areas of high humidity.
Do not use bent, damaged or modied power cords.
Discontinue use and contact your technician.
Do not spray cleaner directly onto monitor. Clean only with a
dry, soft cloth.
Only use the power adapter supplied with this product! Use of non-approved power
adapters may result in personal injury or damage to the product.
This product should be installed using a manufacturer-approved mounting method ONLY.
Use of unapproved mounting brackets may damage the product and void the warranty.
Route all cables safely per mounting situation. Ensure that the cables are routed in a manner
as to avoid being damaged by personnel or equipment.
Ensure the product has adequate ventilation so as not to overheat the product. Do not place
anything on the product that may impede proper air circulation and thus damage the product.
Avoid extreme temperatures. Locate the equipment away from sources of heat, such as
radiators and heat registers.
Radio Frequency Interference (RFI) Federal Communications Commission, Part 15
This device complies with Part 15 of the FCC Rules (47CFR15). Operation is subject to the following two conditions:
1. This device may not cause harmful interference, and
2. This device must accept any interference received, including interference that may cause undesired operation.
This product generates and utilizes radio frequency energy. If not installed and maintained in accordance with the installation &
maintenance procedures as prescribed by MYE Entertainment, there is a possibility of causing interference with other services.
In order to determine whether or not this product is generating harmful interference, try performing the following steps:
• Try turning off the product by unplugging it from the AC power receptacle.
• Try powering the product from another AC power receptacle.
• Relocate or turn the antenna of the receiving device.
• Increase the distance between this product and the receiving device.
If these steps do not resolve the interference, please contact your local installing company.

February, 2016(Version 2)
PERSONAL VIEWING SCREEN OWNER’S GUIDE
5
1) ST156TV2-NAQ2 Personal Viewing Screen
2) Manual
IN THE BOX ...
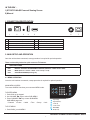
1. CONNECTION IDENTIFICATION
1 DC Power In. 2.5mm DC jack 6 RF Signal Input
2 AUX TV Controller Cable port. RJ45 jack 7 AUX CableSat port. RJ45 Jack.
3 AUX Audio Output. 3.5mm stereo jack
4 Firmware Download USB jack
5 HDMI Port
1 2 3 4
5
6
7
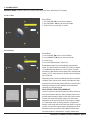
2. MAIN SETUP AND OPERATION
Once the unit has been connected, a setup procedure is required for optimal operation
There are three Key Codes for quick access to TV features.
QUICK KEY CODES
0001 INSTANT CHANNEL PROGRAMMING FEATURE (DEFAULT: CABLE AUTO / QAM)
0002 MENU (Channel - Picture - Audio - Time - Set up - Lock)
0003 CUSTOM FEATURES (See Page 23)
Once the unit has been connected, a setup procedure is required for optimal operation.
2.1 MENU OPERATION
MAIN MENU ACCESS
To access all MENU functions you must enter MENU mode.
To ENTER MENU
1. Push 0002 on the keypad.
2. Use VOLUME keys to select SUB-MENU.
3. Press CHANNEL key to enter SUB-MENU.
SUB-MENU pages are:
• Channel • Picture • Audio • Time • Setup • Lock
To EXIT MENU
1. Push DASH(-) to exit MENU
: Adjust(Up)
: Adjust(Down)
: Scroll Up
: Scroll Down
: ENTER(Ok)
: EXIT(Dash)

February, 2016(Version 2)
PERSONAL VIEWING SCREEN OWNER’S GUIDE
6
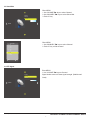
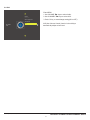
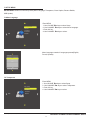
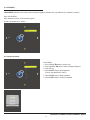
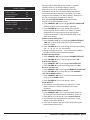
3.2 Auto Scan
3. CHANNEL MENU
CHANNEL MENU contains 4 sub-menu presets (Air/Cable, Auto Scan, Show/Hide, DTV Signal)
Air/Cable
Auto Scan
Show/Hide
DTV Signal Bad
Channel
Enter MENU
1. Use VOLUME keys to select Channel.
2. Use CHANNEL keys to select Auto Scan.
3. Push CC key.
4. Push VOLUME keys to select Yes.
Are you sure ?
No Yes
AutoScan
Found 0 Progam(s)
ATV 0 Progam(s)
DTV 0 Progam(s)
2 % CH 4
INPUT SIGNAL LEVEL REQUIREMENTS
Common sources of television signal are cable, satellite or
over-the-air antenna systems. Many of these choices will
provide signal in analog, digital or both even both formats.
In order to provide high-quality images, the signal level
supplied to each screen should be in the range of -70dBm
to -5 dBm when read on analog channels. A signal level
outside of this range will provide less than optimum results.
In order to ensure the highest degree of satisfaction, MYE
Entertainment recommends using a MYE Entertainment
Certied Installer for installation & ongoing maintenance.
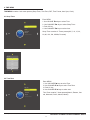
Broadcasting frequency is automatically searched and
saved. The search starts from analog TV (NTSC) to digital
TV (VSB/QAM) and takes from 4 to 5 minutes. Channel
numbers are allocated for weak signals from analog broad-
casting. In DTV, weak signals or signals without broadcast-
ing are ignored.
Depending on the content provided by the cable or satellite
company, there may be some content received that is inap-
propriate for your intended viewing audience. Once channel
scanning is complete, these channels can be deleted as
necessary by using the keypad.
Air/Cable Cable
Auto Scan
Show/Hide
DTV Signal Good
Channel
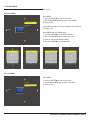
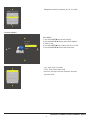
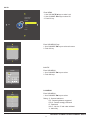
3.1 Air / Cable
Enter MENU
1. Use VOLUME ▲▼ keys to select Channel.
2. Use CHANNEL ▲▼ keys to select Air/Cable.
3. Push CC Key to select.(Air or Cable)

February, 2016(Version 2)
PERSONAL VIEWING SCREEN OWNER’S GUIDE
7
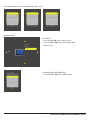
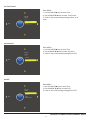
3.3 Show/Hide
Enter MENU
1. Use VOLUME keys to select Channel.
2. Use CHANNEL keys to select Show/Hide.
3. Push CC key.
Show/Hide
6.1 SBS
7.1 KBS2
7.1 KBS2
9.1 KBS1
9.1 KBS1
10.1 EBS
10.1 EBS
11.1 MBCDTV
MENU OK
Enter MENU
1. Use CHANNEL keys to select Channel.
2. Push CC key to Hide channel.
Air/Cable
Auto Scan
Show/Hide
DTV Signal Bad
Channel
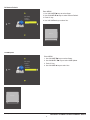
3.4 DTV Signal
Enter MENU
1. Use VOLUME keys to Channel.
Signal window meter will show signal strength. (Bad/Normal/
Good)
Air/Cable
Auto Scan
Show/Hide
DTV Signal Good
Channel

February, 2016(Version 2)
PERSONAL VIEWING SCREEN OWNER’S GUIDE
8
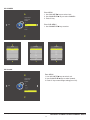
4.1 Picture Mode
Enter MENU
1. Use VOLUME keys to select Picture.
2. Use CHANNEL keys to select Picture Mode.
3. Push CC key.
Picture Mode Personal
Contrast 50
Brightness 50
Sharpness 50
Tint 50
Color 50
MENU
Picture Mode contains 4 video presets(Standard, Dynamic,
Personal, Soft)
Picture Mode Standard
Contrast 50
Brightness 50
Sharpness 50
Tint 50
Color 50
MENU
4. PICTURE MENU
PICTURE MENU contains 3 sub-menu presets (Picture Mode, Color Mode, Aspect Ratio)
Picture Mode Personal
Color Mode
Aspect Ratio 4:3
Picture
Picture Mode Dynamic
Contrast 70
Brightness 60
Sharpness 60
Tint 60
Color 50
MENU
Picture Mode Soft
Contrast 45
Brightness 40
Sharpness 50
Tint 50
Color 50
MENU
Enter MENU and SUB-MENU page
1. Use VOLUME keys to select Personal.
2. Use CHANNEL keys to select sub menu.
3. Push CC key to enter/change setting.
4. Use VOLUME keys to adjust level.
4.2 Color Mode
Enter MENU
1. Use VOLUME keys to select Picture.
2. Use CHANNEL keys to select Color Mode.
3. Push CC key.
Picture Mode
Color Mode Normal
Aspect Ratio 4:3
Picture

February, 2016(Version 2)
PERSONAL VIEWING SCREEN OWNER’S GUIDE
9
Color Mode Normal
R133
G130
B123
MENU
Color Mode contains 3 video presets(Normal, Warm, Cool)
Color Mode Warm
R127
G118
B99
MENU
Color Mode Cool
R133
G130
B123
MENU
4.3 Aspect Ratio
Enter MENU
1. Use VOLUME keys to select Picture.
2. Use CHANNEL keys to select Aspect Ratio.
3. Push CC key.
Aspect Ratio
4:3
16:9
MENU
Enter MENU and SUB-MENU page
1. Use CHANNEL keys to adjust setting.
Picture Mode
Color Mode
Aspect Ratio 4:3
Picture

February, 2016(Version 2)
PERSONAL VIEWING SCREEN OWNER’S GUIDE
10
5.1 Equalizer
5. AUDIO MENU
Enter MENU
1. Use VOLUME keys to select Audio.
2. Use CHANNEL keys to select Equalizer.
3. Push CC key.
4. Use VOLUME keys to change setting.
Equalizer Standard
120 Hz 70
500 Hz 60
1.5 KHz 65
5 KHz 70
10 KHz 40
Balance 50
MENU
Equalizer contains 5 Audio presets(Standard, Sport, Movie,
Music, Personal)
Equalizer Sports
120 Hz 30
500 Hz 30
1.5 KHz 40
5 KHz 60
10 KHz 80
Balance 50
MENU
Equalizer Movie
120 Hz 50
500 Hz 50
1.5 KHz 70
5 KHz 60
10 KHz 70
Balance 50
MENU
Equalizer Music
120 Hz 40
500 Hz 50
1.5 KHz 70
5 KHz 20
10 KHz 30
Balance 50
MENU
Equalizer Personal
120 Hz 50
500 Hz 50
1.5 KHz 50
5 KHz 50
10 KHz 50
Balance 50
MENU
Enter MENU and SUB-MENU page
1. Use VOLUME keys to select Personal.
2. Use CHANNEL keys to select sub menu.
3. Use VOLUME keys to adjust level.
AUDIO MENU contains 5 sub-menu presets (Equalizer, MTS Stereo, Audio Language, SurroundSound, AVC )
Equalizer Personal
MTS STEREO
Audio Language Enlish
Surround Sound
AVC On
Audio

February, 2016(Version 2)
PERSONAL VIEWING SCREEN OWNER’S GUIDE
11
5.2 Audio Language
Enter MENU
1. Use VOLUME keys to select Audio.
2. Use CHANNEL keys to select Audio Language.
3. Push CC key.
Audio Language
English
French
Spanish
MENU
Audio Language contains 3 Language presets(English,
French, Spanish)
Audio Language supports digital broadcasting audio
as digital broadcasting include several kinds of audio.
Audio Languageis set to Default. In some digital channels,
audio language is not English authough English is set as
audio language. It can be regarded as an error in terms of
broadcasting information, but there will be no problem in
functioning.
Equalizer
MTS STEREO
Audio Language Enlish
Surround Sound
AVC On
Audio
Enter MENU
1. Use VOLUME keys to select Audio.
2. Use CHANNEL keys to select Surround Sound.
3. Push CC key to enter/change setting(ON or OFF).
Equalizer
MTS STEREO
Audio Language Enlish
Surround Sound Off
AVC On
Audio
5.3 Surround Sound

February, 2016(Version 2)
PERSONAL VIEWING SCREEN OWNER’S GUIDE
12
5.4 AVC
Equalizer
MTS STEREO
Audio Language Enlish
SurroundSound
AVC On
Audio
Enter MENU
1. Use VOLUME keys to select Audio.
2. Use CHANNEL keys to select AVC.
3. Push CC key to enter/change setting(ON or OFF).
AVC(Auto Volume Control) function is the ability to
automatically adjust volume level.

February, 2016(Version 2)
PERSONAL VIEWING SCREEN OWNER’S GUIDE
13
6.1 Sleep Timer
6. TIME MENU
TIME MENU contains 6 sub-menu presets (Sleep Timer, Time Zone, DST, Time Format, Auto Sync, Clock)
Sleep Timer Off
Time Zone
DST Off
Time Format
Auto Sync
Clock 2015/1/26 18:3
Time
Enter MENU
1. Use VOLUME keys to select Time.
2. Use CHANNEL keys to select Sleep Timer.
3. Push CC key.
4. Use CHANNEL keys to select time.
Sleep Timer contains 11 Timers presets(Off, 5, 10, 15, 30,
60, 90, 120, 180, 240Min, Personal)
Sleep Timer
Off
5 Min
10 Min
15 Min
30 Min
60 Min
MENU
6.2 Time Zone
Sleep Timer
Time Zone Pacic
DST Off
Time Format
Auto Sync
Clock 2015/1/26 18:3
Time
Enter MENU
1. Use VOLUME keys to select Time.
2. Use CHANNEL keys to select Time Zone.
3. Push CC key.
4. Use CHANNEL keys to select area.
Time Zone contains 7 Areas presets(Atlantic, Eastern, Cen-
tral, Mountain, Pacic, Alaska, Hawaii)

February, 2016(Version 2)
PERSONAL VIEWING SCREEN OWNER’S GUIDE
14
6.3 Time Format
Sleep Timer
Time Zone
DST Off
Time Format 24-hour
Auto Sync
Clock 2015/1/26 18:3
Time
Enter MENU
1. Use VOLUME keys to select Time.
2. Use CHANNEL keys to select Time Format.
3. Push CC key to enter/change setting(12-Hour or 24-
Hour).
6.4 Auto Sync
Sleep Timer
Time Zone
DST Off
Time Format
Auto Sync On
Clock 2015/1/26 22:3
Time
Enter MENU
1. Use VOLUME keys to select Time.
2. Use CHANNEL keys to select Auto Sync.
3. Push CC key to enter/change setting(ON or OFF).
Sleep Timer
Time Zone
DST Off
Time Format
Auto Sync
Clock 2015/1/26 22:3
Time
6.5 DST
Enter MENU
1. Use VOLUME keys to select Time.
2. Use CHANNEL keys to select DST.
3. Push CC key to enter/change setting(ON or OFF).

February, 2016(Version 2)
PERSONAL VIEWING SCREEN OWNER’S GUIDE
15
6.6 Clock
Sleep Timer
Time Zone
DST
Time Format
Auto Sync
Clock 2015/1/26 22:3
Time
Enter MENU
1. Use VOLUME keys to select Time.
2. Use CHANNEL keys to select Clock.
3. Push CC key.
4. Use CHANNEL keys to select sub menu.
5. Use VOLUME keys to adjust time.
Clock
- Year 2015 +
Month 1
Month 1
Hour 22
Minute 3
MENU

February, 2016(Version 2)
PERSONAL VIEWING SCREEN OWNER’S GUIDE
7.1 Menu Language
7. SETUP MENU
SETUP MENU contains 5 sub-menu presets (Menu Language, Transparent, Close Caption, Restore Default,
USB Update)
Menu Language English
Transparent
Closed Caption
Restore Default
USB Update
Setup
Enter MENU
1. Use VOLUME keys to select Setup.
2. Use CHANNEL keys to select Menu Language.
3. Push OK key.
4. Use CHANNEL keys to select.
Menu Language
English
French
Spanish
MENU
Menu Language contains 3 Languages presets(English,
French, Spanish)
7.2 Transparent
Menu Language
Transparent 50 %
Closed Caption
Restore Default
USB Update
Setup
Enter MENU
1. Use VOLUME keys to select Setup.
2. Use CHANNEL keys to select Transparent.
3. Push CC key.
4. Use CHANNEL keys to select.
16

February, 2016(Version 2)
PERSONAL VIEWING SCREEN OWNER’S GUIDE
Transparent contains 5 presets(0, 25, 50, 75, 100%)
Transparent
0 %
25 %
50 %
75 %
100 %
MENU
7.3 Close Caption
Menu Language
Transparent
Closed Caption
Restore Default
USB Update
Setup
Enter MENU
1. Use VOLUME keys to select Setup.
2. Use CHANNEL keys to select Close Caption.
3. Push CC key.
4. Use VOLUME keys to select CC On or CC Off.
5. Use CHANNEL keys to select sub menu.
-. CC1, CC2, CC3, CC4 mode
-. Text1, Text2, Text3, Text4 mode
-. Service1, Service2, Service3, Service4, Service5,
Service6 mode
CC Mode CC On
Basic CC1
Advanced Service1
MENU
17

February, 2016(Version 2)
PERSONAL VIEWING SCREEN OWNER’S GUIDE
7.4 Restore Default
Menu Language
Transparent
Closed Caption
Restore Default
USB Update
Setup
Enter MENU
1. Use VOLUME keys to select Setup.
2. Use CHANNEL keys to select Restore Default.
3. Push CC key.
4. Use VOLUME keys to select Yes.
Are you sure ?
No Yes
18
7.5 USB Update
Menu Language
Transparent
Closed Caption
Restore Default
USB Update
Setup
Enter MENU
1. Use VOLUME keys to select Setup.
2. Use CHANNEL keys to select USB Update.
3. Push CC key.
4. Use VOLUME keys to select Yes.
Are you sure ?
No Yes

February, 2016(Version 2)
PERSONAL VIEWING SCREEN OWNER’S GUIDE
Enter Password _ _ _ _
Lock
8. LOCK MENU
Enter LOCK MENU
Enter Password “0000” on the number keypad.
(Factory set password is “0000”)
LOCK MENU contains 6 sub-menu presets (Change Password, System Lock, Input Block, US, CANADA, Unrated)
Change Password
System Lock On
Input Block
US
Canada
RRTSetting
ResetRRT
Unrated
Lock
8.1 Change Password
Enter MENU
1. Use VOLUME keys to select Lock.
2. Use CHANNEL keys to select Change Password.
3. Push CC key.
4. Use NUMBER keys to Old Password.
(Factory set password is “0000”)
5. Use NUMBER keys to New Password.
6. Use NUMBER keys to Conrm Password.
Enter Old Password
Enter New Password
Conrm Password
Clear Cancel
19
Page is loading ...
Page is loading ...
Page is loading ...
Page is loading ...
Page is loading ...
Page is loading ...
Page is loading ...
Page is loading ...
-
 1
1
-
 2
2
-
 3
3
-
 4
4
-
 5
5
-
 6
6
-
 7
7
-
 8
8
-
 9
9
-
 10
10
-
 11
11
-
 12
12
-
 13
13
-
 14
14
-
 15
15
-
 16
16
-
 17
17
-
 18
18
-
 19
19
-
 20
20
-
 21
21
-
 22
22
-
 23
23
-
 24
24
-
 25
25
-
 26
26
-
 27
27
-
 28
28


Star Trac 8CT-PVS Owner's manual
- Category
- LCD TVs
- Type
- Owner's manual
Ask a question and I''ll find the answer in the document
Finding information in a document is now easier with AI
