Page is loading ...

Installation and Operating Instructions 1 - 35
46771V001-132013-0-OCE-Rev.C_GB
SP 900

– 2
Table of contents
General Information ...................................................... 3
Symbols ........................................................................................... 3
Safety instructions ............................................................................ 3
Intended use .................................................................................... 4
Permitted gate wing dimensions ...................................................... 4
Technical data .................................................................................. 4
Dimensions ...................................................................................... 4
General Information ...................................................... 5
Installation preparations ............................................... 6
Safety instructions ............................................................................ 6
Tools required ................................................................................... 6
Personal safety equipment ............................................................... 6
Scope of supply ................................................................................ 7
Package 1 ........................................................................................ 7
Package 2 ........................................................................................ 7
Tips for installation ........................................................................... 8
Installation ...................................................................... 9
Foundation ....................................................................................... 9
Installation of column ....................................................................... 9
Installing the drive .......................................................................... 12
Installing the racks ......................................................................... 13
Adjusting tooth play ........................................................................ 14
Safety instructions .......................................................................... 16
Installation location ......................................................................... 16
Connection .................................................................. 16
Mains connection ........................................................................... 17
Connecting safety devices ............................................................. 17
Connecting button .......................................................................... 19
Optional connections ...................................................................... 20
Radio-based safety contact strip .................................................... 20
Connection / Commissioning ..................................... 20
Battery pack ................................................................................... 21
Safety instructions .......................................................................... 23
Connecting the power supply ......................................................... 23
Commissioning / Operation ....................................... 23
Installing limit switches ................................................................... 24
Rest control unit ............................................................................. 25
Programming .................................................................................. 25
Safety instructions .......................................................................... 26
Radio receiver ................................................................................ 26
Explanation of radio channels ........................................................ 26
Pulse sequence of gate movements .............................................. 26
Deleting the radio receiver memory ............................................... 27
Deleting a channel from the radio receiver .................................... 27
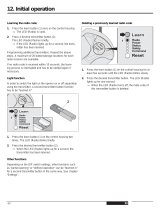
Programming the hand-held remote control ................................... 27
Deleting the hand-held transmitter from the radio receiver ............ 27
Finishing commissioning ................................................................ 27
Safety instructions .......................................................................... 28
Open gate ...................................................................................... 28
Close gate ...................................................................................... 28
Partial opening ............................................................................... 28
Automatic closing function ............................................................. 29
Pre-warning time ............................................................................ 29
Dead man operation ....................................................................... 29
Obstacle detection ......................................................................... 30
Standby mode ................................................................................ 30
DIP 5 ON: Standby deactivated. .................................................... 30
Overload protection ........................................................................ 30
Operation after a power failure ....................................................... 30
Maintenance and care ................................................. 31
Safety instructions .......................................................................... 31
Regular testing ............................................................................... 31
Description of the ash sequences of the LEDs ........................... 32
DIP switch settings ...................................................... 33
Emergency release ........................................................................ 34
Disassembly ................................................................................... 34
Disposal ......................................................................................... 34
Disassembly and disposal.......................................... 34
Wiring diagram ............................................................ 35

– 3
General Information
Symbols
ATTENTION SYMBOL:
Important safety instructions!
Attention - to ensure personal safety, it is important to
observe all instructions. Save these instructions!
NOTE SYMBOL:
Information, useful advice!
Refers to a respective picture in the introduction or main text.
Safety instructions
General
• These installation and operating instructions must be read,
understood and complied with by persons who install, use or
perform maintenance on the drive.
• Keep this installation and operating manual accessible at all times.
• Installation, connection and initial commissioning of the drive may only
be carried out by technically knowledgeable persons.
• Install the drive on correctly aligned gates only. An improperly aligned
gate can cause serious injuries or damage the drive.
• The manufacturer assumes no liability for injuries, damage or break-
downs that occur due to non-compliance with the installation and
operating instructions.
• Always ensure compliance with accident prevention regulations and
current standards in each respective country.
• Observe and comply with the "ASR A1.7 Technical Regulations for
Workplaces" of the German Committee for Workplaces (ASTA),
which is mandatory for the operator in Germany.
• Before any work on the drive disconnect it from the power supply and
lock it to prevent reconnection. This also includes disconnection of
a battery, if present.
• All electrical wiring must be firmly secured to prevent displacement
• Only use OEM (Original Equipment Manufacturer) spare parts,
accessories and mounting material.
Storage
• The drive must be stored in an enclosed, dry area at a room
temperature of -20 - +50 °C.
• The drive should be stored horizontally.
Operation
• The drive must be operated only if a non-hazardous force tolerance
is set or safety is guaranteed by other safety equipment. The force
tolerance must be set low enough to eliminate any danger of injury by
the closing force (see "Maintenance and care").
• Never put your hand near the gate when it is moving or near
moving parts.
• Drive through the gate only when it has opened completely.
• There is a risk of persons being crushed or cut by the mechanism or
sharp edges of the gate.
• For automatic closing the main and auxiliary closing edges must be
secured in accordance with the applicable directives and standards.
• Open and close the gate only if there are no children, persons, animals,
or objects within its range of motion.
• Regularly check the safety and protection functions and repair faults
when they are detected. See Care and maintenance.
Radio remote control
• The remote control must only be used for devices and systems in
which radio interference will not endanger people, animals or objects or
the risk is reduced by other safety devices.
• The user must be made aware that systems that pose an accident risk
should only be remote controlled, if at all, if the user can actually see
the gate.
• The radio remote control may only be used if the gate’s movement
can be watched and no persons or objects are within the range of
movement.
• Store the hand-held transmitter so that unintended operation, e.g.,
by children or animals, is impossible.
• The operator of the radio system is not protected from faults due to
other telecommunications equipment or devices (e.g. radio-controlled
systems that are licensed to operate in the same frequency range).
If substantial interference occurs, please contact your appropriate
telecommunications office which has radio interference measuring
equipment (radiolocation).
• Do not operate the hand-held transmitter in areas with sensitive radio
communications or systems (e.g. airports, hospitals).
Type plate
• The type plate is attached to the inside of the base frame/housing.
The type plate shows the exact type designation and the date of
manufacture (month/year) of the drive.

General Information
– 4
Intended use
• The drive is exclusively intended to open and close sliding gates
(see EN 12433-1). Any other use does not constitute intended use.
The manufacturer accepts no liability resulting from use other than
intended use. The user bears the sole responsibility for any risk
involved. The warranty expires as a result.
• Gates automated with a drive must comply with all valid standards and
directives: e.g. EN 12604, EN 12605.
• Maintain the safety clearances between the gate and surroundings as
specified in EN 12604.
• The drive must be in good technical condition, and it must be used for
its intended purpose with awareness of the hazards as described by
the installation and operating manual.
• The gate must not have any rise or fall during opening or closing.
• Position the running rail to allow water to drain to prevent ice
accumulation in winter.
• The gate must move freely in the guide and on the running rail to
allow the drive to react sensitively and the gate to be switched off in
emergency.
• The gate must have end stops in open and closed position, otherwise it
may be pushed out of the guide in the event of an emergency release.
• Malfunctions which could affect safety must be corrected immediately.
• The gate must be stable and rigid, meaning that it may not bend or
twist when being opened or closed.
• The drive cannot compensate for defects in the gate or incorrect
assembly or installation.
• Do not install drive in explosive areas.
• Do not operate drive in rooms with aggressive atmosphere.
For the Declaration of Conformity for
the radio see:
www.sommer.eu/mrl
Permitted gate wing dimensions
Min. path: 1,400 mm
Max. path: 12,000 mm
Weight: 400 kg
Gate inclination: 0%
Technical data
Rated voltage 220 - 230 V AC
Rated frequency 50/60 Hz
Operating temperature range -20 to + 60 °C
Degree of protection Operator: IP 44 control unit: IP 64
Max. tension and compress. force 900 N
Rated tension force 300 N
Rated current consumption 0.2 A
Rated wattage 46 W
Max. speed 285 mm/s
Power consumption, stand-by 0.5 W
Operating time 40% S3
Max. movement cycles per day 40
Workplace-related emission value < 75 dBA - drive only.
Dimensions
All dimensions are in millimetres. The drive is locked.
152
162
216
1285 / 2135
152
80
100 - 300
60- 260
.* Minimum height: 800 mm.

– 5
General Information
Declaration of Installation
for the installation of an incomplete machine
in accordance with the Machinery Directive 2006/42/EC, Appendix II, Section 1 B
SOMMER Antriebs- und Funktechnik GmbH
Hans - Böckler - Straße 21 - 27
73230 Kirchheim unter Teck
Germany
hereby declares that the drive
SP 900
in combination with the control unit
ST-B-1
as of the identication SP 900 complies with the Machinery Directive 2006/42/EC and is intended for installation in
a gate system.
• The following fundamental safety requirements have been applied and observed in accordance with Appendix I:
- General principles No. 1
- 1.2 Safety and reliability of control units
Optical safety contact strip for gate OPEN direction of motion: terminal 19; 21; 23 cat 2 / PL C
Optical safety contact strip for gate CLOSE direction of motion: terminal 25; 27; 29 cat 2 / PL C
Electrical safety contact strip for gate OPEN direction of motion: terminal 19; 21 cat 2 / PL C
Electrical safety contact strip for gate CLOSE direction of motion: terminal 25; 27 cat 2 / PL C
2-wire photo eye terminal 12; 14 cat 2 / PL C
4-wire photo eye terminal 8; 10; 12; 14 cat 2 / PL C
STOP button terminal 20; 30 cat 2 / PL C
EMERGENCY STOP button terminal 15; 17 cat 2 / PL C
Internal force limitation Cat 2 / PL C
Safety categories in accordance with EN 13849 - 1:2008
• Compliant with the regulations of the EC Building Products Directive 89/106/EC.
For the operating forces part, the respective initial testing has been carried out in consultation with recognized
inspecting authorities. In doing so, the harmonized standards EN 13241-1, EN 12453 and EN 12445 have been
applied. For the tested combinations, refer to the "Reference list" table in the Internet under www.sommer.eu.
• Compliant with the Low Voltage Directive 2006/95/EC.
• Compliant with the Directive on Electromagnetic Compatibility 2004/1 08/EC.
• The technical documentation was drawn up in accordance with Appendix VII B.
The product may only be put into operation after it has been established that the gate system complies with
the regulations of the Machinery Directive.
Kirchheim, 01-09-2011
Jochen Lude
Responsible for documents

– 6
Installation preparations
Safety instructions
NOTE!
Follow all installation directions. Improper installation may
cause serious injuries.
• The mains voltage must correspond with the voltage listed on the drive
type plate.
• The contacts of all devices to be connected externally must be safely
isolated from the mains voltage supply according to IEC 60364-4-41.
• Wires for external devices must be installed in accordance with
IEC 60364-4-41.
• The drive may only be installed, connected and commissioned by
qualified technicians.
• Do not move the gate if there are people, animals or objects in the area
of movement.
• Keep children, disabled persons and animals away from the gate.
• Wear safety glasses when drilling the fastening holes.
• Cover the drive during drilling to prevent penetration of dirt.
NOTE!
The foundation must be solid and stable. Only install the drive
on a correctly aligned gate. An incorrectly aligned gate could
cause serious injury.
• Gates must be stable in themselves, since high traction and
compression forces are encountered. Reinforce lighter gates made of
plastic or aluminium if necessary before installation. Ask a specialist
retailer for advice.
• Remove or disable gate locks.
• Use only approved fasteners (e.g. anchor fittings, bolts). The fasteners
must match the material of the ground.
• Check that the gate runs smoothly.
Tools required
5 mm 10 mm
10 mm 5 mm
3 mm
10 mm
13 mm
13 mm
8 mm
Personal safety equipment
• Safety glasses (for drilling)
• Work gloves

– 7
Installation preparations
Scope of supply
• Check the package before installation to avoid unnecessary work and
expense if a part is missing.
• The actual scope of supply may vary depending on the design of
the drive.
Package 1
1
4
3
2
5
Package 1
Post 1250 mm high
Package (L x W x H) 1470 mm x 200 mm x 230 mm
Weight 11.8 Kg
Post 2100 mm high
Package (L x W x H) 2400 mm x 200 mm x 230 mm
Weight 20 Kg
1. 1 item Post
2 1 item Post cover
3. 1 item Baseplate
4. 2 items Cover for height adjustment
5 1 item Revision ap
Package 2
8
TRL1 L N N
10
12 14 16 18
7
9 11 13 15 17
20
22 24 26
28
30
19 21 23 25
27
29
100%
START
PROG
75%
50%
25%
0%
MAX
MAX
0
Limit
Limit
Status
Safety
Light
Relay
1
ON
ECE
2
3
4
5
6
7
8
7
8
9
Bedienungsa
nleitung
1
D
D
6
Package 2
Package (L x W x H) 800 mm x 180 mm x 155 mm
Weight 7.3 Kg
6 1 item Installation and Operating Instructions
7. 1 item Operator unit
8 1 item Control unit with transformer
9. 1 item Installation bag*
*no. 9 installation bag
1 item Pinion
1 item Plastic shield
1 item Circlip
2 items Screw (3.8 mm torx)
6 items Covers
2 items Solenoid for limit switch
8 items Slot nut
8 items Spring clamp
4 items Pan head screw with hexagon socket
1 item Lever lock
1 item Locking clamp for lever lock
2 items Key
1 item Dust cap
4 items Torx screw with llister head (M6 x 20 mm)
4 items Hexagon screw (M6 x 16 mm)

– 8
Installation preparations
Tips for installation
• A safety device must always be connected as an NC contact so that
safety is always guaranteed in case tripping or a defect.
• Determine the position of the accessories before installation together
with the operator.
1. Warning light DC 24 V, 25 W, max 0.8 A
2. Key switch (1 or 2 contact)
3. Photo eyes (required for automatic closing, see EN 12543)
4. Main switch (lockable)
5. Rod antenna (including 10 m cable)
6. Safety contact strip (8.2 kOhm, optoelectronic safety contact strip)
7. Telecody
8. Car/wall holder for hand-held transmitter
General preparations
• Remove or disable all locking devices (electric lock, bars, etc.) before
installing the drive.
• The gate must have a stable structure and must be suitable.
• The gate must not show excessive lateral deviation throughout its
range of movement.
• The system wheels and bottom track and the roller and top guide must
operate without excessive friction.
• End stops must be installed at the "gate OPEN + gate CLOSED"
positions to prevent derailing of the gate.
• Install empty ducts under the gate for the cables of the mains supply
line and the accessories (photo eye, warning light, key switch, etc.).
NOTE!
Additional pulse transmitters are: hand-held transmitters,
Telecody, wireless indoor switches and key switches. etc.
In the case of the hand-held transmitter, Telecody or the
wireless indoor switches a connecting line to the drive is not
required (contact your dealer).
3
2 x 0,75 mm
2
SOM
M
E
R
0
1
2
5
6
2 bzw. 3 x 0,75 mm
2
M
C
P
E
M
C
S
7
8
AC 230V
O
4
3 x 1,5 mm
2
3
4 x 0,75 mm
2
3
2
1
4 x 0,75 mm
2 x 0,75 mm

– 9
Installation
Foundation
• The foundation must extend below the frost line (approx. 800 mm
in Germany).
• The foundation must be cured and horizontal.
152
216
130
90
59
59
R5,5
13
16
111
184
20,5
• Provide a hole in the foundation for the cables (cable outlet).
Installation of column
NOTE!
Risk of injury when drilling
- Wear safety glasses and close-tting clothing.
- Bind long hair back.
NOTE!
Use only suitable and approved installation materials.
NOTE
Dispose of packaging according to local regulations.
Step 1: Install cover for height adjustment
Required parts:
• 1 x post (1)
• 1 x cover for height adjustment (4)
1. Carefully place column horizontally on a soft surface.
⇒ Bottom is accessible.
2. Insert cover into the inside back of the column as shown in the drawing.
Step 2: Installing the control unit
Required parts:
• 1 x Post
• 1 x Control unit (8)
• 4 x Socket head bolts (installation bag)
• 4 x Slot nuts (installation bag)
• 4 x Spring clamps (installation bag)
1. Slide spring clamps onto slot nut.

Installation
– 10
2. Insert slot nuts in C-prole on the inside back.
⇒ Note the installation direction of the slot nuts (diagram).
8
TRN N
10 1214 16 18
7 9 11 13
15
17
20 2224 26 2830
19
21
23 2527
29
100%
START PROG
75%
50%
25%
0%
MAX
MAX
0
Limit
Limit
Status
Safety
Light
Relay
1
ON
ECE
2
3
4
5
6
7
8
3. Insert control unit through the revision opening onto the C-prole.
4. Align control unit and slot nuts with the holes in the retainer plate
exactly above the slot nuts.
5. Lightly screw in the socket head bolts and move the control unit to its
subsequent position.
6. Tighten bolts.
Step 3: Installing the drive unit
Required parts:
• 1 x Post
• 1 x Drive unit (7)
• 4 x Slot nuts (installation bag)
• 4 x Spring clamps (installation bag)
• 4 x Hexagon bolts (M6 x 16)
1. Insert slot nuts into the C-prole as in step 2 (installing control unit).
2. Install the drive unit in the same way as the control unit.

Installation
– 11
Step 4: Installing the base plate
Required parts:
• 1 x Post
• 1 x Base plate (3)
• 4 x Torx screws with llister head (M6 x 20 mm)
• Screw base plate to column from below as shown in the diagram.
⇒ Position the base plate with the milled groove in the direction of
the gate.
- Only in the position can the screw heads be countersunk in
the holes in the base plate.
Step 5: Installing the pinion
Required parts:
• 1 x Post
• 1 x Shield (installation bag)
• 1 x Pinion (installation bag)
• 1 x Circlip (installation bag)
• 2 x Screws (3.8 mm torx)
1. Position shield as shown in the diagram and screw in place.
2. Place pinion on motor shaft as shown in the diagram.
3. Lock pinion with circlip.
⇒ Use a suitable circlip pliers.
Step 6: Installing the revision ap
Required parts:
• 1 x Revision ap (5)
• 1 x Lever lock (installation bag)
• 1 x Dust cap (installation bag)
• 1 x Locking clamp for lever lock (installation bag)
• 1 x Key (installation bag)
1. Assemble dust cap and lever lock as shown in the diagram.

Installation
– 12
2628 30
2527 29
100%
75%
%
MAX
2. Connect revision ap and lock as shown in the diagram.
3. Attach lock to back of revision ap with locking clamp.
⇒ Do not close revision ap yet, because additional work inside
the column is required.
Installing the drive
90 - 290
59
59
138 - 338
8
19
40
1. Place the drive on the foundation.
2. Position the drive as shown by the dimension in the diagram.
3. Mark the xing points.
4. Dene the subsequent position of the racks.
▫ A second person holds a rack in the required position.
10 mm 10 mm
5. Unscrew the 4 external hexagon bolts (M6).
6. Push the motor unit upwards until the pinion is in contact with the rack.
7. Tighten the 4 external hexagon bolts at that position.
8. Measure the clearance.
▫ Measure the distance between the oor (foundation) and rack.
⇒ (The rack used for measurement can be placed aside for now).
▫ Subtract 35 mm from the result.
▫ Cut the cover plate included with the system to the calculated
dimension.
9. Remove the drive from the foundation and place horizontally on a soft
surface with the bottom accessible.
10. Insert the cover plate into the C-prole from below to close the opening
under the pinion.
11. Drill holes in the foundation for the fastening points.
12. Replace drive on the foundation.
▫ Align column with spirit level.
NOTE
If the unevenness of the base makes it impossible to align it
correctly, a levelling plate, available as an accessory, will be
required.
13. Screw drive to foundation.

Installation
– 13
NOTE
Post cover must be secured to prevent removal.
NOTE
Post cover is cast aluminium.
• Fasten post cover to post so it cannot be removed simply by lifting it.
Releasing drive
2628 30
2527 29
100%
75%
%
MAX
1. Open dust cap.
2. Unlock lock.
3. Open revision ap.
4. Push lever down.
⇒ Drive is unlocked.
Installing the racks
NOTE!
Steel racks must have a minimum width of 12 mm. Narrower
steel racks may damage the drive.
• The rack must not press on the pinion at any position during operation,
otherwise the gears will be damaged.
• Always start installing the rack on the passage side of the gate.
• The holes must always be marked near the pinion.
1
1. Before marking the rst hole open the gate completely by hand.
2. Position the rack on the pinion and align it horizontally with a spirit level .
3. Mark the rst hole, drill it and fasten.
2
4. Slide gate towards the Closed position until the next drill point is
positioned as shown in the diagram and mark the hole again.
5. Repeat until all drill positions are marked.
6. Fasten rack.
Installation

Installation
– 14
Installing additional racks
TIP!
Mark and drill the two outer holes rst. Screw rack
temporarily and mark the remaining holes. Then remove
the rack again and drill the remaining holes. Then the rack
can be nally bolted in position.
2
3
1
1. Position second rack (2) ush with the rst rack (1) and hold another
rack (3) against them from below so the teeth of the additional rack (3)
mesh with the teeth of the two top racks (1 and 2). This will ensure that
the second rack (2) is accurately tted.
▫ A height offset must be avoided at all times.
2. Mark and drill the holes for the second rack.
3. Attach rack.
4. Repeat this procedure for additional racks.
Adjusting tooth play
IMPORTANT!
Adjusting the tooth play compensates for minor unevenness
and protects the gears.
IMPORTANT!
The weight of the gate must never rest on the motor shaft
or pinion.
1,5mm
• The play between pinion and racks must be approx. 1.5 mm.
10 mm 10 mm
Tip! Mark the position of the motor unit before loosening
the bolts
1. Unscrew the 4 hexagon bolts.
2. Adjust the height of the motor unit so the tooth play
is approx. 1.5 mm.
3. Tighten the 4 hexagon bolts.
Installing clamps
NOTE
Clamps are also required for installing the high
column (2100 mm).
1. Fix clamps at the specied position.
⇒ The column has holes.
⇒ The clamps have locating pins.
2. Fasten the clamps with the 4 socket head bolts to max. 15 Nm each.

Troubleshooting
– 15
Connection
8
TRL1 L N N
10 12 14 16 18
7 9 11 13 15 17
20 22 24 26 28 30
19 21 23 25 27 29
100%
START PROG
75%
50%
25%
0%
MAXMAX
0
Limit
Limit
Status
Safety
Light
Relay
1
ON
ECE
2
3
4
5
6
7
8
8
9
10
12
11
7
6
15
18
19
14 13
541 3
2
16
17
20
1. Torminal connection
2. Slot for four-channel radio receiver
3. LEDs
4. Software update interface
5. DIP switches
6. Prog. Button
7. Start button
8. Weight setting
9. Automatic close setting
10. SOM bus
11. Battery connection
12. Connecting strip for accessories
13. Secondary transformer
14. Mains connection
15. Motor connection
16. Motor lock (green)
17. Emergency release switch (red)
18. Left limit switch (blue)
19. Right limit switch (orange)
20. Connection for wireless safety contact strip (accessory)

Connection
– 16
Safety instructions
• The control unit must be connected to the power supply by an
electrician only.
• Ensure that the drive is securely fastened to the ground and the racks
on the gate to withstand the high forces generated when opening and
closing the gate.
• If a button is used for opening or closing, it must be installed within
sight of the gate at a height of at least 1.6 m to prevent operation by
children.
• The rack must not press on the pinion during operation, otherwise
the drive will be damaged. See p. 13 "Adjusting the gear play".
• Follow the standards for installation, e.g.: EN 12604, EN 12605.
NOTE!
Set the DIP switch with a narrow and at plastic object.
Never use a metal object.
This will damage the DIP switch.
Installation location
NOTE!
As delivered the drive is installed on the left, i.e. the gate
opens to the left.
NOTE!
If a moving block with an internal rack is used, the DIP switch
positions are reversed
see "Setting the limit switches", sec. "Moving block with
internal rack".
250
X
59
1
ON
ECE
2
3
4
5
6
7
8
• DIP 7 OFF
⇒ Gate opens to the left.
250
X
59
1
ON
ECE
2
3
4
5
6
7
8
• DIP 7 ON
⇒ Gate opens to the right.
Connection

Connection
– 17
Mains connection
WARNING:
Risk of electric shock when working on live parts!
Always disconnect the complete system from the power
supply before starting any electrical work.
Also unplug the battery pack.
NOTE!
The mains power cable and the cables for the solenoids (limit
switches) must be installed in the right of the column.
All signal wiring must be installed in the right of the column .
• Approved cable length max. 30 m.
• Approved cable cross-section: max. 2.5 mm².
8
TRL1 L N N
10 12 14
7 9 11 13
L1
N
8
TRN N
10 1214 1618
7 9 1113 15 17
20
22 2426 2830
19
21 2325 2729
0%
MAXMAX
0
Limit
Limit
2
3
5
1 L1
Primary transformer line AC 220 V -
230 V
2 L (black) Mains supply line AC 220 V - 230 V
3 N (blue) Transformer line
(neutral conductor)
4 N Primary transformer line
(neutral conductor)
5 PE (green/
yellow)
The PE is run from the control unit
housing and connected to the earth
clamp under the control unit housing
NOTE!
Buttons and other command controls must be installed and
actuated within view of the gate only.
Violation of this requirement may result in serious injury to
third parties.
Note!
Connect all safety components and accessories
before commissioning, because the control unit automatically
detects and saves the connected peripherals. If additional
peripherals are connected later, the control unit will need to
be reset rst. Then the peripherals can be connected. When it
is switched on for the rst time after that, the control unit
detects newly connected accessories and the system can be
operated again.
Connecting safety devices
PLEASE NOTE!
The system must be disconnected from the power supply
before any work on the gate or drive.
Also unplug the battery pack.
PLEASE NOTE!
The emergency stop button must used for the specied
purpose only.
Emergency stop button (normally closed contact)
TR
L1
L N
N
8 10 12 14 16 18
7 9 11 13 15 17
20 22 24 26 28 30
19
21 23 25 27 29
8 10 12
14
16
18
7 9 11 13
15
17
20
22
24
26
28
30
19
21
23
25
27
29
Terminals:
15 Normally closed contact
17 Normally closed contact
Safety contact strips
8.2 KΩ (OPEN)
TR
L1
L N
N
8 10 12 14 16 18
7 9 11 13 15 17
20 22 24 26 28 30
19
21 23 25 27 29
8 10 12
14
16
18
7 9 11 13
15
17
20
22
24
26
28
30
19
21
23
25
27
29
Terminals:
19 GND
21 Signal
8.2 KΩ (CLOSED)
TR
L1
L N
N
8 10 12 14 16 18
7 9 11 13 15 17
20 22 24 26 28 30
19
21 23 25 27 29
8 10 12
14
16
18
7 9 11 13
15
17
20
22
24
26
28
30
19
21
23
25
27
29
Terminals:
25 GND
27 Signal

Connection
– 18
Optoelectronic safety contact strip (OPEN)
TR
L1
L N
N
8 10 12 14 16 18
7 9 11 13 15 17
20 22 24 26 28 30
19
21 23 25 27 29
8 10 12
14
16
18
7 9 11 13
15
17
20
22
24
26
28
30
19
21
23
25
27
29
Terminals:
19 GND
21 Signal
23 +12 V
Optoelectronic safety contact strip (CLOSED)
TR
L1
L N
N
8 10 12 14 16 18
7 9 11 13 15 17
20 22 24 26 28 30
19
21 23 25 27 29
8 10 12
14
16
18
7 9 11 13
15
17
20
22
24
26
28
30
19
21
23
25
27
29
Terminals:
25 GND
27 Signal
29 +12 V
2-wire photo eye (bus system)
TR
L1
L N
N
8 10 12 14 16 18
7 9 11 13 15 17
20 22 24 26 28 30
19
21 23 25 27 29
8 10 12
14
16
18
7 9 11 13
15
17
20
22
24
26
28
30
19
21
23
25
27
29
Terminals:
12 NC
14 COM
Note!
The polarisation is irrelevant for connection!
4-wire photo eye
PLEASE NOTE!
If an external device that is used only during movement
operation is powered from the +24V output (e.g. card reader),
power-saving mode must be disabled. See "Standby mode".
TR
L1
L N
N
8 10 12 14 16 18
7 9 11 13 15 17
20 22 24 26 28 30
19
21 23 25 27 29
8 10 12
14
16
18
7 9 11 13
15
17
20
22
24
26
28
30
19
21
23
25
27
29
Terminals:
8 +24V; max. 400 mA
10 0 V
12 NC
14 COM
Warning light
TR
L1
L N
N
8 10 12 14 16 18
7 9 11 13 15 17
20 22 24 26 28 30
19
21 23 25 27 29
8 10 12
14
16
18
7 9 11 13
15
17
20
22
24
26
28
30
19
21
23
25
27
29
Terminals:
7 24 V (unregulated), max. 25 W
9 GND
NOTE!
The control unit automatically generates the ashing
warning light.

– 19
Connection
Connecting button
NOTE!
Connect button only!
Do not use locking switches, because continuous signals
cannot be processed.
Pulse button
TR
L1
L N
N
8 10 12 14 16 18
7 9 11 13 15 17
20 22 24 26 28 30
19
21 23 25 27 29
8 10 12
14
16
18
7 9 11 13
15
17
20
22
24
26
28
30
19
21
23
25
27
29
Terminals:
22 GND
26 Signal
Dened opening and closing
PLEASE NOTE!
Which button has which function must be clearly labelled.
TR
L1
L N
N
8 10 12 14 16 18
7 9 11 13 15 17
20 22 24 26 28 30
19
21 23 25 27 29
8 10 12
14
16
18
7 9 11 13
15
17
20
22
24
26
28
30
19
21
23
25
27
29
Terminals:
22 GND
24 OPEN input (normally open contact)
28 CLOSED input (normally open contact)
Partial opening
TR
L1
L N
N
8 10 12 14 16 18
7 9 11 13 15 17
20 22 24 26 28 30
19
21 23 25 27 29
8 10 12
14
16
18
7 9 11 13
15
17
20
22
24
26
28
30
19
21
23
25
27
29
Terminals:
11 GND
13 Partial opening
Stop button
Note!
Remove jumper
TR
L1
L N
N
8 10 12 14 16 18
7 9 11 13 15 17
20 22 24 26 28 30
19
21 23 25 27 29
8 10 12
14
16
18
7 9 11 13
15
17
20
22
24
26
28
30
19
21
23
25
27
29
Terminals:
20 GND
30 STOP input (normally closed contact)

– 20
Connection / Commissioning
Open-Stop-Close button
PLEASE NOTE!
Which button has which function must be clearly labelled.
TR
L1
L N
N
8 10 12 14 16 18
7 9 11 13 15 17
20 22 24 26 28 30
19
21 23 25 27 29
8 10 12
14
16
18
7 9 11 13
15
17
20
22
24
26
28
30
19
21
23
25
27
29
Terminals:
20 GND
24 OPEN input (normally open contact)
28 CLOSED input (normally open contact)
30 STOP input (normally closed contact)
Potential-free relay contact
TR
L1
L N
N
8 10 12 14 16 18
7 9 11 13 15 17
20 22 24 26 28 30
19
21 23 25 27 29
8 10 12
14
16
18
7 9 11 13
15
17
20
22
24
26
28
30
19
21
23
25
27
29
Terminals:
16 ; 18 max. 24 V DC or AC; max. 1 A
Optional connections
PLEASE NOTE!
The system must be disconnected from the power supply
before any work on the gate or drive.
Also unplug the battery pack.
Radio-based safety contact strip
Connect radio receiver to board
PLEASE NOTE!
The system must be disconnected from the power supply
before plugging in the radio receiver.
Also unplug the battery pack.
8
TRL1 L N N
10 12 14 16 18
7 9 11 13 15 17
20 22 24 26 28 30
19 21 23 25 27 29
100%
START PROG
75%
50%
25%
0%
MAXMAX
0
Limit
Limit
Status
Safety
Light
Relay
1
ON
ECE
2
3
4
5
6
7
8
1. Connect the receiver board to the control unit as shown in the diagram.
NOTE!
The maximum runtime for a gate movement when using
a radio-based safety contact strip is reduced to 80 seconds
for safety reasons.
NOTE!
For information on connection, settings etc., see the separate
instructions for the radio-based safety contact strip.
/