
PN-ZB03W
WIRELESS BOARD
OPERATION GUIDE

2
Contents
Introduction ................................................................................................................................................................... 3
Preparations .................................................................................................................................................................. 5
LCD monitor operation .............................................................................................................................................. 8
Connect the computer to the wireless board ............................................................................................................. 9
MirrorOp for SHARP preparations .......................................................................................................................... 12
Start MirrorOp for SHARP ....................................................................................................................................... 13
Wireless mode screen ................................................................................................................................................ 15
Displaying the computer screen ............................................................................................................................... 16
Operation from the monitor (touch-applicable models only) ................................................................................... 16
Operation from the connection software ................................................................................................................. 17
Controlling the computer whose screen is displayed (Conference control mode) .................................................. 22
Displaying the image in a web browser (WebSlides) .............................................................................................. 23
Displaying a computer screen on multiple monitors ................................................................................................ 24
Actions when a screen is displayed (touch-applicable models only) ................................................................... 25
Drawing on the screen with a pen (Direct Drawing) ................................................................................................ 25
Saving the screen as an image le ......................................................................................................................... 26
Exiting .......................................................................................................................................................................... 27
Settings ........................................................................................................................................................................ 28
Starting from a commercially available USB ash drive ........................................................................................ 32
Uninstalling the connection software ....................................................................................................................... 33
Using as a whiteboard (Direct Drawing) (touch-applicable models only) ............................................................. 34
Intellectual Property Rights and Other Matters ....................................................................................................... 36
E
Important Information
• This product has been shipped after strict quality control and product inspection. If, however, you nd any failure or
malfunction, contact your product dealer.
• Please understand that SHARP CORPORATION bears no responsibility for errors made during use by the customer or a
third party, nor for any other malfunctions or damage to this product arising during use, except where indemnity liability is
recognized under law.
• Transcribing or duplicating part or all of this manual and/or this software without permission from our company is not
permitted.
• As a part of our policy of continuous improvement, SHARP reserves the right to make design and specication changes for
product improvement without prior notice.
About this manual
• The screens and procedures are examples. The contents or details may vary depending on the screen conguration and OS
version, etc. Windows 7 is used as an example in this manual.
• This manual does not contain basic operating instructions for Windows and Mac OS.
Trademarks
• Microsoft and Windows are either registered trademarks or trademarks of Microsoft Corporation in the United States and/or
other countries.
• Apple, App Store, Mac, and Mac OS are trademarks of Apple Inc., registered in the U.S. and other countries.
• Intel, Celeron, and Intel Core are trademarks or registered trademarks of Intel Corporation or its subsidiaries in the U.S.A.
and other countries.
• MirrorOp is a registered trademark of Awind, Inc.
• Google, Android and Google Play are trademarks or registered trademarks of Google Inc.
• The trademark, Android, is used under license from Google Inc.
• The trademark, iOS, is used under license from Cisco Systems, Inc., in the U.S. and other countries.
• All other brand and product names are trademarks or registered trademarks of their respective holders.

3
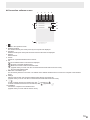
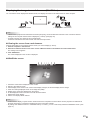
Introduction
Please update to the latest version of the rmware. Use the Information Display Downloader on the CD-ROM to download the
rmware, and run the update with “Admin” – “Firmware Upgrade” – “Firmware Upgrade”. (See page 31.)
n
Wireless
• On the monitor tted with wireless board you can display a screen of a computer that is connected to the same network as
the wireless board.
• You can display the screen by wireless LAN.
Computer
A
A
n
Simultaneous display
• You can display the screens of up to 4 computers at once.
A
A
B
B
C
C
D
D
n
Direct Drawing (touch-applicable models only)
• You can use the monitor as a white board. (See page 34.)
• Using a touch pen, you can write on the displayed screen in Wireless mode. (See page 25.)
E

4
n
Conference control mode
• A conference admin can be designated to manage which computer screens are displayed. (See page 22.)
n
WebSlides
• The screen that is displayed in Wireless mode appears in the web browser of the computer that is connected to the wireless
board. (See page 23.)
Caution
• To keep the performance of the wireless board stable, put the monitor in the Power off (Standby mode) state once a day.
TIPS
• You can connect up to 10 devices to the wireless board.
• The wireless LAN communication range is about 10 m.
In the following cases, the communication speed may slow down or communication may not be possible.
- An obstacle is present
- Interference occurs with another wireless device using the same frequency
- Electromagnetic interference occurs due to the magnetic eld or static electricity of a microwave oven or other device
- When the transmission speed is slow,
appears.
• The monitor may reboot due to external load noise, static electricity, or other factors. This will break the wireless connection
between the wireless board and computer, so in this event, you will need to reestablish the connection.
• The computer screen information is sent to the wireless board and displayed on the monitor.
For this reason, there may be a delay in the display or it may not be possible to display the screen correctly.
Correct operation may not be possible from some applications.
E

5
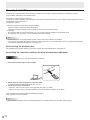
Preparations
E
Connect the wireless board to your computer.
After connecting, congure wireless board settings if needed to connect to an existing network.
For details, consult your network administrator.
Caution
• Due to legal restrictions, the wireless board cannot be connected to a public wireless LAN access point.
n
Connecting the wireless adapter
To connect your computer by wireless, install the wireless adapter (supplied) on the wireless board.
1. Remove the screw next to the wireless adapter port on the wireless board.
Wireless adapter port
2. Insert the wireless adapter (supplied) into the wireless adapter port.
Wireless
adapter
3. Attach the wireless adapter cover (supplied), and fasten with the screw you removed in step 1.
Wireless
adapter
cover

6
E
n
Connecting only the wireless board and the computer
Directly connect the wireless board and the computer by wireless LAN.
When connecting for the rst time, connect directly as well.
Computer
n
Connecting the wireless board to an existing network by wired LAN
If an access point already exists:
Connect the wireless board to the existing network by wired LAN.
Connect the computer to the wireless board from an existing access point.
Network
Computer
Connect by
wired LAN
Wireless
LAN
access
point
• Set the wireless board appropriately for the existing network.
If there is no access point:
Connect the wireless board to the existing network by wired LAN.
Connect the computer to the access point of the wireless board.
Connect with the
computer as a wireless
LAN access point
Network
Computer
• Set the wireless board appropriately for the existing network.
• Set the wireless board to access point mode.
* The wireless LAN access point function of the wireless board cannot be used when the monitor power is off.

7
E
n
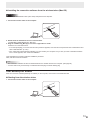
Connecting the wireless board to an existing network by wireless LAN
Connect the wireless board and computer to an access point of the existing network by wireless LAN.
Connect to the wireless LAN access point
Wireless
LAN
access
point
Network
Computer
• Set the wireless board appropriately for the existing network access point.
• Set the wireless board to client mode. (See page 30.)
n
Using an existing network access point to display the screen of 1 computer on multiple
monitors
You can display a screen on up to 4 monitors.
Connect the wireless board to the existing network by wired LAN.
Connect the computer to the wireless board from an existing access point.
Network
Computer
Wireless
LAN
access
point
Connect by wired LAN
(maximum of 4)
• Set the wireless board appropriately for the existing network.

8
E
LCD monitor operation
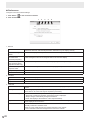
n
Wireless settings
You can change the settings below in “COMMUNICATION SETTING” of the SETUP menu. Depending on the monitor, some
menu items may not appear.
WIRELESS SETTING
WIRELESS FUNCTION .................... Set whether or not the wireless board’s wireless LAN is used.
Even when this is set to OFF, the LAN terminal of the wireless board can be used.
* When the setting is changed, the monitor restarts.
CONNECT AUTO INPUT SELECT ... Set whether or not the input mode automatically changes to OPTION when a video
signal is input via the wireless board.
n
Change the monitor to OPTION mode
To use the wireless board, change the input mode to OPTION. The home screen of Wireless mode appears.
IP AddressSSID (Host Name) Passcode
* Some icons do not appear on models that are not touch-applicable. (See page 15.)
TIPS
• When the power is in the off state, the wireless LAN access point function of the wireless board cannot be used.
• Even if LOGO SCREEN is set to OFF in the OTHERS menu, the “MirrorOp” logo is displayed when the OPTION input mode
changes.
• The following functions cannot be set in the Wireless Board.
HDMI AUTO VIEW, HOT PLUG CONTROL
• When you rst display the home screen after installing the wireless board, the wireless board may restart.

9
E
Connect the computer to the wireless board
Directly connect the computer to the wireless board.
When using a different method, connection is necessary as well to change the settings from the factory default settings.
In addition, read your computer’s manual.
TIPS
• The factory default setting for the wireless board’s wireless LAN is 2.4 GHz.
n
Windows
1. Click on the taskbar.
2. Select the wireless board from the wireless network list.
The SSID of the wireless board is shown in the home screen of Wireless mode.
Caution
• The factory default setting for wireless LAN security is not enabled.
For security, set “Encryption” (encryption method) and a “Key”. (See page 11.)

10
E
n
Mac OS
1. Click “System Preferences” from the Apple menu ( ).
2. Click “Network”.
3. Click “Wi-Fi” and select the wireless board from the wireless network list.
The SSID of the wireless board is shown in the home screen of Wireless mode.
Caution
• The factory default setting for wireless LAN security is not enabled.
For security, set “Encryption” (encryption method) and a “Key”. (See page 11.)

11
E
n
Security and key settings
For wireless LAN security, set “Encryption” (encryption method) and a “Key”.
TIPS
• A security warning may appear in some web browsers.
Follow the instructions in the web browser and continue the procedure.
1. Start the computer’s web browser.
2. Enter the IP address shown on the home screen of Wireless mode in the address bar of the web browser.
The settings screen appears.
3. Click “Admin”.
4. Enter the password and click “Login”.
The default password is “admin”.
5. Click “WLAN Setup”.
6. Set “Encryption” and a “Key”.
7. Click “Apply”.
8. Click “OK”.
Restart the wireless board.
Connect the computer to the wireless board. (See pages 9 or 10.)
For the security key, specify the key that you set in the above.

12
E
MirrorOp for SHARP preparations
To display the computer screen on the monitor by wireless LAN, connection software (MirrorOp for SHARP) is required.
The connection software is in the wireless token.
First read the software license agreement.
To use the connection software, you must agree to the software license agreement. For the software license agreement, refer to
the le below in the wireless token.
\Installer\EULA-EN.txt
There are 2 methods for using the connection software:
• Use the connection software in the wireless token
• Install the connection software on the computer to be used from the wireless token
For example,
• On computers that are not used frequently, you can use the connection software in the wireless token
• On frequently used computers, you can install the connection software
TIPS
• To use multi-touch on touch-applicable models, use the connection software you installed.
• If you want to use a token for multiple computers at the same time, you can enable starting of the connection software from a
commercially available USB ash drive. (See page 32.)
n
Connecting the wireless token
No preparations are needed. Start the connection software from the wireless token. (See page 13.)
n
Installing the connection software from the wireless token (Windows)
Caution
• This can only be done by a user with administrator authority.
1. Connect the wireless token to the computer.
2. Double-click the setup program in the wireless token.
\Installer\Windows installer\SHMirrorOp_Win_inst.msi
3. Follow the on-screen instructions.
• When the “User Account Control” screen appears, click “Yes” (or “Allow”).
• When a security warning screen (The publisher could not be veried.) appears, click “Allow”.
This completes the connection software installation procedure.
Next, start the connection software.
TIPS
• The connection software can also be downloaded from the wireless board to the computer. (See page 28.)

13
E
n
Installing the connection software from the wireless token (Mac OS)
Caution
• To install, an administrator name (user name) and password are required.
1. Connect the wireless token to the computer.
2. Double-click the installation le in the wireless token.
\Installer\Mac installer\SHMirrorOp_Mac.dmg
3. Drag the “SHMirrorOp_Mac.app” icon to the “Applications” folder.
Follow the on-screen instructions.
• If a screen prompting you to enter the name and password appears, enter the name and password of the administrator and
click “Install Software” (or “OK”).
• If the “When this software nishes installing, you must restart your computer. Are you sure you want to install the software
now?” screen appears, click “Continue Installation”.
This completes the connection software installation procedure.
Next, start the connection software.
TIPS
• The connection software can also be downloaded from the wireless board to the computer. (See page 28.)
• In some cases it may be necessary to install Sound Flower.pkg or Extend desktop.pkg.
Start MirrorOp for SHARP
Start the connection software (MirrorOp for SHARP) on the computer, and connect to the wireless board.
n
Starting from the wireless token
1. Connect the wireless token to the computer.

14
E
2. Windows: Double-click “SHMirrorOp_Win.exe” in the Autoplay screen.
If the Autoplay screen does not appear, open the wireless token and double-click “SHMirrorOp_Win.exe”.
Mac: Open the wireless token and double-click “SHMirrorOp_Mac.app”.
The connection software starts.
3. Click “ ”, select the wireless board to be connected, and click “CONNECT”.
The host name of the wireless board is shown in the home screen of Wireless mode.
4. Enter the passcode and click “OK”.
The passcode is shown in the home screen of Wireless mode.
The computer connects to the wireless board.
n
Starting from the installed/downloaded software
1. Double-click “MirrorOp for SHARP”.
The connection software starts.
2. Click “ ”, select the wireless board to be connected, and click “CONNECT”.
The host name of the wireless board is shown in the home screen of Wireless mode.
3. Enter the passcode and click “OK”.
The passcode is shown in the home screen of Wireless mode.
The computer connects to the wireless board.
TIPS
• The passcode changes for security.
You can change the settings to make the passcode permanent, or connect without entering the passcode. (See page 28.)

15
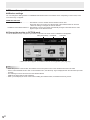
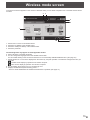
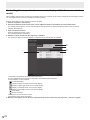
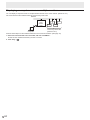
Wireless mode screen
E
In the home screen that appears on the monitor in Wireless mode, you can select computers to be connected and set various
functions.
1
4
3
2
5
6
7
8
9
1. Shows how to connect to the wireless board.
2. Shows the IP address of the wireless board.
3. Shows the SSID (Host Name) of the wireless board.
4. Shows the passcode.
The following items only appear on touch-applicable models.
5. Show a list of the connected computers.
6. You can change the language used in the wireless board screen.
You can enable starting of the connection software from a commercially available USB ash drive. (See page 32.)
7. Specify whether or not a screen is displayed on the monitor by computer operation. The selection changes each time you
touch this.
: Prohibit screen display by operation from another computer
: Allow screen display by operation from another computer
8. You can display the screens of up to 4 computers at once.
9. Displays the whiteboard (Direct Drawing) screen. *
* This icon will be added when the wireless board rmware is updated. (See page 31.)

16
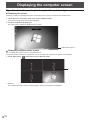
Displaying the computer screen
E
Operation from the monitor (touch-applicable models only)
n
Displaying the screen
Select the computer to be displayed from the computers that are currently connected to the wireless board.
1. Touch “Device in connection” in the home screen of Wireless mode.
A list of the currently connected computers appears.
2. Touch the computer to be displayed.
The screen of the computer is displayed on the monitor.
Toolbar (See page 25.)
n
Displaying multiple screens at once
You can display the screens of up to 4 computers at once.
The monitor screen is divided into 4 partitions, and you can select the computer that appears in each partition.
1. Touch “Split Screen” (
) in the home screen of Wireless mode.
1
1. Add User
The computers that are currently connected appear. Select the computers to be displayed.

17
E
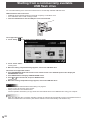
Operation from the connection software
Operate from the connection software on the computer whose screen is displayed.
TIPS
• Screen display by operation from the computer must be allowed. ( )
• On touch-applicable models, you can also operate by touching the screen on the monitor.
1. Click “Play” (
) in the connection software.
The screen of the computer is displayed on the monitor.
Toolbar (See page 25.)
* Only appears when touch-
applicable model is used.
1 2 3 4
5 6 7
1 2 3 4
7
1.
Wireless boards found from the computer appear. (See page 19.)
2. Split Screen
Set 4-screen display.
3. Play
The screen of the computer is displayed on the monitor.
During screen display, “Stop” (
) and “Pause” ( ) appear.
4. Mute
Mute the audio of the currently connected device.
Click when the audio is muted to unmute.
5. Menu
Preferences : Congure settings for the connection software. (See page 20.)
Capture & Save screen : Save the screen as an image le (JPEG). (See page 21.)
Disconnect : Break the connection with the wireless board.
About : Display the version and license information of the connection software.
Quit : Exit the connection software.
6. Minimize
Minimize the operation screen.
7. Close
Exit the connection software. (See page 27.)

18
E
n
Stopping the display
You can stop display of the computer screen on the monitor.
1. Click “Stop” (
).
Return to Wireless mode screen.
n
Pausing the display
You can pause the display of the computer screen on the monitor. When paused, the screen will not change even if an action is
performed on the computer.
1. Click “Pause” (
).
2. To resume the display, click “Play” (
).
n
4-screen display
1. Click “Split Screen” ( ).
2. Select the display location.
: Full-screen display / : Upper left display / : Upper right display / : Lower left display /
: Lower right display

19
E
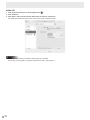
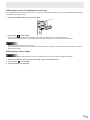
n
Connection software screen
1
6
8
9
10
7
2345
1.
Return to the operation screen.
2. Wireless board list
The wireless boards (host name) found by the computer are displayed.
3. Favorites
Wireless boards (host name) that have been saved as favorites are displayed.
4. Refresh
Refresh the list.
5. Search
Search for a specied wireless board in the list.
6. List
The list of wireless boards or favorites are displayed.
: Currently connected wireless board
: Break the connection with the wireless board.
(Appears when you hover over the connected wireless board with the mouse cursor.)
: Unconnected wireless board
7. Host name / IP address input
You can directly enter the host name or IP address of the desired wireless board to connect the computer to that wireless
board.
8. Settings
Start the web browser and congure wireless board settings. (See page 28.)
(Appears when you hover over the connected wireless board with the mouse cursor.)
9.
/
To add a wireless board to the favorites list, click . (Appears as )
To delete a wireless board from the favorites list, click
. (Appears as )
10. CONNECT
Connect the computer to the wireless board.
(Appears when you hover with the mouse cursor.)

20
E
n
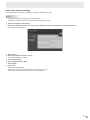
Preferences
Congure connection software settings.
1. Click “Menu” (
) in the connection software.
2. Click “Preferences”.
1 2
3
4
5
1. General
Name Set the computer name used for connection to the wireless board.
Characters other than half-width alphanumeric characters may not display correctly.
Allows controlling from
tablets
Select this to display the computer in the list screen of MirrorOp Receiver by Awind, Inc.
Allows screen projection
be redirected to
browsers (temporary)
Select to display the screen on another computer using the WebSlides function.
Enable saving the screen as an image le even in the 4-screen display.
Allows control inputs
from receivers (touch-
applicable models only)
Select to enable operation of the computer displayed by wireless by touching the monitor.
By default, always mute
projection audio.
Select to automatically mute the audio when displaying a computer screen on the monitor.
Always on top Select to always move the connection software to the front.
Disable Aero Select to disable Windows Aero.
2. Favorites
Default List Set the default display for the connection software wireless board list.
Import Retrieve a wireless board that has been saved.
Export Save a wireless board that has been added to the favorites.
3. Advanced
Mode Set whether the desktop is duplicated or extended when displaying a computer screen on the
monitor.
Quality Set the image quality of the computer screen displayed on the monitor.
When “Best” is set, more time may be required for processing.
Resolution Setting Set the resolution of the computer screen displayed on the monitor.
Always ask: Conrm the resolution each time a screen is displayed.
Always change: Automatically change the resolution.
Never ask: Display at the resolution of the computer desktop.
Aspect Ratio Set whether the aspect ratio is adjusted to the screen or remains unchanged when a computer
screen displayed on the monitor.
Encode Format Set the data format used to send screen data.
Normally “Automatic” should be used.
“JPEG” is a high quality format, but increases the load on the network.
“H.264” reduces the data size and lightens the load on the network.
Page is loading ...
Page is loading ...
Page is loading ...
Page is loading ...
Page is loading ...
Page is loading ...
Page is loading ...
Page is loading ...
Page is loading ...
Page is loading ...
Page is loading ...
Page is loading ...
Page is loading ...
Page is loading ...
Page is loading ...
Page is loading ...
Page is loading ...
Page is loading ...
Page is loading ...
Page is loading ...
Page is loading ...
Page is loading ...
Page is loading ...
Page is loading ...
Page is loading ...
-
 1
1
-
 2
2
-
 3
3
-
 4
4
-
 5
5
-
 6
6
-
 7
7
-
 8
8
-
 9
9
-
 10
10
-
 11
11
-
 12
12
-
 13
13
-
 14
14
-
 15
15
-
 16
16
-
 17
17
-
 18
18
-
 19
19
-
 20
20
-
 21
21
-
 22
22
-
 23
23
-
 24
24
-
 25
25
-
 26
26
-
 27
27
-
 28
28
-
 29
29
-
 30
30
-
 31
31
-
 32
32
-
 33
33
-
 34
34
-
 35
35
-
 36
36
-
 37
37
-
 38
38
-
 39
39
-
 40
40
-
 41
41
-
 42
42
-
 43
43
-
 44
44
-
 45
45


Sharp PNZB03W Owner's manual
- Type
- Owner's manual
- This manual is also suitable for
Ask a question and I''ll find the answer in the document
Finding information in a document is now easier with AI
Related papers
Other documents
-
Oce cm5520 User manual
-
 Clear Clear Spot 4G+ User manual
-
WePresent WiPG-1600W User guide
-
WePresent WiCS-2100 User guide
-
 WePresent WIPG-1000 User guide
-
Barco wePresent WiPG-1600W User guide
-
Samsung CLX-6210FX User manual
-
Aiphone JO-1MDW Install Manual
-
-
 WePresent wePresent WiPG-2000 User guide


