Intellinet 551441 User guide
- Category
- Security cameras
- Type
- User guide
This manual is also suitable for
- 551069
- 551366
- 551380
- 551397
- IBC-637IR Outdoor Night Vision Megapixel HD Network Bullet Camera
- IBC-667IR Outdoor Night Vision 2 Megapixel HD Network Bullet Camera
- IDC-752IR Night Vision Megapixel Network IP Dome Camera
- IDC-757IR Outdoor Night Vision Megapixel Network Dome Camera
- IDC-862 HD 2 Megapixel Network Mini-Dome Camera

The Intelligent Surveillance Solution
User manual

CamGraba IP System
CONTENTS
1.1 System Requirement ................................................................................................ 1
1.2 Installation ................................................................................................................ 1
1.3 Quick Start ................................................................................................................ 5
2.1 Start Menu ............................................................................................................... 10
2.2 Information Window: .............................................................................................. 12
2.3 PTZ Config: ............................................................................................................. 12
2.3.1. Preset/ Go: ....................................................................................................... 12
2.3.2. Zoom: ............................................................................................................... 12
2.3.3. Focus: .............................................................................................................. 12
2.3.4. Patrol: ........................................ ..................................................................... .. 12
2.4 On Screen Menu ..................................................................................................... 13
2.4.1. Camera Setting: ............................................................................................... 13
2.4.2. Enable Move/Area Zoom: ................................................................................ 13
2.4.3. Enable Talk: ..................................................................................................... 14
2.4.4. Connect/ Disconnect: ....................................................................................... 14
2.4.5. Show Camera: ................................................................................................. 14
2.4.6. Snapshot: ......................................................................................................... 14
2.4.7. Manual Record: ................................................................................................ 14
2.4.8. Toggle Full Screen: .......................................................................................... 14
3.1 Information Window: .............................................................................................. 16
3.2 Audio Volume Control: .......................................................................................... 16
3.3 Screen Division: ..................................................................................................... 16
3.4 Browse Mode: ......................................................................................................... 17
3.5 Open Record: .......................................................................................................... 17
3.6 Enhancement / Post Processing Tool .................................................................. 18
3.6.1. General Setting: ............................................................................................... 18
3.6.2. Filter Setting ..................................................................................................... 18
3.7 Save Video .............................................................................................................. 18
3.8 Save Image ............................................................................................................. 19
3.9 Print ......................................................................................................................... 19
3.10Backup .................................................................................................................... 20
3.11Log Viewer .............................................................................................................. 21
3.11.1.System Log: ..................................................................................................... 21
3.11.2.Export and Backup Log: ................................................................................... 22

CamGraba IP System
4.1 Day Mode ................................................................................................................ 23
4.2 Load Preset Modes ................................................................................................ 23
4.3 Insert a New Schedule Manually ........................................................................... 24
4.4 Copy Schedule ....................................................................................................... 25
4.5 Week Mode ............................................................................................................. 25
4.5.1. Default: ............................................... .............................................................. 26
4.5.2. Holiday: ............................................................................................................ 26
4.5.3. Custom: ............................................................................................................ 26
4.6 Adjust the Scheduled Setting ................................................................................ 26
4.7 Encoding Option .................................................................................................... 27
4.7.1. Always Record: ................................................................................................ 27
4.7.2. Record on Motion: ............................................................................................ 27
4.7.3. Pre-record/ Post-record Time: .......................................................................... 27
4.7.4. Encoded Options .............................................................................................. 27
5.1 Setting – General .................................................................................................... 29
5.1.1. Startup ............................................................................................................. 29
5.1.2. Storage ............................................................................................................ 29
5.1.3. Status Display .................................................................................................. 30
5.1.4. Miscellaneous .................................................................................................. 31
5.1.5. Audio Preview .................................................................................................. 31
5.1.6. Auto Reboot ..................................................................................................... 32
5.2 Setting - Camera ..................................................................................................... 32
5.2.1. Add Camera ..................................................................................................... 33
5.2.2. Setting .............................................................................................................. 34
5.2.3. Miscellaneous: ................................................................................................. 34
5.2.4. IP Camera / Video Server Setting Panel .......................................................... 35
5.3 Setting - I/O Device ................................................................................................. 35
5.4 Setting - PTZ Config ............................................................................................... 36
5.5 Setting – Monitor Display ...................................................................................... 38
5.6 Save/ Load Configuration ...................................................................................... 39
5.7 Log Viewer .............................................................................................................. 40
5.7.1. Log Viewer – System Log ................................................................................ 40
5.7.2. Export and Backup Log .................................................................................... 41
5.8 7.2 Export ................................................................................................................ 41
5.9 Backup .................................................................................................................... 42

CamGraba IP System
5.9.1. Backup ............................................................................................................. 42
5.9.2. Delete Recorded Information from the System ................................................ 44
5.10 Network Service ..................................................................................................... 46
5.10.1.Live Streaming Server ...................................................................................... 46
5.11 About Main Console ............................................................................................... 49
6.1 Setup Panel ............................................................................................................. 51
6.1.1. General Setting ................................................................................................ 52
6.1.2. Server Setting .................................................................................................. 53
6.1.3. Group Setting ................................................................................................... 54
6.1.4. Camera Setting ................................................................................................ 55
6.1.5. Monitor Display Setting .................................................................................... 56
6.1.6. Notification Setting ........................................................................................... 57
6.2 Show Camera(s) On the Display Screen .............................................................. 57
6.2.1. Log In/ Log Out: ............................................................................................... 58
6.2.2. Server and Camera List: .................................................................................. 58
6.2.3. PTZ Camera Control: ....................................................................................... 58
6.2.4. Digital Zoom: .................................................................................................... 59
6.2.5. Play/ Stop/Drop: ............................................................................................... 59
6.2.6. Information Display Window: ............................................................................ 59
7.1 Server IP .................................................................................................................. 60
7.2 Remote Live Viewer ............................................................................................... 60
7.3 Remote Playback .................................................................................................... 61

CamGraba IP System
1
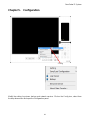
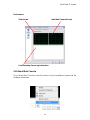
Chapter 1. Quick Start
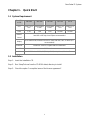
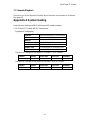
1.1 System Requirement
Total FPS
at CIF
480~640 360~480 240~360 120~240 0~120
CPU
Intel Core 2
Duo
Intel Pentium
D 930
Intel Pentium
D 930
Intel P4 2.8
GHz
Intel P4 2.4
GHz
RAM 1 GB 1 GB 1 GB 512 MB 512 MB
Mother-
board
Intel 945 or 965 chip, Intel Chipset recommended
Display
ATI Radeon 9200, nVIDIA GeForce FX-5200, Intel 945 / 965, or above (ATI
recommended)
Ethernet 100 BaseT or Above, Gigabit LAN Recommended
Hard Disk 80 GB or above
OS MS Windows 2003 / XP(32-bit) / 2008(64-bit) / Vista / Windows 7
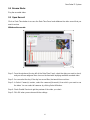
1.2 Installation
Step 1: Insert the Installation CD.
Step 2: Run SetupTool.exe from the CD-ROM driver/ directory to install.
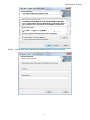
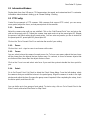
Step 3: Check the option “I accept the terms of the license agreement”.

CamGraba IP System
2
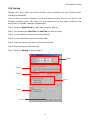
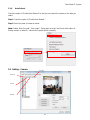
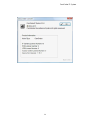
Step 4: Please enter your name and the company name for which you work.

CamGraba IP System
3
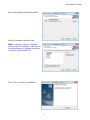
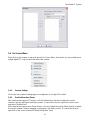
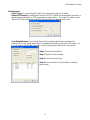
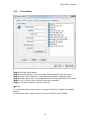
Complete Setup Type:
Install all program features into the
default directory.
Check the option “Complete”.
All program features will be installed.
[Require the most disk space.]
Press the “install” to start the
installation.
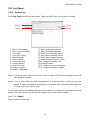
Custom Setup Type:
Install the system to a preferred directory.
Or select whichever feature(s) you wish to
install.
Check the option “Custom”.
Select which program features you want to
install. This is recommended for advanced
users.

CamGraba IP System
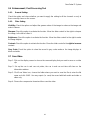
4
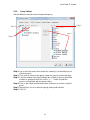
Select folder where setup will install files.
Select the features setup will install.
Hint: For example, select only Playback
and LiveView for installation. Install and use
only these features on multiple remote sites
at home or anywhere with a PC.
Press “Finish” to finish the installation.

CamGraba IP System
5
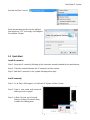
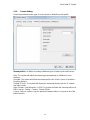
Execute the Main Console
Enter the password you like into the edit box.
And then press “OK”. Now enjoy our Intelligent
Surveillance Solution.
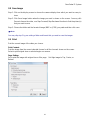
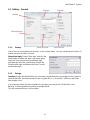
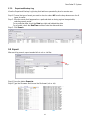
1.3 Quick Start
Install IP camera(s)
Step 1: Setup the IP camera(s) following by the instruction manual provided by the manufacturer.
Step 2: Check the network between the IP camera(s) and the system.
Step 3: Add the IP camera(s) to the system following below steps.
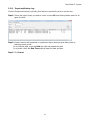
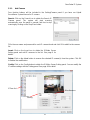
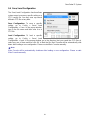
Add IP camera(s)
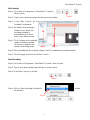
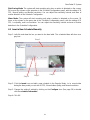
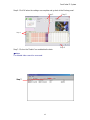
Step 1: Go to Start > All Programs > CamGraba IP System > Main Console.
Step 2: Type in user name and password
and log on to the system.
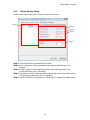
Step 3: In Main Console, go to General
Setting > Setting > System Setting
to obtain the Setting panel.
Step 3

CamGraba IP System
6
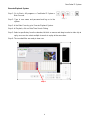
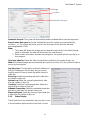
Step 4: Go to Camera tab. If your IP
cameras support UPnP. Follow
step 5. Otherwise, follow step 8.
Step 5: Click “Search” to search for the IP
cameras that are available at this
point.
Note:
Search function just support the IP
cameras with UPnP supported.
Step 6: Select one of the IP cameras that
are available; check the option and
enter the username and password.
Step 7: Click OK to add the camera.
Step 8: Click “Insert” to insert the IP
cameras.
Step 9: Enter the IP address or domain
name (check the “Use DNS” option), Http Port, Username, and Password.
Step 10: Click “Auto Detect”
Step 11: Click OK to add the camera.
Click OK to exit the Setting panel.
Step 9
Step 10
Step 11
Step 4
Step 8
Step 5

CamGraba IP System
7
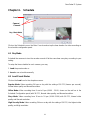
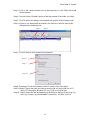
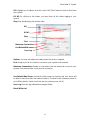
Set Schedule
Step 1: Go to Start > All programs > CamGraba IP System >
Main Console.
Step 2: Type in user name and password and log on to the system.
Step 3: In the Main Console, go to
Schedule Configuration.
Step 4: By default, when inserting a
camera to the system, the
recording schedule is
automatically set to be 24
hours a day, always record.
Step 5: Click Configure on the selected
camera schedule or double
click on any schedule bar to
modify the recording mode.
Step 6: When satisfied with the schedule setting, click OK to update the recording schedule.
Step 7: Click OK again to go back to the Main Console.
Start Recording
Step 1: Go to Start > All Programs > CamGraba IP System > Main Console
Step 2: Type in user name and password and log on to the system.
Step 3: In the Main Console, go to Start.
Step 4: Click on “Start Recording Schedule” to enable
the functions.
Step 3
Step 3
Ste
p
4
Ste
p
5
Ste
p
4

CamGraba IP System
8
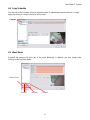
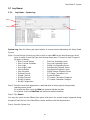
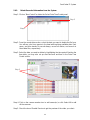
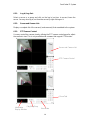
Execute Playback System
Step 1: Go to Start > All programs > CamGraba IP System >
Main Console.
Step 2: Type in user name and password and log on to the
system.
Step 3: In the Main Console, go to Execute Playback System.
Step 4: In Playback, click on Date Time Search Dialog.
Step 5: Select a specific day from the calendar, left click on mouse and drag to select a video clip to
reply; user can also select multiple channels to replay at the same time.
Step 6: The recorded files are ready to view now.
Step 3
Step 5

CamGraba IP System
9
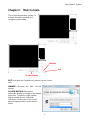
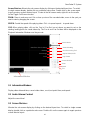
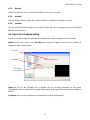
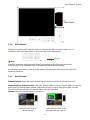
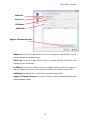
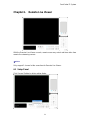
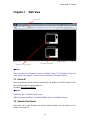
Chapter 2. Main Console
This is the main operation system - to
activate, schedule recording, and
configure system setting.
EXIT: Shut down the Surveillance System or log out current
user.
MINIMIZE: Minimize the Main Console
window.
SCREEN DIVISION:
Allocate the
sub-screen display by clicking on the desired
layout icon. To switch to single camera
display, double click on a particular
sub-screen. Double click on the screen
again to regain previous screen division
layout.
Exit
Minimize
Screen Division

CamGraba IP System
10
Only available under wide screen resolution(1440x900, 1680x1050, 1920x1080, 1920x1200):
2.1 Start Menu
START: Click on the Start Menu icon and select from the drop down menu to activate/ deactivate:
Recording Schedule System. Select Start/Stop Monitor All to activate/ deactivate all the functions at
once.
Note:
When activating any of the monitor functions, system considers the current screen status as normal.
Therefore, if you want to, for example, detect Missing Object, be sure the object needed to be
protected is in its position at the moment you click Start button.
Divide into 1
screen(s)
Divide into 4
screen(s)
Divide into 6
screen(s)
Divide into 9
screen(s)
Divide into
10 screen(s)
Divide into
13 screen(s)
Divide into
16 screen(s)
Divide into N
screen(s)
Divide into
13 screen(s)
Divide into
17 screen(s)
Switch to
Full screen
Rotate all
screens
Start
Divide into
12 screen(s)
Divide into 9
screen(s)
Divide into 6
screen(s)
Divide into 4
screen(s)

CamGraba IP System
11
PLAYBACK: Click on the icon to get Playback Console. You can watch recorded video, search
recorded video, adjust image of the stored data, save video/ pictures, print images, check log
information and event records, and set up recording function configuration. See Playback on page
15 for detail.
SCHEDULE: Organize recording time schedule and setup recorder configuration. See Schedule on
page 23 for detail.
GENERAL SETTING: Select from the drop down menu to modify general setting, save/ load
configuration settings, start counting application, access log viewer and backup files, or network
services. See General Setting on page 28 for detail.
Schedule Configuration
Execute Playback
S
y
stem
General Setting
Information
Window
PTZ Camera
Control

CamGraba IP System
12
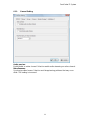
2.2 Information Window:
Display date, time, free HD space, CPU temperature, fan speed, and customized text. To customize
Information about window’s setting, go to General Setting > Setting
2.3 PTZ Config:
Control the movement of PTZ cameras. With cameras that support PTZ control, you can move,
zoom, patrol, adjust the focus, and set preset points of the cameras.
2.3.1. Preset/ Go:
Adjust the camera view until you are satisfied. Click on the “Add Present Point” icon and set up the
view as the preset point 01. Adjust the camera view again and set up the preset point 02. Repeat
the process until finish setting up all preset points. You can enter any names you like to instead of
the preset point 01, preset point 02, preset point 03.
Click on the “Go to Present Point” icon and view the result of your setting.
2.3.2. Zoom:
Click on the + and – signs to zoom in and zoom out the view.
2.3.3. Focus:
You can select to have the camera focused near or far. To focus near means objects that are closer
will be clearer than the objects that are further away. On contrast, to focus far means objects that
are further will be clearer than the objects that are closer.
Click on the Focus icon and select auto focus if you want the system to decide the focus point for
you.
2.3.4. Patrol:
Go to Set Preset Point- Set Patrol to obtain the Patrol Setup dialog. From the left window, select
the cameras that you would like to have in the patrol group. Align the cameras in order in the right
window and adjust the time. Rename the group name if required. After completing the setup, check
the Active option, and then click OK.
You can define up to four groups of auto patrol. To start or stop, click on Go to Preset Point in the
Main Console, and select Start Patrol or Stop Patrol.

CamGraba IP System
13
2.4 On Screen Menu
Right click on the camera screen and get the On Screen Menu, from which you can enable move,
enable digital PTZ, and connect/ disconnect the camera.
2.4.1. Camera Setting:
Click to go to the camera setting page for configuration. See Page 35 for detail.
2.4.2. Enable Move/Area Zoom:
With cameras that support PT function, click the Enable Move function to adjust the current
camera’s view by clicking on the display screen. To cancel this function, right click on the screen
and select Disable Move.
With cameras that support Area Zoom function, click the Enable Move/Area Zoom function to adjust
the current camera’s view by dragging a rectangle on the display screen. To cancel this function,
right click on the screen and select Disable Move/Area Zoom.

CamGraba IP System
14
2.4.3. Enable Talk:
With cameras that support two-way audio, you may select enable talk to utilize the function.
2.4.4. Connect/ Disconnect:
Right click on the display screen and select Connect/Disconnect to modify the connecting status of
the camera.
2.4.5. Show Camera:
Select the camera from the Show Camera Menu to display video on selected screen.
2.4.6. Snapshot:
Select the snapshot function to capture a specific video image immediately. You have the options to
copy the image to the clipboard or to save it.
2.4.7. Manual Record:
Start recording video by selecting manual record.
2.4.8. Toggle Full Screen:
Select to view a specific channel with full screen. Press “ESC” to go back to original window.

CamGraba IP System
15
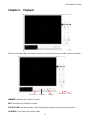
Chapter 3. Playback
Watch the recorded video, view and/or search for unusual events and recorded system information.
MINIMIZE: Minimize the Playback console.
EXIT: Shut down the Playback console.
SCROLL BAR:
Indicate the status of the playing video; drag it to where you want to review.
CONTROL: Play, pause and stop the video.
Scroll Bar
Exit Minimize
Control
Speed

CamGraba IP System
16
Screen Division: Allocate the sub-screen display by clicking on the desired layout icon. To switch
to single camera display, double click on a particular sub-screen. Double click on the screen again
to go to previous screen division layout. To view in the full screen mode, right click on the screen
for the Toggle Full Screen function.
ZOOM:
Zoom in and zoom out. Get a close up view of the recorded video; move to the spot you
want to view by dragging the screen.
SPEED: Control the speed of the playing video. Click + to speed up and – to speed down.
CUE: When playing video, click on the Cue In/ Cue Out icon at where you want to set as the
starting/ ending point of a saved video clip. The Cue In and Cue Out time will be displayed on the
Playback Information Window once they are set.
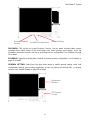
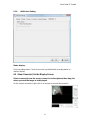
3.1 Information Window:
Display video date and time, current video status, cue in/ out points’ time, and speed.
3.2 Audio Volume Control:
Adjust the sound level
3.3 Screen Division:
Allocate the sub-screen display by clicking on the desired layout icon. To switch to single camera
display, double click on a particular sub-screen. Double click on the screen again to regain previous
screen division layout.
Audio Volume
Control
Information Window
Date Time Search Dialog
General Setting
Search Mode
Screen Division
Backup
Post Processing Tool
Save Image
Export Video/Audio
Print
Log Viewer
Zoom
Speed
Cue
Page is loading ...
Page is loading ...
Page is loading ...
Page is loading ...
Page is loading ...
Page is loading ...
Page is loading ...
Page is loading ...
Page is loading ...
Page is loading ...
Page is loading ...
Page is loading ...
Page is loading ...
Page is loading ...
Page is loading ...
Page is loading ...
Page is loading ...
Page is loading ...
Page is loading ...
Page is loading ...
Page is loading ...
Page is loading ...
Page is loading ...
Page is loading ...
Page is loading ...
Page is loading ...
Page is loading ...
Page is loading ...
Page is loading ...
Page is loading ...
Page is loading ...
Page is loading ...
Page is loading ...
Page is loading ...
Page is loading ...
Page is loading ...
Page is loading ...
Page is loading ...
Page is loading ...
Page is loading ...
Page is loading ...
Page is loading ...
Page is loading ...
Page is loading ...
Page is loading ...
-
 1
1
-
 2
2
-
 3
3
-
 4
4
-
 5
5
-
 6
6
-
 7
7
-
 8
8
-
 9
9
-
 10
10
-
 11
11
-
 12
12
-
 13
13
-
 14
14
-
 15
15
-
 16
16
-
 17
17
-
 18
18
-
 19
19
-
 20
20
-
 21
21
-
 22
22
-
 23
23
-
 24
24
-
 25
25
-
 26
26
-
 27
27
-
 28
28
-
 29
29
-
 30
30
-
 31
31
-
 32
32
-
 33
33
-
 34
34
-
 35
35
-
 36
36
-
 37
37
-
 38
38
-
 39
39
-
 40
40
-
 41
41
-
 42
42
-
 43
43
-
 44
44
-
 45
45
-
 46
46
-
 47
47
-
 48
48
-
 49
49
-
 50
50
-
 51
51
-
 52
52
-
 53
53
-
 54
54
-
 55
55
-
 56
56
-
 57
57
-
 58
58
-
 59
59
-
 60
60
-
 61
61
-
 62
62
-
 63
63
-
 64
64
-
 65
65


Intellinet 551441 User guide
- Category
- Security cameras
- Type
- User guide
- This manual is also suitable for
-
- 551069
- 551366
- 551380
- 551397
- IBC-637IR Outdoor Night Vision Megapixel HD Network Bullet Camera
- IBC-667IR Outdoor Night Vision 2 Megapixel HD Network Bullet Camera
- IDC-752IR Night Vision Megapixel Network IP Dome Camera
- IDC-757IR Outdoor Night Vision Megapixel Network Dome Camera
- IDC-862 HD 2 Megapixel Network Mini-Dome Camera
Ask a question and I''ll find the answer in the document
Finding information in a document is now easier with AI