
1

2
1. Safety Instruction ............................................................................................
Table of Contents
4
1.1 Safety Notice ................................................................................................ 4
1.2 Electromagnetic Compatibility (EMC) ................................................................ 5
2. Overview.......................................................................................................... 6
2.1 2MP IR Mini Bullet Camera
Features and Specifications ..................................... 6
2.2 2MP IR Mini Bullet Camera Package Contents .................................................. 7
2.3 Minimum System Requirement ...................................................................... 7
3. Web Interface Main Menu ............................................................................... 9
4. Setting_Information ..................................................................................... 12
5. Setting_Basic Setup ..................................................................................... 13
5.1 Account .................................................................................................... 13
5.2 Network .................................................................................................... 14
5.2.1 TCP/ IP ............................................................................................... 14
5.2.2 PPPoE ............................................................................................... 15
5.3 Date Time ................................................................................................. 17
5.4 Video ........................................................................................................ 19
5.4.1 Video Setting .................................................................................... 19
5.4.2 Profile .............................................................................................. 21
5.4.3 Day/Night ......................................................................................... 22
6. Setting_Live View ......................................................................................... 24
6.1 Video ........................................................................................................ 24
6.2 Camera Setting .......................................................................................... 26
6.2.1 Image Settings .................................................................................. 25
6.2.2 ROI .................................................................................................. 27
7. Settingc_Playback ........................................................................................ 28
7.1 Network Storage ........................................................................................ 28
8. Setting_Event ............................................................................................... 30
8.1 Event Server ............................................................................................. 30
8.1.1 Event Server ..................................................................................... 30
8.2 Event List .................................................................................................. 33
8.2.1 Event List ......................................................................................... 33
8.2.2 Schedule Recording ............................................................................ 35
8.3 Motion Detection ........................................................................................ 36

3
8.4 Tampering Detection .................................................................................. 37
8.5 Schedule ................................................................................................... 37
9. Setting_System ............................................................................................ 39
9.1 Maintenance .............................................................................................. 39
9.2 Date Time ................................................................................................. 41
9.3 Security .................................................................................................... 42
9.3.1 Account ............................................................................................ 42
9.3.2 IP Address Filter ................................................................................ 42
9.3.3 HTTPS .............................................................................................. 43
9.4 Network Basic ............................................................................................ 44
9.4.1 TCP/ IP ............................................................................................. 44
9.4.2 PPPoE ............................................................................................... 44
9.5 Network Advanced ..................................................................................... 44
9.5.1 RTSP ................................................................................................ 44
9.5.2 UPnP ................................................................................................ 45
9.5.3 Bonjour ............................................................................................ 46
9.5.4 DDNS ............................................................................................... 47
9.6 System Log ............................................................................................... 49
10. Video Surveillance Software .......................................................................... 51

4
1. Safety Instruction
Thank you for purchasing this 2MP IR Mini Bullet Camera. This user manual includes
instructions for using and managing the camera on your network. The latest version of this
user manual can also be found on the Installation CD accompanying this product, along with
user manuals in other languages.
1.1 Safety Notices
Before you use this product
This product has been designed with safety in mind. However, the electrical products can
cause fires which may lead to serious body injury if it is not used properly. To avoid such
accidents, be sure to heed the following.
Legal Caution
Video and audio surveillance can be forbidden by laws that vary from country to country.
Check the laws in your local region before using this product for surveillance purposes.
Don't open the housing
Don't try to open the housing or remove the covers which may expose yourself to dangerous
voltage or other hazards.
Don't use the accessories not recommend by the manufacturer
Heed the safety precautions
Be sure to follow the general safety precautions and the “Operation Notice.”
Operation Notice - Operating or storage location
Avoid operating or storing the camera in the following locations:
• Extremely hot or cold places (Operating temperature: -40 °C to + 60 °C [-40 °F to
140°F] )
• Exposed to direct sunlight for a long time, or close to heating equipment (e.g., near
heaters)
• Close to water (e.g. near a bathtub, kitchen sink, laundry tub)
• Close to sources of strong magnetism
• Close to sources of powerful electromagnetic radiation, such as radios or TV
transmitters
• Locations subject to strong vibration or shock
In case of a breakdown
In case of system breakdown, discontinue use and contact your authorized dealer.
In case of abnormal operation
• If the unit emits smoke or an unusual smell.
• If water or other foreign objects enter the cabinet.
• If you drop the unit or damage the cabinet:
-Disconnect the cable and the connecting cables.

5
-Contact your authorized dealer or the store where you purchased the product.
Transportation
When transporting the camera, repack it as originally packed at the factory or in materials of
equal quality.
Ventilation
To prevent heat buildup, do not block air circulation around the device.
Cleaning
• Use a soft, dry cloth to clean the external surfaces of the device. Stubborn stains can
be removed using a soft cloth dampened with a small quantity of detergent solution,
then wipe dry.
• Do not use volatile solvents such as alcohol, benzene or thinners as they may damage
the surface.
1.2 Electromagnetic Compatibility(EMC)
FCC Statement
This equipment has been tested and found to comply with the limits for a Class B digital
device, pursuant to Part 15 of the FCC Rules. The limits are designed to provide reasonable
protection against harmful interference in a residential installation.
This equipment generates, uses and can radiate radio frequency energy and, it not installed
and used in accordance with the instructions, may cause harmful interference to radio
communications. However, there is no guarantee that interference will not occur in a
particular installation. If this equipment does cause harmful interference to radio or television
reception, which can be determined by turning the equipment off and on, the user is
encouraged to try to correct the interference by one of the following measures:
• Reorient or relocate the receiving antenna.
• Increase the separation between equipment and receiver.
• Connect the equipment into an outlet on a circuit different from that to which the
receiver is connected.
• Consult the dealer or an experienced radio/TV technician for help.
CE Mark Warning
This is a Class B product. In a domestic environment, this product may cause radio
interference, in which case the user may be required to take adequate measures.

6
2.
Overview
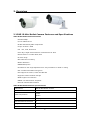
2.1 2MP IR Mini Bullet Camera Features and Specifications
2MP IR Mini Bullet Camera Features
• Full HD 1080p
• 1/2.8" CMOS sensor
• H.264 and Motion JPEG compression
• 25 fps at 1920 x 1080
• 3.6 mm, F1.8, Fixed lens
• True day & night with automatic removable IR-cut filter
• Smart feature: Corridor Mode, ROI
• IR 15m range
• RTC with built-in battery
• Motion detection
• IP66weatherproof
• Screwless 3-axis angle adjustment for easy instalation on walll or ceiling
• SSL v3 advanced HTTPS encryption
• Full support for Firefox, Safari and Mac OS
• Supports Samba network storage
• Multi-lingual user interface
• ONVIF 2.4 and Profile S compliant
• Free 64-channel NVR software
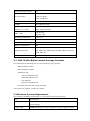
2MP IR Mini Bullet Camera Specifications
Model Name 2MP IR Mini Bullet Camera
Max Resolution 1920 x 1080 (2MP)
Video Compression
H.264
MJPEG
Max Frame Rate 25fps @ 1920 x 1080
Max Simultaneous Streams 4
Image Sensor 1/2.8" CMOS sensor
Lens 3.6mm, F1.8

7
Horizontal Angle of View 70°
Min Illumination
0.05 lux @ F1.8 (color)
0.005 lux (B/W)
0 lux (IR LED on)
Mechanical IR-Cut Filter Yes
IR LEDs 15m effective range
Camera Angle Adjustment
and Pan / Tilt / Zoom
3-axis bracket
(with cable protection)
Power / PoE
PoE 802.3af
12V DC, 1.5A
Operating Temperature
-10~50 ℃
Weatherproof / Vandal-Proof IP66 weatherproof
Dimensions (HxWxD)
φ66 x 165 x 89mm, incl. bracket
ONVIF 2.4 & Profile S Yes
Supported Protocols
TCP/IP, HTTP, HTTPS, RTSP, RTP , RTCP, Bonjour, UPnP,
FTP, SMTP, NTP, DHCP, DNS, DynDNS, PPPoE, TCP, UDP,
ICMP, ARP, SSL
Video Management Software 64-channel NVR software included
2.2 2MP IR Mini Bullet Camera Package Contents
You should find the following items in the packaging of your product.
• Network bullet camera
• Quick installation guide
• Installation CD
-Camera Installation Tool
-Video Management Tool
-User Manuals
-Camera Language Packs
• Screw pack for wall and ceiling mounting
If any items are missing, contact your dealer.
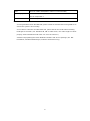
2.3 Minimum System Requirement
Your computer hardware should meet or exceed the following specifications:
Item Requirements
CPU Minimum Intel® Cord 2 Duo or higher(Core i3 or above is
recommended)
Graphic Card 256MB RAM graphic cards(or equivalent on-board graphic cards)

8
RAM Minimum 1GB or RAM(2GB or above is recommended)
Operating System Window 2000, 2003, XP, Vista or Windows 7
Mac OS Leopard10.5
Web Browser Internet Explorer 6 or later
Note:
• If using Windows 98 or Windows ME, please install IP Installer before using WEB UI to
ensure the system runs normally.
• If not able to view the recorded video file, please install Xvid codec while installing
Intelligent IP Installer. (For Windows 98, ME or 2000 server, the codec might not work
properly. Please download Xvid codec 1.0 from the internet.)
• Please keep updating the latest Windows software and service package. (Ex: Net
Framework, Windows Media Player, Enhance ActiveX Security)

9
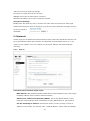
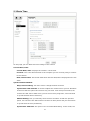
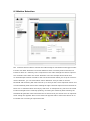
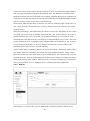
3.
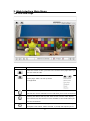
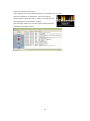
The Live View Page
Web Interface Main Menu
Toolbar Function
Click this button to take you back to the camera home page where you
can live view the vide
Click this button to open the administrator
menu page, which can set up all the
configuration
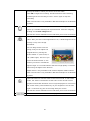
Click this button to pause or resume from pause the live video stream.
The function is also available in VLC mode when you use non-IE browser
Clicking this button will stop the video stream and the video display
turns black (off).The function is also available in VLC mode when you
use non-IE browser
Click on the Record button, if you wish to record the live video to your
computer’s hard drive. When selected, a prompt will request you to

10
specify the folder in which you want to store the video.
Click OK to begin the recording. The Record button starts flashing,
indicating that the recording is active. Click it again to stop the
recording.
Note: This function is only available in MS Internet Explorer on Windows
systems.
Use this button to take a snapshot of the video. Clicking the button
opens up a window showing the captured frame. Save the image by
clicking on the Save Image button.
The function is also available in VLC mode when you use non-IE browser
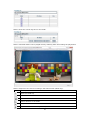
The digital zoom function allows magnification of certain areas of the
video. After you click on the magnification icon, a window appears as an
overlay on top of the image.
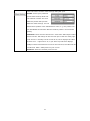
See below.
You can drag the box over the
image, and you can adjust the
magnification by moving the
slider toward “T” (tele-zoom) or
“W” (wide-angle). The more you
move the slider toward “T,” the
further you zoom in and details
appear larger. It is normal behavior that the image quality is reduced
when using the digital zoom function.
Digital Zoom is only available in MS Internet Explorer Web browsers.
Note: This function is only available in MS Internet Explorer on Windows
systems.
Click this button to view the video in full screen mode. In full screen
mode, the video is stretched to fit the entire screen and all control
graphics and window elements are no longer displayed. To return from
full screen mode, press the ESC key on your keyboard. You can also
right- or left-click any part of the image with your mouse.
The function is also available in VLC mode when you use non-IE browser
Returns the user to the main live video page.

11
Click this button and the client settings dialog will open.
Profile- Select your preferred
profile from the drop-down list.
The network camera can store
different profiles that provide
different video settings. You can
define these profiles in the administrator menu, e.g, one profile is for
low bandwidth environment whereas another profile is for maximum
quality.
View Size- There are two choices here. “Fit Screen” will keep the video
small so that it will always fit into the view port of the live video page.
“Full Screen” is actually not full screen at all, but it displays the video
stream at it’s original size. So, if you select a profile that displays
1080p contents and select full screen for the view size, the video will be
rendered at 1920 x 1080 pixels on your screen.
Protocol- Select the transfer protocol here.

12
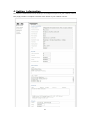
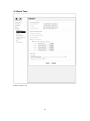
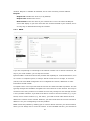
4.
The camera’s administrator menu allows you to configure all aspects of your network camera.
This page provides a complete overview of the status of your network camera.
Setting_Information

13
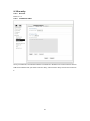
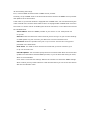
5.
The basic setup allows you to manage the user accounts of your network
camera,
define the network parameters, set up the date and time
settings and most importantly, the video settings.
Setting_Basic Setup
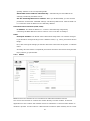
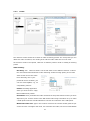
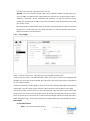
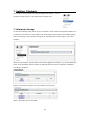
5.1 Account
The network camera allows the creation of different user accounts with different levels of
access to the camera. There are three main user levels. The Viewer account only allows
viewing the live video page of the camera. The Operator account allows viewing the live video
as well as changing the image setup settings, such as brightness, contrast, etc. Only the
Administrator account has full access to all camera settings, including the Settings menu.
You can define up to nine additional user accounts. The user name and password must be
between 4 and 16 characters in length. For each account you can also specify different user
authority (Viewer, Operator or Administrator).
Account List:
Click the Add button to create a new user account. A popup window will open up.
Here you
type in a user name and a password for the new account. Also, you must define the role of the
new user account. The example shows how we create a guest account that only has viewing

14
rights, but cannot change any settings.
Click Save to create the new user account.
Highlight an account to either edit or remove it.
Note that the admin user account cannot be removed.
Anonymous Settings:
Enabling this will allow any user to view the live video from the camera live video page
without entering a user name or password. If you do not want to allow this to happen, be sure
to set this option to
“Disabled.”
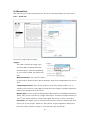
5.2 Network
On this page you can define the network settings of the camera. By default the camera is set
up to automatically obtain the necessary IP information from the DHCP server (e.g., the
router) in your network. You can, however, set up the IP address and related settings
manually.
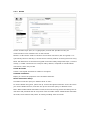
5.2.1 TCP/IP
Internet Protocol Version 4(TCP/IPv4):
MAC address- MAC address stands for Media Access Control address. This is the unique
hardware address of the camera’s network interface.
Obtain an IP address automatically (DHCP)- This is the default setting. In this
mode the camera obtains the IP information from the DHCP server in your network.
Use the following IP address- Activate this option in order to assign a static IP
address to the camera. You need to enter a valid IP address, subnet mask and default

15
gateway address in the corresponding fields.
Obtain DNS server address automatically - automatically use the DNS server
settings provided by the DHCP server.
Use the following DNS server address- When you disable DHCP, you also need to
provide the camera with valid DNS settings. The Primary DNS server must be filled out.
It is often the same IP address as the Gateway address.
Internet Protocol Version 6(TCP/IPv6):
IP address- The IPv6 IP address of camera is automatically assigned by
converting the MAC address of the IP camera. User is not able to modify it.
HTTP:
HTTP port number- The default value is 80 and normally there is no need to change it.
If you decide to change the http port to a different value; e.g., 1024, you need to do two
things:
First, after saving the settings you need to reboot the camera via the System -> Initialize
menu.
Secondly, after the reboot is completed you need to connect to the camera using the URL
http://camera_ip:portnumber.
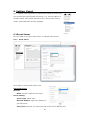
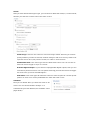
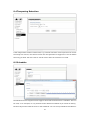
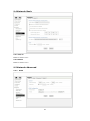
5.2.2 PPPoE
PPPoE is the most common form of connection for DSL-based Internet service.
You can use this function to connect the camera directly to a DSL modem. A common
application for this is where the network camera is installed in a remote location where no
network is present. In the location is a DSL Internet connection (DSL modem), but no router

16
or any other network infrastructure. You can connect the camera to the DSL modem and
enter your DSL account information in the fields below.
PPPoE:
PPPoE- On
Authentication Type-
PAP or CHAP
IP address- Displays the current IP address obtained from the Internet Service
Provider (ISP). It displays 0.0.0.0 if the camera is not connected to the Internet via
PPPoE.
User ID- Enter the user ID for your DSL service here. The user ID has been given to you
by your ISP.
Password- The password for the DSL account goes here. Re-type the password in the
field below.
DNS Server- Typically, your ISP will send DNS Server information to the camera when
it connects. Some ISPs, however, require entering specific DNS servers manually. In that
case you can activate the option “Use the following DNS server address” and enter the
primary and secondary DNS servers in the fields below (not shown on the screen shot).

17
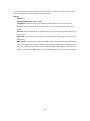
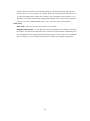
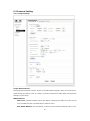
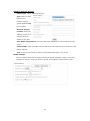
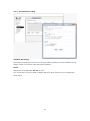
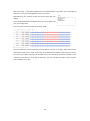
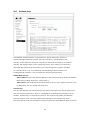
5.3 Date Time
On this page you can define the time settings of the camera.
Current Date/Time:
Current Date/Time- Displays the camera’s current time.
PC Clock- This is the date and time of the computer you are currently using to connect
to the camera.
Date/Time Format- The format determines how the date/time is displayed on the live
video.
Synchronization Method:
Keep current setting- You don’t want to change the date and time.
Synchronize with client PC- It means to adjust the camera time to your PC. Be aware
of the fact that this option sets the time only one time. From that point forward, the
camera time will start to differ from your PC time as time progresses, and occasional
re-synchronization will be necessary.
Manual Setting- Lets you manually enter the time and date. As with the previous
option, the camera’s time will become inaccurate as time passes and you will need to
re-synchronize the time periodically.
Synchronize with NTP- This option is the recommended setting. In this mode, the

18
camera will synchronize its time settings based on the interval setting (ranging from
once per hour to once per day). The camera obtains the time from the NTP server. You
can use the default value unless your camera is not connected to the Internet, or if a
firewall in your network blocks the outgoing NTP request of the camera. Select “Manual”
and you can enter a different NTP server; e.g., a server in your local network.
Time zone:
Time zone- Select the correct time zone for your location.
Daylight Saving Time- You can define the range of Daylight Saving Time by activating
this option. The camera will adjust the time (move the clock forward or backward by one
hour) depending on the programmed start and end time. If your camera is not equipped
with this feature, you can adjust the time zone manually for Daylight Saving Time.

19
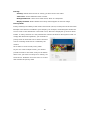
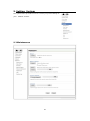
5.4 Video
The following three menus: Video Setting, Profile and Day/Night, allowing defining all
video-related parameters. Note that the Day/Night option as well as other parameters may
not be available on all models.
5.4.1 Video Setting
Rotated:
Mirror/Flip- Allows to mirror and flip the image.
Image Rotated- Allows 90/180/270 rotating the image.
Image:
Video Clip Format- Select which video profile the camera should be using for video
clips it records in such as the network storage device, or SD card.
Snapshot Format- Select the video profile used for snapshots (e.g., for JPG upload to
a FTP server).

20
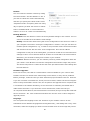
Overlay:
Overlay- Define what kind of an overlay you want for the live video.
Text Color- Choose between black or white.
Background Color- Select from either black, white or transparent.
Display Position- Define where the overlay should appear on the live image.
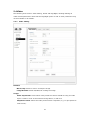
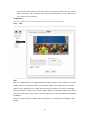
Privacy Mask:
Privacy masking is the ability of the camera to back out (censor) certain parts of the live video.
Example: The camera is installed in your company; for example, overlooking the warehouse.
In one corner of the warehouse is the break room, where the employees go for their lunch
breaks. In many countries it is not permitted to monitor the workers during their break. To
comply with laws and regulations, you can define a
privacy mask in the break area to ensure that this
area is not being monitored or recorded by the
camera.
Click “Add” to create a new privacy mask.
As you can create multiple masks, you need to
provide a name for the mask, and you can define
which color you want to overlay to be. Finally, set
the status to “Enabled” and click “Save” to create
and activate the privacy mask
Page is loading ...
Page is loading ...
Page is loading ...
Page is loading ...
Page is loading ...
Page is loading ...
Page is loading ...
Page is loading ...
Page is loading ...
Page is loading ...
Page is loading ...
Page is loading ...
Page is loading ...
Page is loading ...
Page is loading ...
Page is loading ...
Page is loading ...
Page is loading ...
Page is loading ...
Page is loading ...
Page is loading ...
Page is loading ...
Page is loading ...
Page is loading ...
Page is loading ...
Page is loading ...
Page is loading ...
Page is loading ...
Page is loading ...
Page is loading ...
Page is loading ...
Page is loading ...
-
 1
1
-
 2
2
-
 3
3
-
 4
4
-
 5
5
-
 6
6
-
 7
7
-
 8
8
-
 9
9
-
 10
10
-
 11
11
-
 12
12
-
 13
13
-
 14
14
-
 15
15
-
 16
16
-
 17
17
-
 18
18
-
 19
19
-
 20
20
-
 21
21
-
 22
22
-
 23
23
-
 24
24
-
 25
25
-
 26
26
-
 27
27
-
 28
28
-
 29
29
-
 30
30
-
 31
31
-
 32
32
-
 33
33
-
 34
34
-
 35
35
-
 36
36
-
 37
37
-
 38
38
-
 39
39
-
 40
40
-
 41
41
-
 42
42
-
 43
43
-
 44
44
-
 45
45
-
 46
46
-
 47
47
-
 48
48
-
 49
49
-
 50
50
-
 51
51
-
 52
52


Ask a question and I''ll find the answer in the document
Finding information in a document is now easier with AI
Related papers
Other documents
-
Commax CNU-2M04RS Owner's manual
-
Intellinet 551069 User manual
-
EverFocus EZN268 Owner's manual
-
EverFocus EZN268V Owner's manual
-
EverFocus EZN7221 Owner's manual
-
Messoa LPR610 User manual
-
Trendnet TV-IP326PI User guide
-
EverFocus EDN468MS Owner's manual
-
Amcrest IP4M-1025EB User manual
-
Xvision X104P User manual