Page is loading ...

1
Lowes.com/harborbreeze
Questions, problems, missing parts? Before returning to your retailer, call our customer
service department at 1-800-643-0067, 8 a.m. - 6 p.m., EST, Monday - Thursday,
8 a.m. - 5 p.m., EST, Friday.
ATTACH YOUR RECEIPT HERE
Serial Number ____________ Purchase Date ____________
EB13167
Harbor Breeze
®
is a registered trademark
of LF, LLC. All Rights Reserved.
ITEM #0384192
CEILING FAN LIGHT KIT
MODEL #40308
Español p. 10
H
a
r
b
o
r
B
r
e
e
z
e

2
Lowes.com/harborbreeze
PART DESCRIPTION QUANTITY
A Light Kit Fitter 1
B Glass Shade 1
C Finial Plate 5
D Finial 5
E Bulb 3
F Pull Chain Extension 1
AA BB
Hex Nut
(preassembled to
Light Kit Fitter (A))
Qty.1
Lock Washer
(preassembled to
Light Kit Fitter (A))
Qty. 1
PACKAGE CONTENTS
HARDWARE CONTENTS (shown actual size)
H
a
r
b
o
r
B
r
e
e
z
e
A
E F
B
C
D

3
Lowes.com/harborbreeze
SAFETY INFORMATION
Please read and understand this entire manual before attempting to assemble, operate or install the
product. Failure to do so could lead to electrical shock, re or other injuries that could be hazardous
or even fatal.
• Before you begin installing the light kit, disconnect the power by removing fuses or turning off the
circuit breakers.
• Make sure that all electrical connections comply with local codes, ordinances, the National
Electrical Code, and ANSI/NFPA 70-199. Hire a qualied electrician or consult a do-it-yourself
wiring handbook if you are unfamiliar with installing electrical wiring.
• The net weight of the light kit is less than 4.4 lbs.
LISTED FOR DAMP LOCATION
Federal regulations require ceiling fans with light kits manufactured or imported after January 1, 2009,
to limit total wattage consumed by the light kit to 190W. Therefore, this light kit is equipped with a
wattage limiting device.
DANGER:
• DO NOT connect this xture to an electrical system that does not provide a means for equipment
grounding. Never use a xture in a two-wire system that is not grounded. Installing a xture into
an electrical system not having a proper grounding means could cause metal parts of the xture
to carry electrical currents if any of the xture wires, wire connections or splices were to become
broken, cut or loose during the mounting or normal operation of the xture. Under this condition,
anyone coming in contact with the xture would be subject to electrical shock, which could cause
serious injury or death.
• DO NOT connect the bare or green insulation xture ground wire to the black (hot) current-carrying
wire or the white neutral house wire. Connection of the bare or green xture ground wire to the
black or white house wires may cause metal parts of the xture to carry electrical currents. Under
this condition anyone coming in contact with the xture will receive electrical shock, which could
cause serious injury or death.
• DO NOT damage or cut the wire insulation (covering) during installation of the xture. DO NOT
permit wires to contact any surface having a sharp edge. To do so may damage or cut the wire
insulation, which could cause serious injury or death from electrical shock.
WARNING:
• All electrical connections must be in agreement with local codes and ordinances, the National
Electric Code (NEC) and ANSI/NFPA 70-1999. Contact your municipal building department to learn
about your local codes, permits and/or inspections. Risk of re - most dwellings built before 1985
have supply wire rated for 140°F. Consult a qualied electrician before installation.
• To avoid personal injury, the use of gloves may be necessary while handling xture parts with sharp
edges.
• DO NOT suspend any xture by the house wires. A xture must always be mounted directly to a
ceiling fan that is mounted directly to an outlet box. Wire connectors will not support the weight of a
xture. Suspending a xture by the house wires and wire connectors will result in the xture falling,
with the possibility of personal injury and the danger of electrical shock or re.
• To reduce the risk of re, electrical shock, or personal injury, each wire connector used with this
light kit should accept only one 18-gauge wire from the light kit and one 18-gauge wire from the
ceiling fan. If there are three or more wires to connect or any of the wires is larger than 18 gauges,
consult an electrician for the proper size wire connectors to use.

4
Lowes.com/harborbreeze
SAFETY INFORMATION
CAUTION:
• TURN OFF ELECTRICITY at the main fuse box (or circuit breaker box) before beginning
installation by removing the fuse (or switching the circuit breaker off). If you are not sure the lighting
system has a grounding means, DO NOT attempt to install this xture. Contact a qualied, licensed
electrician for information regarding the proper grounding methods as required by the local
electrical code in your area.
• All xtures must be mounted to a ceiling fan that is mounted to an outlet box that is supported by
the building structure.
• DO NOT use bulbs having a wattage greater than the maximum value stated on the xture. The
use of bulbs with higher wattage than specied will increase temperatures and risk of re.
• If a dimmer control switch is used with this xture, obtain professional advice to determine the
correct type to use as well as the electrical rating required.
PREPARATION
Before beginning the assembly of this product, ensure that all parts are present. Compare all parts
with the package contents list and hardware contents list. If any part is missing or damaged, do not
attempt to assemble the product.
Estimated Assembly Time: 30 minutes
Tools Required for Assembly (not included): Flathead screwdriver, Phillips screwdriver, pliers, wire
cutters, safety glasses, step ladder, wire connectors (included with fan), and electrical tape
Helpful Tools (not included): Wire strippers, A/C tester light, wiring handbook, soft cloth
ASSEMBLY INSTRUCTIONS
1. Turn off the circuit breakers and the wall switch to the
fan supply line leads.
DANGER: Failure to disconnect the power supply
prior to installation may result in serious injury or death.
1

5
Lowes.com/harborbreeze
ASSEMBLY INSTRUCTIONS
Hardware Used
Hex Nut
x 1
x 1
AA
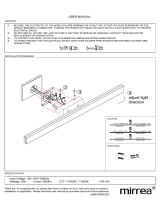
2. Remove the three switch housing screws and
lower switch housing from the existing fan. If
applicable, disconnect the male and female plugs
located inside the switch housing (Fig. 2a).
Note: If your existing fan has a switch housing cap,
remove only the switch housing cap by removing
the switch housing screws at the bottom of the
switch housing (Fig. 2b).
3. Use a screwdriver (not included) to push out the
center cap from either the switch housing (Fig. 3a)
or the switch housing cap (Fig. 3b).
4. Remove the hex nut (AA) and lock washer (BB)
from the rod on the top of the light kit tter (A).
Gently feed the wires from the light kit tter
(A) through the hole in the center of the switch
housing (Fig. 4a) or switch housing cap (Fig.
4b). Thread the rod from the light kit tter (A) into
the switch housing cap. Then thread the wires
through the lock washer (BB) and hex nut (AA)
and tighten the hex nut (AA) over the lock washer
(BB) to secure the rod.
2a
2b
3a
3b
4b
4a
BB
Lock Washer
Switch
Housing
Motor
Housing
Motor
Housing
Switch
Housing
Switch
Housing
Switch
Housing
Center Cap
Center Cap
Switch
Housing Cap
Switch
Housing Cap
Switch
Housing Cap
Switch
Housing Plate
AA
AA
A
A
BB
BB

6
Lowes.com/harborbreeze
ASSEMBLY INSTRUCTIONS
5a
5b
A
A
White
White
Black
Blue
White White
BlackBlue
6
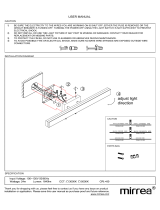
5. Remove the existing wire connectors from the white
and blue wires labeled FOR LIGHT in the switch
housing. Connect the white wire from the light kit
tter (A) to the white wire from the fan. Connect
the black wire from the light kit tter (A) to the blue
wire from the fan. (Fig. 5a/Fig. 5b) If applicable,
reconnect the male plug from the motor housing to
the female plug from the switch housing. Ensure the
plugs connect securely (Fig. 5a).
WARNING: To reduce the risk of re, electrical
shock or personal injury, each wire connector used
with this light kit should accept only one 18-gauge
wire from the light kit and one 18-gauge wire from
the ceiling fan. If there are three or more wires
to connect or any of the wires is larger than 18
gauges, consult an electrician for the proper size
wire connectors to use.
6. Reconnect the wire connectors and twist in a
clockwise direction. Wrap electrical tape (not
included) around each individual wire connector
down to the wire.
7. Align three holes in the switch housing cap with
three holes in the switch housing plate. Reattach
the switch housing with the three screws that
were removed in Step 2. Tighten all screws
securely (Fig.7a).
Note: To reconnect the switch housing cap, align
the holes in the switch housing cap with the
holes at the bottom of the switch housing and
use the three previously removed screws to
secure the switch housing cap. (Fig. 7b).
Note: When attaching switch housing or switch
housing cap, turn assembly as necessary
to ensure fan pull chain falls between glass
shades and functions without interference.
7a
7b
Male
Plug
Switch
Housing
Switch
Housing
Plate
Switch
Housing
Cap
Switch
Housing
Switch
Housing
Motor
Housing
Motor
Housing
Motor
Housing
Female Plug
A

7
Lowes.com/harborbreeze
ASSEMBLY INSTRUCTIONS
8. Install bulbs (E).
9. Remove the pull chain extension from the fan pull
chain coming from the switch housing. Feed pull
chains coming from the center of the light kit tter
(A) through the center hole in the glass shade (B).
Feed the pull chain coming from the switch housing
through the off-center hole in the glass globe (B).
8
9
10
Fan Pull
Chain
E
A
B
B
C
D
10. Choose nial plate (C) and nial (D) that most
closely match the nish color of the existing fan;
you may discard the remaining nial plates (C)
and nials (D). Feed the pull chains through the
appropriate holes in the nial plate (C) and the hole
in the nial (D). Lift the nial plate (C) up until it is
ush with the glass shade (B). Screw the nial (D)
onto the threaded rod of the light kit tter (A).

8
Lowes.com/harborbreeze
OPERATING INSTRUCTIONS
ASSEMBLY INSTRUCTIONS
11. Attach pull chain extension (F) to the light pull chain
and reattach the previously removed extension to the
fan pull chain.
Restore the power and test light kit.
H
a
r
b
o
r
B
r
e
e
z
e
H
a
r
b
o
r
B
r
e
e
z
e
F
Light Pull
Chain
Fan Pull
Chain
11
1
2
1. To change the bulbs or clean the xture, lower the light
kit assembly by pushing up on the glass shade (B).
Once it is pushed competely up, tilt the glass shade (B)
and gently lower.
Note: The lower arms of the light kit tter (A) will extend
downward approximately 2.5 in., but will not allow the
xture to fall.
2. Once maintenance has been performed, simply lift the
lift the glass shade (B) back up to its original position.
The light kit tter (A) is secure once it clicks into place.

9
Lowes.com/harborbreeze
TROUBLESHOOTING
ONE-YEAR LIMITED WARRANTY
The manufacturer warrants all of its lighting xtures against defects in materials and workmanship
for one (1) year from the date of purchase. If within this period the product is found to be defective,
take a copy of the bill of sale as a proof of purchase and the product in its original carton to the place
of purchase. The manufacturer will, at its option, repair, replace or refund the purchase price to the
consumer. All costs of installation and removal of the xture is the responsibility of the consumer. This
warranty does not cover xtures becoming defective due to misuse, accidental damage or improper
handling and/or installation and specically excludes liability for direct, incidental or consequential
damages. As some states do not allow exclusions of limitations on an implied warranty, the above
exclusion and limitation may not apply. This warranty gives you specic rights and you may also have
other rights which may vary from state to state.
Printed in China
PROBLEM POSSIBLE CAUSE CORRECTIVE ACTION
Bulbs will not light. 1. The bulbs are not
installed correctly.
2. The light kit wire plugs
are not connected properly.
3. Faulty wire connection.
4. The fan has a 190W
limiter. When total wattage
exceeds 190W, the lights
do not work.
1. Reinstall the bulbs.
2. Ensure the male and female
plugs are connected properly.
3. Turn the power off and check
all connections at the ceiling
outlet box.
4. Replace with bulbs with lower
wattage.
Harbor Breeze
®
is a registered trademark
of LF, LLC. All rights reserved.

18
Lowes.com/harborbreeze
SOLUCIÓN DE PROBLEMAS
PROBLEMA CAUSA POSIBLE ACCIÓN CORRECTIVA
Las bombillas no se
encienden.
1. Las bombillas no se instalaron
correctamente.
2. Los enchufes de cables del kit
de iluminación no están conectados
apropiadamente.
3. Una conexión de los cables
no es la correcta.
4. El ventilador cuenta con un
limitador de electricidad a 190 vatios.
Si el vataje total supera los 190
vatios, las luces no funcionan.
1. Vuelva a colocar las bombillas.
2. Asegúrese de que los enchufes
macho y hembra estén bien
conectados.
3. Desactive la alimentación eléctrica
y revise todas las conexiones de la
caja de salida del techo.
4. Reemplace las bombillas con unas
de menor vataje.
UN AÑO DE GARANTÍA LIMITADA
El fabricante garantiza que todas sus lámparas estarán libres de defectos en los materiales y la
mano de obra por un (1) año a partir de la fecha de compra. Si dentro de este período el producto
presenta defectos, lleve una copia del recibo de venta como comprobante de la compra y el producto
en su caja original al lugar donde lo compró. El fabricante, a su elección, reparará, reemplazará o
devolverá el monto de la compra al comprador. Todos los costos de instalación y de extracción de
la lámpara son de responsabilidad del comprador. Esta garantía no cubre lámparas dañadas debido
almaluso,dañoaccidental,manipulacióny/oinstalacióninadecuadayexcluyeespecícamente
toda responsabilidad por daños directos, accidentales o resultantes. Debido a que algunos estados
no permiten exclusiones o limitaciones en una garantía implícita, las exclusiones y limitaciones
anteriorespuedennoaplicarseensucaso.Estagarantíaleotorgaderechosespecícos,peropodría
tener también otros derechos que varían según el estado.
Impreso en China
Harbor Breeze® es una marca registrada de LF, LLC.
Todos los derechos reservados.
/