Boss Audio Systems BV9962 Owner's manual
- Category
- Car media receivers
- Type
- Owner's manual

07.2012

02
Welcome
Warning
Features
Front panel function instruction
Basic function
Remote control function
Main menu touch operation
OSD SETUP
RDS user operation
Audio
Radio operation
Disc play touch operation
DVD mode
DVD basic operation
VCD basic operation
CD basic operation
MP3/USB/SD operation
IPOD READY
Other play modes
Trouble shooting
Wiring Diagram
Specifications
Accessories
Setup need password
CONTENTS
03
03
04
05
06
08
10
11
14
15
16
18
20
22
25
28
30
31
34
35
36
37
38
39
Setup need password
During actual operation, when you enter TV setup,
system setup, radio area and touch calibration, you
need to enter the password "888888".
DVD Parental control function:The default set
for DVD is #8 adult, which means all grades of
DVD can be read without entering password.To
change the default grade,you need to follow the
below procedure: Press SETUP button on the
remote, display will show the system set up menu
and the submenu,
select password and enter
0000, you will be able to choose the DVD
grade as default.
SETUP NEED PASSWORD
39

WELCOME
WARNING
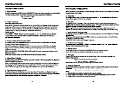
1. Please keep the disc slot clean, wipe it off when there is some dirt on it. You should
wipe off any dirt on the disc before you place it into the unit. If the disc is dirty and you
place it inside the unit, it will cause the unit to go into an error and will not play the
disc. Please ask professional to clean the laser.
2. Playing the radio at higher volumes for a long period of time may cause hearing
issues. You should play this unit at a moderate listen level.
3. This unit is set up by precision parts. If you open up this unit, you will void any and
all of your warranty.
4. Please do not touch LCD display with any hard object so that you prevent it from
getting scratched or damaged.
5. To avoid an accident caused by watching the LCD screen. This unit has a vehicle
lock out wire so that you will not be allowed to watch a video while driving down the
road.
6. This unit is meant for a 12V power and negative ground system from a vehicle.
NOTE:
We keep improving this product all the time. There may be some changes in it that are
not in this manual.
Thank you for enjoying our serirs of digital car A/V product.
To properly use this product, please go through this instruction manual for installation
and operation, put it in a safe place for future use!

FEATURES
DVD PLAYER
1. MPEG-4 Decoder Technology
2. Compatible with MP4 (AVI/5.X), DVD (DVD-R/DVD-RW), VCD,
SVCD, CD-RW, WMA, MP3, JPG
3. Supporting Multiple Subtitles, Angles, Languages
4. Child lock function
5. 4-Channel Audio Output
6. Pause, Play, Up/Down, Stop, Zoom, PBC Function
RADIO
1. AM/FM Radio Tuner
2. 30 Radio Preset Stations (18FM, 12AM)
LCD DISPLAY
1. 7” - 16:9 TFT LCD Display
2. Touchscreen
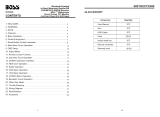
Power supply
Power range
Max operate current
Ground system
FM tuner
European requency range f
Signal/Noise ratio
Stereo separation
Search station volt
Distortion rate
AM tuner
Limit noise sensitivity
DVD PLAYER
Signal/Noise ratio
Frequency response
DC 12V
10.8-16.0V DC
15A
Negative ground
87.5-108MHz
55dB
30dB
20-30dBuv
1.5
%
522-1620KHz
32dB
70dB
20Hz-20KHz
SPECIFICATIONS:
USA frequency range
87.5-107.9MHz
European requency range f
USA frequency range
530-1710KHz
Amp Rating
85 Watts x 4 Channels

Front panel function instruction
Brown- Parking Brake (-)
Blue
Connect to Power Antenna or
remote control for Amplifier
Orange
CCD OFF
Conne ct t o ca r
rever si ng s witch
Brown
Braking wire
Memory +
Yellow
Connect to battery or +12V of
Pow er So urc e tha t is al way s live
Ground - Black
Connect to Ground terminal
Red
Connect to ignition key switch
FUSE
WHITE
WHITE/BLACK
Left front
GREEN
GREEN/BLACK
Left rear
GREY
GREY/BLACK
Right front
PURPLE
PURPLE/BLACK
Right rear
A:
A
B
C
C:
Light grey with yellow tip: 2 channel video output
Brown with yellow tip: Reversing video input
Black with yellow tip: External video input
Black with red & white tip: AUX audio input
(red right & white left)
Light grey with red & white tip: Front RCA
output(red right & white left)
Dark grey with red & white tip: Rear RCA
output (red right & white left)
B:
Radio antenna input
SWC wire
MODE
MUTE
BAND
AMS
2/RPT
3/RDM
1/
6/
5/4/
OPEN
MODE
MUTE
BAND
AMS
2/RPT
3/RDM
1/
6/
5/4/
OPEN

BASIC FUNCTION
1. OPEN
Press the button to open / close the screen.
Press this button for short moment to turn on power, and long press it to turn off power.
2. MODE Button
When the unit is power on, Repeat press this button can switch to different function
mode as following picture.
Note: When the device without
connecting to USB、SD or DVD
no disc inside, the system will
automatically skip these related
working mode.
3. MUTE/TFT ON/OFF Button
Press this button to shut off sound output, repress this button to resume sound output;
Long press this button longer to turn on / off TFT LCD display.
4. (VOL/SEL) Volume adjustment mode
Repeat pressing this button can select the VOL、BAS、TRE、BAL、FAD adjustment
mode,
Then can rotate the button to adjust VOL、BAS、TRE、 BAL、 FAD as you like.
5. AMS Program preset/Play Repeat button
Under radio mode, press this button for a short moment to start scanning preset
programs.
Under PLAY mode, press it to repeat playing a single song, and press it again to turn
off this function.
6. BAND Button
In radio mode, press this button to switch band, the sequence is as follows:
7.
In radio mode, press the button for the next station.
In playback mode, press the button to select the next song, Long press it to
fast-backward.
8.
In radio mode, press the button for the previous station.
In playback mode press the button to select the previous song. Long press it to
fast-forward.
9. USB
Insert USB device, the unit will play the files automatically.
10. SD
Insert SD/MMC card, the unit will play the files automatically.
IPOD
Cannot load disk

11. Number Button 1 /
In radio mode, press this button to hear radio preset;
In disc playback mode, press this button for Play/Pause.
12. Number Button 2 / RPT (Repeat Playback)
In radio mode, press this button to hear radio preset;
In disc playback mode, press this button to repeat the current track indefinitely.
13. Number Button 3 / RDM (Random playback)
In radio mode, press this button to hear radio preset;
In disc playback mode, press this button to play frocks on the disc in random order.
14. Number Button 4 /
In radio mode, press this button to hear radio preset;
In disc playback mode, press this button for to stop playback.
15. Number Button 5 /
In playback mode, press the button to adjust the angle of screen.
16. Number Button 6 /
In playback mode, press the button to adjust the angle of screen.
17. Dual (front and rear)AUX
Warning :You can only use either front or rear AUX at a time. Never connect both front
and rear AUX at the same time!
18. IR
To receive infrared signal from the remote controll.
19.
When there is a disc in the unit, press the button to eject the disc.
20. RESET
Press this button to restore to initialized state.
21. IPOD
Insert IPOD device, the unit will play the files automatically.
OTHER PLAY MODE

28
1.POWER
Press once to switch on, press again to
switch off.
2. MUTE Button
Press once to turn off audio output,
press again to resume volume level.
3. SOURCE Button
Press this button to choose audio sources.
4. EQ Button
Press this button to choose POP、ROCK、
CLASSIC、EQ off.
5. SEEK+ ( )/ SEEK-( ) Button
Press this button to manual tuning, speed
or quick back, previous song and next song.
6. VOL+ ( ) / VOL- ( )
Press this button to increase or decrease
volume level.
7. SEL Button
Press this button to choose sound feature.
8. LOUD Button
Press this button to startup LOUD function.
9. BAND-P/N Button
In radio mode, press this button to choose
band.
In VCD、DVD mode, press this button to
choose AUTO、PAL or NTSC system.
10. LOC/RDM Button
In radio mode, press this button to switch
between local and direction.
In VCD、CD mode,press this key to randomly
play.
11. STOP Button
Press this button to stop playing.
12. PLAY/PAUSE Button
Press this button to switch between play and
pause.
In stop mode, press this button to play.
13. ST/PROG Button
In radio mode, press this button to choose
stereo or mono station.
In audio mode, it can help STOP button to
programmed play.
POWER ON/OFF
MUTE
SOURCE
EQ
SEEK+ / SEEK-
VOL+ / VOL-
SEL
LOUD
BAND / P / N
LOC / RDM
STOP
PLAY / PAUSE
ST / PROG
O-10+
AMS / RPT
TITLE
AUDIO
GO TO
SUBTITLE
PBC / MENU
UP / DOWN / L / R ENTER
SLOW
ANGLE
SETUP
OSD
ZOOM
MENU
DSP
28
REMOTE CONTROL FUNCTION

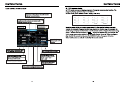
14. 0-10+ Button
Press this button to choose desired song
section、preset stations.
Decimal numbers, for example the 19th
song, press 1.9 button;
Centesimal numbers, for example, the
120th song, press 1.2.0 button.
15. AMS / RPT Button
In radio mode, press this button to browse
stored stations.
In audio mode, press this button to play
repeatedly.
16. TITLE Button
In DVD mode, press this button to play
back to the top menu of disc.
17. AUDIO Button
In DVD mode, press this button to switch
language of dialogue.
In VCD mode, press this button to choose
left track、right track and stereo.
18. GO TO
In DVD mode, press this button, you can
define playing time.
19. SUBTITLE Button
In DVD mode, press this button to switch
language of subtitle.
20. PBC Button
In VCD mode, press this button to display
all song menus, work with number button
to choose songs.
21. UP、DOWN、LEFT、 RIGHT、ENTER
Button
In DVD mode, press this button to move
cursor up, down, left, right to choose item
in menu. Press enter button to confim
choice.
22. SLOW Button
In audio mode, press this button to slow
backward and slow forward.
、
In DVD mode, press this button to change
play angle.
24. SETUP Button
In audio mode, press this button to choose
different set items.
25. OSD Display
Press this button to display the title chapter
and the left time.
26. ZOOM Button
In DVD/VCD mode, press this button to
ZOOM in.
27. MENU Button
Press button to back to the main menu.
28. DSP
Press this button to show the time.
BATTERY CHANGE
When control distance of remote control
becomes shorter or no function, please
change battery. Please confirm polarity
before change.
23. ANGLE Button
One hand press stopper, then pull out battery.
Put battery into controller.
Insert battery holder into controller.
NO LINK

T-V
T-V
NO LINK
Note: This unit does not have BLUETOOTH, T-V function.

EXIT
AM

T-V
PROG
3[__ ]
4 [ _ _ ]
7[__ ]
8 [ _ _ ]
5 [ _ _ ]
6[__ ]
11 [ _ _ ]
12 [ _ _ ]
9 [__ ]
10 [ _ _ ]
15 [ _ _ ]
16 [ _ _ ]
13 [ _ _ ]
14 [ _ _ ]
PLAY
CLEAR
1 [ _ _ ]
2[__ ]
MODE
EXIT
AM


PROG
3[__ ]
4 [ _ _ ]
7[__ ]
8 [ _ _ ]
5 [ _ _ ]
6[__ ]
11 [ _ _ ]
12 [ _ _ ]
9 [__ ]
10 [ _ _ ]
15 [ _ _ ]
16 [ _ _ ]
13 [ _ _ ]
14 [ _ _ ]
PLAY
CLEAR
1 [ _ _ ]
2[__ ]
05:40 AM
VOL:31
Press “SEL” to enter the audio inferface,
Prese refer to page 15 for function.

MONO L
MIX MONO
MONO R
STEREO
VOL 20
FAD:F07
TRE: 00
BAS: 00

ZOOM x 2 ZOOM x 3 ZOOM x 4
ZOOM
x 1/2
ZOOM x 1/3ZOOM x 1/4
ZOOM:
OFF

PROG
T C
3__:__
4__:__
7__:__
8__:__
5__:__
6__:__
11__:__
12__:__
9 __:__
10__:__
15__:__
16__:__
13 _ _ : _ _
14__:__
PLAY
CLEAR
1__:__
2__:__
T C T C T C

Chapter
TITLE REP ALL
OFF
10
10
10

ZOOM x 2 ZOOM x 3 ZOOM x 4
ZOOM
x 1/2
ZOOM x 1/3ZOOM x 1/4
ZOOM:
OFF
24. Press this button to adjust angles of the monitor.
25. Back main menu.
26. AUDIO/VIDEO adjustment.
27. Click to select your desired song or chapter.
28. Return to the menu one level.

-
 1
1
-
 2
2
-
 3
3
-
 4
4
-
 5
5
-
 6
6
-
 7
7
-
 8
8
-
 9
9
-
 10
10
-
 11
11
-
 12
12
-
 13
13
-
 14
14
-
 15
15
-
 16
16
-
 17
17
-
 18
18
-
 19
19
-
 20
20


Boss Audio Systems BV9962 Owner's manual
- Category
- Car media receivers
- Type
- Owner's manual
Ask a question and I''ll find the answer in the document
Finding information in a document is now easier with AI
Related papers
-
Boss Audio Systems BV9996BT Owner's manual
-
 Boss Audio Systems BV9562BT Owner's manual
-
 Boss Audio Systems BV9964B User manual
-
 Boss Audio Systems BV9996B Owner's manual
-
Boss Audio Systems BV9967BI User manual
-
 Boss Audio Systems bv9568bi User manual
-
 Boss Audio Systems BV8966B User manual
-
Boss Audio Systems BV9969NY User manual
-
 Boss Audio Systems 624B Owner's manual
-
 Planet Audio BV9564BI User manual


Other documents
-
Planet Aaudio PI9756 User manual
-
SSL SMC2.100 User manual
-
 Planet Aaudio PI9759B User manual
-
 Planet Aaudio P9725B User manual
-
 Eonon E1015 User manual
-
 Eonon E1012 User manual
-
SoundMax SM-CMD2021 Owner's manual
-
 XO Vision X00191NT User manual
-
-
 Planet Aaudio P9745B-V2 User manual


