Belmont Decor BDV037SLOVLGRY Installation guide

Type
Installation guide
INSTALLATION GUIDE
P 1
MODEL
C
Bolts (4) Undermount clips (4)
Washers (4) Wing nuts (4)
D
A B
HARDWARE
NEEDEDINCLUDED
Permanent marker
Silicone - (Recommend Liquid Nails
#LN-933 OR Loctite GE Silicone II
#M90010)
Epoxy - (Recommend Loctite
#1365868 OR Gorilla Glue #4200101)
Caulking gun
Base cabinet
Countertop
Sink basin
Backsplash
Hardware
STEP 1 - PLACE & TRACE STEP 2 - PREPARE SINK BASIN
Place the sink basin on the bottom of the countertop,
making sure to center over the opening. Draw guide
lines on the countertop and the basin in two locations.
Using a caulking gun, apply a heavy amount of
silicone of your choice on the top side of the sink
basin edge.
STEP 3 - FLIP & SET IN PLACE
Carefully flip the sink basin over and place it so the
guide lines match up in both locations.
STEP 4 -
DRY & SET
Press down on the sink basin to seal the silicone.
Remove any excess. Follow dry time recommendations
found on your product, typically 12 to 24 hours.
A
A
Need Further Asistance?
For more help, please contact us and one of our trusted
experts will be more than happy to provide guidance.
800-509-5070
Monday-Friday from 9:00am-5:00pm (PST)
C
D
EPOXY
INSTALLATION GUIDE
P 2
MODEL
STEP 5 -
PREPARE & SET BOLTS
STEP 6 -
ATTACH UNDERMOUNT CLIPS
Fill in the small holes surrounding the sink basin with
epoxy. Immediately place the top of the bolt (PART A)
in the hole with the epoxy. Allow sufficient dry time &
follow the package directions on the epoxy before
moving to the next steps, typically 12 to 24 hours.
After following recommended drying time, attach the
undermount clips (PART B) facing down, place the
washer (PART C) on the clips & use the wing nuts
(PART D) to secure in place. Apply silicone to the wing
nut for added stability.
B
STEP 7 -
PREPARE BASE CABINET
STEP 8 -
SET COUNTERTOP IN PLACE
Using a caulking gun, apply silicone around the top of
the base cabinet.
Carefully place the countertop, with the sink attached,
onto the cabinet and press down firmly. Wipe away
and excess silicone immediately.
STEP 9 -
SET BACKSPLASH
After the vanity is in place, use a caulking gun to
apply silicone to the back and bottom unfinished sides
of the backsplash. Press firmly down and back to set
in place. Remove any excess silicone.
GUIDE D'INSTALLATION
P 1
MODEL
C
Boulons (4) Clips de montage (4)
Rondelles (4) Écrous à oreilles (4)
D
A B
MATÉRIEL
NEEDEDINCLUS
Marqueur permanent
Silicone - (Recommander Liquide à
ongles # LN-933 OU Loctite II n °
PL530 ou Silicone GE # M90010)
Epoxy - (Recommander Loctite #
1365868 OU Colle Gorilla # 4200101)
Pistolet à calfeutrer
Meuble bas
Comptoir
Lavabo
Dosseret
Matériel
ÉTAPE 1 - PLACE & TRACE ÉTAPE 2 - PRÉPARER LE BASSIN D'ÉVIER
Placez le lavabo sur le fond du comptoir en veillant à
centrer l'ouverture. Tracez des lignes de guidage sur
le comptoir et le bassin à deux endroits.
À l’aide d’un pistolet à calfeutrer, appliquez une forte
quantité de silicone de votre choix sur le bord
supérieur du bassin de l’évier.
ÉTAPE 3 - RETOURNER ET METTRE EN PLACE
Retournez soigneusement le lavabo et placez-le de
manière à ce que les lignes de guidage correspondent
aux deux endroits.
ÉTAPE 4 - SEC ET SET
Appuyez sur le lavabo pour sceller le silicone. Enlevez
tout excès. Suivez les recommandations de temps de
séchage trouvées sur votre produit, généralement
entre 12 et 24 heures.
A
A
Besoin d'aide supplémentaire?
Pour plus daide, contactez-nous et un de nos experts
de conance se fera un plaisir de vous guider.
800-509-5070
Du lundi au vendredi de 9h00 à17h00
(heure normale du Pacifique)
C
D
EPOXY
GUIDE D'INSTALLATION
P 2
MODEL
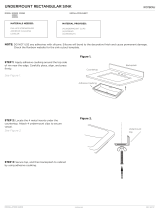
ÉTAPE 5 - PRÉPARER ET RÉGLER LES BOULONS
ÉTAPE 6 - FIXATION DES CLIPS SOUS-MONTÉS
Remplissez les petits trous entourant le lavabo avec
de l'époxy. Placez immédiatement le haut du boulon
(PARTIE A) dans le trou avec l'époxy. Laissez
suffisamment de temps de séchage et suivez les
instructions de l'emballage sur l'époxy avant de
passer aux étapes suivantes, généralement 12 à 24
heures.
Après avoir suivi le temps de séchage recommandé,
attachez les attaches (PARTIE B) vers le bas, placez
la rondelle (PARTIE C) sur les attaches et utilisez les
écrous à oreilles (PARTIE D) à fixer en place.
Appliquez du silicone sur l’écrou à oreilles pour plus
de stabilité.
B
ÉTAPE 7 - PRÉPARER L'ARMOIRE DE BASE
ÉTAPE 8 - MISE EN PLACE DU COMPTOIR
À l'aide d'un pistolet à calfeutrer, appliquez du
silicone autour du haut de l'armoire de base.
Placez délicatement le comptoir, avec l'évier en
place, sur le meuble et appuyez fermement. Essuyez
immédiatement et l'excès de silicone.
ÉTAPE 9 - RÉGLER LE DOSSERET
Une fois le meuble en place, utilisez un pistolet à
calfeutrer pour appliquer du silicone sur les côtés
non finis du dos et du dessous du dosseret. Appuyez
fermement vers le bas et retour pour mettre en
place. Retirez tout excès de silicone.
  • Page 1 1
  • Page 2 2
  • Page 3 3
  • Page 4 4

Belmont Decor BDV037SLOVLGRY Installation guide

Type
Installation guide

Ask a question and I''ll find the answer in the document

Finding information in a document is now easier with AI