Page is loading ...

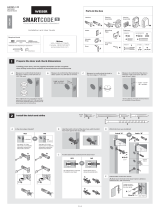
SECURE I SECURE PLUS I SECURE PRO
INSTALLATION MANUAL
DEADBOLT EDITION

INSTALLATION OVERVIEW
Lockly
TM
Secure can be fitted for both right swing doors and left swing doors.
P
Q
N
A
B
C
D
F
G
I
O
K
J
M
H
H1
H2

PARTS LIST
N
D F G J K
P Q A
B
H1
H2
x 2
x 8
x 2
C
E
O
x 5
x 3
M
x 3
I
3M Double Sided
Tape- EVA Sticker

STEP 1: PREPARING YOUR DOOR
Make sure your door is prepped for installation prior to installation. Please use
the supplied template for drilling holes required if you choose to drill a hole.
1-3/8"—2"
(35mm—50mm)
1/2"
12mm
3-7/8"(98mm)
1"
25mm
2-3/8"(60mm)
2-3/4"(70mm)
or
Drill Hole
Drill Hole
IMPORTANT NOTICE
You are not required to drill a hole in your door. We have provided 3M
double sided tape for you to help stabilize the lock during installation. Only
drill a hole if you wish to have added stability. Please refer to the provided
templates for drilling if needed.

STEP 2: ADJUSTING THE BOLT
If the latch holes are centered in the drilled
hole, no adjustment is needed.
If NOT, adjust the latch as shown below.
Push toggle button "A"
downwards and pull part "B"
outwards.
Initial position of A: 2-3/8"
Pull "C" to 2-3/4" and release
button "a". Now the backset
has been adjusted to 2-3/4".
31 2
2-3/8"
B
A
C
2-3/4"2-3/4"
Adjust as shown below (as needed)

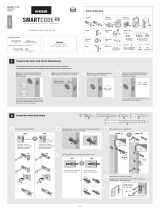
STEP 3: EXTENDING THE BOLT
Extend the latch bolt as shown.
When installing the latch, make sure the
position of the "+" mark is on the bottom
part of the latch.
N
O
P(2X)
MAKE SURE THE BOLT IS FULLY EXTENDED (LOCKED)
BEFORE INSTALLING PROCEEDING TO THE NEXT STEP

STEP 4: PREPARING THE EXTERIOR ASSEMBLY
*The pole (Labeled X) is used if you drilled a hole in your door. It is not required. If you did not drill
a hole in your door, please remove this pole with a flathead screwdriver by turning it counter clock-
wise. You can then apply 3M double sided tape where the pole (Labeled X) used to be. If you
drilled a hole, then make sure the pole (Labled X) is secured tight by tightening clockwise.
B
C
D
When the bolt is extended, the
torque blade should be kept in
a vertical position.
Install “D” & “C” on “B”
in order as shown.
Vertical
X
D
C
B
X
*REMOVE
COUNTERCLOCKWISE
(Pole Removed)
3M TAPE
GOES HERE

STEP 5: INSTALLING THE EXTERIOR ASSEMBLY
Note: Please use rotate the
torque blade into the vertical
position for installation.
B. Make sure the cable goes
underneath the latch.
A. When the bolt is extended,
the torque blade should be kept
in a vertical position.
B
EXTERIOR VIEW
INTERIOR VIEW
A
Route cable through center hole, then push it into side hole.
Center Hole
Side Hole

I(2X)
H
I(2X)
H
H1
H2
Before screwing check the vertical
alignment for the mounting plate and
exterior assembly.
STEP 5 (CON’TD): INSTALLING THE EXTERIOR ASSEMBLY
After installation, please use the physical key to test the door latch. If the bolt does not
retract or extend smoothly, adjust the screws to ensure the bolt system works smoothly.
* H is only required if you drilled a hole in your door. If you did not drill a hole in your
door, please do not insert H.
Depending on your door thickness, use H1 or H2 screws for the doors.
Doors with thickness of 35-43mm, use H1. Doors with thickness of 43-50mm, use H2.
*
*

J
Connect the cable.
Please insert the RED face of the cable connector into the
socket marked in RED. Make sure the connector is securely
fixed to the socket.
Torque Blade Thumb turn shaft
Push the thumb turn shaft into the torque blade.
STEP 6: INSTALLING INTERIOR ASSEMBLY
MAKE SURE IT IS IN THE VERTICAL POSITION

STEP 7: SECURING Lockly
TM
SECURE
Warning: Do not install the batteries yet!
M
A
A. Make sure the thumbturn is in a vertical position.
Make sure the cover is removed so you can install batteries, but don’t install batteries yet.

STEP 8: INSTALLING BATTERIES
+
+
-
+
-
-
+
-
First install 3 of the 4 batteries. Before installing the
last battery, press and hold the PROGRAM button
while installing the last battery until you hear a
beep from Lockly
TM
.
Lockly
TM
will then perform a self check and the
keypad
screen will start to initiate. This self check will
automatically
determine and set your door lock to a
left open or right open door.
The self-check process is very important step to ensure the installation is done properly.
Double check if the thumb turn key can be turned smoothly after this self-check process.
If not, go through the whole installation process again making sure all the steps are followed
correctly. Do not install battery cover yet.

You’re all done! You have completed the Lockly
TM
Secure physical lock installation and now
you’re
ready to get the lock set up. Download the Lockly
TM
app from the iOS or Google Play
Store to complete your installation.
Scan or visit Lockly.com/app
Install the door strike.
Install the door strike to your door frame and
proceed to the last step of installation of your new
lock.
Notice: Do not install the battery cover just yet -
you’ll need to program Lockly
TM
before doing so.
P
O(2X)
Q
STEP 9: FINISHING INSTALLATION

For an online version of this installation guide and videos, visit:
http://lockly.com/help
/