JBL BAR 9.1 Owner's manual

Type
Owner's manual

JBL BAR 9.1: Experience cinematic surround sound at home with this cutting-edge soundbar system. Featuring Dolby Atmos and DTS:X support, the BAR 9.1 delivers immersive audio that flows all around you. Its detachable rear speakers and wireless subwoofer provide a truly cinematic experience. Enjoy crystal-clear dialogue and powerful bass that bring your movies, TV shows, and music to life. Bluetooth connectivity lets you stream your favorite tunes effortlessly.

JBL BAR 9.1: Experience cinematic surround sound at home with this cutting-edge soundbar system. Featuring Dolby Atmos and DTS:X support, the BAR 9.1 delivers immersive audio that flows all around you. Its detachable rear speakers and wireless subwoofer provide a truly cinematic experience. Enjoy crystal-clear dialogue and powerful bass that bring your movies, TV shows, and music to life. Bluetooth connectivity lets you stream your favorite tunes effortlessly.

BAR 9.1 TRUE WIRELESS SURROUND
WITH DOLBY ATMOS
®
OWNER’S MANUAL
22
IMPORTANT SAFETY INSTRUCTIONS
Verify Line Voltage Before Use
The JBL Bar 9.1 True Wireless Surround with Dolby Atmos
®
(soundbar, detachable speakers and subwoofer) has been
designed for use with 100-240 volt, 50/60 Hz AC current.
Connection to a line voltage other than that for which your
product is intended can create a safety and re hazard and may
damage the unit. If you have any questions about the voltage
requirements for your specic model or about the line voltage in
your area, contact your retailer or customer service representative
before plugging the unit into a wall outlet.
Do Not Use Extension Cords
To avoid safety hazards, use only the power cord supplied
with your unit. We do not recommend that extension cords be
used with this product. As with all electrical devices, do not run
power cords under rugs or carpets, or place heavy objects on
them. Damaged power cords should be replaced immediately
by an authorized service center with a cord that meets factory
specications.
Handle the AC Power Cord Gently
When disconnecting the power cord from an AC outlet, always
pull the plug; never pull the cord. If you do not intend to use this
speaker for any considerable length of time, disconnect the plug
from the AC outlet.
Do Not Open the Cabinet
There are no user-serviceable components inside this product.
Opening the cabinet may present a shock hazard, and any
modication to the product will void your warranty. If water
accidentally falls inside the unit, disconnect it from the AC power
source immediately, and consult an authorized service center.
www.jbl.com
English
33
TABLE OF CONTENTS
IMPORTANT SAFETY INSTRUCTIONS 2
1. INTRODUCTION 4
2. WHAT’S IN THE BOX 4
3. PRODUCT OVERVIEW 5
3.1 SOUNDBAR 5
3.2 DETACHABLE SPEAKERS 6
3.3 SUBWOOFER 6
3.4 REMOTE CONTROL 6
4. PLACE 7
4.1 DESKTOP PLACEMENT 7
4.2 WALL-MOUNTING 7
5. CONNECT 9
5.1 CONNECTION WITH YOUR TV AND DIGITAL DEVICES 9
5.2 BLUETOOTH CONNECTION 11
5.3 CONNECTION WITH YOUR HOME NETWORK 11
6. SETUP 13
6.1 CONNECT THE DETACHABLE REAR SPEAKERS AND
SUBWOOFER 13
6.2 CHARGE THE DETACHABLE SPEAKERS 13
6.3 SOUND CALIBRATION 14
7. PLAY 16
7.1 POWER-ON/AUTO STANDBY/AUTO WAKEUP/POWER-
SAVING MODE 16
7.2 PLAY FROM THE TV SOURCE 17
7.3 PLAY FROM THE HDMI IN SOURCE 17
7.4 PLAY FROM THE BLUETOOTH SOURCE 18
7.5 PLAY THROUGH QPLAY (QQMUSIC) 18
7.6 PLAY THROUGH AIRPLAY 18
7.7 MULTI-ROOM PLAYBACK 19
8. SOUND SETTINGS 19
9. RESTORE FACTORY SETTINGS 20
10. SOFTWARE UPDATE 21
11. RE-CONNECT THE SUBWOOFER 22
12. PRODUCT SPECIFICATIONS 22
13. TROUBLESHOOTING 23
SYSTEM 23
SOUND 23
BLUETOOTH 23
WI-FI 24
MUSIC STREAMING 24
REMOTE CONTROL 24
14. TRADEMARKS 24
15. OPEN SOURCE LICENSE NOTICE 25
44
1. INTRODUCTION
Thank you for purchasing the JBL Bar 9.1 True Wireless Surround
with Dolby Atmos
®
(soundbar, detachable speakers and
subwoofer) which is designed to bring an extraordinary sound
experience to your home entertainment system. We encourage
you to take a few minutes to read through this manual, which
describes the product and includes step-by-step instructions for
setting up and getting started.
To make the most of product features and support, you may
need to update the product software through the Internet
and the USB connector in the future. Refer to the software
update section in this manual to ensure that your product
has the latest software.
Designs and specications are subject to change without notice.
If you have any questions about the soundbar, installation or
operation, please contact your retailer or customer service
representative, or visit our website: www.jbl.com.
2. WHAT’S IN THE BOX
Unpack the box carefully and ensure that the following parts are
included. If any part is damaged or missing, do not use it and
contact your retailer or customer service representative.
Soundbar
Subwoofer
Detachable speakers
Remote control (with 2 AAA batteries)
Power cord*
x 2
* Power cord quantity and plug type vary region.
www.jbl.com
English
55
HDMI cable
Side caps**
(For the soundbar) (For the detachable speakers)
**For some regions only.
Wall-mounting kit
x 2
x 2
x 6x 6
x 2
x 2
x 2
Product information & wall-mounting template
3. PRODUCT OVERVIEW
3.1 Soundbar
Controls
1 3 4 52
1) (Power)
Switch on or to standby
2) -/+ (Volume)
Decrease or increase the volume
Press and hold to decrease or increase the volume
continuously
Press the two buttons together to mute or unmute
3)
(Source)
Select a sound source: TV (default, for
audio input from TV connection where the
connector is prioritized
over the connector), Bluetooth or HDMI IN.
4) Microphone
For audio calibration (wireless surround sound)
(For details, see “Sound calibration” in the “SETUP”
chapter.)
5) Status display
Rear connectors
1 2 3 4 5 6
1)
Connect to power (with the supplied power cord)
2)
USB connector for software update
Connect to a USB storage device for MP3 le playback
(for US version only)
3)
Connect to the optical output on your TV or digital device
66
4)
Connect to your home network through an Ethernet cable
5)
Connect to the HDMI ARC / HDMI eARC input on your TV
6)
Connect to the HDMI output on your digital device
3.2 Detachable speakers
1
2
3
1) (Connect)
Press to reconnect to the soundbar
2) Micro USB connector
For battery charging
3) Status indicator
For battery power
Flashing red Low battery (battery level: <20%)
Solid red Battery charging underway
Off Battery charging complete
For wireless connection status
Slow ashing white
Disconnected from the
soundbar
Fast ashing white Connecting to the soundbar
Solid white Connected to the soundbar
3.3 Subwoofer
1
2
1)
Connection status indicator
Solid white Connected to the soundbar
Fast ashing white Pairing mode
Slow ashing white
Reconnecting or exiting the
pairing mode
Solid amber Standby mode
2)
Connect to power (with the supplied power cord)
3.4 Remote control
1
2
3
5
9
4
6
7
8
www.jbl.com
English
77
1)
Switch on or to standby
2)
Select the TV source (default, for audio input from TV
connection where the
connector is prioritized over the connector)
3)
(Bluetooth)
Select the Bluetooth source
Press and hold to connect another Bluetooth device
4)
Select the level of Dolby Atmos/DTS:X effect: middle
(default), high or low
5) HDMI
Select the
source
Press and hold for more than 5 seconds to enter the
calibration mode for wireless surround sound
6) + / -
Increase or decrease the volume
Press and hold to increase or decrease the volume
continuously.
7)
(Mute)
Mute/unmute
8)
Select the bass level for subwoofer: 1/2/3 (default)/4/5
9)
(available when both of the detachable rear speakers are
undocked from the soundbar)
Select the surround sound level for rear speakers:
middle (default), high, mute or low
Press and hold to mute/unmute the rear speakes
4. PLACE
4.1 Desktop placement
Place the soundbar, detachable speakers and subwoofer on a
at and stable surface. Refer to the recommended distance in
the following diagram.
>10cm/4”
5cm/2”
R
L
3m/10ft
1m/3ft
1-1.4m/
3-4.6ft
1-1.4m/
3-4.6ft
2.5-3.0m/8.2-9.8ft
NOTES:
The power cord shall be properly connected to power.
Do not place any objects on the top of the soundbar, detachable
speakers or subwoofer.
Charge the detachable speakers in time to ensure sufficient battery
power (See “ Connect the detachable rear speakers” in the chapter
“SETUP”).
4.2 Wall-mounting
Wall-mount the soundbar and detachable rear speakers together
or separately.
88
A) Wall-mount the soundbar
1
5
32
≤8 mm/
0.31"
4mm/
0.16"
≥30 mm/1.18"
4
2” (50mm)
1a)
1b)
1c)
1. Preparation:
a) With the distance of about 2” (50mm) from your TV, stick
the supplied wall-mounting template to a wall by using
adhesive tapes.
b) Use your ballpen tip to mark the screw holder location.
Remove the template.
c) On the marked location, drill a 4 mm/0.16” hole.
2. Install the support for wall-mounting bracket.
3. With the screw, fasten the wall-mounting bracket onto the
bottom of the soundbar.
4. Mount the soundbar.
5. After the soundbar is securely wall-mounted, dock the two
detachable speakers onto the soundbar.
NOTES:
Make sure that the wall can support the weight of the soundbar.
Install on a vertical wall only.
Avoid a location under high temperature or humidity.
Before wall-mounting, make sure that cables can be properly
connected between the soundbar and external devices.
Before wall-mounting, make sure that the soundbar is unplugged from
power. Otherwise, it may cause an electric shock.
To move the soundbar, first remove the two detachable speakers to
avoid accidental damage.
B) Wall-mount the detachable speakers as rear
surround speakers
3
5
4
1
2
≤8 mm/
0.31"
4mm/
0.16"
≥30 mm/1.18"
1. From the soundbar, remove the two detachable speakers.
2. Install the wall-mounting bracket.
3. Fasten the support onto the back of the speakers.
4. Mount the speakers.
5. Install the side caps as needed.
www.jbl.com
English
99
HDMI IN
1. Connect the soundbar with the
connector on your TV by using the supplied HDMI cable.
On your TV, check that HDMI-CEC and HDMI ARC /
eARC have been enabled. Refer to the owner’s manual of
your TV for more information.
2. Use an HDMI cable (V2.0 or later) to connect the soundbar
with your digital device, such as a set-top box, DVD/Blu-ray
player or game console.
On your digital device, check that HDMI-CEC has been
enabled. Refer to the owner’s manual of your digital
device for more information.
On your digital device, select “Bitstream” or “Raw data”
in the audio output settings for the best Dolby Atmos
experience.
3. To play audio from the digital device connected to the
soundbar, select
on the remote control.
5. CONNECT
5.1 Connection with your TV and digital devices
For audio playback through the soundbar, connect the soundbar
with your TV through the supplied HDMI cable or an optical cable
(sold separately).
An HDMI connection supports digital audio and video with a
single connection. HDMI connectivity is the best option for your
soundbar.
TV (HDMI ARC / eARC)
(Recommended connection for the best Dolby Atmos / DTS:X
experience)
HDMI IN
HDMI OUT
*
HDMI (ARC)
1010
TV (HDMI eARC)
HDMI (eARC)
HDMI IN
HDMI OUT
*
TV
1. Connect the soundbar with the connector
on your TV by using the supplied HDMI cable.
On your TV, check that HDMI-CEC and HDMI ARC /
eARC have been enabled. Refer to the owner’s manual of
your TV for more information.
2. Use an HDMI cable (eARC compatible, V2.0 or later) to connect
your TV with your digital device, such as a streaming device,
set-top box, DVD/Blu-ray player or game console.
On your digital device, check that HDMI-CEC has been
enabled. Refer to the owner’s manual of your digital
device for more information.
On your TV and digital device, select “Bitstream” or “Raw
data” in the audio output settings for the best Dolby
Atmos experience.
3. To play audio from the digital device connected to your TV,
select
on the remote control.
OPTICAL
HDMI IN
HDMI OUT
OPTICAL
OPTICAL
*
TV
NOTES:
With the 4 up-firing speakers and the detachable surround speaker
design, the Dolby surround upmixer of the soundbar can expand the
legacy channel-based audio of Dolby Digital format, including 5.1 and
7.1 content, and provide an immersive 3D Atmos experience.
www.jbl.com
English
1111
1. Connect the soundbar with your TV by using an optical cable.
2. Use an HDMI cable (V2.0 or later) to connect your TV with your
digital device, such as a streaming device, set-top box, DVD/
Blu-ray player or game console.
3. To play audio through the optical cable, select
on the
remote control.
NOTES:
* The HDMI cable (for digital device connection) and the optical cable
are sold separately.
Full compatibility with all HDMI-CEC devices is not guaranteed.
When both HDMI ARC and optical cables are connected to the
soundbar for audio input from TV connection, the HDMI ARC
connection is prioritized.
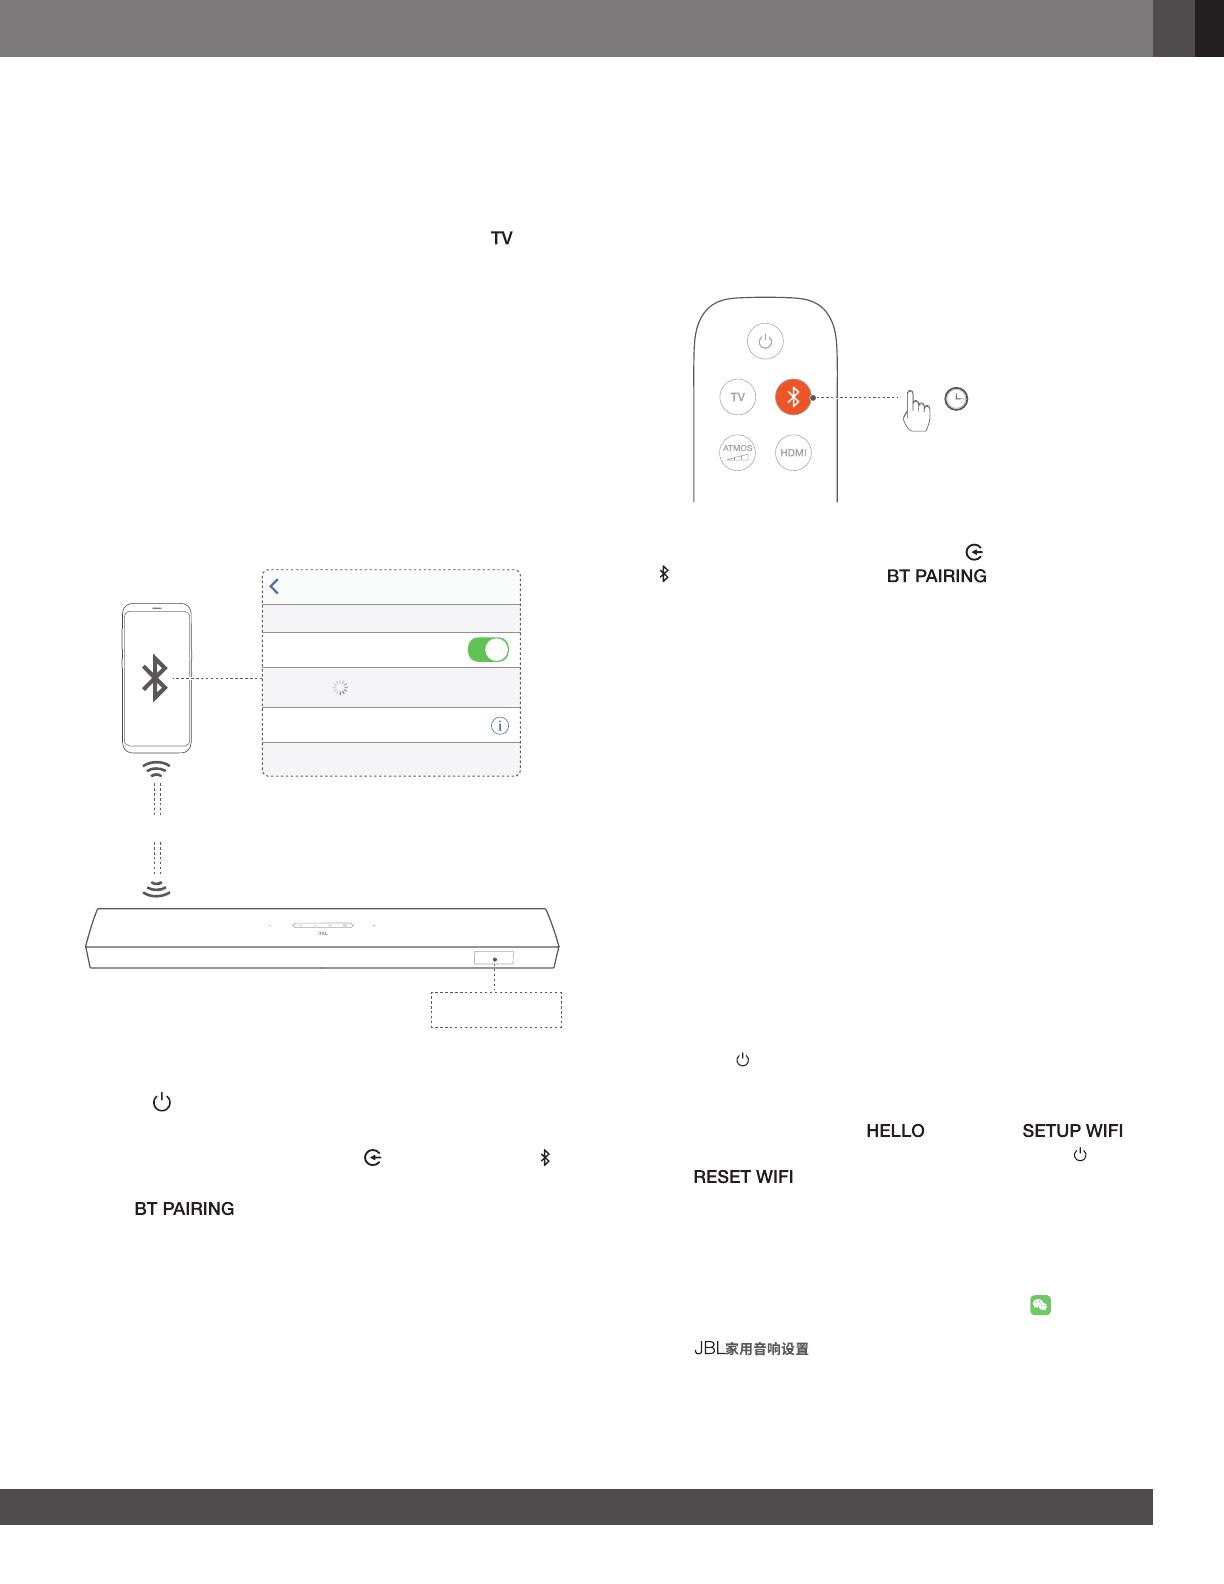
5.2 Bluetooth connection
Through Bluetooth, connect the soundbar with your Bluetooth
device, such as a smartphone, tablet and laptop.
Settings Bluetooth
Bluetooth
DEVICES
JBL Bar 9.1 xxxx
Now Discoverable
Connected
< 10 m / 33 ft
BT PAIRING
Connect a Bluetooth device
1. Press to switch on (See “Power-on/Auto standby/Auto
wakeup” in the “PLAY” chapter).
2. To select Bluetooth source, press
on the soundbar or on
the remote control.
”: Ready for BT pairing
3. On your Bluetooth device, enable Bluetooth and search for
“JBL Bar 9.1 xxxx” within three minutes.
Successful connection: The device name is displayed
if your device is named in English. A conrmation tone
is heard.
To reconnect the last paired device
Your Bluetooth device is retained as a paired device when the
soundbar goes to standby mode. Next time you switch to the
Bluetooth source, the soundbar reconnects the last paired
device automatically.
To connect to another Bluetooth device
3S
1. In the Bluetooth source, press and hold on the soundbar or
on the remote control until “ ” is displayed.
The previously paired device is cleared from the soundbar.
The soundbar enters the Bluetooth pairing mode.
2. Follow the Step 3 under “Connect a Bluetooth device”.
If the device has ever been paired with the soundbar, rst
unpair “JBL Bar 9.1 xxxx”
on the device.
NOTES:
The Bluetooth connection will be lost if the distance between the
soundbar and Bluetooth device exceeds 33 ft (10 m).
Electronic devices may cause radio interference. Devices that generate
electromagnetic waves must be kept away from the Soundbar, such
as microwaves and wireless LAN devices.
5.3 Connection with your home network
Through Wi-Fi or an Ethernet cable, connect the soundbar to
your home network. With QPlay and AirPlay supported, the
soundbar allows you to stream audio on smartphones or tablets
through the soundbar speakers.
1. On the soundbar, enter the Wi-Fi setup mode:
Press
to switch on (See “Power-on/Auto standby/Auto
wakeup” in the “PLAY” chapter).
If the soundbar has not been connected to a network,
the screen shows “
” and then, “ ”.
To re-enter the Wi-Fi setup mode, press and hold
until
” is displayed.
2. On your Android or iOS device, add the soundbar to your
home Wi-Fi network.
Through the WeChat Mini Program
a) Connect your Android or iOS device to your home
Wi-Fi network. Launch the WeChat app
and then
scan the QR code, or search for the Mini Program
”.
1212
b) Follow the app instructions to complete setup.
SETUP WIFIQPLAY READY
微信
搜索
搜索小程序
JBL家用音响设置
(安卓 / iOS)
*Through AirPlay setup on an iOS device
a) Connect your iOS device to your home Wi-Fi network.
b) On your iOS device, go to Settings > Wi-Fi. Under SET
UP NEW AIRPLAY SPEAKER…, select “JBL Bar 9.1
xxxx” and follow onscreen instructions to complete
setup.
3. If necessary, use an Ethernet cable to connect the soundbar
to your home network.
Make sure that you connect to the same network as you
did during the setup.
NOTES:
To rename the soundbar in the Mini Program, tap the soundbar name
to edit.
On your iOS device, add the soundbar to the Apple Home app and
manage it together with other AirPlay 2-compatible speakers.
*On your iOS device, if the soundbar has been added to your home
Wi-Fi network through the WeChat Mini Program, skip the steps under
“Through AirPlay setup on an iOS device” and you can start AirPlay
streaming from an AirPlay-compatible app (See “Play through AirPlay”
in the “PLAY” chapter).
www.jbl.com
English
1313
6. SETUP
6.1 Connect the detachable rear speakers and
subwoofer
POWER
1
2
POWER
LOAD
READY
HELLO
1. Connect the soundbar to power by using the supplied power
cord.
The screen on the soundbar shows “
” and then,
”.
2. Do the following to start the connection:
Connect the subwoofer to power by using the supplied
power cords;
On the soundbar, press
to switch on;
Dock the detachable speakers onto the soundbar, or
press
on the detachable speakers to fast re-connect to
the soundbar.
The soundbar connects the subwoofer automatically.
Connected:
turns solid white on the subwoofer.
The soundbar connects the detachable speakers
automatically.
Connected: The status indicator turns solid white (
) on
the detachable speakers.
6.2 Charge the detachable speakers
Wi-Fi and Bluetooth connection will be off and the soundbar will
enter into power saving mode when the detachable surround
speakers are out of battery.
The first time you use the two detachable speakers, charge them
for more than 3 hours to ensure sufficient battery power.
When the battery power runs low, the status indicator
ashes red on the detachable surround speakers and
” is displayed on the soundbar.
When the battery power runs out, “
” or
” is displayed on the soundbar.
CHARGE SPKR. BATT LOW
6.2.1 Charge by docking the detachable speakers
With the detachable speakers docked, the soundbar will enter the
charging mode after switching to standby mode.
: The detachable speakers are fully charged
( turns off). The soundbar returns to standby mode.
The charging mode exits when the soundbar is switched
on (after auto wake-up or by your pressing
on the
soundbar or remote control). See “Power-on/Auto-
standby/Auto wake-up/Power-saving mode” in the
“PLAY” chapter.
It takes about 3 hours for the empty battery to be fully
charged.
STDBY
3H
100%
1414
6.2.2 Charge through a USB cable
100%
Micro USB
Use a USB cable to connect the detachable speakers to
power respectively.
For the detachable speakers, the status indicator is used
for status indication of both battery power and wireless
connection (See “Detachable speakers” in the “PRODUCT
OVERVIEW” chapter).
NOTES:
* The USB cable is sold separately.
6.3 Sound calibration
For sound calibration, do the following:
Make sure that your room is quiet;
Make sure that the soundbar and the two detachable rear speakers
are fully in sight of each other, without obstacles in between.
Make sure that the left and right rear speakers are properly placed, the
L speaker on the left and the R speaker on the right.
6.3.1 Wireless surround sound
With the audio calibration, your surround sound
experience will be optimized for your favorite seating and
speaker positions.
1) Calibrate the listening zone
R
L
>5S
1-CALIBRATION
1DONE
1. Place the detachable rear speakers beside your seating
position.
Make sure that the two detachable speakers have been
connected to the soundbar (See “Wireless connection”
under “Connect the detachable rear speakers” in the
“SETUP” chapter).
2. On the remote control, press and hold
until
” is displayed on the soundbar.
Countdown starts from 5 to 1.
Calibration tone is heard. Audio calibration starts.
”: Calibration ongoing.
”: Calibration of the listening zone is completed
successfully.
www.jbl.com
English
1515
2) Calibrate the speaker position
>5S
2-CALIBRATION
R
L
R
L
2DONE
1. Place the detachable rear speakers in your desired location.
2. On the remote control, press and hold
until
” is displayed on the soundbar.
Countdown starts from 5 to 1.
Calibration tone is heard. Audio calibration starts.
”: Calibration ongoing.
”: Calibration of the speaker position is
completed successfully.
3. To select suitable surround sound, press
repeatedly to
switch between high, low or middle (default).
NOTES:
During calibration, all buttons on the remote control are disabled
except for
and .
” is displayed if calibration failed.
6.3.2 Dolby Atmos
®
/ DTS:X
®
With Dolby Atmos
or DTS:X, overhead audio distribution is
provided for powerful 3D sound immersion.
1. To play the surround sound of DOLBY ATMOS or DTS:X,
connect and play your Blu-ray player or streaming device
as described under “Connection with your TV and digital
devices” in the “CONNECT” chapter.
2. To select suitable strength for Dolby Atmos or DTS:X, press
on remote control to switch between middle (default),
high, low or off.
HIGH
MID
LOW
MID
HIGH
LOW
R
L
L
R
R
L
1616
7. PLAY
7.1 Power-on/Auto standby/Auto wakeup/
Power-saving mode
12
POWER
LOADREADY
3
HELLO
Switch on
On the soundbar, press to switch on.
” is displayed.
The subwoofer is reconnected to the soundbar
automatically. Connected:
turns solid white.
On the detachable speakers, press
to reconnect to the
soundbar.
Auto standby
If the soundbar is inactive for more than 10 minutes, it will switch
to standby mode automatically. “ ” is displayed.
The subwoofer also goes to standby, and
turns solid
amber.
10 minutes later, the detachable speakers switches to
standby, and the status indicator turns off for wireless
connection status.
Next time you switch on the soundbar, it returns to the
last selected source.
Auto wakeup
In standby mode, the soundbar will wake up automatically when
the soundbar is connected to your TV through the HDMI
ARC connection and your TV is switched on;
the soundbar is connected to your TV through an optical
cable and audio signals are detected from the optical cable;
the soundbar is connected to your TV through the HDMI
ARC connection and through the HDMI connection, is also
connected to your digital device such as a set-top box, DVD/
Blu-ray player or game console, and your digital device is
switched on;
the soundbar is connected to your home network and audio
is streamed to the soundbar through QPlay (QQ Music) or
AirPlay.
Power-saving mode
In power-saving mode, Wi-Fi and Bluetooth are disabled on the
soundbar. You cannot wake up the soundbar by playing music
through QPlay (QQ Music) or AirPlay.
The soundbar will switch to standby, and then enter power-
saving mode if the detachable speakers
run out of power; or
lose wireless connection.
On the detachable speakers, the status indicator ashes red;
on the soundbar, “
” or “ ” is
displayed. Charge the detachable speakers by docking them
onto the soundbar or though USB cables (See “Charge the
detachable speakers” in the “SETUP” chapter). If necessary,
press
on the detachable speakers to re-connect to the
soundbar.
CHARGE SPKR. BATT LOW
www.jbl.com
English
1717
7.2 Play from the TV source
With the soundbar connected, you can enjoy TV audio from the
soundbar speakers.
TV
OPTICAL
HDMI eARC/
HDMI ARC
1. Make sure that your TV is set to support external speakers
and the built-in TV speakers are muted. Refer to the owner’s
manual of your TV for more information.
2. Make sure that the soundbar has been properly connected to
your TV (See “Connection with your TV and digital devices” in
the “CONNECT” chapter).
3. To select the TV source, press
on the soundbar or on
the remote control.
”: The TV source is selected.
In the factory settings, the TV source is selected by default.
NOTES:
If the soundbar is connected to your TV through both an HDMI cable
and an optical cable, the HDMI cable source is selected for the TV
connection.
7.2.1 TV remote control setup
To use your TV remote control for both your TV and the soundbar,
check that your TV supports HDMI-CEC. If your TV does not support
HDMI-CEC, follow the steps under “TV remote control learning”.
HDMI-CEC
If your TV supports HDMI-CEC, enable the functions as instructed
in your TV user manual. You can control the volume +/-, mute/
unmute, and power on/standby functions on your soundbar
through the TV remote control.
TV remote control learning
1. On the soundbar, press and hold and + until “
is displayed.
You enter the TV remote control learning mode.
2. Within 15 seconds, do the following on the soundbar and your
TV remote control:
a) On the soundbar: press one of the following buttons +, -,
+ and - together (for the mute/unmute function), and
.
b) On your TV remote control: press the desired button.
” is displayed on the soundbar.
”: The function of the soundbar button is learnt
by your TV remote control button.
3. Repeat Step 2 to complete the button learning.
4. To exit the TV remote control learning mode, press and hold
and + on the soundbar until “
” is displayed.
The soundbar returns to the last selected source.
7.3 Play from the HDMI IN source
With the soundbar connected as shown, your digital device can
play video on your TV and audio from the soundbar speakers.
1
HDMI IN
HDMI OUT
2
.
.
.
HDMI
(ARC)
1. Make sure that the soundbar has been properly connected to
your TV and digital device (See “Connection with your TV and
digital devices” in the “CONNECT” chapter).
2. Switch on your digital device.
Your TV and the soundbar wake up from standby mode
and switch to the input source automatically.
To select the
source on the soundbar, press
on the soundbar or on the remote control.
3. Switch your TV to standby mode.
The soundbar and source device are switched to standby mode.
NOTES:
Full compatibility with all HDMI-CEC devices is not guaranteed.
1818
7.4 Play from the Bluetooth source
Through Bluetooth, stream audio play on your Bluetooth device
to the soundbar.
1. Check that the soundbar has been properly connected to
your Bluetooth device (See “Bluetooth connection” in the
“CONNECT” chapter).
2. To select the Bluetooth source, press
on the soundbar or
on the remote control.
3. Start audio play on your Bluetooth device.
4. Adjust the volume on the soundbar or your Bluetooth device.
7.5 Play through QPlay (QQMusic)
Through QPlay (QQMusic), stream audio on your Android or iOS
device to the soundbar.
1. On the soundbar,
a) Check that the soundbar has been properly connected
to your home network (See “Connection with your home
network” in the “CONNECT” chapter).
b) Check that the soundbar has been switched on or to
standby mode.
2. On your Android or iOS device,
a) Check that your Android or iOS device has been
connected to the same network as the soundbar.
b) Launch the QQMusic app
, and start music playback.
c) On the player screen, tap ... and then the QPlay icon
and select “JBL Bar 9.1 xxxx” as speaker.
Android / iOS device
安卓或 iOS 设备
QPLAY
7.6 Play through AirPlay
Through AirPlay, stream audio on your iOS device to the soundbar.
1. On the soundbar,
Check that the soundbar has been properly connected
to your home network (See “Connection with your home
network” in the “CONNECT” chapter).
2. On your iOS device,
a) Check that your iOS device has been connected to the
same network as the soundbar.
b) To enter the Control Center on an iOS device, swipe down
from the upper right corner (iOS 12 or later) or swipe up
from the bottom edge (iOS 11 or earlier). Tap
to select
the connected soundbar and then, start audio streaming
from an app.
usic
Phone
AIRPLAY
3. To exit from the music playback, switch to other sources.
NOTES:
The soundbar can support audio streaming and cannot support video
streaming.
During QPlay (QQMusic) or AirPlay, music playback pauses on the
current connected device when you start music playback on a second
connected device.
When the soundbar switches between your home Wi-Fi and wired
network during AirPlay 2, music playback pauses and will resume in
a few minutes, depending on the bandwidth condition of broadband.
For the connection to your home wired network, see Step 3 under
“Connection with your home network” in the Chapter “CONNECT”.
www.jbl.com
English
1919
7.7 Multi-room playback
With the multi-room playback, you can stream music on your
iOS device to multiple AirPlay speakers.
AirPlay
usic
1. On an iOS device, enter the Control Center.
2. Tap
to select multiple connected speakers as needed.
3. Start music streaming from an app.
8. SOUND SETTINGS
Bass adjustment
1. Check that the soundbar and subwoofer are properly
connected (See the “SETUP” chapter).
2. On the remote control, press
repeatedly to switch
between bass levels.
” to “ ” is displayed (default: “ ”).
Rear adjustment
With both of the detachable rear speakers undocked, you can
select the surround sound level: middle (default), high, mute or
low.
X 1 >3S
HIGH
MID
MUTED REAR SPKR
MUTED REAR SPKR
LOW
MID/HIGH/LOW
MID / HIGH / LOW
MUTED REAR SPKR
R
L
L
R
1. Check that the soundbar and the detachable rear speakers
are connected wirelessly (See the “SETUP” chapter).
2. On the remote control, press
repeatedly to switch between
surround sound levels.
” / “ ” / “ ” / “ ” is
displayed (default: “ ”).
” is displayed if the detachable rear
speakers have been docked onto the soundbar.
NOT SUPPORTED
To mute or unmute the undocked rear speakers,
press and hold
is displayed.
When unmuted, the rear speakers return to the last
selected surround sound level.
2020
Audio sync
With the audio sync function, you can synchronize audio and
video to make sure that no delay is heard from your video content.
1. On the remote control, press and hold
for more than three
seconds and then, press +.
2. Within ve seconds, press + or - on the remote control to
adjust the audio delay and match with video.
The audio sync timing is displayed.
NOTES:
If no action is taken within five seconds, you will exit the audio sync
mode.
Smart mode
With the smart mode enabled by default, you can enjoy TV
programs with rich sound effects. For TV programs such as
news and weather forecasts, you can reduce sound effects by
disabling the smart mode and switching to the standard mode.
Smart mode: EQ settings and JBL Surround Sound are applied
for rich sound effects.
Standard mode: The preset EQ settings are applied for standard
sound effects.
To disable the smart mode, do the following:
1. On the remote control, press and hold
for more than three
seconds. Press +.
Current mode is displayed. “
”: The
smart mode is enabled.
2. Repeat Step 1.
You switch to another mode. “
”: The
standard mode is enabled.
Next time you switch on the soundbar, the smart mode is
enabled again automatically.
9. RESTORE FACTORY SETTINGS
By restoring the default settings dened at factories. you remove
all your personalized settings from the soundbar.
On the soundbar, press and hold
and for more than 10
seconds.
” is displayed.
The soundbar shows “
” and “ ” and then,
goes to standby mode.
  • Page 1 1
  • Page 2 2
  • Page 3 3
  • Page 4 4
  • Page 5 5
  • Page 6 6
  • Page 7 7
  • Page 8 8
  • Page 9 9
  • Page 10 10
  • Page 11 11
  • Page 12 12
  • Page 13 13
  • Page 14 14
  • Page 15 15
  • Page 16 16
  • Page 17 17
  • Page 18 18
  • Page 19 19
  • Page 20 20
  • Page 21 21
  • Page 22 22
  • Page 23 23
  • Page 24 24
  • Page 25 25

JBL BAR 9.1 Owner's manual

Type
Owner's manual

JBL BAR 9.1: Experience cinematic surround sound at home with this cutting-edge soundbar system. Featuring Dolby Atmos and DTS:X support, the BAR 9.1 delivers immersive audio that flows all around you. Its detachable rear speakers and wireless subwoofer provide a truly cinematic experience. Enjoy crystal-clear dialogue and powerful bass that bring your movies, TV shows, and music to life. Bluetooth connectivity lets you stream your favorite tunes effortlessly.

Ask a question and I''ll find the answer in the document

Finding information in a document is now easier with AI