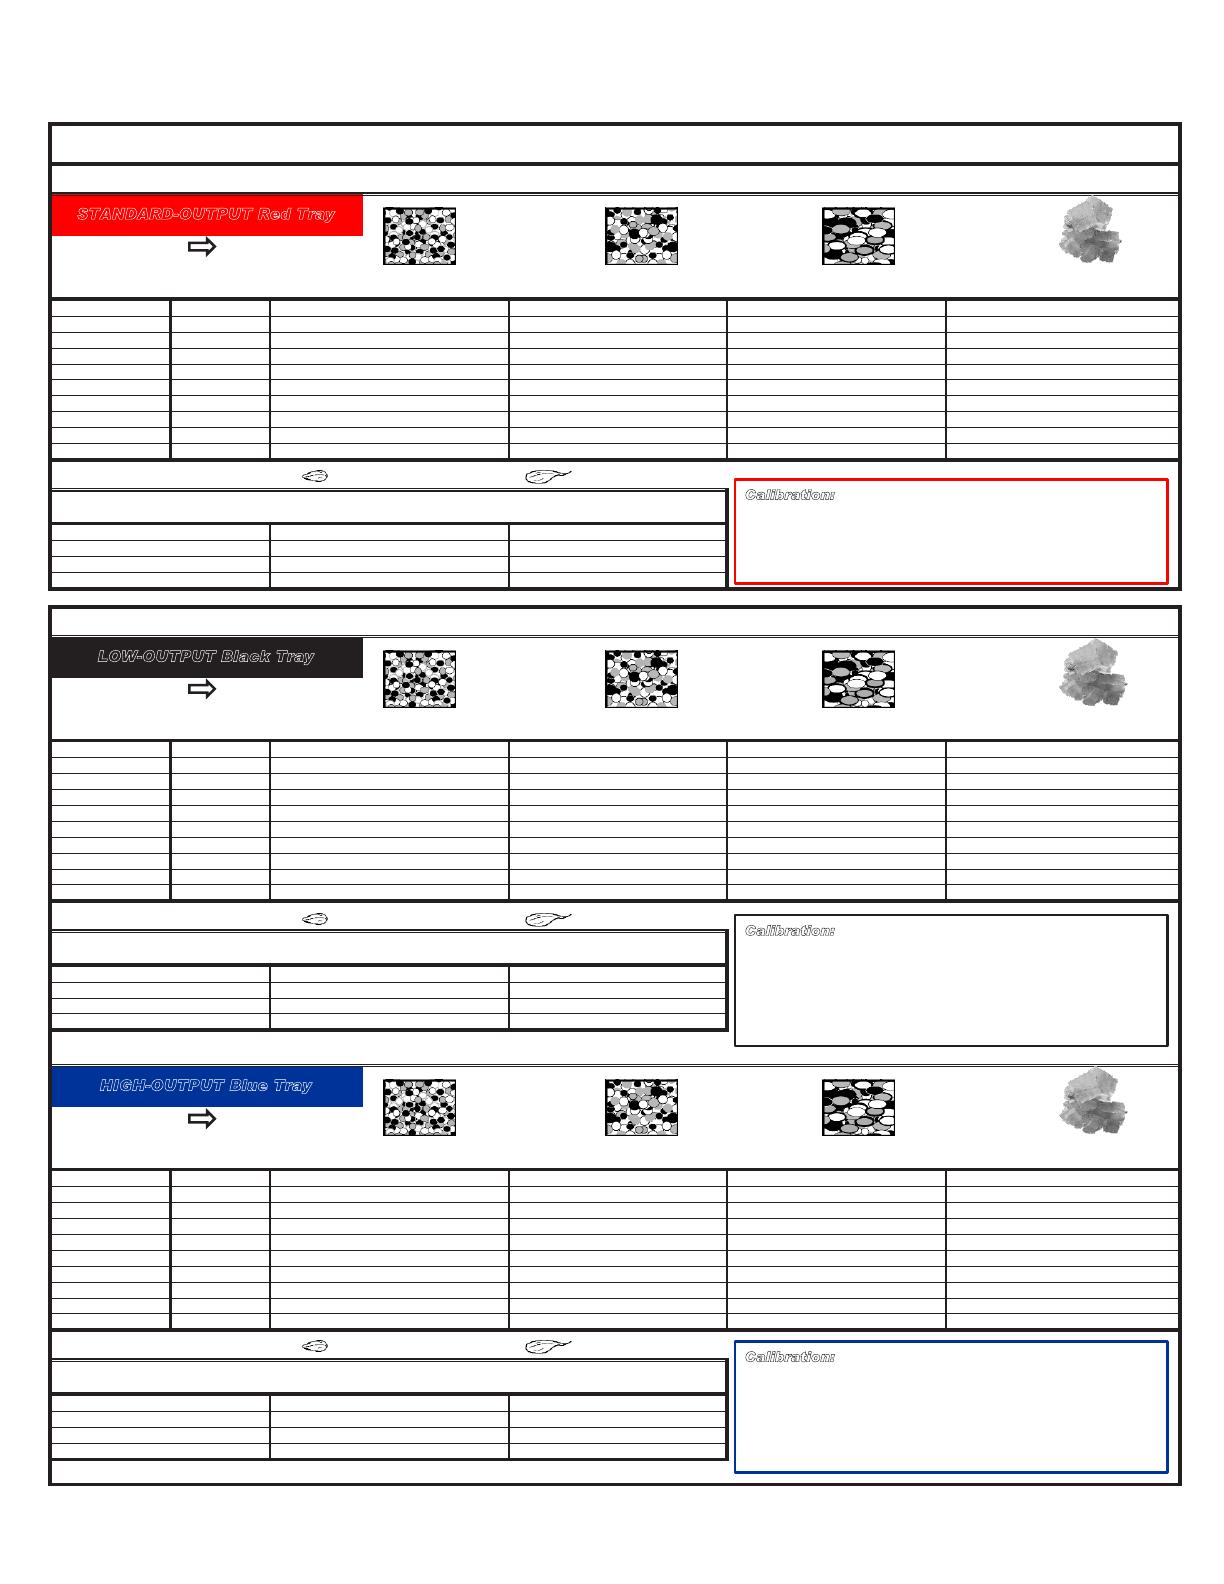
EarthWay F80PD Owner's manual

Type
Owner's manual
F80 FLEX
-
SELECT® Series
Broadcast Spreader

1-30-2018 Pt# F52157 PAGE 1
WARNING



PLEASE CONTACT US:



; 


; 

; 


®

; 
; 

©2018 Earthway Products, Inc. All rights reserved. EarthWay
®
EV-N-SPRED
®
, FLEX-SELECT
®
, and SPRAY-PRO
®
are registered trademarks of Earthway Products, Inc.
Use of trademarks or images are prohibited unless approved by Earthway Products, Inc. 1009 Maple Street Bristol, Indiana 46507









EV-N-SPRED
E
ar
thW
ay
R
Coast wheel side
1” Cotter Pin
Drive wheel side
2” Cotter Pin






















ASSEMBLY
Axle
Bushing
Bearing
Drive wheel
Coast wheel
Bushing
Alignment
Notch
(Fits into the lower handle slot)
Axle Bearing
Flat
Side
Notch
TURN SPREADER UPRIGHT ON
TO THE WHEELS
to complete the next steps
PAGE 3
ASSEMBLY - continued










TIGHTEN BOLTS












0
30
Control Rod
Tabbed Hole
Control Rod
Lever
Tension Nut
Gauge & Lever
30
¼-20
Hex Nuts
Pivot
Bracket
Control
Rod
Pivot
Rod
Rod
Clip



ASSEMBLY - continued


9
10


STANDARD
-
OUTPUT

This only applies to the RED 3-hole drop
STANDARD
-
OUTPUT Trays.
The HIGH-OUTPUT (Blue) and LOW-OUTPUT (Black)Trays
do not use the Agitator or Debris Screen shown below.
The Agitator and Screen above
Are only included with RED STANDARD
-
OUTPUT Trays.
TRAY INSTALLATION
HIGH
-
OUTPUT 

LOW
-
OUTPUT 

PAGE 5
No Agitator or Debris
screen are included
No Agitator is included
FULL Rate (one pass)
HALF Rate (two passes)
SPREAD PATH
© 2015 Earthway Products, Inc. All rights reserved






HOW TO ORDER SPARE PARTS








OPERATING INSTRUCTIONS

5 

5 
5 
5 
5 
5 
5 
5-YEAR LIMITED WARRANTY








SPECIFIC LIMITATIONS:




How to Install a Tray


TIP:









STANDARD
-
OUTPUT 

NOTE: 







TIP:




How to ensure your spreader is
properly calibrated
HIGH
-
OUTPUT and LOW
-
OUTPUT 
FULLY
CLOSED

FULLY CLOSED
HIGH
-
OUTPUT
and LOW
-
OUTPUT 
Calibration Adjustment





TIP:CLOSE
shut-off fully closed

continued
EarthWay® Flex-Select®
Setup and Calibration Techniques
©2018 Earthway Products, Inc. All rights reserved. EarthWay
®
EV-N-SPRED
®
, FLEX-SELECT
®
, and SPRAY-PRO
®
are registered trademarks of Earthway Products, Inc.
Use of trademarks are prohibited unless approved by Earthway Products, Inc. 1009 Maple Street Bristol, Indiana 46507
STANDARD-OUTPUT
PRO F13130DKIT
Red Tray
install Pivot Rod
from the bottom
to the top
LOW-OUTPUT
F13130LKIT
Black Tray
install Pivot Rod
from the top
to the bottom
HIGH-OUTPUT
F13130HKIT
Blue Tray
install Pivot Rod
from the bottom
to the top
Deburr
Rod Clip
Shut-Off End
Shut-Off End
Shut-Off End
1
3
2
1
3
2
1
3
2
4
5
Quarter Turn
Tray Fastener
6
0
30
PIVOT
CALIBRATION
POINT
GAUGE &
LEVER
How to ensure your spreader is properly calibrated - continued
STANDARD
-
OUTPUT
FULLY OPEN
FULLY OPEN



Calibration Adjustment


TIP:
OPEN
shut-off fully open







Control Lever Drag adjustment



0
30
PIVOT
CALIBRATION
POINT
GAUGE &
LEVER
#0
#30
Lever
Drag
Adjustment




®
PRO
- 

®



o






®











o

EV
-
N
-
SPRED
®
Dual Port PRO System Setup
Test all material prior to beginning your spreading job. 


 Using the EarthWay
®
Bag Calibrator
#77016 can greatly reduce the time needed for
determining the Setting Rates on any material but
is not mandatory to establish a setting rate.
 












TIP:
The spread width that
you measure is used to calculate the actual  for the material.
S
p
r
e
a
d
P
a
t
t
e
r
n
Adjustable Throwing Ports
with 8 repeatable settings
to balance the left or right
spread pattern to
the center.
S
p
r
e
a
d
P
a
t
t
e
r
n
SPREAD WIDTH
#0
#30
FINE
MEDIUM LARGE
ADJUSTING THE EV
-
N
-
SPRED
®
DUAL PORT SHUT
-
OFF SYSTEM



TIP:LEFT SIDELINES

®

LEFT SIDELINESRIGHT SIDECIRCLES

®


great for medians

OPEN STOP
CLOSE
STOP

having the same amount of material in each
baking tin
RETEST

ESTABLISH THE SETTING RATE


Above
is a chart to help determine the distance needed for 1,000 square foot
calculation.
START and END POINTS



STOP 
START LINE and 
END POINT
LINE






®

®



®
Spread width
in feet
Length needed
for 1,000 Sq Ft
Spread width
in feet
Length needed
for 1,000 Sq Ft
Spread width
in feet
Length needed
for 1,000 Sq Ft
    
    
    
     
11    31 
     
13    33 
     
15    35 
     
START
END
COVERAGE AREA
i.e. 1,000 SQ FT
2’ 2’ 2’2’2’2’
S
p
r
e
a
d
P
a
t
t
e
r
n

®
SIDESPRED-CONTROL

 OPERATION


 for a  








FULL Rate (one pass)
HALF Rate (two passes)
SPREAD PATH
© 2018 Earthway Products, Inc. All rights reserved
SIDEWALK
DRIVEWAYDRIVEWAY
FLOWER
BED
FLOWER
BED
Does not change the setting rate
NEW ~ NOUVEAU ~ NUEVO
Included on Standard Output Tray
F13130Kit
44249
17
19
19
10
26
18
14
13
27
9
13
10
13
8
27
13
14
1
21
18
31
15
6
29
28
25
2
30
11
16
7
24
15
34
33
32
39
3
4
20
19
38
22
35
23
12
37
5
F77080 or F77130
OPTIONAL
Heavy-Duty
Rain Cover
60060RNC
OPTIONAL
Left Side Deflector Kit
F80 
     
1  
  
    
3     
    
5     
    
    
    
  31  
     
11   33  
     
13   35 
     
15     
     
     
  
     
    
     
     
Bolt Identifier
1-1/2”
1”
2”
2-1/4”
2-3/4”
72300
SSC Remote
Control Kit
44249
17
19
19
10
26
18
14
13
27
9
13
10
13
8
27
13
14
1
21
18
31
15
6
29
28
25
2
30
11
16
7
24
15
34
33
32
39
3
4
20
19
38
22
35
23
12
37
5
F77080 or F77130
OPTIONAL
Heavy-Duty
Rain Cover
60060RNC
OPTIONAL
Left Side Deflector Kit
F80S 
     
1  
  
    
3     
    
5     
    
    
    
  31  
     
11   33  
     
13   35 
     
15     
     
     
  
     
    
     
     
72300
SSC Remote
Control Kit
F12219D DUAL-PORT PRO
SHUT-OFF ASSY
31135 #8 X 1/2 PHPS (BLACK)
F12219L LOW-OUTPUT
SHUTOFF ASSY
36107 1/8 X 1 FLAT HD
18-8 SS RIVET
36208 #6 X 3/8" TYPE
25 PHPS S.S.
F12111 AGITATOR
PIN RETAINER
F14102 SHUT OFF
PLATE RETAINER RING
F12135 1/4 TURN
FASTENER
F12117 CAM
31127 ROD CLIP
F44251L PIVOT ROD
LOW-OUTPUT
12209 HOPPER BUSHING
STANDARD-OUTPUT
F13130KIT
HIGH-OUTPUT
F13130HKIT
LOW-OUTPUT
F13130LKIT
STANDARD-OUTPUT PRO
F13130DKIT
31135 #8 X 1/2 PHPS (BLACK)
F12219H HIGH-OUTPUT
SHUTOFF ASSY
36208 #6 X 3/8" TYPE
25 PHPS S.S.
F12111 AGITATOR
PIN RETAINER
F14102 SHUT OFF
PLATE RETAINER RING
F12135 1/4 TURN
FASTENER
31127 ROD CLIP
F44251H PIVOT ROD
HIGH-OUTPUT
12209 HOPPER BUSHING
31138 #8 X 3/8
PMT #8HD (BLACK)
33117 AGITATOR
F12135 1/4 TURN
FASTENER
31127 ROD CLIP
F44251 PIVOT ROD
STANDARD-OUTPUT
12209 HOPPER BUSHING
F12219SSC STANDARD-OUTPUT
SideSpred-Control
SHUT-OFF ASSY
31138 #8 X 3/8
PMT #8HD (BLACK)
33117 AGITATOR
F12135 1/4 TURN
FASTENER
31127 ROD CLIP
F44251 PIVOT ROD
STANDARD-OUTPUT
12209 HOPPER BUSHING
These parts are wear items and designed to be
consumed with normal operation and have a 90 day warranty
36107 1/8 X 1 FLAT HD
18-8 SS RIVET
F12117 CAM
These parts are wear items and designed to be
consumed with normal operation and have a 90 day warranty
F40003 DEBRIS SCREEN
Included with both
STANDARD-OUTPUT,
and LOW-OUTPUT
Trays only
GRANULAR MATERIAL
PARTICLE SIZES:
Fine/Small
Medium
Large
EXTRA LARGE
(SAND) (HALF BB) (BB) ROCK SALT
 GRAMS PER SPREAD SPREAD SPREAD SPREAD SPREAD SPREAD SPREAD SPREAD
SQUARE FEET SQUARE METER SETTING WIDTH FT METERS SETTING WIDTH FT METERS SETTING WIDTH FT METERS SETTING WIDTH FT METERS
1 LB. 5 7 18' 5.5m 9 24' 7.3m 14 36' 11m 17 37' 11.3m
2 LBS. 10 10 18' 5.5m 13 24' 7.3m 18 36' 11m 22 37' 11.3m
3 LBS. 15 13 18' 5.5m 16 24' 7.3m 23 36' 11m 24 37' 11.3m
4 LBS. 20 14 18' 5.5m 20 24' 7.3m 27 36' 11m 26 37' 11.3m
5 LBS. 24 16 18' 5.5m 22 24' 7.3m 30 36' 11m 28 37' 11.3m
6 LBS. 29 18 18' 5.5m 25 24' 7.3m 23 = 2 pass 36' 11m 29 37' 11.3m
7 LBS. 34 20 18' 5.5m 27 24' 7.3m 25 = 2 pass 36' 11m 30 37' 11.3m
8 LBS. 39 22 18' 5.5m 28 24' 7.3m 27 = 2 pass 36' 11m 26 = 2 pass 37' 11.3m
9 LBS. 44 24 18' 5.5m 30 24' 7.3m 28 = 2 pass 36' 11m 27 = 2 pass 37' 11.3m
10 LBS. 49 26 18' 5.5m 22 = 2 pass 24' 7.3m 30 = 2 pass 36' 11m 28 = 2 pass 37' 11.3m
GRASS SEED
 GRAMS PER FINE SPREAD SPREAD COARSE SPREAD SPREAD
SQUARE FEET SQUARE METER SETTING WIDTH FT METERS SETTING WIDTH FT METERS
2 LBS. 10 14 8' 2.4m 22 14' 4.3m
3 LBS. 15 16 8' 2.4m 25 14' 4.3m
4 LBS> 20 18 8' 2.4m 28 14' 4.3m
5 LBS> 25 20 8' 2.4m 30 14' 4.3m
GRANULAR MATERIAL
PARTICLE SIZES:
Fine/Small
Medium
Large
EXTRA LARGE
(SAND) (HALF BB) (BB) ROCK SALT
 GRAMS PER SPREAD SPREAD SPREAD SPREAD SPREAD SPREAD SPREAD SPREAD
SQUARE FEET SQUARE METER SETTING WIDTH FT METERS SETTING WIDTH FT METERS SETTING WIDTH FT METERS SETTING WIDTH FT METERS
1 LB. 5 8 16' 4.9m 10 20' 6.1m 15 30' 9.1m 18 24' 7.3m
2 LBS. 10 10 16' 4.9m 13 20' 6.1m 18 30' 9.1m 20 24' 7.3m
3 LBS. 15 12 16' 4.9m 18 20' 6.1m 23 30' 9.1m 25 24' 7.3m
4 LBS. 20 13 16' 4.9m 20 20' 6.1m 28 30' 9.1m 27 24' 7.3m
5 LBS. 24 16 16' 4.9m 22 20' 6.1m 30 30' 9.1m 30 24' 7.3m
6 LBS. 29 18 16' 4.9m 25 20' 6.1m 23 = 2 pass 30' 9.1m 25 = 2 pass 24' 7.3m
7 LBS. 34 20 16' 4.9m 27 20' 6.1m 25 = 2 pass 30' 9.1m 26 = 2 pass 24' 7.3m
8 LBS. 39 21 16' 4.9m 29 20' 6.1m 28 = 2 pass 30' 9.1m 27 = 2 pass 24' 7.3m
9 LBS. 44 23 16' 4.9m 30 20' 6.1m 29 = 2 pass 30' 9.1m 29 = 2 pass 24' 7.3m
10 LBS. 49 24 16' 4.9m 22 = 2 pass 20' 6.1m 30 = 2 pass 30' 9.1m 30 = 2 pass 24' 7.3m
GRASS SEED
 GRAMS PER FINE SPREAD SPREAD COARSE SPREAD SPREAD
 SQUARE METER SETTING WIDTH FT METERS SETTING WIDTH FT METERS
2 LBS. 10 15 9' 2.7m 21 15' 4.6m
3 LBS. 15 18 9' 2.7m 24 15' 4.6m
4 LBS. 20 21 9' 2.7m 27 15' 4.6m
5 LBS. 25 24 9' 2.7m 30 15' 4.6m
GRANULAR MATERIAL
PARTICLE SIZES:
Fine/Small
Medium
Large
EXTRA LARGE
(SAND) (HALF BB) (BB) ROCK SALT
 GRAMS PER SPREAD SPREAD SPREAD SPREAD SPREAD SPREAD SPREAD SPREAD
 SQUARE METER SETTING WIDTH FT METERS SETTING WIDTH FT METERS SETTING WIDTH FT METERS SETTING WIDTH FT METERS
1 LB. 5 3 16' 4.9m 5 22' 6.7m 7 28' 8.5m 8 26' 7.9m
2 LBS. 10 5 16' 4.9m 6 22' 6.7m 10 28' 8.5m 11 26' 7.9m
3 LBS. 15 6 16' 4.9m 8 22' 6.7m 12 28' 8.5m 13 26' 7.9m
4 LBS. 20 7 16' 4.9m 9 22' 6.7m 14 28' 8.5m 14 26' 7.9m
5 LBS. 24 8 16' 4.9m 11 22' 6.7m 15 28' 8.5m 15 26' 7.9m
6 LBS. 29 10 16' 4.9m 13 22' 6.7m 17 28' 8.5m 16 26' 7.9m
7 LBS. 34 11 16' 4.9m 15 22' 6.7m 20 28' 8.5m 17 26' 7.9m
8 LBS. 39 12 16' 4.9m 16 22' 6.7m 21 28' 8.5m 18 26' 7.9m
9 LBS. 44 13 16' 4.9m 17 22 6.7m 23 28' 8.5m 19 26' 7.9m
10 LBS. 49 14 16' 4.9m 18 22' 6.7m 24 28' 8.5m 21 26' 7.9m
GRASS SEED
 GRAMS PER FINE SPREAD SPREAD COARSE SPREAD SPREAD
 SQUARE METER SETTING WIDTH FT METERS SETTING WIDTH FT METERS
2 LBS. 10 7 10' 3m 11 15' 4.6m
3 LBS. 15 9 10' 3m 14 15' 4.6m
4 LBS. 20 11 10' 3m 16 15' 4.6m
5 LBS. 25 13 10' 3m 18 15' 4.6m
HIGH-OUTPUT Blue Tray
FLEX-SELECT
®
BROADCAST SPREADER SETTING MATRIX
STANDARD-OUTPUT Red Tray
LOW-OUTPUT Black Tray
Calibration: Start by ensuring that your spreader calibration is
correct. Make sure the drop holes in the Standard-Output
Tray are fully open when the Rate Control handle is on #30. If
not, please adjust control rod at the pivot to allow for a full open
hopper holes with the handle at position at #30.
Calibration: Start by ensuring that your spreader calibration is
correct. Make sure the drop holes in the
LOW-OUTPUT TRAY
are when the Rate Control Handle is resting on the
. If not, please adjust control rod at the pivot to ensure
the shut-off is with the handle at position at #0.
Move the spreader slightly to confirm the calibration because of
the cam.
Calibration: Start by ensuring that your spreader calibration is
correct. Make sure the drop holes in the HIGH-OUTPUT TRAY
are when the Rate Control Handle is resting on the
. If not, please adjust control rod at the pivot to ensure
the shut-off is with the handle at position at #0.
Move the spreader slightly to confirm the calibration because of
the cam.
  • Page 1 1
  • Page 2 2
  • Page 3 3
  • Page 4 4
  • Page 5 5
  • Page 6 6
  • Page 7 7
  • Page 8 8
  • Page 9 9
  • Page 10 10
  • Page 11 11
  • Page 12 12
  • Page 13 13
  • Page 14 14
  • Page 15 15

EarthWay F80PD Owner's manual

Type
Owner's manual

Ask a question and I''ll find the answer in the document

Finding information in a document is now easier with AI