Page is loading ...

INSTALLATION, OPERATION & MAINTENANCE INSTRUCTIONS
CAST STEEL FLANGED
GATE, GLOBE, & CHECK VALVES
DOC: IOM_FNWFGGC_ ver_12-2007 Page 1 of 15
INTRODUCTION
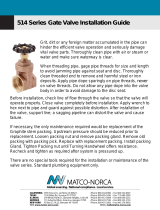
This instruction manual includes storage, installation, operation and maintenance information for cast steel
flanged gate, globe, and check valves. This manual addresses class 150 and 300 pound bolted bonnet, outside
screw and yoke, carbon and stainless steel valves. Only standard manual valves are addressed. For other
options and accessories, consult their individual manuals.
STORAGE
Be careful not to damage the valve stems during handling. In case the valves are rack mounted for storage, their
packing chambers should not come into direct contact with the racks. Placing valves directly on the ground or on
concrete floors is not recommended.
Temporary Storage
If valves are to be temporarily stored prior to installation, the following should be observed.
1. Keep the valves wrapped and protected at all times.
2. Preferably, store the valves in a dust-free and well ventilated place with low humidity.
3. If stored outside, make sure that the valves are well protected from the environment and positioned so
that water does not accumulate on or in the valve.
4. Protective end coverings are shipped with the valve to protect against mechanical damage and
prevention of dust and foreign object intrusion. If the end covers are found missing during transit, apply
an adequate type of end protector immediately.
5. Valves should be kept in the close position.
Long Term Storage
If the valves are to be stored for more than one year, they should be prepared as above but include the following:
1. Do not store the valves outdoors.
2. Remove the packing and apply a preservative to the packing well.
3. Annually, perform the following:
a. Lubricant may be lost or reduced from the stem threads or grease nipples. Apply lubricant to
these exposed areas.
b. Remove the end protectors and apply a rust prevention spray to the valve interior. Reinstall the
end protectors.
c. As needed, apply a protective surface coating to the valve exterior. Be sure the surface area is
clean before applying protective spray.
INSTALLATION
WARNING
To avoid personal injury to your self, fellow workers, or damage to property from release of process fluid, before
installation:
a. Shut off all operating lines to the valve site
b. Isolate the valve site completely from the process
c. Release process pressure
d. Drain the process fluid from the valve site
1. If the valve was supplied with an actuator, secondary support may be necessary. Contact FNW for
recommendations.
2. Remove the valve end protectors.

INSTALLATION, OPERATION & MAINTENANCE INSTRUCTIONS
CAST STEEL FLANGED
GATE, GLOBE, & CHECK VALVES
DOC: IOM_FNWFGGC_ ver_12-2007 Page 2 of 15
3. Before installing the valve, inspect the valve body port and associated equipment for any damage that may
have occurred and for any foreign matter that may have collected in shipping or storage. Make certain the
body interior is clean by blowing compressed air into the valve.
4. Before installing the valve, inspect the pipe line and mating flanges, making sure the pipe is free of foreign
material and the flanges are clean and have no burrs or pits that could cause leakage.
5. A preservative may have been applied to the interior of the valve prior to shipment. If necessary, this
preservative can be removed with a solvent.
6. Ensure that the connecting pipe has adequate support. Improper support can lead to valve distortion,
inefficient operation, or early maintenance problems.
7. When installing globe and check valves, ensure that the flow indicator arrow on the valve is pointing in the
correct direction of pipe flow.
8. When installing gate and globe valves, make sure there is sufficient space around the hand wheel to easily
and safely operate the valve and that there is adequate space for the stem to rise when the valve is opened.
9. Make sure that the bolting and gasket materials are compatible with the valve’s body material and pressure
rating.
10. With proper support, align the valve flange holes with the pipe flange holes.
11. For Ring Gaskets, Insert two to four bolts through the lowest bolt holes.
12. Insert and center the appropriate gasket between the flanges. For Ring Gaskets, use the inserted bolts to
center the gasket.
13. Insert all bolts and nuts and hand tighten. Care should be taken to ensure flanges are parallel.
14. Using the cross-over pattern (star pattern), evenly tighten each bolt to ensure uniform gasket loading. The
ends of the tightened bolts should protrude equally beyond each nut (see Figure 5).
15. After installing the valve, recheck all bolts and nuts of the coupled flanges and retighten them if found loose.
OPERATION
1. Gate valves are not designed for throttling (modulating) service and should be used in the open or closed
position. Prolonged use in the partially open or closed position may result in the erosion of the wedge and/or
seat. This position may also cause a “chatter” noise in the line or cause damage to the valve.
2. For Gate and Globe valves, turn the hand wheel counter-clockwise to open the valve. Turn the hand wheel
clockwise to close the valve. Do not use pipe extensions (cheater bars) to operate the valve as this may
damage seat surfaces, yoke, or stem. For larger valves, consider gear-operators or other means of actuation.
3. For Gate and Globe valves, on a new valve or a valve that has had new packing installed, the hand wheel
torque may be relatively high. This high torque will diminish to a reasonable level after the valve has been
operated several times. Hand wheel operating torque also depends on the type and size of each valve and
its position. Note that the operating torque is high when opening a fully closed valve or when closing the
valve and near the end of valve travel.
4. For Gate valves, after closing a valve completely, it is recommended that the hand wheel be turned back
about 90°. This turn back is particularly important in high temperature services where stress can build up due
to thermal expansion. It also makes the valve opening easier and smoother.

INSTALLATION, OPERATION & MAINTENANCE INSTRUCTIONS
CAST STEEL FLANGED
GATE, GLOBE, & CHECK VALVES
DOC: IOM_FNWFGGC_ ver_12-2007 Page 3 of 15
5. For Gate and Globe valves, sometimes material in the line can get stuck between the disc and seating area.
Should this happen, re-open the valve to allow the process fluid to clear the material. If the condition persists,
it may be necessary to shut down the line and inspect the interior of the valve.
6. Check valves are a process operated device. The valve will begin opening when upstream pressure is
appropriately higher than downstream pressure. When upstream and down stream pressures equalize, or
when downstream pressure is higher than upstream pressure, the valve will close.
TROUBLESHOOTING
The following is intended as a guide only.
Trouble Probable Cause Remedy
Gland nuts are loose Tighten gland nuts
Gland is binding against the stem or
packing well wall
Check to insure that the gland is
centered and evenly tightened
Inadequate amount of packing rings Install additional packing rings
Packing is hard and dry Replace with new packing
Packing was not properly cut and
staggered
Replace with new packing
Leakage through the stem packing
Stem is damaged Repair or replace as required
Stem is binding during travel
Remove dirt and lubricate stem with
grease
Stem packing is exerting excessive
force on stem
Check torque on gland nuts
Stem is damaged
Examine stem through full open and
close action. Repair or replace as
required.
Hand wheel is difficult to turn
Internal components may be
damaged
Disassemble the valve. Inspect and
repair as needed.
Bonnet nuts are loose Tighten to values listed in Table 2
Bonnet gasket is damaged
Disassemble valve and install a new
gasket
Leakage from the bonnet
Bonnet flange faces are damaged
Repair damaged area and install a
new gasket
Valve is not properly seated
Check with hand wheel to see if the
valve is tightly closed
There is an obstruction between the
seat and disc
Open and close the valve a couple
times to see if the obstruction clears
Leakage past the seat
Internal components are damaged
or worn
Disassemble the valve, inspect
internal components, and repair or
replace as required
Table 1
INSPECTION
Valve parts are subject to normal wear and must be inspected and replaced as necessary. Inspection and
maintenance frequency depends on the severity of the service conditions.

INSTALLATION, OPERATION & MAINTENANCE INSTRUCTIONS
CAST STEEL FLANGED
GATE, GLOBE, & CHECK VALVES
DOC: IOM_FNWFGGC_ ver_12-2007 Page 4 of 15
Frequent Inspection
For safe, uninterrupted operation of valves, frequent inspection is recommended. Frequent inspection should
include:
1. Inspect for process fluid leakage from the packing gland area, flange connection, bonnet flange, threaded
area, through the valve body surface and any welded areas. Packing gland, flange, and bonnet flange leaks
should be addressed as outlined in the maintenance section. For leakage through the body surface or
welded areas, consult a valve repair specialist.
2. Listen for the presence of abnormal noise from the valve, possible loosened bolts, or pipeline vibration. With
frequent inspection, abnormal noise can better be distinguished from normal noise by familiarity. Loosened
bolts should be tightened immediately. Abnormal noise or pipeline vibration should be brought to the
attention of the pipeline engineer.
3. Visually confirm the valve’s correct operating position, that bolts are secure, and that there is adequate
lubrication around the stem. As stated in the operation section, the valve should be operated in the full open
or close position. Intermediate positioning is not recommended. Tighten any loose bolts immediately and
apply grease around stem if needed.
Periodic Inspection
Inspection of the valve should be made periodically to detect wear of the body seats, disc or stem, corrosion of
the valve body or bonnet interior and wear of the threads. Usually, packing and gaskets are replaced during
periodic inspections as part of a basic maintenance program. Periodic inspection should include the following
which are described in greater detail in the maintenance section:
1. Valve disassembly
2. Examination of valve components
3. Component repair and/or replacement
4. Valve reassembly
5. Test and inspections
MAINTENANCE
Valve parts are subject to normal wear and must be inspected and replaced as necessary. Inspection and
maintenance frequency depends on the severity of the service conditions.
WARNING
To avoid personal injury to your self, fellow workers, or damage to property from release of process fluids, before
performing any maintenance:
a. Shut off all operating lines to the valve.
b. Isolate the valve completely from the process.
c. Release process pressure.
d. Drain the process fluid from the valve.
Preliminary
Prior to removal from the pipeline, mark the edges of the valve and pipeline flanges so that the valve can be
returned to its original position. If multiple valves are to be inspected and they are not already tagged, number the
valve and flange for proper match-up after maintenance. Remove and collect residual objects from the valve, if
any, and note their location so that they may be returned to their proper position.

INSTALLATION, OPERATION & MAINTENANCE INSTRUCTIONS
CAST STEEL FLANGED
GATE, GLOBE, & CHECK VALVES
DOC: IOM_FNWFGGC_ ver_12-2007 Page 5 of 15
Disassembly and Assembly
GATE VALVES
For the following disassembly and assembly instructions, refer to Figure 6. Note: All gate valves may not have
the same components listed below. Consult the drawing for the specific valve series for correct bill of materials.
These steps assume the valve has already been removed from the pipeline.
Disassembly
1. Close the valve and then open two full hand wheel turn.
2. Remove the bonnet nuts (7) and bolts (8).
3. Mark the body (1) and bonnet (6) flanges so they can be matched up during assembly.
4. Lift the bonnet (6), stem (4), and disc (3) assembly out of the body (1) using care not to scratch any of the
seating surfaces. Mark the disc (3) and body (1) so that the disc can be returned in the same position.
5. Remove the bonnet gasket (5) from the valve.
6. Remove the disc (3) from the T-head of the stem (4). Be careful to protect the seating surfaces of the disc.
7. Unfasten the hand wheel nut (20). Remove the hand wheel (19) from the valve.
8. Unfasten the eye-bolt nuts (15) to loosen the gland flange (14). Pulling from below, remove the stem (4),
turning it counterclockwise. Be careful not to score or scratch the stem’s machined surface.
9. Remove the packing (10) using appropriate tools. Do not score or scratch the packing well.
Assembly
1. Thoroughly clean the valve interior and all components. Remove all scale, oil, grease or other foreign
material. Wipe the seating surface of the disc (3) and valve seat (2) with a solvent soaked cloth. Clean the
body (1) and bonnet (6) flange surfaces and all nuts and bolts.
2. Install the stem (4) carefully, sliding it through the bonnet (6) packing well, gland (13), and gland flange (14)
until the threads are engaged with the yoke sleeve (17). Slowly rotate the stem clockwise until it extends
beyond the bonnet (6).
3. Place the hand wheel (19) on to the valve and secure with the hand wheel nut (20).
4. Position a new bonnet gasket (5) on the body’s (1) bonnet flange, aligning the holes in gasket and body. The
gasket should not extend over the open body cavity. The gasket may be coated with light oil. DO NOT
REUSE GASKETS.
5. Install the disc (3) on to the T-head of the stem (4).
6. Lift the bonnet (6), stem (4), and disc (3) assembly up and over the body. Check the location marks
previously made to align the bonnet (6) and body (1) and the disc (3) and body (1) properly. Carefully lower
the assembly until the body (1) and bonnet (6) flange marks meet. Again, caution must be used to prevent
scoring or scratching of the seating surfaces. Keeping the bonnet (6) stationary, open the valve a few turns to
ensure the disc (3) is not touching the seat (2).
7. Line up the body (1) and bonnet (6) holes. Make sure the gasket (5) does not extend into any of the bolt
holes.
8. Install the bonnet bolting (8) and nuts (7) and tighten in a cross-over pattern (see Figure 5) to evenly load the
gasket (5) to the appropriate torque value listed in Table 2.
9. Install new packing (10) per instructions in section “Stem Packing Replacement”.
10. Align and center the packing gland (13) in the packing well.
11. Holding the eye bolts (12) up, lower the gland flange (14) over the packing gland (13).
12. Install the eye bolt nuts (15) and alternate tightening with no more than a quarter turn on each until hand tight.
With a wrench, tighten the eye bolt nuts at least 1/2 to 3/4 turns more.
13. Open and close the valve using the hand wheel (19). The action should be smooth and regular through full
stem travel.

INSTALLATION, OPERATION & MAINTENANCE INSTRUCTIONS
CAST STEEL FLANGED
GATE, GLOBE, & CHECK VALVES
DOC: IOM_FNWFGGC_ ver_12-2007 Page 6 of 15
GLOBE VALVES
For the following disassembly and assembly instructions, refer to Figure 7. Note: All globe valves may not have
the same components listed below. Consult the drawing for the specific valve series for correct bill of materials.
These steps assume the valve has already been removed from the pipeline.
Disassembly
1. Close the valve and then open two full hand wheel turn.
2. Remove the bonnet nuts (8) and bolts (7).
3. Mark the body (1) and bonnet (13) flanges so they can be matched up during assembly.
4. Lift the bonnet (13), stem (6), and disc (3) assembly out of the body (1) using care not to scratch any of the
seating surfaces.
5. Remove the bonnet gasket (9) from the valve.
6. Remove the disc (3) from the stem (6) by cutting tack welds and unthreading the disc nut (5). Note the
location and quantity by marking the disc nut. This information will be used during assembly. Be careful to
protect the seating surfaces of the disc.
7. Unfasten the hand wheel nut (22). Remove the backing ring (23) and hand wheel (21) from the valve.
8. Unfasten the eye-bolt nuts (18) to loosen the gland flange (16). Pulling from below, remove the stem (6),
turning it counterclockwise. Be careful not to score or scratch the stem’s machined surface.
9. Remove the packing (12) using appropriate tools. Do not score or scratch the packing well.
Assembly
1. Thoroughly clean the valve interior and all components. Remove all scale, oil, grease or other foreign
material. Wipe the seating surface of the disc (3) and valve seat (2) with a solvent soaked cloth. Clean the
body (1) and bonnet (13) flange surfaces and all nuts and bolts.
2. Install the stem (6) carefully, sliding it through the bonnet (13) packing well, gland (15), and gland flange (16)
until the threads are engaged with the yoke sleeve (19). Slowly rotate the stem clockwise until it extends
beyond the bonnet (13).
3. Place the hand wheel backing ring (23) and hand wheel (21) on to the valve and secure with the hand wheel
nut (22).
4. Position a new bonnet gasket (9) on the body’s (1) bonnet flange, aligning the holes in gasket and body. The
gasket should not extend over the open body cavity. The gasket may be coated with light oil. DO NOT
REUSE GASKETS.
5. Install the disc (3) on to the stem (6) by screwing the disc nut (5) down. Using the marked information on the
disc nut from disassembly, tack weld the disc and disc nut assembly to secure it.
6. Lift the bonnet (13), stem (6), and disc (3) assembly up and over the body. Check the location marks
previously made to align the bonnet (13) and body (1) properly. Carefully lower the assembly until the body
(1) and bonnet (13) flange marks meet. Again, caution must be used to prevent scoring or scratching of the
seating surfaces. Keeping the bonnet (13) stationary, open the valve a few turns to ensure the disc (3) is not
touching the seat (2).
7. Line up the body (1) and bonnet (13) holes. Make sure the gasket (9) does not extend into any of the bolt
holes.
8. Install the bonnet bolting (7) and nuts (8) and tighten in a cross-over pattern (see Figure 5) to evenly load the
gasket (9) to the appropriate torque value listed in Table 2.
9. Install new packing (12) per instructions in section “Stem Packing Replacement”.
10. Align and center the packing gland (15) in the packing well.
11. Holding the eye bolts (17) up, lower the gland flange (16) over the packing gland (15).
12. Install the eye bolt nuts (18) and alternate tightening with no more than a quarter turn on each until hand tight.
With a wrench, tighten the eye bolt nuts at least 1/2 to 3/4 turns more.
13. Open and close the valve using the hand wheel (21). The action should be smooth and regular through full
stem travel.

INSTALLATION, OPERATION & MAINTENANCE INSTRUCTIONS
CAST STEEL FLANGED
GATE, GLOBE, & CHECK VALVES
DOC: IOM_FNWFGGC_ ver_12-2007 Page 7 of 15
BOLTED COVER SWING CHECK VALVES
For the following disassembly and assembly instructions, refer to Figure 8. Note: All swing check valves may not
have the same components listed below. Consult the drawing for the specific valve series for correct bill of
materials. These steps assume the valve has already been removed from the pipeline.
Disassembly
1. Unfasten the cover nuts (14) and remove the cover bolts (13).
2. Lift the cover (15) off the body (1).
3. Remove the gasket (12) from the valve body (1).
4. If the disc (3) is internally hung, remove hex bolt (11) and washer (10) by cutting tack weld. For valves with a
side plug, remove the plug (17) and spring washer (18).
5. While supporting the disc (3) and hinge arm (7), remove the hinge pin (8).
6. Lift the disc (3) assembly out of the body (1). Be careful not to scratch any of the seating surfaces.
7. To remove the hinge arm (7) from the disc (3), remove the cotter pin (5) and unfasten the disc nut (6).
Assembly
1. Thoroughly clean the valve interior and all components. Remove all scale, oil, grease or other foreign
material. Wipe the seating surface of the disc (3) and valve seat (2) with a solvent soaked cloth. Clean the
body (1) and cover (15) flange surfaces and all nuts and bolts.
2. Attached the hinge arm (7) to the disc (3) securing it with the disc nut (6). Secure the disc nut with a new
cotter pin (5). If the old pin is in good condition, it can be reused, however a new pin is always recommended.
3. Lift the disc (3) assembly into the body (1), again, being careful not to scratch the seating surfaces. While
supporting the assembly, insert the hinge pin (8).
4. If the disc (3) is internally hung, install washer (10) and bolt (11) and secure with tack weld. For valves with a
side plug, install the spring washer (18) and plug (17).
5. Open the valve by lifting the hinge arm (7). The action should be smooth and regular through the full hinge
pin (8) rotation.
6. Position a new gasket (12) on the body’s (1) cover flange, aligning the holes in gasket and body. The gasket
should not extend over the open body cavity. The gasket may be coated with light oil. DO NOT REUSE
GASKETS.
7. Line up the body (1) and cover (15) holes. Make sure the gasket (12) does not extend into any of the bolt
holes.
8. Install the cover bolts (13) and nuts (14) and tighten in a cross-over pattern (see Figure 5) to evenly load the
gasket (12) to the appropriate torque value listed in Table 2.

INSTALLATION, OPERATION & MAINTENANCE INSTRUCTIONS
CAST STEEL FLANGED
GATE, GLOBE, & CHECK VALVES
DOC: IOM_FNWFGGC_ ver_12-2007 Page 8 of 15
Stem Packing Replacement
WARNING
To avoid personal injury to your self, fellow workers, or damage to property from release of process fluids, ensure
that all pressure is removed from the valve both upstream and downstream before disassembly.
1. Check the original tightness of the valve operation. Remove the eye bolt nuts. Lift the gland flange and gland
up the stem, clear of the packing well and loosely tie them off with string or wire (see Figure 1).
2. Remove the existing packing rings with a sharp tool or packing remover such as a flexible cork screw tool.
Do not scratch or score the machined surface of the stem or packing well with the tool.
3. Examine the stem and packing well. Any burrs, scoring or scratches should be removed with emery cloth or
hand filing. Clean the stem with a solvent soaked rag.
4. Count the original number of packing rings and measure their cross-section thickness. If the original packing
can not be counted or measured, use the following calculation. If no such packing is available, slightly thicker
packing can be used. Do not use thinner packing:
a. Measure the stem diameter (OD), packing well diameter (ID), and packing well depth (d).
b. The packing’s cross-section thickness (R) = (ID – OD)/2
c. The quantity of packing rings # = (1.25 x d)/R
5. Install the new packing. Cut each ring at a 45 degree angle (see Figure 2) and proper length so that the ends
meet each other. Stagger the joints at 120 degree. Every 4
th
joint will be in the same position as the first.
Install rings individually (see Figure 3). Tamp each ring when installed.
6. When the packing well is full, reassemble the gland, gland flange, and eye bolt nuts. Alternate tightening of
the eye bolt nuts a quarter turn at a time until the eye bolts begin to get tight. If the gland travels more than
the height of one packing ring into the packing well, insert one more ring and repeat step 6 until the packing
well is full. Ideally, the gland should be 3 to 4 mm below the top of the packing well.
7. Compare the valve operation to the original tightness. If the valve operation is considerably tighter than the
original tightness, back the eye bolt nuts off 1/4 turn and recheck tightness.
8. Several hours after the repacked valve is returned to service, inspect the packing area to ensure full
compression, tight bolting, and no leakage.
9. Should there be a packing leak, turn the eye bolt nuts evenly at 1/4 turn increments until the leakage stops.
45° END CUT
Figure 2
EYE BOLT
GLAND
GLAND FLANGE
EYE BOLT NUTS
STEM
GRAPHITE PACKING TEFLON PACKING
JOINTS ARE
STAGGERED AT 120°
INTERVALS.
EVERY 4TH RING IS
IN THE SAME
POSITION.
BRAIDED END RING
BRAIDED END RING
DIE-FORMED RINGS
(3 minimum)
Figure 1 Figure 3

INSTALLATION, OPERATION & MAINTENANCE INSTRUCTIONS
CAST STEEL FLANGED
GATE, GLOBE, & CHECK VALVES
DOC: IOM_FNWFGGC_ ver_12-2007 Page 9 of 15
Lapping Procedures
Though valves may be lapped either in or out of the pipelines, we recommend valves be disassembled out of line
so lapping is easier and gives better service.
1. Carefully and thoroughly clean the part to be lapped.
2. Apply an adequate amount of lapping powder and vegetable oil mixture to the surfaces to be lapped.
3. While lapping, apply a pressure of 1 kgF/cm
2
to the lapping plate. Excessive surface pressure will make
lapping too fast and cause galling.
4. Lapping should be carried out until the whole surface is flat, showing even and tight contact. Do not keep
lapping the same place too long, as it may affect the flatness of the lapping plate.
5. After lapping, wipe the lapped area clean with a piece of cloth and carefully check the surface finish.
6. Apply inspection paste to a precision surface plate or a new lapping plate. Press and gently move it left and
right a few times against the lapped surface by 10 to 15 degrees and check the result of the lapping work.
7. Figure 4 shows the various methods for how the lapping plate should contact the valve parts for proper
lapping.
Lapping Wedge Gate Seat Lapping Wedge Gate Disc
Lapping Globe Valve Seat Lapping Swing Check Disc
Figure 4

INSTALLATION, OPERATION & MAINTENANCE INSTRUCTIONS
CAST STEEL FLANGED
GATE, GLOBE, & CHECK VALVES
DOC: IOM_FNWFGGC_ ver_12-2007 Page 10 of 15
Bolt Tightening Sequence
Figure 5

INSTALLATION, OPERATION & MAINTENANCE INSTRUCTIONS
CAST STEEL FLANGED
GATE, GLOBE, & CHECK VALVES
DOC: IOM_FNWFGGC_ ver_12-2007 Page 11 of 15
Bonnet Bolting Torques (Ft-Lbs)
Bolt
Diameter
Alloy
Steel
Stainless
Steel
1/4 4 1.5
5/6 8 3
3/8 12 5
7/16 20 8
1/2 30 12
9/16 45 18
5/8 60 24
3/4 110 44
7/8 170 68
1 260 104
1-1/8 375 150
1-1/4 525 210
1-3/8 715 286
1-1/2 925 370
1-5/8 1200 480
1-3/4 1500 600
1-7/8 1850 740
2 2260 904
Table 2

INSTALLATION, OPERATION & MAINTENANCE INSTRUCTIONS
CAST STEEL FLANGED
GATE, GLOBE, & CHECK VALVES
DOC: IOM_FNWFGGC_ ver_12-2007 Page 12 of 15
General Construction Drawing – Gate Valve
Figure 6

INSTALLATION, OPERATION & MAINTENANCE INSTRUCTIONS
CAST STEEL FLANGED
GATE, GLOBE, & CHECK VALVES
DOC: IOM_FNWFGGC_ ver_12-2007 Page 13 of 15
General Construction Drawing – Globe Valve
Figure 7

INSTALLATION, OPERATION & MAINTENANCE INSTRUCTIONS
CAST STEEL FLANGED
GATE, GLOBE, & CHECK VALVES
DOC: IOM_FNWFGGC_ ver_12-2007 Page 14 of 15
General Construction Drawing – Swing Check Valve
Figure 8

INSTALLATION, OPERATION & MAINTENANCE INSTRUCTIONS
CAST STEEL FLANGED
GATE, GLOBE, & CHECK VALVES
DOC: IOM_FNWFGGC_ ver_12-2007 Page 15 of 15
WARRANTY
1. LIMITED WARRANTY: Subject to the limitations expressed herein, Seller warrants that products
manufactured by Seller shall be free from defects in design, material and workmanship under normal use for
a period of one (1) year from installation but in no case shall the warranty period extend longer than eighteen
months from the date of sale. This warranty is void for any damage caused by misuse, abuse, neglect, acts of
God, or improper installation. For the purpose of this section, “Normal Use” means in strict accordance with
the installation, operation and maintenance manual. The warranty for all other products is provided by the
original equipment manufacturer.
2. REMEDIES: Seller shall repair or replace, at its option, any non-conforming or otherwise defective product,
upon receipt of notice from Buyer during the Manufacturer’s warranty period at no additional charge. SELLER
HEREBY DISCLAIMS ALL OTHER EXPRESSED OR IMPLIED WARRANTIES, INCLUDING, WITHOUT
LIMITATION, ALL IMPLIED WARRANTIES OF MERCHANTABILITY AND FITNESS OR FITNESS FOR A
PARTICULAR PURPOSE.
3. LIMITATION OF LIABILITY: UNDER NO CIRCUMSTANCES SHALL EITHER PARTY BE LIABLE TO THE
OTHER FOR INCIDENTAL, PUNITIVE, SPECIAL OR CONSEQUENTIAL DAMAGES OF ANY KIND.
BUYER HEREBY ACKNOWLEDGES AND AGREES THAT UNDER NO CIRCUMSTANCES, AND IN NO
EVENT, SHALL SELLER'S LIABILITY, IF ANY, EXCEED THE NET SALES PRICE OF THE DEFECTIVE
PRODUCT(S) PURCHASED DURING THE PREVIOUS CONTRACT YEAR.
4. LABOR ALLOWANCE: Seller makes NO ADDITIONAL ALLOWANCE FOR THE LABOR OR EXPENSE OF
REPAIRING OR REPLACING DEFECTIVE PRODUCTS OR WORKMANSHIP OR DAMAGE RESULTING
FROM THE SAME.
5. RECOMMENDATIONS BY SELLER: Seller may assist Buyer in selection decisions by providing information
regarding products that it manufacturers and those manufactured by others. However, Buyer acknowledges
that Buyer ultimately chooses the product’s suitability for its particular use, as normally signified by the
signature of Buyer’s technical representative. Any recommendations made by Seller concerning the use,
design, application or operation of the products shall not be construed as representations or warranties,
expressed or implied. Failure by Seller to make recommendations or give advice to Buyer shall not impose
any liability upon Seller.
6. EXCUSED PERFORMANCE: Seller will make a good faith effort to complete delivery of the products as
indicated by Seller in writing, but Seller assumes no responsibility or liability and will accept no back-charge
for loss or damage due to delay or inability to deliver, caused by acts of God, war, labor difficulties, accidents,
inability to obtain materials, delays of carriers, contractors or suppliers or any other causes of any kind
whatever beyond the control of Seller. Under no circumstances shall Seller be liable for any special,
consequential, incidental, or indirect damages, losses, or expense (whether or not based on negligence)
arising directly or indirectly from delays or failure to give notice of delay.
/