Sealey PC35230V User manual

Category
Vacuum cleaners
Type
User manual

Sealey PC35230V is a high-powered industrial vacuum cleaner with M class filtration. Suitable for hazardous dusts with an exposition limit value ≥0.1mg/m3, it's ideal for use with 230V power tools. Features a 2000W electronically controlled power tool outlet, self-cleaning filter technology, and includes a range of accessories for both wet and dry vacuuming.

Sealey PC35230V is a high-powered industrial vacuum cleaner with M class filtration. Suitable for hazardous dusts with an exposition limit value ≥0.1mg/m3, it's ideal for use with 230V power tools. Features a 2000W electronically controlled power tool outlet, self-cleaning filter technology, and includes a range of accessories for both wet and dry vacuuming.

Thank you for purchasing a Sealey product. Manufactured to a high standard, this product will, if used according to these instructions,
and properly maintained, give you years of trouble free performance.
IMPORTANT: PLEASE READ THESE INSTRUCTIONS CAREFULLY. NOTE THE SAFE OPERATIONAL REQUIREMENTS, WARNINGS & CAUTIONS. USE
THE PRODUCT CORRECTLY AND WITH CARE FOR THE PURPOSE FOR WHICH IT IS INTENDED. FAILURE TO DO SO MAY CAUSE DAMAGE AND/OR
PERSONAL INJURY AND WILL INVALIDATE THE WARRANTY. KEEP THESE INSTRUCTIONS SAFE FOR FUTURE USE.
PC35230V Issue 4 (1,F) 07/06/21
Original Language Version
© Jack Sealey Limited
35L WET & DRY INDUSTRIAL VACUUM CLEANER PLASTIC
DRUM M CLASS FILTRATION SELF-CLEAN & AUTO START
MODEL NO: PC35230V
1. SAFETY
1.1. ELECTRICAL SAFETY
WARNING! It is the user’s responsibility to check the following:
Check all electrical equipment and appliances to ensure that they are safe before using. Inspect power supply leads, plugs and
all electrical connections for wear and damage. Sealey recommend that an RCD (Residual Current Device) is used with all electrical
products. You may obtain an RCD by contacting your local Sealey stockist.
If the product is used in the course of business duties, it must be maintained in a safe condition and routinely PAT (Portable
Appliance Test) tested.
Electrical safety information, it is important that the following information is read and understood.
Ensure that the insulation on all cables and on the appliance is safe before connecting it to the power supply.
Regularly inspect power supply cables and plugs for wear or damage and check all connections to ensure that they are secure.
Important: Ensure that the voltage rating on the appliance suits the power supply to be used and that the plug is tted with the
correct fuse - see fuse rating in these instructions.
8 DO NOT pull or carry the appliance by the power cable.
8 DO NOT pull the plug from the socket by the cable.
8 DO NOT use worn or damaged cables, plugs or connectors. Ensure that any faulty item is repaired or
is replaced immediately by a qualied electrician.
This product is tted with a BS1363/A 13 Amp 3 pin plug.
If the cable or plug is damaged during use, switch off the electricity supply and remove from use.
Ensure that repairs are carried out by a qualied electrician.
Replace a damaged plug with a BS1363/A 13 Amp 3 pin plug. If in doubt contact a qualied electrician.
a) Connect the GREEN/YELLOW earth wire to the earth terminal ‘E’.
b) Connect the BROWN live wire to the live terminal ‘L’.
c) Connect the BLUE neutral wire to the neutral terminal ‘N’.
Ensure that the cable outer sheath extends inside the cable restraint and that the restraint is tight.
Sealey recommend that repairs are carried out by a qualied electrician.
1.2. GENERAL SAFETY
9 Safety precautions must be observed to avoid injuries and damage. Read
the complete operating manual carefully. Keep this manual in a safe place so that the information is always available to ANY users of
the equipment.
9 Never leave the appliance switched on unattended. If the operator leaves the work area, switch the appliance off or unplug it from the
power supply.
8 DO NOT vacuum or use this vacuum cleaner near ammable liquids, gases or explosive vapours like gasoline or other fuels,
lighter uids, cleaners, oil-based paints, natural gas, hydrogen, or explosive dusts like coal dust, magnesium dust, grain dust or gun
power. Sparks inside the motor can ignite ammable vapours or dust.
9 This vacuum cleaner is not suitable for the vacuuming of asbestos or asbestos dust.
8 DO NOT vacuum anything that is burning or smoking, such as cigarettes, matches, or hot ashes.
9 Ensure the hose and connections are always pointed away from the users face, hair, ears and eyes during operation and never direct
the nozzle towards persons or animals.
9 Clear the working area of any items or possessions that do not need to be vacuumed before using equipment
9 Keep mains cable away from heated surfaces.
8 DO NOT expose to rain. Store indoors.
8 DO NOT unplug by pulling on the mains cable. To unplug, grasp the plug, not the cable.
8 DO NOT use with damaged cord, plug or other parts.
8 DO NOT pull or carry by cable, use cable as handle, close a door on the cable, or pull cable around sharp edges or corners.
9 If the supply cord is damaged, it must be replaced by the manufacturer, a qualied service agent or similarly qualied persons in order
to avoid a hazard.
8 DO NOT handle the plug or vacuum cleaner with wet hands.
9 Frequently check that the oat valve positioned underneath the motor is able to move freely.
8 DO NOT use this vacuum cleaner with a torn lter or without the lter installed.
Refer to
instruction
manual
Vacuum cleaners of dust category M
according to IEC/EN 60335-2-69 for
dry vacuuming of hazardous dusts
with an exposition limit value ≥0.1
mg/m3
.
Wear protective
clothing
Wear a P-2
respirator when
changing bags,
filter or
cartridges
Recommended fuse rating
13 Amp
8 DO NOT allow to be used as a toy. Close attention is necessary when used by or near children.
WARNING! To reduce the risk of injury from accidental starting, unplug power cord before changing or cleaning lter.
WARNING! Unplug from power supply when not in use and before carrying out maintenance.
8 DO NOT cover the ventilation openings. DO NOT vacuum with any ventilation openings blocked; keep free of dust, lint, hair or
anything that may reduce air ow.
9 Keep hair, loose clothing, ngers, all parts of body away from openings and moving parts.
9 This machine is not intended for use by persons (including children) with reduced physical, sensory or mental capabilities, or lack of
experience and knowledge. Children shall not play with the appliance. Cleaning and user maintenance shall not be made by children
without supervision. For additional protection: It is recommended that this vacuum cleaner can be used in conjunction with residual
current device (RCD) with a rated residual current of 30mA or less.
9 Only use the socket outlet on the machine for purposes specied in the instructions.
9 If foam or liquid escapes from the machine, switch off immediately.
9 Check the oat valve regularly to ensure it is moving freely and examine it for signs of damage.
9 Precautions should be taken when changing attachments.
9 For user servicing, the machine must be dismantled, cleaned and serviced, as far as is reasonably practicable, without causing risk to
the maintenance staff and others. Suitable precautions include decontamination before dismantling.
9 Provision must be made for local ltered exhaust ventilation where the machine is dismantled, cleaning of the maintenance area and
suitable personal protection must be worn whilst carrying out these tasks.
9 Perform a technical inspection at least annually, consisting of, for example, inspection of lters for damage, air tightness of the
machine and proper function of the control mechanism.
9 Besides the operating instructions and the binding accident prevention regulations valid in the country of use, observe recognized
regulations for safety and proper use.
9 When dust removers are used, the rate at which air is exchanged in the room must be adequate if the exhaust air from the vacuum
cleaner is blown into the room (please observe regulations valid in the country of use).
9 Before starting work, the operating staff must be informed on:
- use of the vacuum cleaner
- risks associated with the material to be picked up
- safe disposal of the picked up material.
9 Before transporting the collection tank, close all the locks.
8 DO NOT tilt the cleaner if there is liquid in the collection tank.
8 DO NOT use a crane hook to lift the cleaner.
9 For class M machines, the outside of the machine should be decontaminated and wiped clean or treated with sealant before being
taken out of a hazardous area. All the machine parts shall be regarded as contaminated when removed from the hazardous area and
appropriate action taken to prevent dust dispersal.
If an extension reel is used it should be fully unwound before connection. A reel with an RCD fitted is preferred since any appliance
plugged into it will be protected. The cable core section is important and should be at least 1.5mm², but to be absolutely sure that the
capacity of the reel is suitable for this product and for others which may be used in the other output sockets, we recommend the use
of 2.5mm² section cable. If an extension reel is to be used outdoors, ensure it is marked for outdoor use.
WARNING! The warnings, cautions and instructions in this manual cannot cover all possible conditions and situations that
may occur. It must be understood by the operator that common sense and caution are factors which cannot be built into
this product, but must be applied by the operator.
NOTE: This appliance can be used by children aged from 8 years and above and persons with reduced physical, sensory or
mental capabilities or lack of experience and knowledge if they have been given supervision or instruction concerning use
of the appliance in a safe way and understand the hazards involved. Children shall not play with the appliance. Cleaning and
user maintenance shall not be made by children without supervision.
2. INTRODUCTION
High powered unit designed for use with 230V power tools. Certied for M class dust extraction in accordance with EU regulations, which
protects the operator from dust particles hazardous to health. Supplied with Ø36mm exible hose, Ø45mm exible hose, crevice nozzle,
Multi-diameter tool adaptor, inserts for liquid collection and hard oors, power tool cord clamps, Class-M bag lter, Class-M cartridge lter and
foam lter. Can be set to continuous suction or in conjunction with a power tool via a 2000W rated electronically controlled outlet. Fitted with a
self-cleaning lter technology designed to prevent lter blockages whilst in use. Fitted with four castors for manoeuvrability.
3. SPECIFICATION
Model No: ............................................................... PC35230V
Motor Power: ................................................................. 1200W
Supply: ............................................................................. 230V
Maximum Vacuum Pressure:...................................... 240mbar
Air Flow: ..................................................................... 216m³/hr
Drum Size: ........................................................................... 35L
Weight: ...........................................................................10.5kg
Vac Accessories: ..........................................................Ø36mm
Power Tool Capacity: ..................................................... 2000W
4. CONTENTSc
4.1. Carton content
4.1.1. Unpack the carton carefully.
4.1.2. Locate the two side clasps which hold the motor housing in place.
4.1.3. Undo the clasps, remove the motor housing and take out the loose items from the drum.
4.1.4. Check and identify each component as listed below. If anything is missing or damaged please contact your Sealey stockist immediately.
Original Language Version
© Jack Sealey Limited
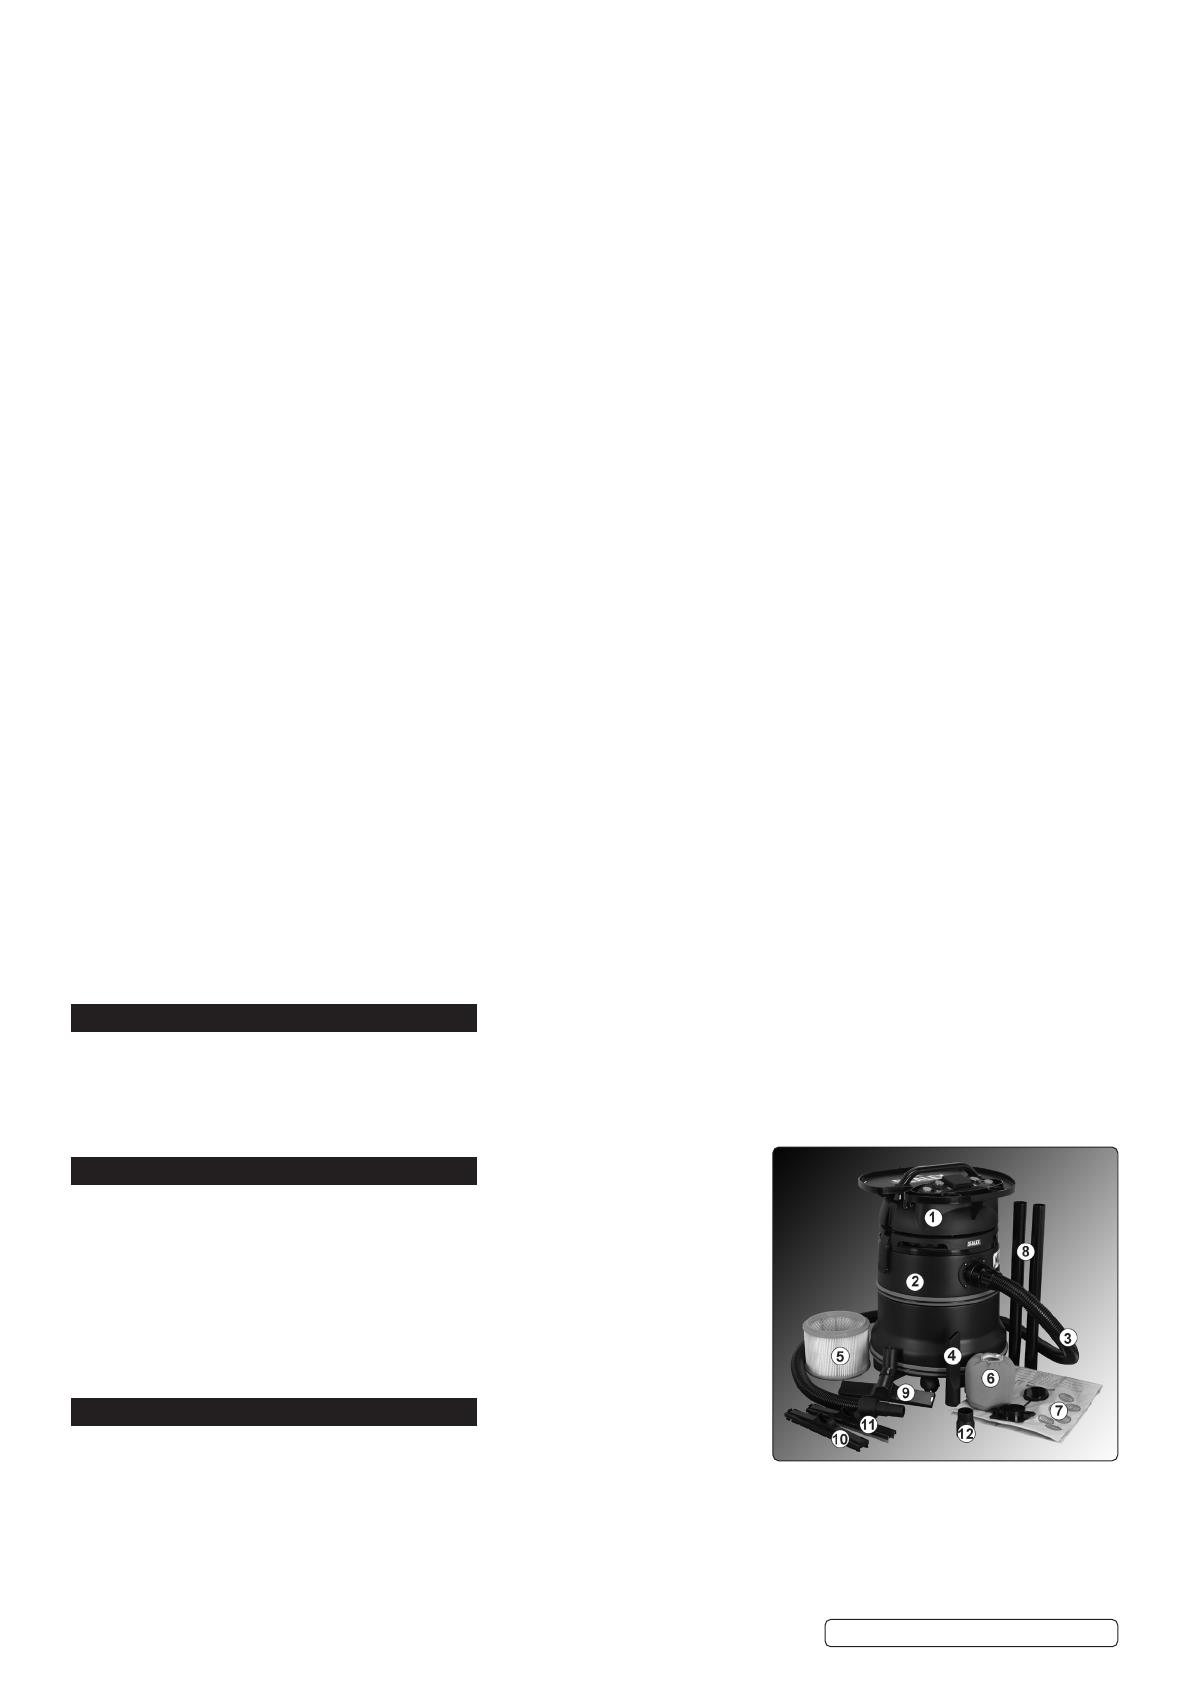
Drum Contents: (fig.1)
Item: Description.
1: Motor Housing.
2: Drum.
3: Ø36mm x 3m
Hose.
4: Crevice Nozzle.
5: Cartridge Filter.
6: Foam Filter.
7: Category M
Vacuum Bag.
8: Pick-up Tube (x2).
9: Swivel Nozzle.
10: Insert (hard floor).
11: Insert (wet floor).
12: Adaptor.
g.1
PC35230V Issue 4 (1,F) 07/06/21
5. ASSEMBLY
5.1. Ensure the electrical supply is disconnected.
5.2. Undo the clasps.
5.3. Lift off the motor housing assembly (fig.1).
5.4. For dry vacuum cleaning use the locking cartridge filter supplied.
5.5. For dry vacuum cleaning and containment use the vacuum bag supplied.
5.6. For wet vacuum cleaning fit the supplied foam filter.
NOTE: DO NOT operate the cleaner without a filter fitted as this will damage the vacuum cleaner and invalidate your warranty.
5.6. Replace the motor housing onto the container.
5.7. Align the motor housing with the clasps and snap closed by hooking the top of the clasp into the location in the motor housing and
pressing the handles down over centre.
6. CONTROLS
6.1. Function symbols
6.1.1. With a power tool connected, switch “B” in position “I” and selector switch “A” is in position , the self cleaning function is
initiated. When the power tool is switched off the vacuum cleaner will continue to run for 8/10 seconds, stop, then the self cleaning lter
function will run for 8/10 seconds and stop.
6.1.2. When the selector switch “A” is set to the self cleaning lter function is not active, that is: vacuum and power tool only.
6.1.3. When the warning light “C” illuminates, start the self cleaning lter manually by pressing the orange switch “D”.
NOTE: Continuous operation of the self cleaning system for more than 60 seconds may cause the thermal protection to trip,
resetting after 20 minutes. (For fuller lter cleaning see section 9.)
6.1.4. If the exhaust air speed drops below 20m/sec warning light “C” illuminates in accordance with IEC/EN60335-2-69.
7. DRY VACUUMINGy
WARNING! Ensure you read, understand and apply Section 1 ‘Safety Instructions’. Reminder: DO NOT vacuum hazardous
substances, hot ashes or embers. Use of an incorrect cartridge filter will invalidate your warranty.
7.1. Category M Cartridge Filter
To pick up dust of class “M” grade the dust bag MUST be installed in the appliance.
To vacuum class “M” dust ALWAYS use the filter element.
7.1.1. Ensure the machine is unplugged from the power supply.
7.1.2. Remove the motor housing and with the raised rim uppermost fit the filter cartridge tube down over the filter basket and push fully
home. Place the locking disc onto the top of the filter and turn the locking bar until the latch drops into the slot in the top of the filter
cage. Continue turning clockwise until the filter is fully locked down.
7.1.3. Reposition the motor housing onto the drum body, and clip in place.
7.1.4. Insert the larger end of the flexible hose into the front inlet on the container and lock in place. Push the required attachment, when
applicable, onto the free end of the hose.
7.1.5. Plug into the power supply.
7.1.6. With the selector switch “A” in position , switch “B” to the ‘On’ (position ‘I’). See 6.1.1 for introduction of a power tool.
7.1.7. When you have completed vacuuming, press the switch “B” to ‘Off’ (position ‘O’).
WARNING! Ensure you read, understand and apply Section 1 ‘Safety Instructions’. Reminder: DO NOT vacuum hazardous
substances, hot ashes or embers.
7.2. Category M Containment Bag Filter NEVER reuse the bag ALWAYS replace it.
7.2.1. Ensure the machine is unplugged from the power supply.
7.2.2. Remove the motor housing. Insert the Category M bag into the drum and fit the plastic socket “x” over the drum internal “y” spigot
(fig.4).
7.2.3. Reposition the motor housing onto the drum body, and clip in place.
7.2.4. Insert the larger end of the flexible hose into the front inlet on the container drum. Push the required attachment, when applicable, onto
the free end of the hose.
7.2.5. Plug into the power supply.
7.2.6. With the selector switch “A” in position, switch “B” to the ‘On’ (position ‘I’). See 6.1.1 for introduction of a power tool.
g.2
g.4
g.3
Original Language Version
© Jack Sealey Limited PC35230V Issue 4 (1,F) 07/06/21
7.2.7. When you have completed vacuuming, press the switch “B” to ‘Off’ (position ‘O’)
7.2.8. When the bag is 3/4 full or vacuuming efficiency drops, remove the bag and seal the opening with the attached plug. Dispose of the
bag in accordance with local regulations. DO NOT re-use.
7.2.9. Avoid using bag for sharp or damp materials.
8. WET VACUUMING
WARNING! Ensure you read, understand and apply Section 1 ‘Safety Instructions’. Reminder: Remove the plug from power
supply before opening unit. DO NOT vacuum solvents, explosives, inflammable and/or hazardous liquids such as petrol, oil,
spirits, paint, thinners, acids etc.
The category “M” filter is NOT for liquids. Vacuuming liquids is only allowed where there is no chance that dust will be sucked
up.
8.1. Ensure the machine is unplugged from the power supply. Make sure the drum is clean and free from dust and dirt.
8.2. Remove the cartridge filter and fit a foam filter (not suitable for vacuuming class “M” dust) over the filter basket. Replace the motor
housing onto the container.
8.3. Fit the crevice nozzle to the flexible hose.
8.4. Ensure the switch “B” is ‘Off’ (position ‘O’) before plugging into the power supply.
8.5. With the selector switch “A” in position , switch “B” to the ‘On’ (position ‘I’). See 6.1.1. for introduction of a power tool.
Note: To vacuum large quantities of liquid, from a sink or tank etc, DO NOT immerse the nozzle completely in the liquid, leave a gap (fig.6) at the
top of the nozzle opening to allow an air inflow. The machine is fitted with a float valve which stops the suction action when the tank has reached
its maximum capacity. The user will notice an increase in motor speed. When this happens, turn off the machine, disconnect from power supply,
remove the head from the container and empty the liquid into a suitable receptacle or drain. To continue vacuuming, refit the head and proceed.
After wet vacuuming, turn the machine off and unplug from the power supply. Empty the container, clean and dry the inside and outside before
storage.
Remember! After wet vacuuming the foam filter must be removed and a cartridge filter must be fitted before dry vacuuming again.
WARNING! Not designed for liquid storage. Always empty liquids after use and before storing.
9. FILTER CLEANINGf
9.1. Handle the filter carefully when cleaning or installing. Unlock and carefully remove the cartridge filter and inspect it for damage. A filter
that has small holes or tears in it will not perform efficiently and should be replaced.
9.2. To clean a dry filter, tap it inside a waste bin. (The cartridge filter is designed for dry vacuuming only). Should the filter be inadvertently
wetted it should be rinsed from the inside and allowed to air dry for 24 hours.
8 DO NOT use the filter wet as the filter will clog quickly and be very difficult to clean.
9.3. Fit a new/cleaned filter over the filter basket
9.4. Lock in place as described in 7.1.2. (0mm clearance).
10. MAINTENANCE
10.1. Ensure the machine is unplugged from the power supply.
10.2. Disconnect the hose from the drum container.
10.3. Undo the clasps and remove motor housing from the drum container.
10.4. Clear out any dirt or debris from the drum container and hoses.
10.5. Clean the foam filter by washing it in a mild soapy solution.
10.6. Check the power cable to make sure that it is not damaged.
10.7. Frequently clean out the safety float slides and periodically inspect it to check its integrity.
11. CONSUMABLES
Locking Cartridge Filter (Must be used for dry vacuuming)................. Model No: DFS35CF
Foam Filter ..................................................... Model No: DFS35FF
IMPORTANT! IF THE MACHINE IS USED WITHOUT A FILTER FITTED THIS MAY CAUSE DAMAGE TO THE MOTOR AND YOUR GUARANTEE
WILL BE INVALIDATED. ALWAYS KEEP A SPARE CARTRIDGE FILTER HANDY.
Category M Dust Bags (Pack of 5) ................................... Model No: DFS35PB
g.6
g.5
g.7
Original Language Version
© Jack Sealey Limited PC35230V Issue 4 (1,F) 07/06/21
12. TROUBLESHOOTING
Symptom Possible causes Solutions
Vacuum will not operate No power supply Check power supply - cable, breakers, fuses.
Faulty power cable Unplug and check the power cable. If
damaged have it replaced by your local Sealey
stockist.
Container full Empty container
Dust expelled from the motor cover Cartridge lter missing or damaged Fit cartridge lter or replace damaged lter
Reduced efciency and increased motor/
speed vibration/orange light (C)
There is a blockage in the nozzle/hose/
drum inlet/ lter.
See 7.1.4.. Check nozzle, hose and container inlets
and clear any blockages found. Remove lter and
clean it or install new lter.
Original Language Version
© Jack Sealey Limited PC35230V Issue 4 (1,F) 07/06/21
Sealey Group, Kempson Way, Suffolk Business Park, Bury St Edmunds, Suffolk. IP32 7AR
01284 757500 01284 703534 sales@sealey.co.uk www.sealey.co.uk
Note: It is our policy to continually improve products and as such we reserve the right to alter data, specifications and component parts without prior
notice.
Important: No Liability is accepted for incorrect use of this product.
Warranty: Guarantee is 12 months from purchase date, proof of which is required for any claim.
ENVIRONMENT PROTECTION
Recycle unwanted materials instead of disposing of them as waste. All tools, accessories and packaging should be sorted, taken to
a recycling centre and disposed of in a manner which is compatible with the environment. When the product becomes completely
unserviceable and requires disposal, drain any fluids (if applicable) into approved containers and dispose of the product and fluids
according to local regulations.
WEEE REGULATIONS
Dispose of this product at the end of its working life in compliance with the EU Directive on Waste Electrical and Electronic Equipment
(WEEE). When the product is no longer required, it must be disposed of in an environmentally protective way. Contact your local solid
waste authority for recycling information.
  • Page 1 1
  • Page 2 2
  • Page 3 3
  • Page 4 4
  • Page 5 5

Sealey PC35230V User manual

Category
Vacuum cleaners
Type
User manual

Sealey PC35230V is a high-powered industrial vacuum cleaner with M class filtration. Suitable for hazardous dusts with an exposition limit value ≥0.1mg/m3, it's ideal for use with 230V power tools. Features a 2000W electronically controlled power tool outlet, self-cleaning filter technology, and includes a range of accessories for both wet and dry vacuuming.

Ask a question and I''ll find the answer in the document

Finding information in a document is now easier with AI